My earliest baking attempts were often humbling, especially when it came to pies. The soggy crust was a recurring villain, no matter how carefully I followed the directions. I spent years chasing the perfect Key Lime Pie, experimenting with blind baking, different fats, and various crumb mixtures. It became an engineering challenge; what precise steps could guarantee a crisp, sturdy crust paired with that signature creamy, tart filling?
The recipe I’m sharing is my definitive answer. It’s a masterclass in avoiding soggy crusts and achieving the perfect wobble, all thanks to a meticulous, engineering-based approach. With a prep time of just 20 minutes, a cook time of 25 minutes, and a total time of 45 minutes, this Key Lime Pie recipe will guide you to success.
Table of Content
The Engineering of a Perfect Crust: How to Banish Soggy Bottoms Forever
Achieving a perfectly crisp crust is, in my opinion, the most critical aspect of a great Key Lime Pie. I’ve spent countless hours experimenting to identify and eliminate the common pitfalls that lead to the dreaded soggy bottom. I’ve organized my findings in the table below to provide a clear, actionable guide to success.
| Problem | Solution | Why This Works |
|---|---|---|
| Soggy Bottom Crust | Blind bake the crust before adding the filling. | Baking the crust before adding the wet filling sets the structure, preventing moisture absorption. The heat causes the starches in the graham crackers to gelatinize and firm up. |
| Uneven Baking | Use pie weights or dried beans during blind baking. | Pie weights ensure the crust maintains its shape and doesn’t puff up unevenly. A flat, even surface is crucial for even cooking and preventing soggy spots. |
| Shrinking Crust | Let the crust cool completely before adding the filling. | Rapid temperature changes can cause the crust to shrink and crack. Allowing it to cool gradually minimizes stress on the structure, maintaining integrity. |
| Lack of Flavor | Toast the graham cracker crumbs before mixing. | Toasting enhances the nutty, caramelized flavors of the graham crackers, adding depth to the overall pie experience. Keep a close eye; it’s easy to burn them. |
| Crumbly, Weak Crust | Use the correct ratio of butter to crumbs; press firmly and evenly. | Too little butter and the crust won’t bind properly. Pressing firmly compacts the crumbs, creating a solid base. I aim for what feels like damp sand. |
Pro tip: After the blind bake, I sometimes brush the warm crust with a thin layer of melted chocolate (omit for this recipe, of course) to create an additional moisture barrier.
The goal here is to engineer a barrier against moisture; a soggy crust undermines the whole experience of Key Lime Pie. By understanding the mechanics of each step, you can ensure a perfectly crisp foundation every time, allowing the tangy filling to truly shine.
The “Wobble Test”: Visual Cues for Key Lime Pie Perfection
That characteristic wobble is more than just a charming visual cue; it’s a precise indicator of when the Key Lime Pie filling has reached the perfect level of set. The science behind it is all about protein coagulation: the lime juice gently denatures the proteins in the yogurt and condensed milk, causing them to thicken without fully solidifying.
So, what should the “wobble” actually look like? After 15 minutes in the oven, the filling should jiggle as a cohesive unit when you gently nudge the pie plate. I look for a gentle, almost fluid-like movement across the entire surface, not a stiff or cracked appearance. If the filling seems completely solid with no movement, it’s likely overbaked.
Overbaking forces the proteins to tighten too much, resulting in a dry, almost curdled texture, losing that signature creamy melt. Finding the sweet spot is key to ensuring the perfect Key Lime Pie, so watch for that wiggle to know when it’s done.
Greek Yogurt vs. Sour Cream: A Healthier, More Flavorful Key Lime Secret
Many classic Key Lime Pie recipes rely on sour cream to achieve that characteristic tangy richness. Through my testing, I’ve discovered that Greek yogurt not only delivers a similar (or even superior) flavor profile but also brings additional benefits to the table. Using Greek yogurt in key lime filling adds a lighter, tangier flavor that cuts through the sweetness of the condensed milk, offering a more balanced and refreshing result.
One of the main reasons I reach for Greek yogurt is its nutritional advantage. It boasts a lower fat content and a higher protein level than sour cream, allowing me to enjoy a slightly healthier slice without sacrificing any of the indulgence. This substitution provides a similar creamy texture while enhancing the tangy flavors of the filling.
Ingredients
- 1½ cups finely crushed graham cracker crumbs, from about 12 whole graham crackers
- ⅓ cup packed light brown sugar
- 4 tablespoons unsalted butter, melted
- Two 14-oz cans sweetened condensed milk
- 1 cup plain Greek yogurt (2% or whole milk)
- 1 tablespoon grated lime zest
- ¾ cup fresh lime juice
- 1 cup cold heavy cream
- 2 tablespoons confectioners’ sugar
- 1 teaspoon grated lime zest
- 8 to 10 thin lime slices
I tested this recipe with both 2% and whole milk Greek yogurt. While the 2% version results in a slightly tangier flavor, the whole milk yogurt provides a richer, creamier texture. I personally prefer the whole milk version in my Key Lime Pie, but both work beautifully.
Instructions
- Preheat oven to 375 °F and set an oven rack in the middle position.
- In a medium bowl, combine the graham cracker crumbs, brown sugar, and melted butter; stir with a fork first, and then your hands until the mixture is well combined. Using your fingers and the bottom of a glass or dry measuring cup, press the crumbs firmly into the bottom and up the sides of a 9 x 1.5-inch (deep-dish) pie pan. The crust should be about ¼-inch thick. (Tip: do the sides first.)
- Bake for 10 minutes, until just slightly browned. Let the crust cool on a wire rack.
- Lower the oven temperature to 350°F.
- In a large bowl, whisk together the sweetened condensed milk, yogurt, lime zest, and lime juice. Pour the thick mixture into the warm graham cracker crust. Bake for 15 minutes, until the filling is almost set; it should wobble a bit. Let cool at room temperature for 30 minutes, then place in the refrigerator to chill thoroughly, about 3 hours. That gentle wobble is your key indicator that you’ve nailed the texture for your Key Lime Pie.
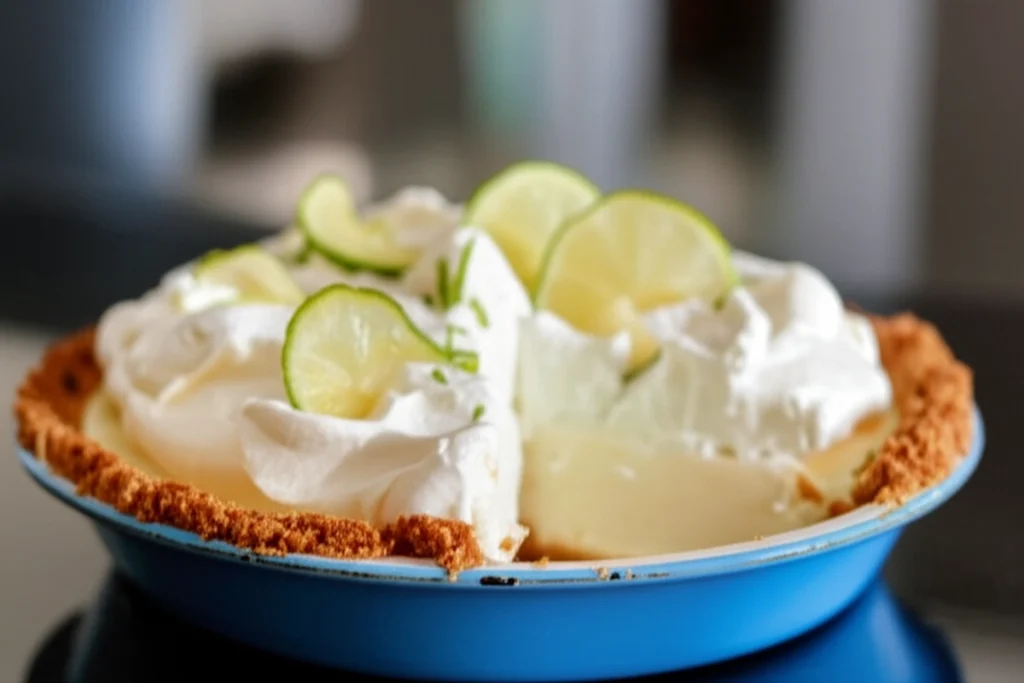
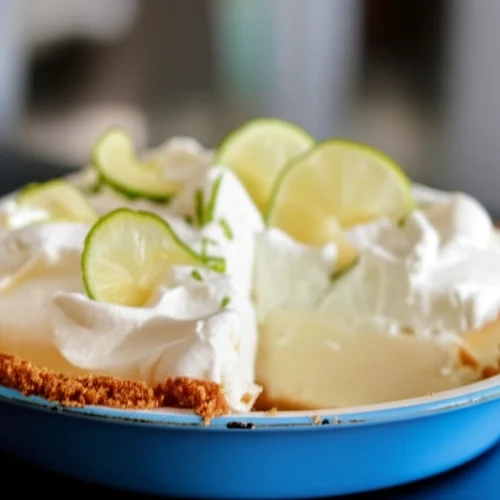
- In the bowl of an electric mixer, beat the heavy cream until soft peaks form. Add the confectioners’ sugar and beat until medium peaks form. Top the pie with the whipped cream. Decorate with the lime zest and lime slices.
- Store the pie in the refrigerator until ready to serve. Slice the pie into wedges, wiping your knife clean between slices, and serve cold.
Pro tip: Understanding the “wobble test” will prevent overbaking, guaranteeing a creamy and perfect key lime filling every time. What you’re looking for is a slight jiggle across the surface, like a perfectly set panna cotta. Mastering this visual cue is key to achieving the ideal Key Lime Pie consistency.
Frequently Asked Questions
What are the key ingredients/steps that make for a good key lime pie?
In my experience, a truly exceptional Key Lime Pie hinges on a few critical elements, starting with fresh ingredients. Freshly squeezed lime juice is non-negotiable, delivering a brightness and vibrancy that bottled juice simply can’t match; I’ve found that the zest really helps accentuate the lime flavor. The other non-negotiable is mastering the “wobble test” to prevent overbaking, ensuring that your key lime filling remains creamy and not rubbery.
What are the common mistakes to avoid when making key lime pie?
Through trial and error, I’ve pinpointed a few common pitfalls that can derail even the most promising Key Lime Pie efforts. Overbaking is a major culprit, leading to a dry, cracked filling. To ensure a perfectly creamy texture, remove the pie from the oven when the filling still exhibits a slight wobble. Another mistake is using pre-shredded graham cracker crumbs for the crust, I recommend grinding your own.
What is the history or background of key lime pie?
While the exact origins of Key Lime Pie are shrouded in a bit of mystery, its roots are firmly planted in the Florida Keys. It’s believed that the pie emerged in the late 19th century, thanks to the availability of sweetened condensed milk (before refrigeration, fresh milk was hard to keep!). As the story goes, cooks combined this new ingredient with the abundant Key limes, creating a dessert that’s become a true symbol of Florida. These key limes, with their unique tartness and aromatic flavor, are what define an authentic Key Lime Pie, making this classic dessert a genuine taste of the Keys.
Yield and Storage
This recipe makes one 9-inch pie, serving 8. Proper storage is critical to maintaining the integrity of your Key Lime Pie, ensuring that each slice is as delightful as the first. I recommend storing any leftover slices in the refrigerator, covered, to prevent the filling from absorbing any unwanted odors or drying out. When stored properly, the pie will maintain its texture and flavor for up to 3 days.
Make-Ahead Instructions
For ultimate convenience, I often break down the preparation of this Key Lime Pie into stages. You can make the crust a day ahead of time. The real trick is to hold off on adding the filling until the day you plan to serve the pie; otherwise, my experience shows that the crust can get soggy from the moisture. Preparing the crust in advance simplifies the process on serving day. This ensures your Key Lime Pie maintains its optimal texture and flavor.
Conclusion
This Key Lime Pie recipe isn’t just another set of instructions; it’s a meticulously engineered pathway to success. As a definitive guide to Key Lime Pie, my aim was to eliminate common failures, especially that dreaded soggy crust. The secret? Mastering the art of the perfectly crisp graham cracker crust and achieving that signature wobble in the filling.
Now, I’d love to hear about your experiences. Did this recipe help you conquer the soggy crust? What tricks have you discovered in your own Key Lime Pie adventures? Leave a comment below and share your successes (and failures!), so we can build a community of Key Lime Pie perfectionists. And if you know someone who deserves a slice of Key Lime Pie perfection, share this recipe with friends and family; let’s spread the joy of a truly exceptional dessert.
Easy Key Lime Pie Inspired Recipe
Ingredients
Crust
- 1½ cups finely crushed graham cracker crumbs from about 12 whole graham crackers
- ⅓ cup packed light brown sugar
- 4 tablespoons unsalted butter melted
Filling
- Two 14 oz sweetened condensed milk
- 1 cup plain Greek yogurt (2% or whole milk)
- 1 tablespoon grated lime zest
- ¾ cup fresh lime juice
Whipped Cream Topping
- 1 cup cold heavy cream
- 2 tablespoons confectioners’ sugar
- 1 teaspoon grated lime zest
- 8 to 10 thin lime slices
Instructions
Instructions
- Preheat oven to 375 °F and set an oven rack in the middle position.
- In a medium bowl, combine the graham cracker crumbs, brown sugar, and melted butter; stir with a fork first, and then your hands until the mixture is well combined. Using your fingers and the bottom of a glass or dry measuring cup, press the crumbs firmly into the bottom and up the sides of a 9 x 1.5-inch (deep-dish) pie pan. The crust should be about ¼-inch thick. (Tip: do the sides first.)
- Bake for 10 minutes, until just slightly browned. Let the crust cool on a wire rack.
- Lower the oven temperature to 350°F.
- In a large bowl, whisk together the sweetened condensed milk, yogurt, lime zest, and lime juice. Pour the thick mixture into the warm graham cracker crust. Bake for 15 minutes, until the filling is almost set; it should wobble a bit. Let cool at room temperature for 30 minutes, then place in the refrigerator to chill thoroughly, about 3 hours. That gentle wobble is your key indicator that you’ve nailed the texture for your Key Lime Pie.
- In the bowl of an electric mixer, beat the heavy cream until soft peaks form. Add the confectioners’ sugar and beat until medium peaks form. Top the pie with the whipped cream. Decorate with the lime zest and lime slices.
- Store the pie in the refrigerator until ready to serve. Slice the pie into wedges, wiping your knife clean between slices, and serve cold.


