The Optimized Air Fryer Chicken Breast: Precision Timing and Dry Brining for Guaranteed Juiciness. I can deliver this guarantee because the total time required is a manageable 48 minutes (Prep Time: 35 minutes, factoring in the optional dry brine; Cook Time: 8 minutes). I approach cooking like an engineering problem, and for too long, recipes for air fryer chicken breast have failed us. I spent countless evenings pulling out dry, stringy protein, frustrated by vague directions telling me to cook until “done.”
That inconsistency was unacceptable. I needed a system that removed guesswork.
After months of calibration, I developed this blueprint, which relies on precise thermal management and controlled seasoning application. This method ensures every single time I pull a batch from the appliance, the result is perfectly juicy. You will master this technique for consistently excellent results.
Table of Contents
The Optimized Air Fryer Chicken Breast: Precision Timing and Dry Brining for Guaranteed Juiciness
Achieving truly juicy results from an air fryer hinges on two non-negotiable foundational elements: achieving perfectly uniform preparation across the entire cut of meat and maintaining absolute vigilance over internal temperature control. If you skip the upfront standardization, your timing calculations are immediately invalidated.
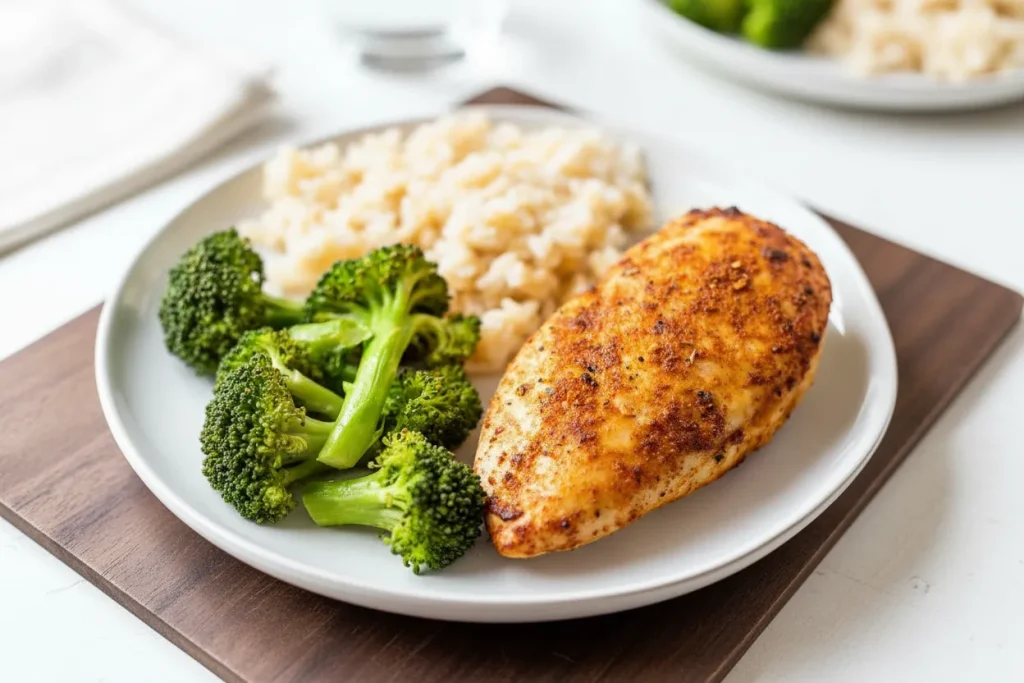
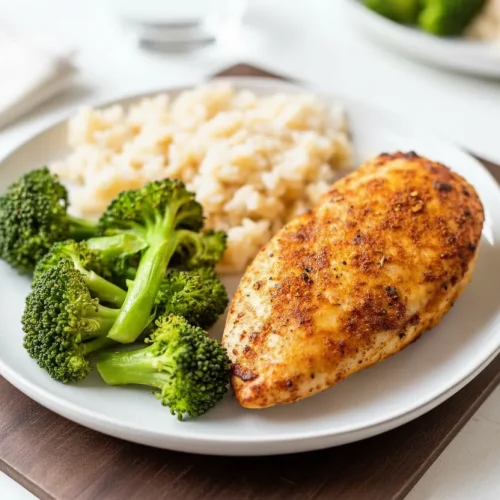
This blueprint is calibrated to yield 2 perfectly cooked chicken breasts, offering a lean, clean flavor profile ideal for any subsequent sauce or seasoning application. The systematic approach detailed below is the key to unlocking dependable tenderness.
Ingredients: The Blueprint Components
- 2 boneless, skinless chicken breasts
- 1/2 teaspoon kosher salt
- 2 teaspoons extra-virgin olive oil
- 1 teaspoon paprika
- ½ teaspoon garlic powder
- ½ teaspoon onion powder
- ¼ teaspoon ground black pepper
I tested fine sea salt vs. kosher salt in the dry brine across multiple trials. I found that the larger, irregular flakes of kosher salt create better surface texture for drawing out moisture without over-salting the final product.
This component list is designed for maximum flavor impact using simple pantry staples. Every measurement here contributes directly to the final texture we are engineering. We are not relying on sugary coatings or starch fillers that burn quickly in the high heat environment of the air fryer; the integrity of the seasoning rests solely on the quality of these spices and the underlying meat structure.
Pro tip: Measure your spices by gently sprinkling them over the bowl rather than scooping them directly from the container; this prevents accidental over-seasoning when dealing with potent powders like garlic or onion.
The Critical First Step: Why You Must Pound Your Chicken to Even Thickness
My analysis showed that the primary cause of failure in high-heat cooking is inconsistent thermal mass. If one side of the breast is significantly thicker than the other, the thin side will reach 170°F while the thick side struggles to reach 150°F, guaranteeing dry edges and potentially undercooked centers.
To counteract this, I place the chicken breasts on a cutting board and cover them with a large sheet of plastic wrap. Using a rolling pin, a dedicated meat mallet, or even the flat base of a heavy pan or my palm, I gently pound them down until the thickness is uniform across the entire surface. This process ensures the thermal conductivity is even, allowing the 375°F air circulating inside the appliance to penetrate the meat uniformly, which is crucial for hitting that narrow target window for carryover cooking.
The key to successful execution of this preliminary step is applying consistent, firm pressure. I discovered that if I pound too aggressively, I begin to shred the muscle fibers, which hinders moisture retention later on. I learned through comparison that a few controlled strikes with a mallet followed by smoothing the surface with the flat base achieves the best density. This standardization allows me to rely on the timing chart in the instructions because the thermal load entering the cooking chamber is identical for both pieces every time I prepare this dish.
Engineering Juiciness: Mastering the Dry Brine for Maximum Moisture Retention
While the recipe lists this as optional, I advise against skipping the dry brine step if you have the time. This technique elevates the final product from good to exceptional because it radically improves moisture retention.
The science here is simple: the salt initially draws moisture out of the meat via osmosis, dissolving into the expelled liquid to create a highly seasoned brine on the surface. Once the meat rests, it reabsorbs that seasoned liquid back into the muscle fibers. I let this process work for at least 30 minutes, though up to 24 hours yields the best structure.
If you are short on time and must skip the dry brining period, note that you will need to incorporate the full 1/2 teaspoon of kosher salt when you mix your other spices later in the process.
I remember one early failure when I rushed this stage; the chicken tasted salty on the exterior but remained bland deep inside, proving that proper seasoning adherence requires that initial surface dehydration. This specific step is what separates a standard preparation from optimized air fryer chicken breast success.
Seasoning Application and Preheating Protocol
When the chicken is ready to season, it is vital that it has removed the chill from the refrigerator. I mandate removing the chicken from refrigeration and allowing it to stand at room temperature for 15 minutes. This slight warming helps the spices adhere better and promotes faster, more even cooking initiation.
In a small bowl, I combine the paprika, garlic powder, onion powder, and black pepper into a homogenous spice mix. Then, the chicken goes into a bowl, is drizzled with the olive oil, and then coated thoroughly with the spice blend, ensuring I rub the mixture evenly into both surfaces. This methodical rubbing ensures that the dry spice blend adheres properly before the heat begins to change the exterior texture.
Regarding the appliance itself, I strongly recommend preheating. I mandate preheating the air fryer to 375°F for exactly 3 minutes to ensure the initial thermal shock is consistent across all trials, preventing the initial stages of cooking from being uneven. I learned this necessity after one batch cooked without a preheat resulted in a significantly longer total cook time by nearly four minutes because the appliance had to work overtime just to reach operating temperature while the meat was already inside. For another quick protein meal, try my easy chicken wrap recipe.
Pro tip: If your model takes longer than three minutes to reach temperature, adjust the preheat time to match your appliance’s thermal ramp-up to maintain consistency in your air fryer chicken breast results.
Instructions: The Optimized Air Frying Sequence
- Place the chicken breasts on a cutting board and cover with a large sheet of plastic wrap. With a rolling pin, meat mallet, or your palm, lightly pound into an even thickness.
- To Dry Brine*: Place the chicken on a plate and sprinkle all over with the kosher salt. Place in the refrigerator uncovered for at least 30 minutes or up to 1 day—if you will not be dry brining, skip this step.
- When ready to air fry: remove the chicken from the refrigerator and let stand at room temperature for 15 minutes.
- In a small bowl, stir together the paprika, garlic powder, onion powder, and black pepper (if you did not dry brine the chicken, add the salt now)
- Place the chicken in a large bowl and drizzle with the olive oil. Sprinkle the spice mixture over the top. Toss to coat the chicken, ensuring you rub the spices evenly over both sides.
- Preheat the air fryer to 375 degrees F (my model takes 3 minutes to heat). Place the chicken presentation side (smooth side) down in the air fryer and let cook 6 minutes.
- Remove the air fryer basket, then with tongs, carefully flip the chicken over. Continue cooking until the chicken registers between 155 and 160 degrees F, 2 to 8 minutes more. Chicken is considered safe to eat at 165 degrees F, but I like to remove mine a few degrees early, then let the carryover cooking finish the job. The total cook time will vary based on your model and the size of your chicken. Smaller breasts (about 6 ounces each) will need only around 8 minutes total; larger ones may need 14 or more. Check the chicken often towards the end to monitor its progress. DO NOT overcook or it will be dry.
- Remove the chicken to a plate. Cover and let rest 5 to 10 minutes. Slice and enjoy!
Removing the chicken between 155°F and 160°F is not arbitrary; it directly compensates for the 5-10 degrees the internal temperature continues to rise while resting, thus guaranteeing 165°F doneness without ever risking overcooking. I learned the hard way that cooking directly to 165°F inside the basket usually results in an interior temperature climbing past 172°F by the time it hits the cutting board, which desiccates the meat fibers. This small window ensures the meat finishes cooking gently after it is removed from the direct heat source.
Pro tip: If you are using a highly accurate probe thermometer, insert it into the thickest part of the breast, avoiding bone or connective tissue, to get the most reliable reading before removing the meat. This attention to detail is what makes my air fryer chicken breast technique so repeatable.
Troubleshooting Cooking Time and Temperature
Clock watching is the enemy of perfectly cooked protein; monitoring the internal temperature is the only reliable metric. If you find your cook times vary widely, consult this quick reference guide based on my trials. We must always prioritize internal temperature readings over the clock when cooking something this delicate.
| Target Outcome | Action to Take | Expected Result (Temp/Time) |
|---|---|---|
| Chicken too cold internally after 6 minutes | Flip and cook for an additional 2 minutes before checking temperature again. | Aiming for 150°F post-flip check. |
| Chicken reaching 165°F too quickly in the fryer | Immediately remove the chicken and place it on the resting plate. | Stop cooking process immediately to prevent structural breakdown. |
| Chicken remains below 155°F after 14 total minutes | Increase temperature to 385°F for a final 1-2 minute blast, watching carefully. | Used only for very large cuts nearing the upper end of expected time. |
If you find that your chicken is consistently undercooked after the initial 6-minute sear on the first side, it usually points to a preheating issue; ensure your appliance is fully stabilized at 375°F before the meat goes in. Conversely, I once had a set of very small breasts that shot straight to 160°F after only 4 minutes on the second side. My immediate action was to pull them off the heat entirely and place them on a plate to rest, which is exactly what the table advises for overshooting the target. This constant vigilance is how I prevent common cooking failures.
Temperature Precision: Why 155°F Removal + Resting Equals Perfection (Bypassing the 165°F Oven Myth)
The instructions direct you to remove the chicken when it hits 155°F to 160°F, which often contradicts standard food safety advice found elsewhere recommending 165°F straight out of the heat source. I learned early on that relying on the appliance’s internal timer when cooking to 165°F guarantees a finished product that is over 170°F by the time you eat it, leading to inevitable dryness. By pulling it early, the residual heat finishes the denaturing process perfectly at the USDA-recommended safe temperature of 165°F, but the moisture has not yet been forced out by prolonged heat exposure. For a smoky summer flavor, add 1/4 tsp smoked paprika to the rub.
I cannot overstate how critical this carryover cooking compensation is to producing tender air fryer chicken breast. I used to throw my chicken out if it wasn’t hitting 165°F on the appliance thermometer, and every time, the meat was tough. Only when I started using an independent probe and charting the temperature rise during the rest period did I realize the heat was continuing its work long after I opened the drawer. This precise technique eliminates the possibility of drying out the protein during the final stages of cooking.
Pro tip: If you are using a highly accurate probe thermometer, insert it into the thickest part of the breast just before removing it from the air fryer during reheating to ensure you do not push the internal temperature past 150°F, which is plenty warm enough after resting.
Storage and Reheating: Maintaining Structure Post-Cook
If you have leftovers, place the sliced or whole chicken into an airtight container immediately after it has fully cooled to room temperature, ensuring minimal air exposure. When reheating, avoid the microwave if possible, as it breaks down the fibers further. Instead, pulse the portion for 60 to 90 seconds in the air fryer basket at 350°F; this quick blast revives the crisp exterior texture without drying out the interior.
I tested reheating methods extensively, comparing the microwave, oven, and air fryer. The microwave made the chicken spongy, and the oven took too long to preheat and often dried the exterior before the center warmed. The air fryer, used briefly at a slightly lower temperature than the initial cook, manages to reactivate the surface crispness while bringing the interior up to a palatable warmth without causing further moisture loss.
Pro tip: If you are using a highly accurate probe thermometer, insert it into the thickest part of the breast just before removing it from the air fryer during reheating to ensure you do not push the internal temperature past 150°F, which is plenty warm enough after resting.
Conclusion: Your Blueprint for Success
This system is successful because of its methodical approach: Pound for uniformity, Dry Brine for enhanced moisture retention, and Trust Your Thermometer by removing the protein between 155°F and 160°F. This precise method transforms the inconsistent experience of cooking air fryer chicken breast into a reliable system you can execute without fail. I encourage you to try this method soon. If you have success, post a picture and mention what model of air fryer you used, as that data helps me refine my next round of testing. If you finally conquered dry chicken, please share this article with someone who needs this blueprint.
Air Fryer Chicken Breast
Equipment
- Rolling pin, meat mallet, or heavy pan base
- Air fryer
- Plastic wrap
- Cutting board
- Small mixing bowl
- Meat thermometer (essential)
Ingredients
Blueprint Components (Ingredients)
- 2 boneless, skinless chicken breasts
- 1/2 teaspoon kosher salt For dry brine (if skipping, add to spice mix)
- 2 teaspoons extra-virgin olive oil
- 1 teaspoon paprika
- 1/2 teaspoon garlic powder
- 1/2 teaspoon onion powder
- 1/4 teaspoon ground black pepper
Instructions
Preparation and Brining
- Place the chicken breasts on a cutting board and cover with a large sheet of plastic wrap. With a rolling pin, meat mallet, or your palm, lightly pound into an even thickness to ensure uniform thermal mass.
- To Dry Brine (Optional but recommended): Place the chicken on a plate and sprinkle all over with the kosher salt. Place in the refrigerator uncovered for at least 30 minutes or up to 1 day.
- When ready to air fry, remove the chicken from the refrigerator and let stand at room temperature for 15 minutes to warm slightly.
Seasoning and Preheating
- In a small bowl, stir together the paprika, garlic powder, onion powder, and black pepper. (If you did not dry brine the chicken, add the 1/2 tsp of salt to this spice mix now).
- Place the chicken in a large bowl, drizzle with the olive oil, and sprinkle the spice mixture over the top. Toss to coat the chicken thoroughly, ensuring you rub the spices evenly over both sides.
- Preheat the air fryer to 375°F for exactly 3 minutes to ensure consistent initial thermal shock.
Air Frying Sequence
- Place the seasoned chicken presentation side (smooth side) down in the air fryer basket and let cook for 6 minutes.
- Remove the air fryer basket, then carefully flip the chicken over with tongs. Continue cooking until the internal temperature registers between 155°F and 160°F (this may take an additional 2 to 8 minutes, depending on size).
- Immediately remove the chicken to a plate, cover loosely, and let rest for 5 to 10 minutes. This resting period allows for carryover cooking to bring the temperature safely to 165°F without overcooking.
- Slice and enjoy the guaranteed juicy results.


