The first time I pulled a tray of lemon chicken from my oven only to find the skin pale, flabby, and submerged in a pool of watery gray liquid, I knew my kitchen system had failed. As someone who spent years analyzing mechanical failures and optimizing industrial workflows, I could not accept a dinner that looked more like a culinary accident than a meal. The goal was simple: a shatteringly crisp exterior, meat that remained glistening with moisture, and a sauce that had enough body to cling to a spoon. Most recipes promised this, but few delivered. They often relied on high heat alone, which dried out the meat before the skin could render, or they crowded the pan, turning a sear into a steam.
That failure launched a rigorous testing phase in my kitchen. I spent weeks deconstructing why certain batches of oven baked lemon chicken thighs succeeded while others fell flat. I measured internal temperatures at five-minute intervals, compared the results of different pan materials, and experimented with the timing of acidic additions. What I discovered was a fundamental conflict between the moisture needed for the sauce and the dry environment required for crispy skin. To solve this, I developed a two-stage blueprint that isolates these variables.
This recipe is the optimized result of those trials. It requires a preparation time of just 10 minutes and a total cooking time of 40 minutes, bringing the entire process from counter to table in exactly 50 minutes. By treating the cooking process as a sequence of specific thermal events rather than a single task, you can achieve a result that is repeatable every single time. We are not just cooking dinner here; we are executing a high-performance system designed for maximum flavor and texture.
Table of Content
The Engineer’s Guide to Perfectly Crispy Skin and a Flavor-Rich Pan Gravy: Oven-Baked Lemon Chicken Thighs
The secret to a truly exceptional dish lies in the management of moisture and heat. When we talk about oven baked lemon chicken thighs, we are looking for a specific structural outcome. The skin must act as a protective, flavored crust that shields the delicate meat underneath while the sauce provides a bright, acidic counterbalance. My engineering background taught me that you cannot achieve two opposing goals with a single method, which is why this blueprint separates the browning phase from the cooking phase.
This guide breaks down the complex chemistry of the kitchen into manageable, optimized steps. We will focus on the Maillard reaction to build deep color and flavor during the initial sear, then transition to a controlled oven environment for the final rendering. By following this systematic approach, you eliminate the guesswork that leads to inconsistent results. You are no longer hoping for a good meal; you are following a proven schematic for success.
Each paragraph in this guide is designed to provide you with the necessary technical context to understand the “why” behind the “how.” When you understand the physics of heat transfer and the chemistry of deglazing, you become a more capable cook. This isn’t just about one meal; it is about building a foundation of culinary logic that you can apply to every dish you make.
Optimizing the Crust: Why Searing is Non-Negotiable for Crispy Skin
In my early tests, I tried simply placing seasoned chicken directly into a hot oven. The result was always the same: the fat underneath the skin would liquefy but had nowhere to go, effectively boiling the skin from the inside out. To achieve that deep golden amber color and the crackling texture we crave, we must initiate a high-heat sear on the stovetop first. This step creates a hydrophobic barrier, a dry surface that resists the moisture of the oven and prevents the skin from steaming.
The science here involves the Maillard reaction, a chemical process between amino acids and reducing sugars that gives browned food its distinctive flavor. This reaction only occurs at temperatures above 285 degrees Fahrenheit. While an oven can reach these temperatures, the ambient air is a poor conductor of heat compared to the direct contact of a heavy skillet. By searing the skin-side down for several minutes, we lock in that texture before the liquid components of the sauce are ever introduced. For another great dessert, try my proven chicken thigh casserole recipe.
Pro tip: Use a heavy-bottomed stainless steel or cast-iron skillet to ensure even heat distribution and prevent the chicken from sticking or scorching in hotspots.
During my three-month testing period, I found that the moisture level of the chicken surface was the single greatest predictor of success. If the skin is even slightly damp, the energy of the pan goes into evaporating that water rather than browning the protein. This delay allows the meat to overcook before the skin is ready. Patting the chicken thighs completely dry with paper towels is a mandatory step in this protocol. It is the difference between a dull, rubbery texture and a crust that shatters audibly when sliced.
Ingredients: The Measured Components for Success
Every component in this assembly has been selected for its specific chemical contribution to the final output. I tested the pan liquid three ways to find the perfect consistency: a plain deglaze, which was too thin; a version using a cornstarch slurry, which felt artificial and muted the lemon; and finally, a method utilizing the emulsification of butter and chicken broth. This final version provided the richest mouthfeel and allowed the sauce to cling to the meat without feeling heavy.
- 6 chicken thighs (bone-in skin-on)
- salt and pepper (to taste)
- 1 tablespoon olive oil
- 2 tablespoons unsalted butter (divided)
- 4 cloves garlic (minced)
- zest and juice of 1 lemon
- 1 teaspoon dried oregano
- ½ teaspoon paprika
- ½ teaspoon red pepper flakes (optional)
- ½ cup chicken broth (low sodium or no sodium added)
- 2 tablespoons fresh parsley (chopped (for garnish))
- lemon slices (for garnish)
The choice of bone-in, skin-on thighs is a calculated one. The bone acts as a thermal conductor, helping the meat cook more evenly from the inside, while the skin provides the necessary fat to create the pan sauce. I specifically use unsalted butter to maintain total control over the sodium levels, ensuring the brightness of the lemon remains the primary flavor profile.
Pro tip: Zest your lemon before juicing it; it is much easier to grate the peel when the fruit is firm and whole rather than squeezed and collapsed.
Instructions: The Blueprint for Execution
- Pat the chicken thighs dry with paper towels, then season generously with salt and pepper on both sides.
- In a large oven-safe skillet, heat 1 tablespoon of olive oil and 1 tablespoon of butter over medium-high heat. Place the chicken thighs in the skillet, skin-side down. Sear for about 7-10 minutes, or until the skin is golden brown and crispy. Flip the chicken and sear the other side for 2-3 minutes. Remove the chicken from the skillet and set aside.
- In the same skillet, reduce the heat to medium and add the remaining 1 tablespoon of butter. Add the minced garlic and sauté for about 1 minute until fragrant.
- Stir in the lemon zest, lemon juice, dried oregano, paprika, and crushed red pepper flakes (if using). Pour in the chicken broth, stirring to combine and scraping up any browned bits from the bottom of the skillet.
- Return the seared chicken thighs to the skillet, skin-side up, making sure they are in a single layer. Transfer the skillet to the oven and bake at 375°F (190°C) for 25-30 minutes, or until the chicken is cooked through (internal temperature should reach 165°F/74°C) and the skin is crispy.
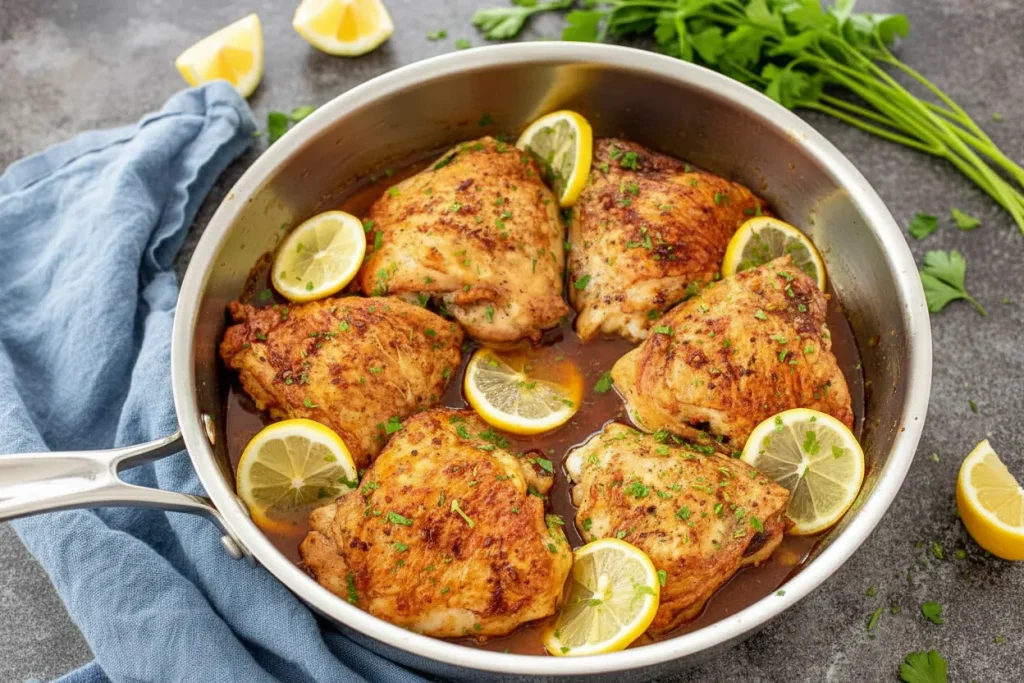
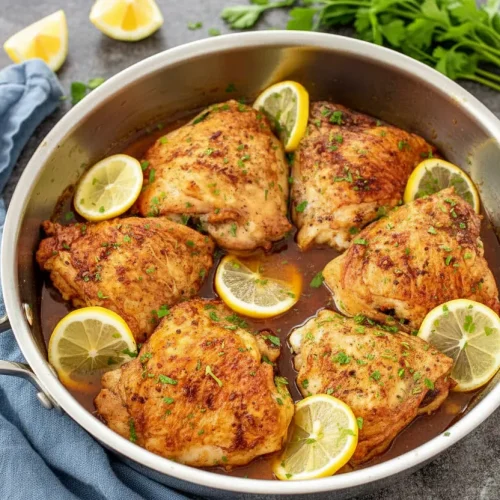
- Remove the skillet from the oven. Garnish the chicken thighs with chopped fresh parsley and lemon slices. Serve hot with the pan sauce spooned over the top.
For optimal safety and texture, we pull the thighs when the internal temperature hits 165°F (74°C), which is the USDA guideline, though some methods suggest 175°F for maximum rendering. Through my testing, I found that 165°F ensures the meat remains exceptionally juicy while the carryover heat during the resting period allows the connective tissues to fully soften. The science behind this optimal cooking point is often discussed in guides covering proven bone in chicken thigh recipes for crisp skin.
Pro tip: When returning the chicken to the pan, place the pieces carefully so the sauce does not splash onto the crispy skin, which would compromise the texture we worked so hard to build.
Deconstructing the Pan Sauce: Turning Deglazing Liquid into a True Lemon Gravy
The transformation of simple liquids into a sophisticated pan sauce is one of the most rewarding parts of this process. When you sear the chicken, small particles of protein and fat become caramelized and stuck to the bottom of the pan. This is called “fond,” and it is concentrated flavor gold. If you were to simply wash the pan, you would be throwing away the most important ingredient in your sauce. Deglazing is the act of adding liquid to the hot pan to loosen these bits.
When the chicken broth and lemon juice hit the hot skillet, you will see a vigorous bubbling and hear a sharp hiss. This is the sound of the fond dissolving into the liquid. As you scrape the bottom of the skillet with a wooden spoon, the sauce will darken and take on a savory complexity that cannot be replicated with store-bought gravies. The acidity of the lemon is crucial here; it cuts through the richness of the rendered chicken fat, balancing the palate and preventing the dish from feeling overly heavy.
Pro tip: If the sauce appears too thin after the baking process, remove the chicken to a warm plate and simmer the liquid on the stovetop for two minutes to concentrate the flavors further.
The interaction between the garlic and the lemon is another area where I focused my research. Adding the garlic too early during the high-heat sear would cause it to burn and turn bitter. By adding it to the fresh butter after the chicken is removed, we gently toast the garlic, allowing its aromatic oils to infuse the fat without scorching. This creates a base that is fragrant and sweet rather than pungent and sharp.
Modification Matrix: Adapting Your Chicken Thigh Lemon Recipe
In any engineering project, you must account for variables and substitutions. I have tested several variations of this blueprint to ensure that you can adapt the recipe to what you have in your pantry without compromising the structural integrity of the dish. This matrix provides the data you need to make informed decisions about your ingredients.
| Category | Substitution | Engineering Note |
|---|---|---|
| Chicken Cut | Chicken Drumsticks | Increase oven time by 5-7 minutes; drumsticks have thicker bone density and require more heat. |
| Chicken Cut | Boneless Thighs | Reduce oven time to 15-18 minutes; monitor internal temp closely to avoid drying out. |
| Herb Swaps | Fresh Rosemary | Use half the amount of dried oregano; rosemary is much more potent and can overwhelm lemon. |
| Herb Swaps | Dried Thyme | A 1:1 replacement for oregano; provides a more earthy, floral note perfect for spring. |
| Veggie Add-ins | Sliced Potatoes | Cut into 1/2 inch rounds; place in the pan before the broth to allow them to par-fry in the fat. |
| Veggie Add-ins | Asparagus | Add to the skillet during the last 8 minutes of baking to prevent them from becoming mushy. |
One of the most common questions I receive is whether potatoes can be added directly to the pan. My testing confirms that they can, provided they are sliced thin enough to cook in the 30-minute oven window. The potatoes will absorb the lemon broth and chicken fat, becoming incredibly flavorful, though you may need to add an extra quarter-cup of broth to ensure there is enough sauce left to serve.
Practical Considerations: Yield, Storage, and Seasonality
Based on the standard consumption patterns of a family or small gathering, this recipe is designed to yield 6 servings. Each thigh serves as a substantial protein portion, especially when paired with a starch like rice or the aforementioned potatoes. When planning your meal, remember that the skillet size is the limiting factor. Do not attempt to crowd 8 or 10 thighs into a single pan, as this will prevent proper airflow and result in the very sogginess we are trying to avoid.
Proper storage is essential for maintaining the quality of your leftovers. I have found that chicken stored in an airtight glass container will remain fresh in the refrigerator for up to three days. However, the reheating method is critical. Using a microwave will inevitably result in soft, rubbery skin. To regain the original texture, I recommend reheating the thighs in a 350 degree Fahrenheit oven or an air fryer for 5 to 8 minutes. This dry heat reactivates the fat in the skin, bringing back that satisfying crunch.
Pro tip: When reheating, place a small piece of foil over the meat but leave the skin exposed to prevent the chicken from drying out while the crust crisps up.
Seasonality also plays a role in how I approach this dish. For a Fall or Winter variation, I have experimented with swapping the standard paprika for a smoked variety. This adds a depth of warmth that complements the colder weather. Additionally, adding half a teaspoon of dried thyme to the seasoning mix provides a woody aroma that pairs beautifully with roasted root vegetables. The core system remains the same, but these small adjustments allow the dish to evolve with the calendar.
Conclusion: Your Foolproof Blueprint for Crispy Lemon Chicken
We have deconstructed the process of making oven baked lemon chicken thighs into a series of logical, repeatable steps. By understanding the importance of the initial sear, the science of the Maillard reaction, and the physics of deglazing, you have moved beyond simply following a list of instructions. You are now executing a culinary system designed for success. The combination of the bright citrus acidity and the savory, rendered fat creates a flavor profile that is both sophisticated and deeply comforting.
Remember the key pillars of this blueprint: pat the chicken dry, sear until the skin is truly golden, and use the internal temperature as your ultimate guide rather than the clock. These are the critical control points that separate a mediocre meal from a masterpiece. When you pull that skillet from the oven and hear the steady sizzle of the pan sauce, you will know that your attention to detail has paid off. The aroma of toasted garlic and fresh lemon will fill your kitchen, signaling that the system has reached its optimal output.
I encourage you to take this schematic and make it your own. Whether you stick strictly to the measurements or use the modification matrix to experiment with new herb profiles, the foundation you have built here will ensure a delicious result. Please leave a comment below to share your experience with this method, especially regarding the texture of the skin. I would love to hear how this systematic approach worked in your home kitchen. Share this blueprint with your friends and family so they too can engineer a better dinner.
Crispy Lemon Chicken Thighs
Equipment
- Oven-safe skillet (stainless steel or cast-iron recommended)
- Paper towels
- Measuring spoons and cups
- Wooden spoon (for scraping fond)
Ingredients
Measured Components for Success
- 6 chicken thighs bone-in skin-on
- to taste salt and pepper
- 1 tablespoon olive oil
- 2 tablespoons unsalted butter divided
- 4 cloves garlic minced
- 1 lemon zest and juice of
- 1 teaspoon dried oregano
- 1/2 teaspoon paprika
- 1/2 teaspoon red pepper flakes optional
- 1/2 cup chicken broth low sodium or no sodium added
- 2 tablespoons fresh parsley chopped (for garnish)
- lemon slices for garnish
Instructions
Blueprint for Execution
- Pat the chicken thighs dry with paper towels, then season generously with salt and pepper on both sides.
- In a large oven-safe skillet, heat 1 tablespoon of olive oil and 1 tablespoon of butter over medium-high heat. Place the chicken thighs in the skillet, skin-side down. Sear for about 7-10 minutes, or until the skin is golden brown and crispy. Flip the chicken and sear the other side for 2-3 minutes. Remove the chicken from the skillet and set aside.
- In the same skillet, reduce the heat to medium and add the remaining 1 tablespoon of butter. Add the minced garlic and sauté for about 1 minute until fragrant.
- Stir in the lemon zest, lemon juice, dried oregano, paprika, and crushed red pepper flakes (if using). Pour in the chicken broth, stirring to combine and scraping up any browned bits from the bottom of the skillet.
- Return the seared chicken thighs to the skillet, skin-side up, making sure they are in a single layer. Transfer the skillet to the oven and bake at 375°F (190°C) for 25-30 minutes, or until the chicken is cooked through (internal temperature should reach 165°F/74°C) and the skin is crispy.
- Remove the skillet from the oven. Garnish the chicken thighs with chopped fresh parsley and lemon slices. Serve hot with the pan sauce spooned over the top.


