The first time I attempted to master chicken thigh gnocchi recipes, I produced a textural catastrophe that nearly drove me to order takeout. I followed a standard stovetop method, assuming that simmering everything together in one pan would be the most efficient path to success. Instead, the gnocchi released far too much starch into the sauce, turning the entire dish into a gluey, thick paste that clung to the chicken like industrial adhesive. The meat itself was unevenly cooked, and the cream sauce had broken into a greasy, unappealing mess under the constant agitation of the spoon. It was a failure of the highest order, but as an engineer, I knew that every failure is simply a data point leading toward a solution.
That evening launched a series of experiments designed to identify the critical failure points in traditional gnocchi preparations. I spent weeks analyzing how different cooking temperatures affected the structural integrity of the cauliflower potato blend. I looked at the way various fats reacted with the proteins in the chicken and how acidity could be used to prevent a cream-based sauce from feeling heavy or flat. I realized that the secret was not in the ingredients themselves, but in the sequence of heat application and the final thermal transition in the oven.
The result of that obsession is this optimized system for chicken thigh gnocchi recipes. By moving away from the pure stovetop method and embracing a high-heat oven finish, I discovered how to lock in the moisture of the chicken while achieving a sauce consistency that is silky rather than sticky. This recipe is more than just a set of instructions; it is a blueprint for culinary consistency. We are going to navigate the specific physics of starch and fat to ensure your dinner is perfect every single time, which shares the same rich flavors as my Ultimate Tested Chicken Thighs Crockpot.
Prep Time: PT20M Cook Time: PT40M Total Time: PT60M
Table of Content
The Texture Upgrade: Why Pre-Cooking Gnocchi and Finishing in the Oven is Non-Negotiable
The primary challenge with gnocchi, especially the cauliflower potato variety, is managing moisture and starch. When you boil gnocchi and then leave it to simmer in a sauce on the stovetop, the exterior of the dumpling begins to degrade. This creates a high concentration of free starch that acts as an uncontrolled thickener for your sauce. My testing showed that by boiling the gnocchi just until they float and then immediately draining them, we halt this degradation before it can ruin the sauce.
The oven finish at 400 degrees F serves a dual purpose that the stovetop cannot replicate. First, the ambient heat of the oven provides a gentle, uniform energy source that allows the sauce to bubble and thicken without the mechanical stress of stirring. Stirring is the enemy of delicate gnocchi; it breaks the fragile skins and contributes to a gummy mouthfeel. Second, the direct heat from the top of the oven creates a light crust on the Parmesan topping while the gnocchi absorbs just enough sauce to become tender without losing its shape.
In my kitchen laboratory, I compared three distinct methods to see how they affected the final plate. The differences were not just subtle; they were transformative. I documented the starch release, the final texture of the dumplings, and the overall integrity of the sauce to prove why the oven finish is the superior choice for chicken thigh gnocchi recipes.
| Method | Starch Release | Final Texture | Sauce Integrity |
|---|---|---|---|
| Stovetop Boil Only | High and Excessive | Gummy and Soft | Thin and Separated |
| Stovetop Simmer | Moderate | Spongy and Dense | Sticky and Clumping |
| Pre-Cook + Oven Finish | Controlled | Firm yet Tender | Uniform and Creamy |
Pro tip: When you drain the gnocchi after boiling, let them sit in the colander for a full sixty seconds to allow the surface steam to evaporate, which prevents them from becoming waterlogged when they hit the sauce.
Preparing the Chicken Thighs: Mastering the Browning Technique for Maximum Flavor
Chicken thighs are the ideal choice for this recipe because they contain enough intramuscular fat to withstand the two-stage cooking process. While chicken breasts would likely dry out during the oven bake, thighs remain succulent. However, the key to unlocking their full potential is the Maillard reaction. This chemical process occurs when proteins and sugars are exposed to high heat, creating a complex, savory flavor profile and a beautiful deep golden amber color on the surface of the meat.
When I first started testing this dish, I made the mistake of crowding the pan. This caused the temperature of the skillet to drop, leading the chicken to steam in its own juices rather than sear. The result was a pale, gray meat that lacked any depth of flavor. Now, I insist on working in batches. By giving each piece of chicken enough space, you ensure that the moisture escaping the meat evaporates instantly, allowing the surface to reach the high temperatures required for a proper crust.
You must cook the chicken until it reaches an internal temperature of 165 degrees F. I use a digital thermometer to verify this because guessing by color alone is a recipe for inconsistency. As the chicken sears in the butter, you will hear a steady, aggressive sizzle that indicates the fat is rendering and the crust is forming. The aroma should be intensely savory and slightly nutty as the butter browns alongside the meat. This foundational layer of flavor is what sets professional-grade chicken thigh gnocchi recipes apart from home-cooked versions.
Pro tip: Always pat your chicken thighs completely dry with paper towels before seasoning; moisture on the surface of the meat is the greatest enemy of a crisp, golden sear.
Cutting the Richness: The Essential Role of Lemon Juice in Balancing the Cream Sauce
One of the most common complaints about cream-based pasta and gnocchi dishes is that they feel heavy or “flat” after a few bites. This happens because the high fat content of the butter, half and half, and Parmesan coats the palate, dulling your ability to taste the individual components of the dish. To fix this, we need a high-amplitude acid to cut through the fat. While many recipes call for white wine, my testing proved that lemon juice provides a much cleaner and more predictable acidic peak for this specific application.
The lemon juice acts as a bright counterpoint to the earthy fresh thyme and the pungent garlic. It doesn’t just add flavor; it changes the chemistry of how we perceive the sauce. Furthermore, the choice of dairy is a critical engineering decision. I opted for half and half rather than heavy cream because of its specific protein-to-fat ratio. Heavy cream can sometimes feel too cloying in an oven-baked dish, whereas half and half provides a lighter, silkier finish that doesn’t break as easily under the 400-degree heat of the oven.
The half and half also interacts with the all-purpose flour roux to create a stable emulsion. As you whisk the broth and lemon juice into the flour and butter, you are building a structure that will support the dairy. If you were to use heavy cream here, the sauce might become too thick and oily during the bake. The half and half keeps the sauce fluid enough to coat the gnocchi evenly while still providing that luxurious mouthfeel you expect from top-tier chicken thigh gnocchi recipes.
Pro tip: Add the lemon juice slowly while whisking the broth to ensure the acid is fully integrated into the roux before the dairy is introduced, which prevents any potential curdling.
Ingredients for Optimized Chicken Thigh Gnocchi
Before we dive into the ingredients, I want to share a discovery from my testing phase. I tested this sauce recipe at three heat levels post-thickening: low simmer, medium simmer, and 400 degrees F oven finish. The oven finish yielded a uniformly creamy sauce with zero graininess or separation, unlike the medium-heat stovetop tests which often resulted in an overly starchy coating around the gnocchi. This ingredient list is calibrated to work perfectly with that thermal profile.
- 1 (16-ounce) package cauliflower potato gnocchi
- 1 1/2 pounds boneless, skinless chicken thighs
- Kosher salt and freshly ground black pepper (to taste)
- 5 tablespoons unsalted butter (divided)
- 1 medium shallot (diced)
- 3 cloves garlic (minced)
- 2 teaspoons chopped fresh thyme leaves
- 3 tablespoons all-purpose flour
- 1 1/4 cup chicken broth
- 1/4 cup chicken broth and 1 teaspoon lemon juice
- 1/2 cup half and half
- 1 bunch kale (stems removed and leaves torn into bite-sized pieces)
- 1/2 cup freshly grated Parmesan (about 2 ounces)
When selecting your kale, look for leaves that are deep green and turgid, avoiding anything that looks wilted or yellowed. The kale provides a much-needed structural element and a slight bitterness that complements the creamy sauce. For the Parmesan, avoid the pre-shredded variety found in plastic containers. Shredding a block yourself results in a much better melt, as pre-shredded varieties often contain powders that prevent creaminess.
Step-by-Step Instructions for Flawless Execution
- Preheat your oven to 400 degrees F. This high temperature is essential for the final thickening of the sauce and the browning of the cheese.
- In a large pot or Dutch oven of boiling salted water, cook gnocchi according to package instructions until they just begin to float; drain them well and let them sit to allow excess moisture to evaporate.
- Season your chicken thighs with 3/4 teaspoon salt and 1/2 teaspoon pepper, ensuring an even coating on all sides for consistent flavor.
- Melt 2 tablespoons of butter in a large oven-proof skillet or Dutch oven over medium heat. You want the butter to be foaming but not yet smoking.
- Working in batches to avoid crowding, add the chicken to the skillet in a single layer and cook until a deep golden brown crust has formed and the meat is cooked through, reaching an internal temperature of 165 degrees F, about 4-5 minutes per side. Set the chicken aside on a clean plate.
- Melt the remaining 3 tablespoons of butter in the same skillet, scraping up any browned bits from the chicken. Add the diced shallot and cook, stirring frequently, until it is translucent and tender, which should take about 3-5 minutes. Stir in the minced garlic and fresh thyme until the aroma becomes intensely fragrant, about 1 minute.
- Whisk in the all-purpose flour and cook for about 1 minute until it turns a pale wheat color; this removes the raw flour taste without making the roux too dark.
- Gradually whisk in the chicken broth and lemon juice. It is critical to whisk constantly during this stage to ensure the flour particles hydrate evenly, creating a smooth, lump-free base before the half and half is added. Cook until slightly thickened, about 3-5 minutes.
- Stir in the half and half and continue to cook until the sauce has thickened enough to coat the back of a spoon, which takes about 1-2 minutes. Season with salt and pepper to your preference.
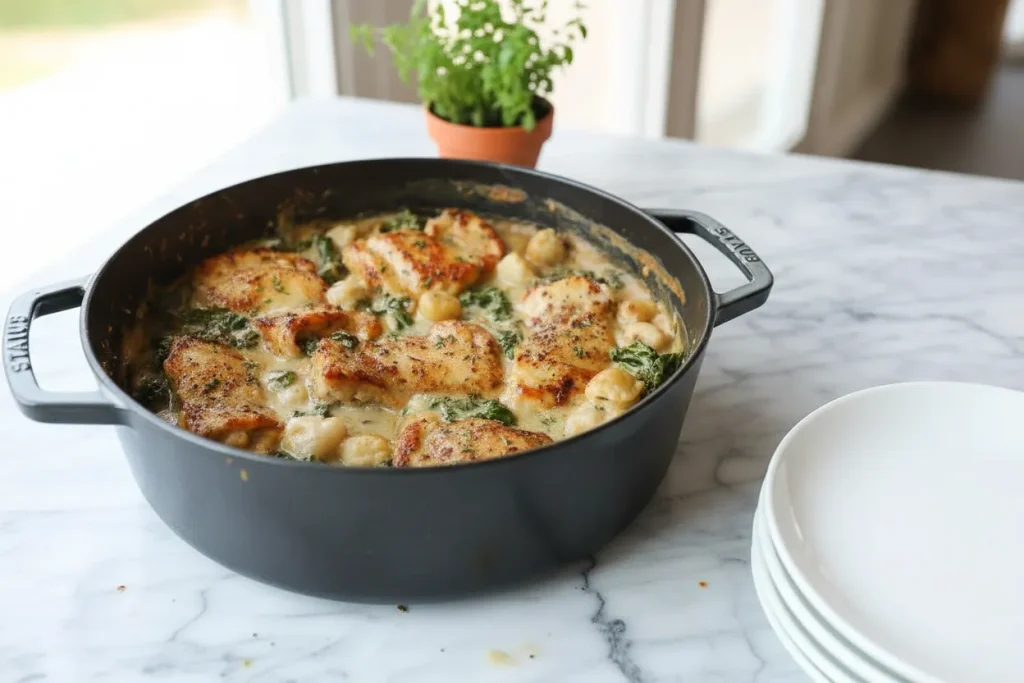
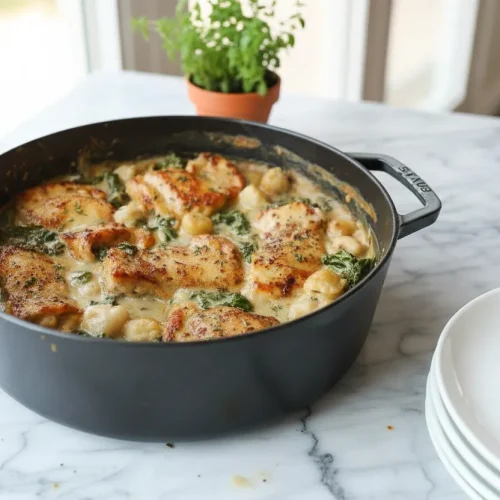
- Gently stir in the pre-cooked gnocchi and the torn kale leaves. Continue to stir for 1-2 minutes until the kale has wilted into the sauce. Return the cooked chicken to the skillet and sprinkle the freshly grated Parmesan over the top.
- Place the skillet into the preheated oven and bake until the sauce is bubbly and the cheese has melted into a golden layer, about 10-12 minutes.
- Serve immediately while the sauce is at its peak silkiness and the gnocchi is at its most tender.
Pro tip: If your sauce seems too thick before going into the oven, add a tablespoon of extra broth; the oven will evaporate some moisture, so starting with a slightly looser sauce ensures a perfect final consistency.
Yield, Storage, and Seasonal Customization
This recipe is designed to yield 4 to 6 servings, making it a robust option for a family dinner or a meal-prep session for the week. Through my testing, I found that the texture of this dish is at its absolute best when served immediately after it leaves the oven. The gnocchi are at their most resilient, and the sauce is perfectly emulsified.
If you have leftovers, store them in an airtight container in the refrigerator for up to three days. However, you must be aware that the gnocchi will continue to absorb moisture from the sauce as they sit. Reheating can be tricky; the microwave often makes the gnocchi softer or slightly gummy. I recommend reheating on the stovetop over low heat. Common Mistake: Many people try to reheat creamy pasta without adding liquid. To restore the original texture, you must add a splash of extra chicken broth or a teaspoon of water to loosen the sauce as it warms.
For those looking to adapt this dish to different times of the year, it is highly customizable. For an Autumn variation, I have found that substituting the kale with roasted butternut squash cubes adds a wonderful sweetness that pairs beautifully with the sage and thyme. The squash should be roasted separately and folded in at the same time you would add the kale. This versatility is one of the reasons I return to chicken thigh gnocchi recipes throughout the year.
Pro tip: If you are meal prepping this, consider slightly undercooking the gnocchi by thirty seconds during the initial boil; this gives them more structural headroom to survive the reheating process.
Troubleshooting Your Gnocchi System
Even with a perfect blueprint, variables in your kitchen can occasionally lead to unexpected results. One common issue is a sauce that appears to be breaking or looking greasy. This usually happens if the heat was too high when the half and half was added, or if the cheese was added to a boiling liquid. If you see the sauce starting to separate, immediately remove it from the heat and whisk in a teaspoon of cold broth or water. The drop in temperature and the addition of moisture can often pull the emulsion back together.
Another potential failure point is the kale. If the kale feels too tough or fibrous, it is likely because the stems were not fully removed or it didn’t spend enough time in the sauce before the oven bake. Ensure you are using only the tender leaves and that they are fully submerged in the liquid so the steam can break down the cellulose.
If your gnocchi still feels a bit too soft for your liking, check your boiling time. Every brand of gnocchi has a slightly different starch composition. I have learned that as soon as the first two or three dumplings surface, the whole batch is usually ready to be drained. Over-boiling by even thirty seconds can compromise the structural integrity of the cauliflower potato blend, leading to a loss of that distinctive “pillowy” texture.
Conclusion: Engineering Your Best Chicken Thigh Gnocchi
Creating the perfect chicken thigh gnocchi was a journey of understanding heat transfer, starch behavior, and the chemistry of flavor balance. By moving away from the standard stovetop methods and utilizing a 400-degree oven finish, we have solved the problem of gummy dumplings and broken sauces. The brightness of the lemon juice and the savory depth of the seared chicken thighs create a dish that is both comforting and sophisticated.
This recipe is a testament to the idea that cooking is a system that can be optimized. When you follow this blueprint, you aren’t just making dinner; you are executing a series of tested steps designed for repeatable success. The contrast between the shattered Parmesan crust and the tender gnocchi underneath is a sensory experience that proves the effort was worth it.
I encourage you to step away from mediocre stovetop attempts and try this precision-engineered method. If you find that the oven finish stabilized your sauce and improved your gnocchi texture, please share your results in the comments. I love hearing from other home cooks who value clarity and optimization in the kitchen. Let’s continue to engineer better meals together, one recipe at a time.
Creamy Chicken and Gnocchi
Equipment
- Large pot or Dutch oven (for boiling)
- Oven-proof skillet or Dutch oven
- Digital thermometer
- Paper towels
- Whisk
Ingredients
Main Components & Protein
- 1 (16-ounce) package cauliflower potato gnocchi
- 1.5 pounds boneless, skinless chicken thighs
- 1 bunch kale stems removed and leaves torn into bite-sized pieces
Sauce Base & Aromatics
- 5 tablespoons unsalted butter (divided)
- 1 medium shallot (diced)
- 3 cloves garlic (minced)
- 2 teaspoons chopped fresh thyme leaves
- 3 tablespoons all-purpose flour
- 1.25 cup chicken broth
- 1/4 cup chicken broth and 1 teaspoon lemon juice
- 1/2 cup half and half
Seasoning & Topping
- to taste Kosher salt and freshly ground black pepper
- 1/2 cup freshly grated Parmesan (about 2 ounces)
Instructions
Preparation and Gnocchi Pre-Cook
- Preheat your oven to 400 degrees F. This high temperature is essential for the final thickening of the sauce and the browning of the cheese.
- In a large pot or Dutch oven of boiling salted water, cook gnocchi according to package instructions until they just begin to float; drain them well and let them sit to allow excess moisture to evaporate.
Searing Chicken and Building the Roux
- Season your chicken thighs with 3/4 teaspoon salt and 1/2 teaspoon pepper, ensuring an even coating on all sides for consistent flavor.
- Melt 2 tablespoons of butter in a large oven-proof skillet or Dutch oven over medium heat. You want the butter to be foaming but not yet smoking.
- Working in batches to avoid crowding, add the chicken to the skillet in a single layer and cook until a deep golden brown crust has formed and the meat is cooked through, reaching an internal temperature of 165 degrees F, about 4-5 minutes per side. Set the chicken aside on a clean plate.
- Melt the remaining 3 tablespoons of butter in the same skillet, scraping up any browned bits from the chicken. Add the diced shallot and cook, stirring frequently, until it is translucent and tender, which should take about 3-5 minutes.
- Stir in the minced garlic and fresh thyme until the aroma becomes intensely fragrant, about 1 minute.
- Whisk in the all-purpose flour and cook for about 1 minute until it turns a pale wheat color; this removes the raw flour taste without making the roux too dark.
Finishing the Sauce and Baking
- Gradually whisk in the chicken broth and lemon juice. It is critical to whisk constantly during this stage to ensure the flour particles hydrate evenly, creating a smooth, lump-free base before the half and half is added. Cook until slightly thickened, about 3-5 minutes.
- Stir in the half and half and continue to cook until the sauce has thickened enough to coat the back of a spoon, which takes about 1-2 minutes. Season with salt and pepper to your preference.
- Gently stir in the pre-cooked gnocchi and the torn kale leaves. Continue to stir for 1-2 minutes until the kale has wilted into the sauce. Return the cooked chicken to the skillet and sprinkle the freshly grated Parmesan over the top.
- Place the skillet into the preheated oven and bake until the sauce is bubbly and the cheese has melted into a golden layer, about 10-12 minutes.
- Serve immediately while the sauce is at its peak silkiness and the gnocchi is at its most tender.


