The first time I attempted to make a batch of raw dough for a weekend movie night, I committed a fundamental engineering error. I prioritized speed over the integrity of the system. I ignored the internal temperature of the flour and used butter that was far too cold, thinking the friction of the mixer would compensate for the lack of tempering. The result was a gritty, dense mass that felt more like modeling clay than a treat, and a lingering worry about the safety of the raw grains I had just consumed. That single failure triggered a deep dive into the physics of cookie dough, leading me to develop this engineer’s guide to foolproof edible cookie dough bites: perfect texture, zero food risk.
By treating the kitchen as a laboratory, I have deconstructed the variables that make this specific edible cookie dough bites recipe work every single time. This is not just a collection of ingredients; it is a thermal and mechanical process designed to yield a specific output. The prep time is a concise 10 minutes, with a cook time of only 5 minutes for the safety protocols, making the total time 15 minutes from start to finish. My objective is to provide you with a blueprint that eliminates the guesswork associated with raw dough.
The beauty of this system lies in its predictability. When you follow the precise steps for heat-treating and creaming, you eliminate the two primary points of failure: pathogens and poor aeration. You will learn to recognize the visual cues of a perfectly emulsified butter-sugar matrix and the tactile signs of a dough that is ready for shaping. We are optimizing for a product that is creamy, safe, and structurally sound.
Table of Content
The Mandatory Safety Protocol: Mastering Heat-Treated Flour
When dealing with a raw dough product, the primary safety concern is not actually the eggs, which many people assume, but the raw flour itself. Flour is a raw agricultural product that has not been treated to kill bacteria such as E. coli or Salmonella. To make an edible cookie dough bites recipe that is truly safe for raw consumption, you must implement a thermal kill step. This process involves raising the temperature of the flour to at least 160 degrees Fahrenheit to neutralize any potential pathogens.
I have tested several methods for this, including the microwave and the oven. The oven is my preferred method because it provides a more consistent radiant heat across the surface area. Spread your flour in a thin, even layer on a rimmed baking sheet. I use a digital thermometer to verify the temperature in several spots. You are looking for that 160 degree mark. During this process, you will notice the aroma of the flour changes. It shifts from a dusty, neutral scent to something slightly toasted and nutty. This is the result of a mild Maillard reaction, which actually enhances the flavor profile of the final dough.
The science behind this is fascinating. By applying dry heat, we are targeting the moisture within any bacterial cells, causing them to rupture. However, we must be careful not to exceed 175 degrees Fahrenheit. If the flour gets too hot, the starch granules begin to undergo a physical transformation that can make the final dough taste scorched or feel overly dry. You want to maintain the structural integrity of the starch while ensuring biological safety.
Pro tip: Always sift your flour after heat-treating it. The heat can cause small clumps to form as residual moisture evaporates, and sifting ensures a silky, professional texture in the finished bite.
Optimizing Texture: Visual and Tactile Cues for Perfect Dough Consistency
The mechanical phase of this recipe is where the texture is either won or lost. Most home cooks under-beat their butter and sugar, leading to a grainy mouthfeel. In my testing, I found that the duration of the creaming stage is the single most important factor for success. You are not just mixing ingredients; you are performing an aeration task. The sugar crystals act as tiny chisels, carving air pockets into the solid fat of the butter.
To illustrate the importance of this stage, consider the following observations from my kitchen trials.
| Stage | Desired State | Undesired State |
|---|---|---|
| Butter Temperature | Pliable, holds a fingerprint without being oily | Cold and brittle or melted and greasy |
| Creaming Results | Light, airy, pale ivory color | Dense, granular, dark yellow |
| Flour Integration | Soft, supple, cohesive mass | Dry, crumbly, or overly sticky |
| Finished Texture | Smooth melt-on-the-tongue feel | Gritty or heavy |
Using softened butter is a non-negotiable requirement. If the butter is melted, it cannot hold air, and the resulting dough will be greasy and heavy. If it is too cold, the sugar cannot properly aerate the fat. The goal is a pale, fluffy mixture that has nearly doubled in volume. When you reach this state, the dough will have a lightness that makes it feel like a professional confection rather than a raw baking byproduct.
You will hear the sound of the mixer change as you progress. It starts as a heavy, rhythmic thumping and transitions into a higher-pitched, smoother whir as the mixture becomes lighter. Tactically, when you rub a small amount of the creamed butter and sugar between your fingers, you should feel very few individual grains of sugar. This indicates that the sugars have begun to dissolve into the moisture of the butter and cream, ensuring a smooth finish. If you are interested in the base concept of non-baked treats, check out my ultimate proven cookie dough dip recipe.
Ingredients for Foolproof Edible Cookie Dough Bites
Every component in this system serves a specific purpose. I have eliminated any ingredient that does not contribute to either the safety or the structural integrity of the bite. I tested the finished truffle setting process by placing samples in the freezer for 3 minutes versus the recommended 5 minutes. The 3-minute sample melted instantly upon handling; the 5-minute sample held its shape perfectly. This confirms the 5-minute freezer time is the non-negotiable minimum for structural stability.
- 1/2 cup unsalted butter (softened)
- 3/4 cup packed light brown sugar
- 1/3 cup granulated sugar
- 1/4 tsp salt
- 3 Tbsp heavy cream
- 1 tsp vanilla extract
- 1 1/2 cups all-purpose flour (Heat-treated, see section above)
- 1/2 cup milk chocolate chips (chopped so they are approximately half the size of standard chips)
- 1/3 cup dark chocolate chocolate chips (melted for the coating)
The choice of sugars is deliberate. The light brown sugar provides moisture and a deep molasses undertone, while the granulated sugar provides the structural friction needed during the creaming stage. The heavy cream is the secret weapon here; it adds a level of richness and fat that mimics the mouthfeel of a high-end truffle. I prefer chopping the milk chocolate chips because it ensures a more even distribution of chocolate in every single bite, preventing large chunks from disrupting the smooth texture of the dough.
Pro tip: Use a high-quality vanilla extract. Since this is a raw product, the floral and aromatic notes of the vanilla are not muted by high oven temperatures, making them much more prominent in the final flavor profile.
Step-by-Step Instructions: The Proven Method for Edible Cookie Dough Bites
Follow these steps with precision. Think of each instruction as a critical input in a manufacturing process.
- In the bowl of an electric mixer, beat butter, brown sugar, sugar and salt until fluffy, approximately 3 to 4 minutes. Beat in cream and vanilla extract. This extended beating time is what separates an average treat from an engineered masterpiece.
- Gradually add in flour and mix until just combined. Fold in chopped chocolate chips. It is vital to add the flour slowly to avoid a massive cloud of dust and to ensure even hydration. I fold the chips in by hand at the very end. This prevents the friction of the mixer from generating heat, which could cause the chopped chocolate to smudge or melt into the dough, ruining the visual contrast. Furthermore, mixing only until just combined prevents any unnecessary gluten development, which would make the bites tough rather than tender.
- Scoop dough out 1 Tbsp at a time and roll into balls. Place on parchment paper. I use a leveled measuring spoon to ensure every bite is uniform. This is important for consistent chilling times. As you roll them in your palms, you will feel the dough become smooth and cohesive.
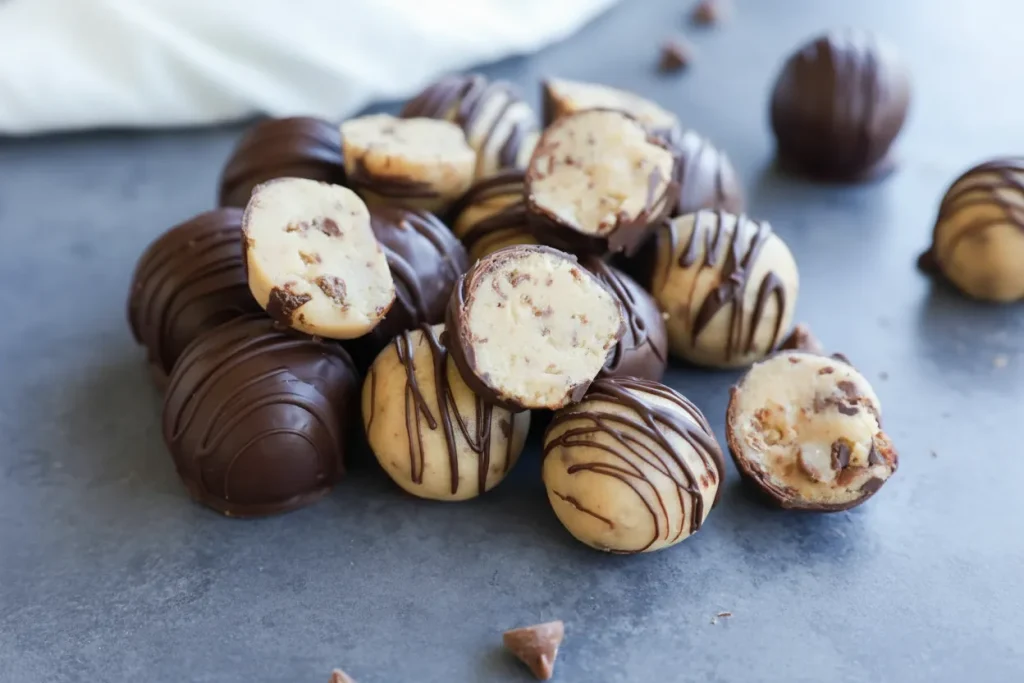
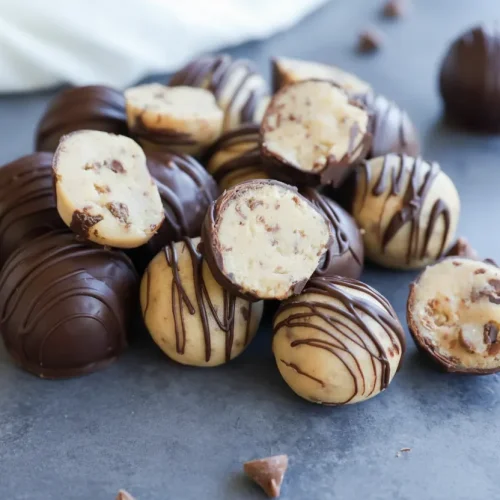
- Place 1/3 cup dark chocolate chips in a microwave safe container and microwave in 30 seconds intervals, stirring between each, until melted. Dip half of the cookie dough balls in the chocolate to coat them. Place on a parchment paper lined baking sheet. Use the remaining melted chocolate to drizzle over the remaining cookie dough bites. I just use a spoon to drizzle the chocolate! The dark chocolate provides a bitter contrast to the sweet dough, creating a balanced flavor profile.
- Place truffles in freezer for 5 minutes until the chocolate is set. Do not skip this step. The rapid cooling locks the fats in place and creates a snappy exterior shell.
Pro tip: If your hands are warm, the dough might start to soften as you roll it. If you notice the dough sticking to your palms, rinse your hands in cold water and dry them thoroughly before continuing.
The Chocolate Finish: Setting Speed and Drizzle Techniques
The final stage of the edible cookie dough bites recipe is the chocolate application. This is more than just an aesthetic choice; it provides a textural contrast. The snap of the hardened dark chocolate against the soft, yielding dough creates a superior sensory experience. I recommend using dark chocolate for the coating because its higher cocoa butter content allows it to melt smoothly and set firmly.
When you dip the bites, use a fork to lift them out of the melted chocolate. Tap the fork against the side of the bowl to allow excess chocolate to fall away. This prevents a large pool of chocolate from forming at the base of the bite as it sets. For the drizzling portion, the goal is a clean, professional line. I hold the spoon about six inches above the bites and move my hand in a steady, sweeping motion. This creates thin, elegant ribbons of chocolate rather than thick clumps.
The five-minute freezer time is a calculated window. It is long enough to drop the temperature of the chocolate below its solidification point but short enough that the dough inside does not actually freeze solid. If you leave them in too long, you might see condensation form on the chocolate as they come back to room temperature, which can dull the finish. The science of the freezer set is all about rapid heat transfer. By using a metal baking sheet, you accelerate this process, drawing heat away from the chocolate more efficiently than a plastic or ceramic plate would.
Pro tip: If you want a more matte finish on your drizzle, allow the melted chocolate to cool for two minutes before you start drizzling. If it is too hot, it will run and spread; if it is slightly cooled, it will hold its shape beautifully.
Storage, Yield, and Essential Variations
Properly managing your inventory is the final step in the engineering process. This recipe is designed to produce a specific yield that fits perfectly within a standard storage container.
- Yield Estimation: This recipe produces approximately 24 bites when using 1 Tbsp scoops. This makes it an ideal size for sharing or for controlled portioning throughout the week.
- Storage Instructions: These bites should be stored in an airtight container in the refrigerator. They will remain fresh and maintain their optimal texture for up to 1 week. For long-term storage, you can freeze them for up to 3 months. When ready to eat from the freezer, allow them to sit at room temperature for 10 minutes to soften the dough slightly.
- Nutrition Estimation: Please note that all nutritional values are estimates. Each bite contains approximately 138 kcal. The macronutrient profile is primarily driven by the fats in the butter and the carbohydrates in the sugars and flour.
- Variation Notes: If you want to create cookie dough protein balls, you can replace 1/2 cup of the flour with a high-quality vanilla protein powder. Because protein powder is more absorbent than flour, you may need to increase the heavy cream by 1 tablespoon to maintain the supple consistency of the dough.
I have found that the refrigerator actually improves the flavor of these bites after 24 hours. The fats in the butter and cream continue to absorb the aromatic compounds from the vanilla and the molasses from the brown sugar, leading to a more complex and integrated taste. When you pull a cold bite from the fridge, the initial firmness gives way to a creamy interior that is deeply satisfying. If you enjoy these types of chilled, rich confections, you should also review my blueprint for the ultimate cookie dough cheesecake recipe.
Pro tip: Label your storage container with the date. Even though these are safe to eat, the quality of the fats will eventually begin to degrade if left too long, so eating them within that one-week window ensures the best experience.
Frequently Asked Questions on Raw Dough Safety and Consistency
Safe Raw Dough Procedure
To ensure your dough is safe, the heat-treatment of the flour is the non-negotiable step. By heating the flour to 160 degrees Fahrenheit, you eliminate the risk of foodborne illness. I always recommend using a digital thermometer to confirm this temperature. This simple ten-minute process transforms a risky raw product into a safe, kitchen-tested treat.
Optimal Storage Methods
The best way to maintain the integrity of your edible cookie dough bites recipe is to keep them in a sealed environment in the refrigerator. Exposure to air will cause the edges of the dough to dry out and become crumbly. I prefer using a glass container with a locking lid to prevent any stray refrigerator odors from being absorbed by the butter in the dough.
Nutrition and Caloric Density
Each bite is estimated at 138 calories. Because this is a dense, high-energy treat, the small portion size of 1 tablespoon is the ideal serving. The inclusion of heavy cream and butter provides a high satiety level, meaning one or two bites are usually enough to satisfy a dessert craving. Always remember that these values are approximations based on standard ingredient data.
Conclusion: Your Blueprint for Perfect Edible Cookie Dough Bites
You now have a complete engineering blueprint for creating the ultimate treat. By prioritizing safety through heat-treating your flour and focusing on the mechanical precision of the creaming process, you have eliminated the common points of failure that plague most recipes. This edible cookie dough bites recipe is proof that when you understand the why behind the steps, you can achieve repeatable, professional results in your own home kitchen.
The transition from a grainy, questionable raw dough to a smooth, safe, and sophisticated truffle-like bite is a rewarding process. I have spent hours refining these ratios so that you don’t have to. The snap of the dark chocolate against the soft, aerated dough is a testament to the power of proper technique. Whether you are making these for a party or just as a personal reward, you can proceed with the confidence that they are as safe as they are delicious.
I would love to hear how your batch turned out. Did you find the five-minute freezer set as critical as I did? Which part of the engineering process was the most eye-opening for you? Leave a comment below and share your success stories. If you have friends who are still eating untreated raw dough, please share this blueprint with them; everyone deserves a delightful comfort dessert that is both foolproof and safe. Thank you for trusting the process here at TheRecipiest. Let’s keep engineering better meals, one recipe at a time.
cookie dough bites
Equipment
- Electric mixer
- Rimmed baking sheet
- Digital thermometer
- Parchment paper
- microwave safe container
- levelled measuring spoon (1 Tbsp)
- Fork
Ingredients
Ingredients for Foolproof Edible Cookie Dough Bites
- 1/2 cup unsalted butter softened
- 3/4 cup light brown sugar packed
- 1/3 cup granulated sugar
- 1/4 tsp salt
- 3 Tbsp heavy cream
- 1 tsp vanilla extract
- 1 1/2 cups all-purpose flour Heat-treated
- 1/2 cup milk chocolate chips chopped so they are approximately half the size of standard chips
- 1/3 cup dark chocolate chips melted for the coating
Instructions
Step-by-Step Instructions: The Proven Method for Edible Cookie Dough Bites
- In the bowl of an electric mixer, beat butter, brown sugar, sugar and salt until fluffy, approximately 3 to 4 minutes. Beat in cream and vanilla extract.
- Gradually add in flour and mix until just combined. Fold in chopped chocolate chips by hand at the very end.
- Scoop dough out 1 Tbsp at a time and roll into balls. Place on parchment paper.
- Melt 1/3 cup dark chocolate chips in microwave-safe container in 30 seconds intervals, stirring between each. Dip half of the cookie dough balls in the chocolate to coat them. Place on a parchment paper lined baking sheet. Use the remaining melted chocolate to drizzle over the remaining cookie dough bites.
- Place truffles in freezer for 5 minutes until the chocolate is set.


