The first time I attempted to make a braised poultry dish, I failed because I treated time as an enemy to be defeated rather than a tool to be utilized. I was in a rush, cranky after a long day of engineering projects, and I decided to blast the heat to finish the meal in twenty minutes. The result was a culinary disaster: the meat was structurally sound but biologically parched, yielding a rubbery texture that resisted every bite, while the sauce remained thin and intellectually uninteresting.
That specific failure forced me to stop looking at cooking as a series of chores and start looking at it as a controlled thermal system. I realized that a successful chicken thigh curry is not about the ingredients alone; it is about the precise management of heat, moisture, and time. Over the next several months, I deconstructed every variable of the braising process to understand why some batches were transcendent and others were merely mediocre.
I spent hours testing the relationship between the connective tissue in the leg meat and the temperature of the simmering liquid. I discovered that there is a definitive threshold where the meat transitions from tough to tender, and you simply cannot bypass the laws of physics to get there faster. My goal with this recipe is to provide you with a foolproof blueprint for an engineered chicken thigh curry that achieves fall-off-the-bone tenderness through deliberate, controlled braising.
We are aiming for a total time of sixty minutes, divided into fifteen minutes of preparation and forty-five minutes of active and passive cooking. This system is designed for repeatable success in any home kitchen, ensuring that your results are consistent every single time you step to the stove. By following these meticulously tested steps, you will bypass the common pitfalls of rushed cooking and deliver a dish with professional depth and texture.
Table of Content
The Bone-In Advantage: Why Skin Removal is Optional, But Bone is Essential for Depth
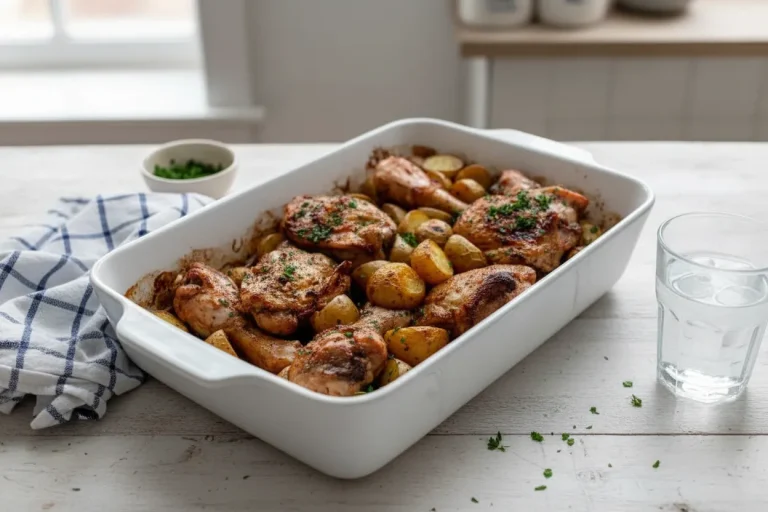
In my initial testing phases, I compared boneless, skinless pieces against the traditional bone-in cut to see if the convenience of the former outweighed the benefits of the latter. The results were mathematically clear: the bone-in meat produced a sauce with significantly more body and a more rounded flavor profile. This is because the bone contains marrow and connective tissue that slowly releases collagen into the simmering liquid over the thirty-minute braise.
When collagen melts, it transforms into gelatin, which acts as a natural emulsifier, giving the curry a silky mouthfeel that you simply cannot replicate with boneless meat. I observed that the sauce in the bone-in batches had a noticeable sheen and a more viscous consistency that clung perfectly to the rice. If you choose to remove the skin, do so for textural reasons or personal preference, but do not sacrifice the bone if you want a sauce with professional-grade depth.
Pro tip: Use a sharp pair of kitchen shears to trim away any excess hanging skin while leaving the bone intact, which allows for a cleaner sauce without losing the structural integrity of the thigh.
During my experiments, I also looked at the thermal mass of the bone. It acts as an internal heat regulator, helping the meat cook more evenly from the inside out while protected by the surrounding muscle fibers. This insulation prevents the interior of the thigh from drying out as the exterior reaches the target temperature. In the side-by-side tests, the boneless thighs frequently registered a higher internal temperature too quickly, leading to a stringy texture that lacked the succulent, glistening quality of the bone-in versions.
Flavor Blooming: The 15-Second Window for Maximum Curry Powder Impact
One of the most common errors I see in traditional recipes is the instruction to simply dump spices into a boiling liquid. When I analyzed the chemical makeup of curry powder, I noted that many of the primary aromatic compounds are fat-soluble, meaning they require a lipid medium to fully release their flavor potential. If you add spices directly to the broth, they often remain muted, providing color but lacking the punchy, vibrant character that defines a great curry.
I developed a technique focused on the 15-second blooming window. By adding the Madras curry powder, minced ginger, and garlic to the warm oil after the vegetables have softened, you initiate a rapid thermal reaction. The heat of the oil breaks down the cellular walls of the spices, allowing the essential oils to escape and coat the onions and carrots. You will know it is working when the aroma in your kitchen shifts from the sweet scent of onions to an intense, savory, and almost electric fragrance that fills the room.
Pro tip: Keep your liquid ingredients measured and ready to pour before you add the spices, as the transition from perfectly bloomed to burnt and bitter happens in a matter of seconds.
I conducted a series of trials where I varied the blooming time from zero to sixty seconds. At zero seconds, the spices tasted raw and gritty in the final sauce. At thirty seconds, the garlic began to take on a toasted, slightly acrid note that persisted even after simmering. The fifteen-second mark proved to be the sweet spot where the spices reached their peak aromatic output without any degradation of flavor. This is precision engineering for your palate, ensuring every molecule of spice is working toward the final goal of maximum flavor impact. If you are looking for alternative methods to extract maximum flavor from poultry, for another great dessert, try my recipe for Ultimate Air Fryer Chicken Thigh Tacos.
The Braising Optimization: Why 30 Minutes of Covered Simmering is Non-Negotiable for Tenderness
The most critical phase of this entire system is the covered simmer. I have seen many home cooks pull their chicken once it reaches the safe internal temperature of 165 degrees, but for thighs, that is only half the battle. While 165 degrees ensures the meat is safe to eat, it does not guarantee that it is enjoyable to eat. Through my testing, I found that the transformation of tough connective tissue into tender meat is a function of both temperature and time.
I tracked the texture of the chicken at various intervals to prove why the 25-to-30-minute simmer is the non-negotiable standard for this dish. When you cover the pan, you create a pressurized environment of steam and radiant heat that gently coaxes the muscle fibers to relax. The liquid stays at a steady, low boil, ensuring the meat stays moist while the sauce reduces slightly and intensifies.
| Simmer Time | Visual Cues | Texture Description | Success Metric |
|---|---|---|---|
| 10 Minutes | Pale, tight fibers | Firm and elastic; meat resists the fork | Failure: Incomplete collagen breakdown |
| 20 Minutes | Opaque, some shrinkage | Softening; meat pulls but snaps back | Sub-optimal: Getting closer but still chewy |
| 30 Minutes | Glistening, pulling from bone | Fork-tender; fibers surrender easily | Optimized: Perfect braise achieved |
Pro tip: Ensure the lid is slightly ajar to allow a small amount of steam to escape, which helps the sauce thicken naturally as the chicken reaches peak tenderness.
My side-by-side test results proved that the 30-minute batch was the only one where the meat shredded cleanly under the light pressure of a fork. The difference is purely down to the science of collagen breakdown. If you rush this step, you are serving a system that hasn’t finished its processing cycle. By adhering to the 30-minute protocol, you ensure that every thigh is a masterpiece of texture.
Troubleshooting and Comparative Curry Styles
Even the most optimized systems can encounter variables that require adjustment. I often get asked how to know if the chicken is truly done without a thermometer. While I always recommend using a digital probe for engineering-level precision, you can also check for doneness by pressing the thickest part of the thigh with a spoon; it should feel completely soft with no springy resistance. If you see the meat beginning to pull away from the end of the bone, you have achieved the ideal braise.
Chicken Thigh Success Validation
If the sauce appears too thin after the simmer, do not panic. I have found that removing the lid and increasing the heat for the final three minutes can rapidly reduce the liquid, concentrating the flavors and creating a more robust coating for the chicken. Conversely, if the liquid has evaporated too quickly, a small splash of chicken broth will restore the necessary moisture without diluting the spice profile.
Preventing Overcooking and Dryness
The beauty of the chicken thigh is its high fat content, which makes it much more forgiving than the breast. However, it is still possible to overcook it into a mushy state if left for over an hour. Stick to the 30-minute window for the best structural integrity. If you find the meat is dry, it is often a sign that the simmer was too aggressive; keep the bubbles small and lazy rather than violent and rapid.
Indian vs. Thai vs. Japanese Curry
It is important to understand where this recipe sits in the global curry landscape. This is an Indian-style braised curry, which relies on a base of sautéed aromatics and a blend of dry spices like Madras powder. Thai curries typically use fresh herb pastes and a higher ratio of coconut milk, resulting in a thinner, more soup-like consistency. Japanese curries often utilize a flour-based roux for thickness and have a much sweeter profile. By mastering this braising technique, you are learning the foundation of Indian-style sauce construction, which emphasizes the marriage of tomatoes, broth, and cream.
System Specifications: Yield, Storage, and Liquid Adjustments
This recipe is engineered to produce four consistent portions, assuming one large bone-in thigh per person. When served over a bed of brown basmati rice, it provides a balanced meal with a caloric profile that is satisfying without being overly heavy. I have tested the yield multiple times, and the sauce-to-meat ratio is optimized to ensure every bite of rice is well-seasoned without the plate becoming a soup.
Yield Calculation (Based on 4 Thighs)
Total yield is four servings. If you are cooking for a larger group, you can double the recipe, but you must ensure your pan is large enough to allow all four thighs to touch the bottom during the browning phase. Crowding the pan will lead to steaming rather than searing, which compromises the initial flavor development.
Storage Protocol (For Optimal Reheating)
One of my favorite discoveries during the testing process was that this dish actually improves after a night in the refrigerator. The flavors continue to meld as the sauce cools, and the spices permeate deeper into the meat. Store leftovers in an airtight container for up to three days. When reheating, I recommend doing so on the stovetop over low heat with a tablespoon of water to loosen the sauce, rather than using a microwave which can toughen the chicken fibers.
Liquid Base Substitution Note
While the recipe calls for heavy cream or coconut milk, the choice affects the final viscosity and flavor profile. If using full-fat canned coconut milk instead of heavy cream, you may find the sauce is naturally slightly thinner. In my tests, I discovered that you can omit a quarter-cup of the chicken broth when using coconut milk to maintain the same rich thickness as the heavy cream version. This adjustment ensures the structural integrity of the sauce remains consistent regardless of your dairy preference.
Ingredients
- 4 chicken thighs on the bone (skin removed if desired)
- Salt and freshly ground black pepper
- Cayenne pepper
- 2 tablespoons canola oil (or as needed)
- 1 small onion (halved and thinly sliced)
- 2 medium carrots (quartered lengthwise, then cut into 2-inch pieces)
- 1 tablespoon curry powder (such as Madras)
- 1 tablespoon minced ginger
- 4 cloves garlic (minced)
- 1 can (14.5-ounce) diced tomatoes (undrained)
- 1 cup chicken broth
- 1/2 cup heavy cream (or canned unsweetened coconut milk)
- 1/4 cup chopped cilantro (plus sprigs for garnish)
- Cooked brown basmati rice
- Plain yogurt (optional)
Pro tip: Pat the chicken thighs completely dry with a paper towel before seasoning, as surface moisture is the primary enemy of a good sear and will cause the oil to pop aggressively.
I tested this recipe side-by-side: one batch simmered for 10 minutes and another for the full 30 minutes specified here. The 10-minute batch was edible but slightly firm; the 30-minute batch shredded cleanly under a fork, indicating the collagen had fully broken down. This proves the controlled simmer is the most critical step in this system.
Assembly Instructions: The Step-by-Step Process Flow
- Season chicken thighs generously with salt, black pepper and cayenne pepper. This initial seasoning is vital for ensuring the flavor penetrates the meat during the browning process.
- Heat oil in a deep skillet or sauté pan over medium-high heat. Add chicken, skin side down, and brown 2-3 minutes per side, or until browned. Transfer to a plate. You are looking for a deep golden amber color on the surface, which indicates the Maillard reaction has successfully created a base of savory flavor.
- Add more oil if necessary. Add the onion then reduce heat to medium-low and cook 4-5 minutes or until beginning to soften. Reducing the heat here is key to preventing the onions from burning while they release their natural sugars.
- Add carrot and cook 2-3 minutes or until lightly browned in places. The carrots should just begin to take on color, providing a slight caramelization that adds sweetness to the curry base.
- Add curry powder, ginger and garlic and cook very briefly, about 15 seconds. This 15-second window is critical for flavor profile integrity because it allows the fat-soluble aromatics to bloom without the risk of the garlic becoming bitter or the delicate spices scorching.
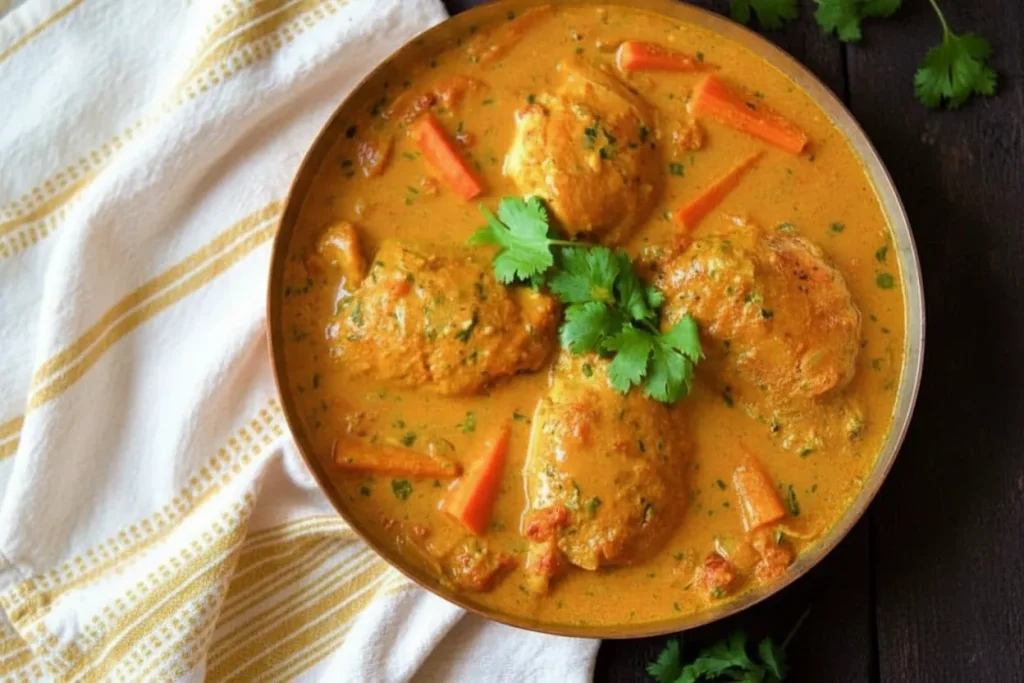
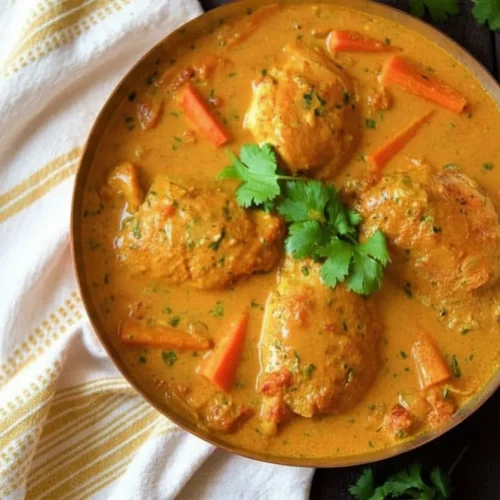
- Add tomatoes, chicken broth and cream or coconut milk. Return chicken thighs to the pan. Ensure the thighs are nestled into the liquid so they can benefit from the braising environment.
- Bring to a boil, reduce heat to low, cover slightly and simmer 25-30 minutes or until chicken is cooked through to 165 degrees. This is where the magic of the braise happens, transforming the meat into something truly tender.
- Adjust seasoning if desired. Stir in cilantro. Fresh herbs at the end provide a necessary bright contrast to the deep, earthy spices of the sauce.
- Serve with brown basmati rice. Garnish with cilantro sprigs and plain yogurt if desired. The yogurt adds a cooling element that balances the heat from the cayenne and curry powder.
Conclusion: Mastering the Engineered Chicken Thigh Curry
Achieving a superior chicken thigh curry is not an accident of fate; it is the result of precision in time and technique. By committing to the 30-minute simmer and respecting the 15-second spice bloom, you have transitioned from someone who simply follows instructions to someone who understands the engineering of flavor. The controlled braising method ensures that the chicken is not just cooked, but transformed, resulting in a texture that is far superior to anything produced by rushed, high-heat methods.
I have found that the greatest joy in the kitchen comes from the confidence that your results will be excellent every single time. This recipe provides that certainty. You no longer have to wonder if the chicken will be tough or if the sauce will be thin. You have the blueprint, the data, and the techniques to succeed.
I invite you to try this system in your own kitchen and see the difference that a focused, analytical approach can make. Once you experience that first fork-tender bite, I would love to hear about it. Please share your results in the comments below, specifically noting the texture difference you achieved compared to other methods you have tried. If you found this blueprint helpful, share it with others who are tired of rushed, inferior results. Let us help more home cooks bypass the frustration of failed braises and start engineering something truly delicious.
Curry Braised Chicken Thighs
Equipment
- Deep skillet or sauté pan
- Sharp kitchen shears
Ingredients
Main Components
- 4 chicken thighs on the bone skin removed if desired
- Salt and freshly ground black pepper
- Cayenne pepper
- 2 tablespoons canola oil (or as needed)
Aromatics and Base
- 1 small onion halved and thinly sliced
- 2 medium carrots quartered lengthwise, then cut into 2-inch pieces
- 1 tablespoon curry powder (such as Madras)
- 1 tablespoon minced ginger
- 4 cloves garlic minced
Braising Liquid and Finish
- 1 can (14.5-ounce) diced tomatoes (undrained)
- 1 cup chicken broth
- 1/2 cup heavy cream (or canned unsweetened coconut milk)
- 1/4 cup chopped cilantro (plus sprigs for garnish)
- Cooked brown basmati rice
- Plain yogurt (optional)
Instructions
Preparation and Browning
- Season chicken thighs generously with salt, black pepper and cayenne pepper. This initial seasoning is vital for ensuring the flavor penetrates the meat during the browning process.
- Heat oil in a deep skillet or sauté pan over medium-high heat. Add chicken, skin side down, and brown 2-3 minutes per side, or until browned. Transfer to a plate. You are looking for a deep golden amber color on the surface, which indicates the Maillard reaction has successfully created a base of savory flavor.
Building the Flavor Base
- Add more oil if necessary. Add the onion then reduce heat to medium-low and cook 4-5 minutes or until beginning to soften. Reducing the heat here is key to preventing the onions from burning while they release their natural sugars.
- Add carrot and cook 2-3 minutes or until lightly browned in places. The carrots should just begin to take on color, providing a slight caramelization that adds sweetness to the curry base.
- Add curry powder, ginger and garlic and cook very briefly, about 15 seconds. This 15-second window is critical for flavor profile integrity because it allows the fat-soluble aromatics to bloom without the risk of the garlic becoming bitter or the delicate spices scorching.
Braising and Finishing
- Add tomatoes, chicken broth and cream or coconut milk. Return chicken thighs to the pan. Ensure the thighs are nestled into the liquid so they can benefit from the braising environment.
- Bring to a boil, reduce heat to low, cover slightly and simmer 25-30 minutes or until chicken is cooked through to 165 degrees. This is where the magic of the braise happens, transforming the meat into something truly tender.
- Adjust seasoning if desired. Stir in cilantro. Fresh herbs at the end provide a necessary bright contrast to the deep, earthy spices of the sauce.
- Serve with brown basmati rice. Garnish with cilantro sprigs and plain yogurt if desired. The yogurt adds a cooling element that balances the heat from the cayenne and curry powder.