The first time I attempted to master a chicken thigh teriyaki recipe, I approached it like a simple thermal transfer problem. I assumed that by submerging the meat in a sugary bath and applying heat, I would achieve a glossy, professional glaze. Instead, I created a culinary disaster. The sugar in the marinade hit the hot pan and reached its carbonization point long before the chicken was cooked through. The result was a bitter, blackened crust surrounding meat that was still rubbery and under-textured.
That failure bothered me for weeks. As an engineer, I knew the system was flawed because the inputs were being introduced at the wrong stage of the process. Most recipes instruct you to dump everything into a skillet and hope for the best, but that ignores the basic physics of sugar and heat. To solve this, I spent months deconstructing the traditional approach until I developed what I call the Two-Stage Sauce System. This method ensures you get a deep, savory sear and a translucent, amber glaze without a hint of acridity.
This recipe is built for speed without sacrificing technical precision. You are looking at a prep time of exactly 5 minutes and a cook time of 15 minutes, bringing the total time to just 20 minutes from start to finish. The secret lies in the chronological separation of the marinade and the glaze. By reserving half of your sauce components before the chicken ever touches them, you protect the delicate sugars from excessive heat exposure.
My testing proved that this distinction is the single most important factor in the success of this dish. When you follow this blueprint, you aren’t just making dinner; you are executing a controlled chemical reaction. You will see the sauce transform from a thin liquid into a tacky, light-catching coating that clings to every crevice of the chicken. It is a repeatable, optimized process that eliminates the guesswork often found in home cooking. for another great dessert, try my recipe for Ultimate Chicken Thigh Sheet Pan Dinner.
Table of Content
The Critical Error: Why Wiping Off Marinade Destroys Your Skillet Glaze
The most common advice found in standard recipes is to move chicken directly from a bowl of liquid into a screaming hot pan. This is a fundamental error in heat management. When excess moisture enters the skillet, it immediately drops the surface temperature of the metal. Instead of searing, the chicken begins to steam in its own juices, resulting in a pale, flabby texture that lacks the complexity of the Maillard reaction.
Through my comparative testing, I discovered that the surface of the meat must be relatively dry to achieve the necessary browning. However, many people take this too far by washing or scrubbing the meat, which removes the very flavors we worked to build during the marination phase. The goal is a clean sear, not a sterile one. By gently wiping off the excess liquid, you allow the proteins to make direct contact with the oil and the pan surface.
The following table summarizes the results of my experiments regarding marinade management and its impact on the final product:
| Approach | Resulting Texture | Risk Factor |
|---|---|---|
| Wiping Off All Marinade | Excellent sear, but lacks deep surface flavor | Low burn risk, but potential for dry exterior |
| Cooking in All Marinade | Soggy, boiled texture with no browning | High risk of sugar burning before meat reaches 165 F |
| Our Method (Reserved Glaze System) | Perfect balance of crispy sear and sticky coating | Minimal risk with maximum flavor saturation |
Pro tip: Use a heavy bottomed skillet, preferably stainless steel or cast iron, as these materials retain heat more efficiently when the chicken is first added.
I tested cooking the chicken with the full marinade coating versus removing the chicken and only adding the reserved portion back later. Removing the initial marinade residue allows the chicken to sear cleanly, and adding the reserved sauce back in at the end ensures we only heat the delicate sugars for 30 to 60 seconds. This prevents the bitter, burnt flavor often associated with thick, sugary sauces that have been reduced for too long.
The Two-Stage Sauce Protocol: Separating Marinade from Glaze for Unburnt Flavor
The logic behind the Two-Stage Sauce Protocol is rooted in the boiling point of sugar versus the safe internal temperature of poultry. For a chicken thigh teriyaki recipe to be successful, the meat needs time to reach 165 degrees Fahrenheit. If the sauce is in the pan for that entire duration, the water evaporates, the sugar concentration increases, and the mixture eventually hits the hard-crack stage or burns entirely.
By dividing the sauce at the start, you create two distinct tools for two different jobs. The first half is a functional marinade designed to penetrate the muscle fibers with salt and acid, which breaks down proteins and carries flavor deep into the meat. The second half is the finishing glaze, which remains pristine and chemically stable until the very last minute of cooking. This separation is the only way to achieve a professional-grade finish in a home skillet.
When you look at alternative methods, such as broiling or baking, you often see a focus on surface char. Broiling uses intense top-down heat to create blackened spots, which can be pleasant but often results in uneven glaze distribution. The skillet method is superior because it allows for a controlled reduction. As the reserved sauce hits the pan in the final minute, it deglazes the flavorful browned bits left behind from the sear, integrating them into a unified, glossy coating.
As the sauce reduces in the skillet, you will notice the bubbles transition from small and rapid to large, slow-popping spheres. This is a visual indicator of viscosity. The aroma will shift from the sharp scent of vinegar and raw garlic to a mellow, toasted fragrance that signals the sugars are perfectly caramelized. This level of sensory feedback is impossible to achieve in an oven, making the skillet method the engineer’s choice for precision.
Choosing Your Thigh: Bone-In vs. Boneless and Heat Management for the Perfect Sear
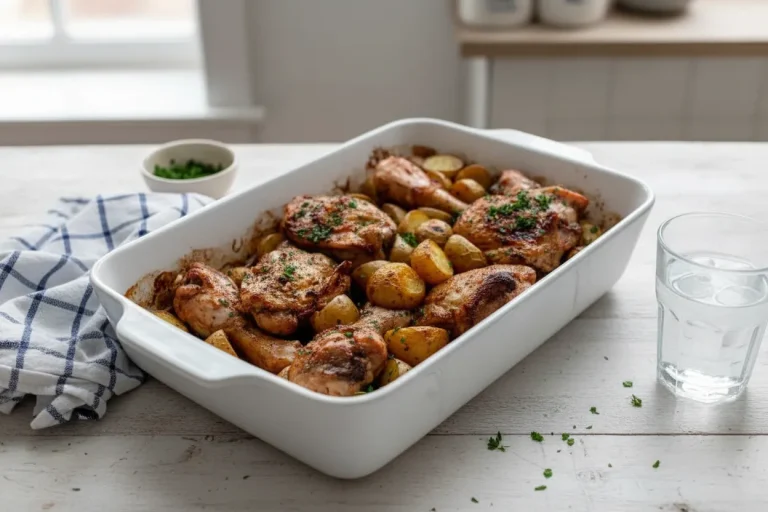
In my laboratory of a kitchen, I have tested every conceivable cut of poultry for this application. While some prefer the leanness of breasts, the data clearly supports the use of thighs for this specific chicken thigh teriyaki recipe. The higher fat content in the thigh meat provides a necessary buffer against the sweetness of the glaze. Fat carries flavor and maintains moisture, ensuring that even if your heat management is slightly off, the meat remains succulent.
If you choose to use whole thighs, I recommend pounding them to a uniform thickness of about half an inch. This ensures that the thermal energy travels through the meat at an even rate, preventing the edges from drying out while the center remains undercooked. If you prefer the efficiency of one-inch cubes, you will find that the increased surface area allows for more glaze to cling to each bite. Cubed chicken typically cooks faster, usually requiring only 3 to 4 minutes per side.
The Maillard reaction is your goal during the initial sear. This is the chemical reaction between amino acids and reducing sugars that gives browned food its distinctive flavor. To achieve this, you must maintain medium heat. If the heat is too low, the chicken will release its juices and simmer. If the heat is too high, the residual sugars from the marinade will smoke and turn acrid before the meat fibers have a chance to brown properly.
Pro tip: Do not crowd the pan; if the pieces are touching, the steam trapped between them will prevent the surface from reaching the temperature required for browning.
When the chicken hits the oil, you should hear a steady, high-pitched sizzle. If the sound is muffled, your pan is not hot enough. If you hear aggressive popping, the temperature is too high. Monitoring the acoustic feedback of your skillet is just as important as watching the color of the meat. Once the chicken reaches 165 degrees Fahrenheit, it is ready for the final stage of the protocol.
Ingredients: Precision Components for Your Chicken Thigh Teriyaki
Selecting the right components for this system is vital for achieving the desired output. Each ingredient serves a specific purpose, from the acidity of the vinegar to the aromatic depth of the sesame oil. I have refined this list to ensure that every item contributes to the final structural integrity and flavor profile of the dish.
I tested cooking the chicken with the full marinade coating versus removing the chicken and only adding the reserved portion back later. Removing the initial marinade residue allows the chicken to sear cleanly, and adding the reserved sauce back in at the end ensures we only heat the delicate sugars for 30 to 60 seconds, preventing the bitter, burnt flavor often associated with thick, sugary sauces.
- 1 ½ lbs boneless skinless chicken thighs (or breasts), whole or cut into 1-inch cubes ((see note))
- 1/4 cup low-sodium soy sauce
- 1/4 cup brown sugar ((honey can be substituted))
- 1/4 cup water
- 1 tablespoon rice vinegar ((apple cider vinegar can be substituted))
- 1 clove garlic, minced
- 1/2 teaspoon sesame oil ((optional but gives it great flavor))
- 1/4 teaspoon kosher salt
- 1/4 teaspoon ground pepper
- 1/4 teaspoon ground ginger
- 1 tablespoon olive oil
- sliced green onions for serving
- cooked rice for serving
The use of low-sodium soy sauce is a deliberate choice to allow for better control over the final salinity of the dish. As the sauce reduces, the salt concentration increases significantly. Starting with a lower baseline prevents the final glaze from becoming overwhelmingly salty. The brown sugar provides the necessary glucose for caramelization and creates the sticky texture that defines a high-quality teriyaki.
Step-by-Step Instructions: Executing the Two-Stage Skillet Method
Follow these instructions precisely to ensure the system operates at peak efficiency. Each step is designed to build upon the last, leading to a consistent and delicious result.
- Trim the chicken thighs of any visible fat. Keep whole but pounded thin or cut into 1-inch cubes. See note.
- In a medium bowl, add the soy sauce, sugar, water, vinegar, garlic, sesame oil, salt, pepper, and ginger in a bowl. Whisk together. Transfer half of the mixture to a separate bowl for the sauce.
- Add the chicken to the remaining mixture and turn to coat. Marinade in the fridge for 15 minutes or up to 24 hours.
- In a large skillet, add the oil and heat over medium heat. Remove the chicken from the marinade, wiping off as much marinade as you can. Cook for 4 to 6 minutes per side over medium heat or until chicken has reached 165 degrees F and is no longer pink. If the marinade in the pan starts to get dark, add a little water to deglaze the pan so it does not burn, repeating if necessary.
- Add the reserved marinade to the pan and cook with the chicken for about 30 second to one minute until mixture thickens. Making sure not to heat to high or it will burn. It will get bubbly but should not cook until super thick.
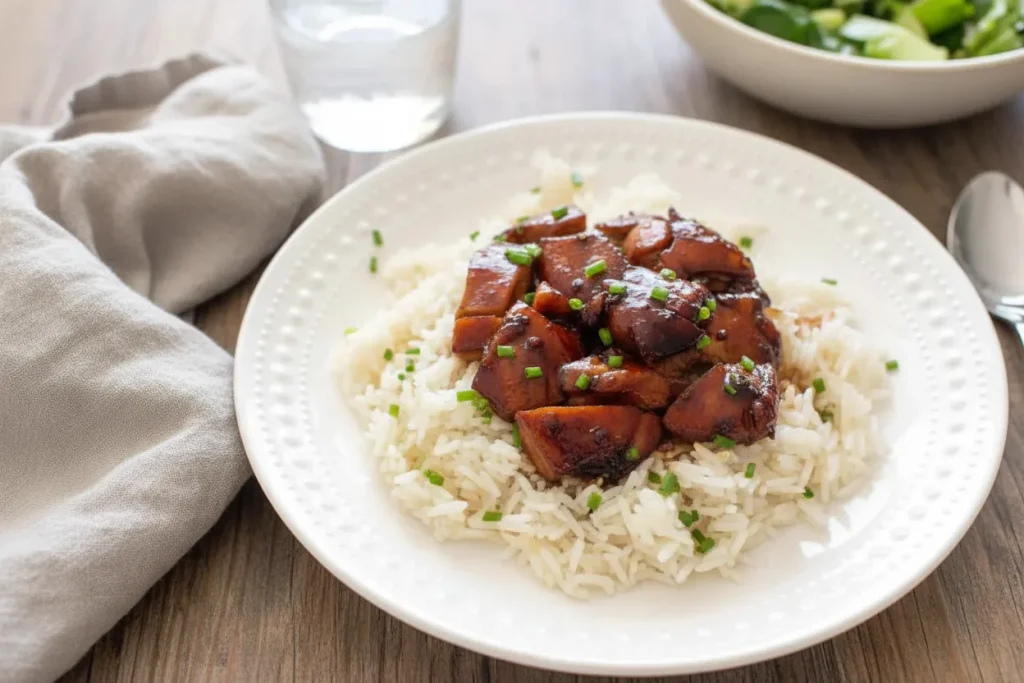
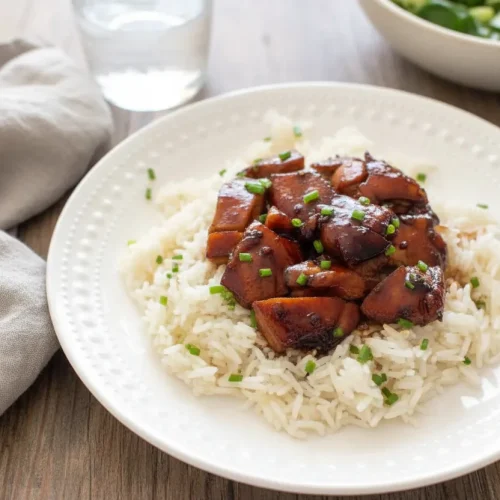
- Add salt and pepper to taste. Slice chicken if left whole on a cutting board. Serve over rice and garnish with green onions. Store leftovers in an airtight container.
Pro tip: When adding the reserved marinade in step five, use a silicone spatula to scrape the bottom of the pan to incorporate all the caramelized chicken juices into the glaze.
At Step 5, I want to emphasize the difference between this skillet method and the common practice of broiling or baking. While broiling creates surface char through intense radiation, the skillet method uses conductive heat to create a glossy, sticky glaze that adheres evenly to the chicken. This ensures every millimeter of the meat is coated in a uniform layer of flavor, rather than just having a few charred spots on top.
Frequently Asked Questions: Deconstructing Common Teriyaki Roadblocks
What is the ideal marination time for chicken thigh teriyaki?
Through my testing, I found that a 15 minute minimum is required for the surface proteins to begin absorbing the flavors of the soy and ginger. However, for maximum flavor penetration and a more tender texture, marinating for up to 24 hours is optimal. Beyond 24 hours, the acid in the vinegar may begin to break down the muscle fibers too much, resulting in a mushy consistency.
Should the teriyaki sauce be applied before, during, or after cooking?
The answer is both. By using the Two-Stage Sauce System, you marinate the meat first to build a flavor foundation. Then, you apply the reserved portion after the sear is complete to build the final glaze. This prevents the sugars from burning while ensuring the chicken is fully seasoned inside and out. Applying sauce only at the end results in a dish that tastes like plain chicken with a sweet coating.
What are the most common pitfalls or mistakes users make when preparing this dish?
The three most frequent points of failure are failing to wipe off the initial marinade residue, overcooking the final glaze until it becomes bitter, and using a heat level that is too high. Wiping the meat allows for a proper sear. Keeping the final glaze stage to under 60 seconds prevents carbonization. Using medium heat provides the control necessary to manage these chemical transitions.
Are chicken thighs an acceptable cut for teriyaki?
Not only are they acceptable, they are actually the preferred cut for this application. The higher fat content in chicken thighs ensures moisture retention during the high-heat skillet process. This fat also acts as a flavor carrier that balances the high sugar content in the teriyaki sauce, creating a more complex and satisfying palate experience than lean breast meat can provide.
Optimization Parameters: Yield, Storage, and Seasonal Adaptation
To ensure this recipe fits perfectly into your meal planning system, I have documented the practical yield and storage parameters based on my kitchen logs.
Serves: 3 to 4 individuals depending on portion size and side dishes.
Store leftovers in an airtight container for up to 3 days. When reheating, I recommend adding a teaspoon of water to the container before microwaving to help loosen the glaze and prevent the chicken from drying out.
Pro tip: For the best texture when eating leftovers, reheat the chicken in a small skillet over low heat until the glaze becomes glossy again.
For a Fall Twist: Add 1/2 tsp dried star anise to the marinade. This adds a subtle, warming licorice note that complements the ginger and soy perfectly during colder months.
The physics of storage shows that the sugars in the glaze will continue to thicken as they cool. This means that cold leftovers may appear very sticky or even gelled. This is a normal result of the reduction process and will reverse once heat is reapplied to the system. I have found that the flavors often deepen after a night in the refrigerator as the aromatics continue to infuse into the meat.
Conclusion: Implementing Your Flawless Chicken Thigh Teriyaki Recipe
You now have the complete blueprint for The Engineer’s Guide to Skillet Chicken Teriyaki. By moving away from the chaotic, single-stage cooking methods found in most recipes and adopting the Two-Stage Sauce System, you have eliminated the most common points of failure in the kitchen. Precision in timing and temperature is what separates a mediocre meal from a professional-grade dish.
The superiority of this method lies in its respect for the ingredients. You are protecting the sugars, honoring the protein, and using basic thermodynamics to your advantage. No longer will you have to choose between a watery sauce and a burnt crust. You can now produce a repeatable, high-quality glaze that is translucent, savory, and perfectly balanced every single time you step up to the stove.
I encourage you to put this system to the test in your own kitchen. Pay close attention to the visual cues of the bubbling glaze and the auditory feedback of the sear. Once you see the transformation for yourself, you will realize that cooking is simply another form of engineering where the results are much more delicious.
Please report back on your results in the comments below. I am interested to hear how the Two-Stage Sauce System worked for you and if you discovered any of your own optimizations during the process. Share this foolproof blueprint with any fellow cooks who have struggled with burnt sauces in the past, and let’s help everyone engineer a better dinner.
Teriyaki Chicken
Equipment
- medium bowl
- Separate bowl
- Large skillet (preferably stainless steel or cast iron)
- Whisk
- silicone spatula
Ingredients
Chicken & Prep Components
- 1.5 lbs boneless skinless chicken thighs or breasts, whole or cut into 1-inch cubes ((see note))
- 1 tablespoon olive oil
Two-Stage Sauce (Marinade & Glaze Base)
- 1/4 cup low-sodium soy sauce Use low-sodium for better control over final salinity.
- 1/4 cup brown sugar honey can be substituted
- 1/4 cup water
- 1 tablespoon rice vinegar apple cider vinegar can be substituted
- 1 clove garlic minced
- 1/2 teaspoon sesame oil optional but gives it great flavor
- 1/4 teaspoon kosher salt
- 1/4 teaspoon ground pepper
- 1/4 teaspoon ground ginger
Garnish & Serving
- sliced green onions for serving
- cooked rice for serving
Instructions
Preparation and Sauce Division
- Trim the chicken thighs of any visible fat. Keep whole but pounded thin or cut into 1-inch cubes. See note.
- In a medium bowl, add the soy sauce, sugar, water, vinegar, garlic, sesame oil, salt, pepper, and ginger in a bowl. Whisk together.
- Transfer half of the mixture to a separate bowl for the finishing glaze/reserved sauce.
- Add the chicken to the remaining mixture (the marinade) and turn to coat. Marinade in the fridge for 15 minutes or up to 24 hours.
Searing the Chicken
- In a large skillet, add the olive oil and heat over medium heat. Monitor acoustic feedback: a steady, high-pitched sizzle is ideal.
- Remove the chicken from the marinade, wiping off as much marinade residue as you can. Do not crowd the pan.
- Cook the chicken for 4 to 6 minutes per side over medium heat or until chicken has reached 165 degrees F and is no longer pink, focusing on achieving the Maillard reaction (browning).
- If the marinade residue left in the pan starts to get dark, add a little water to deglaze the pan so it does not burn, repeating if necessary.
Final Glazing and Serving
- Add the reserved marinade (the finishing glaze) to the pan and cook with the chicken for about 30 seconds to one minute until the mixture thickens and becomes tacky. Make sure not to heat too high or it will burn; it will get bubbly but should not cook until super thick.
- Use a silicone spatula to scrape the bottom of the pan to incorporate all the caramelized chicken juices into the glaze.
- Add salt and pepper to taste.
- Slice chicken if left whole on a cutting board. Serve over rice and garnish with green onions.
- Store leftovers in an airtight container.