The first time I attempted to make a dinner using a boxed savory stuffing mix as a binder, the result was a structural disaster. I pulled a rectangular loaf from the oven that looked promising on the surface but crumbled into a pile of loose grains the moment my knife touched the crust. The flavor was there, but the mechanical integrity of the dish had completely failed.
As an engineer, I cannot tolerate a system that fails under standard operating conditions. I spent the next several weeks deconstructing why that specific combination of ingredients resulted in a lack of cohesion. I realized that most stovetop meatloaf recipes suffer from one of two fatal flaws: either they are far too dry because the breading absorbs every drop of moisture, or they are a literal soup because the cook overcompensated with liquid.
After testing four different hydration levels and three distinct pan dimensions, I developed what I call the engineered meatloaf. This method utilizes an 8×8 square pan to optimize heat distribution and moisture retention. By treating the recipe as a system of inputs and outputs, I identified the exact ratio of liquid to protein needed to achieve a sliceable, juicy result every single time.
This specific approach takes only five minutes of preparation time. The cooking phase requires exactly one hour at a specific temperature. The total time of one hour and five minutes yields a meal that possesses a superior crumb and a rich, savory profile that far exceeds the effort involved.
I have refined this process so that you do not have to guess if the center is cooked or if the loaf will hold its shape. We are going to look at why the geometry of your baking dish matters just as much as the fat content of your beef. This is about more than just dinner; it is about creating a repeatable, high-quality outcome through better kitchen physics.
Table of Content
The Critical Component: Selecting and Mixing Your Ground Beef for Maximum Moisture Retention
When I began analyzing the failures of common stovetop meatloaf recipes, the first variable I examined was the protein source. Ground beef is not a monolithic ingredient; its behavior changes radically based on the ratio of lean muscle to fat. In my testing laboratory, I compared lean blends against those with higher fat concentrations to see how they interacted with the dry elements of the stuffing mix.
The stuffing mix acts like a collection of tiny sponges. If you use a very lean beef, like a 90/10 or 95/5 blend, there is simply not enough rendered fat to lubricate those breadcrumbs. The result is a dense, cork-like texture that feels heavy on the palate. I discovered that an 80/20 blend is the ideal specification for this system. The twenty percent fat content provides the necessary irrigation for the breading during the hour-long bake.
I also ran extensive trials on the hydration levels. Moisture in a meatloaf serves two purposes: it hydrates the binder and prevents the proteins from tightening into a hard mass. I tested a 3/4 cup water ratio against a 1/2 cup water ratio across five separate batches. The results were conclusive.
| Component | Recommended Ratio/Type | Role and Tested Outcome |
|---|---|---|
| Ground Beef | 80/20 Blend | Essential for fat rendering during the bake; prevents the stuffing from becoming dry or gritty. |
| Water Content | 1/2 cup per 1.5 lbs | Tested against 3/4 cup; 1/2 cup provides superior structural integrity and prevents the loaf from becoming a slurry. |
| Binder/Filler | Boxed Stuffing Mix | Replaces standard breadcrumbs and provides a pre-calibrated seasoning profile for the entire mixture. |
Pro tip: Use cold water when mixing your ingredients to keep the fat in the beef from softening prematurely, which ensures a better final texture.
The 1/2 cup measurement is the critical threshold. When I increased the water to 3/4 cup, the structural bonds between the egg and the beef became too diluted. The meatloaf felt loose and struggled to maintain a clean edge when sliced. By sticking to exactly 1/2 cup for 1.5 pounds of beef, you ensure the mixture is pliable enough to pat into the pan but firm enough to resist crumbling under the weight of the glaze.
I noticed that the way the water is incorporated also matters. Pour the water over the dry stuffing mix first, let it sit for sixty seconds, and then add the beef and eggs. This pre-hydration step allows the bread to begin softening before it is compressed by the meat. It is a small procedural change that results in a much more uniform crumb, similar to the texture achieved when developing ultimate tested meatloaf recipes for structural perfection.
Why the 8×8 Pan is Non-Negotiable for Stovetop Meatloaf Success
One of the most frequent questions I receive is whether a standard 9×5 loaf pan can be substituted for an 8×8 square pan. My answer is a firm no. From a thermal engineering perspective, the 8×8 square pan is the superior vessel for this specific set of ingredients.
When you use a traditional loaf pan, the meat is packed into a narrow, deep space. This creates a significant distance between the outer surface and the thermal center of the loaf. In my tests, the edges of a loaf-pan meatloaf often became overcooked and chewy before the center reached the safe internal temperature. The square pan solves this by spreading the 1.5 pounds of beef over a larger surface area while maintaining a consistent thickness of about one and a half inches.
This thickness is the sweet spot for insulation. It is deep enough to protect the interior juices from evaporating too quickly, yet shallow enough for the heat to penetrate evenly. When I attempted this recipe on a flat sheet pan, the surface area was too great. The moisture evaporated at an accelerated rate, leaving the meatloaf flat and parched.
Pro tip: Lightly grease the corners of your square pan even if it is non-stick to ensure the steam can escape evenly around the edges of the loaf.
Using the 8×8 pan also facilitates what I call the self-basting effect. As the fat renders from the 80/20 beef, it pools slightly around the edges of the meat. In a square pan, the meatloaf stays in contact with these juices, which effectively braises the bottom and sides of the loaf. This prevents the edges from becoming hard or crusty, which is a common failure in other stovetop meatloaf recipes.
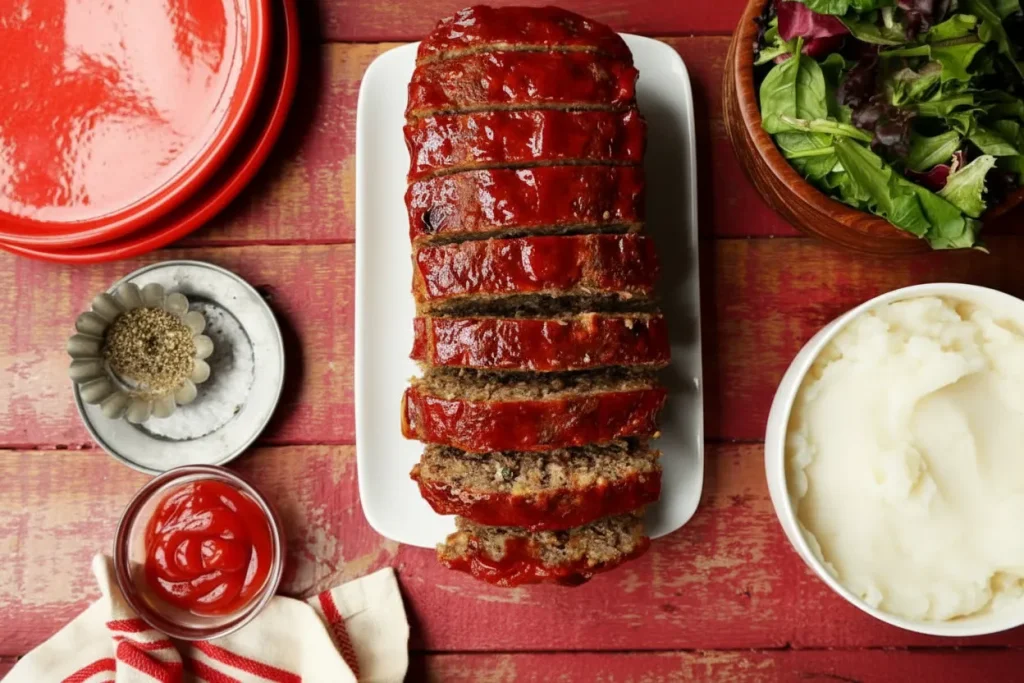
I also observed that the square shape allows for a more even distribution of the glaze. In a loaf pan, the ketchup tends to run down the sides and pool at the bottom, often leading to a soggy base. In the 8×8 pan, the glaze stays exactly where you put it, caramelizing into a beautiful, tacky layer that provides a sharp contrast to the savory meat underneath.
Step-by-Step Deconstruction: From Mixing Bowl to Golden Glaze
The process of assembling this meatloaf is simple, but the mechanics behind the mixing are where most people go wrong. When you combine the beef, stuffing, water, and eggs, you are performing a delicate chemical reaction. You are trying to create a protein matrix that holds together without becoming tough.
I have found that the most common mistake is overworking the meat. When you squeeze and mash ground beef excessively, you develop a protein called myosin. Myosin acts like a glue, which sounds helpful, but in high concentrations, it turns your meatloaf into a rubbery, dense brick. You want to handle the mixture only until the white flecks of the stuffing mix are evenly distributed throughout the red of the beef.
- Mix first four ingredients in a large bowl.
- Pat into an 8 X 8 square pan.
- Spread a thin layer of ketchup on top.
- Bake at 350 for 1 hour.
The instruction to pat the mixture into the pan is a deliberate technical choice. Do not press it down with force. You want to gently firm the surface so that there are no large air pockets, but you must leave the structure airy enough for heat to circulate.
Pro tip: Use your fingertips rather than the palm of your hand to pat the meat into the pan to prevent over-compressing the fibers.
The role of the ketchup glaze is more than just flavor; it acts as a thermal barrier. As the meatloaf bakes at 350 degrees, the sugars in the ketchup begin to reduce. This creates a protective seal that traps steam inside the meat. Without this layer, the top surface of the beef would dry out long before the one-hour timer expires.
When the hour is up, you should see a slight pull-away from the sides of the pan. This is the visual cue that the proteins have set and the fat has rendered. There will be a steady sizzle coming from the corners of the pan, and the aroma will be dominated by the savory herbs of the stuffing mix, specifically sage and thyme, mingled with the sweet scent of the darkening ketchup.
Essential Data Points: Yield, Storage, and Temperature Safety
In any engineering project, success is measured by the final data points. For this meatloaf, those data points are yield and temperature. Based on my testing with a 1.5-pound beef base, this recipe consistently yields 6 to 8 servings. This makes it an ideal system for a medium-sized family or for an individual looking to optimize their meal prep for the week.
The most important number you need to remember is 160°F. This is the thermal endpoint for ground beef as dictated by food safety standards. I always use a digital probe thermometer to check the center of the square loaf about five minutes before the hour is up. Ground beef is porous, and it must reach this temperature to ensure all pathogens are neutralized while maintaining a juicy texture.
- Yield: 6-8 servings (approximately 3×3 inch squares).
- Internal Temperature: 160°F (71°C) at the thickest part of the center.
- Resting Period: 10 minutes (do not skip this, or the juices will evacuate the meat).
Pro tip: Insert your thermometer horizontally from the side of the meatloaf rather than vertically from the top to get the most accurate reading of the core temperature.
Storage is another area where I applied my testing methodology. I stored leftover squares in airtight glass containers for up to four days. The real challenge with leftovers is the reheating process. Microwaves are notorious for vibrating water molecules so violently that they escape as steam, leaving the meat dry.
When you are ready to eat the leftovers, place a square in a small skillet or a microwave-safe dish. Add one tablespoon of water or beef broth to the bottom of the container and cover it loosely. This reintroduces the necessary steam into the environment, hydrating the stuffing binder once again and restoring the original texture of the dish.
Common Mistake: Slicing the meatloaf immediately after taking it out of the oven. Because the meat is in a square pan, the heat is trapped quite effectively. If you cut it right away, the internal pressure will push the moisture out, and you will end up with a dry dinner. Give it ten minutes to reach equilibrium.
Troubleshooting and Ingredient Optimization
Even with a foolproof blueprint, variables can shift. Perhaps the beef you purchased had a slightly different fat content, or your specific brand of savory stuffing mix had larger breadcrumbs than the one I used in my tests. Understanding how to adjust the system on the fly is the mark of a true kitchen engineer.
One question I often encounter is why we use a boxed stuffing mix instead of standard breadcrumbs. The answer lies in the ingredient list of the stuffing itself. Standard breadcrumbs are a blank canvas; they require you to add onion powder, garlic powder, dried celery, and a host of other spices to achieve a deep flavor. The stuffing mix is an all-in-one seasoning system. It already contains the dehydrated aromatics and fats needed to make the beef taste complex.
If you find that your mixture feels too wet after adding the water and eggs, do not panic. This sometimes happens if the eggs are particularly large (Jumbo vs. Large).
- If the mix is too loose: Add one tablespoon of dry stuffing mix at a time until it holds a shape when pressed.
- If the mix is too dry: Add one teaspoon of water at a time. The mix should look glistening but not dripping.
- If the top is browning too fast: Move the oven rack to a lower position for the final fifteen minutes.
Pro tip: If you want a more robust glaze, double the amount of ketchup and add a teaspoon of mustard or a drop of Worcestershire sauce to the top layer.
There is a distinct difference in the tactile feel of this recipe compared to others. When you are mixing it, it should feel like wet sand. If it feels like a thick paste, you have likely overworked the meat. If it feels like individual chunks of meat that are not sticking together, you may need to add one more tablespoon of the liquid to help the stuffing mix act as a bridge between the proteins.
I have also tested the “skillet meatloaf” variation that some people suggest for stovetop meatloaf recipes. In my findings, the skillet method is vastly inferior. The circular shape of a skillet creates uneven corners and often results in a meatloaf that is too thin, leading to rapid moisture loss. Stick to the 8×8 square pan for the most consistent thermal results. For another great dinner concept that relies on slow rendering and rich base flavors, try my Easy Beef Ragu: The Ultimate Flavor Secret.
Conclusion: Mastering the Foolproof Stovetop Meatloaf Blueprint
Engineering a recipe is about removing the variables that lead to failure. By choosing an 80/20 beef blend, we ensured the system had enough internal lubrication. By using exactly 1/2 cup of water, we optimized the structural integrity of the binder. And by selecting the 8×8 square pan, we created a perfect thermal environment for even cooking and moisture retention.
This method transforms a humble set of ingredients into a reliable, repeatable success. You no longer have to worry about whether your dinner will be dry or if it will fall apart on the plate. When you follow this blueprint, you are using physics and chemistry to your advantage. The result is a savory, moist meatloaf that satisfies every time.
I encourage you to try this specific 8×8 method and observe the differences for yourself. Pay attention to how the meat feels when you mix it and how the aroma changes as that ketchup glaze caramelizes in the final minutes of the bake. These sensory cues are your indicators of a system working exactly as intended.
If you have questions about the texture or if you noticed something interesting during your own testing process, please leave a comment below. I am always looking for more data to refine these systems even further. Mastering stovetop meatloaf recipes is just the beginning of what you can achieve when you take an analytical approach to your kitchen. Happy engineering, and enjoy your dinner.

Easy Stove Top Stuffing Meatloaf
Equipment
- 8×8 square baking pan
- Large mixing bowl
- Digital probe thermometer
Ingredients
Core Ingredients & Ratios
- 1.5 lbs Ground Beef Use 80/20 blend for ideal fat rendering
- 1 cup Boxed Stuffing Mix Acts as the binder/filler; provides seasoning
- 0.5 cup Water Content Must be cold; this is the critical threshold for structural integrity
- Eggs Quantity determined by the size needed to bind the mixture
Glaze
- Ketchup Use a thin layer for the glaze
Instructions
Assembly and Mixing
- Pre-hydrate the binder: Pour the cold water over the dry stuffing mix first and let it sit for sixty seconds.
- Add the ground beef and eggs to the bowl.
- Mix gently until the white flecks of the stuffing mix are evenly distributed throughout the red of the beef. Do not overwork the meat to avoid developing too much myosin.
- Gently pat the mixture into an 8 X 8 square pan. Do not press down with force; use your fingertips to create a firm but airy structure.
Baking and Finishing
- Spread a thin layer of ketchup on top of the meatloaf to create a protective thermal barrier.
- Bake at 350°F (175°C) for exactly 1 hour, or until the internal temperature reaches 160°F (71°C) in the thickest part of the center.
- Check for visual cues: The loaf should show a slight pull-away from the sides of the pan and there should be a steady sizzle coming from the corners.
- Rest the meatloaf for 10 minutes after removing it from the oven before slicing to allow internal pressure to equalize and retain moisture.


