The first time I attempted to construct a homemade cookie dough protein bar, the result was an absolute disaster. I had followed a popular recipe that promised a fudge-like consistency, yet what I pulled from my refrigerator was a crumbly, sandy mess that disintegrated the moment my knife touched it. It was a classic engineering failure: the structural integrity was non-existent because the recipe relied on fixed ratios that didn’t account for the unique absorption rates of different protein powders. That failure bothered me for days, leading me to treat my kitchen like a laboratory for the better part of a month as I isolated every possible variable.
I spent dozens of hours and several pounds of ingredients testing different binders, from melted fats and various syrups to complex flour blends. What I discovered was a revelation in its simplicity: the key to a perfect cookie dough protein bar isn’t a secret ingredient or a complicated layering process. It is the precise management of hydration through controlled water addition. Most recipes overcomplicate the system by adding more fat or dry flours to fix texture issues, which only adds unnecessary calories and variables. By treating water as the primary adjustable binder, I developed a blueprint that is both foolproof and remarkably streamlined.
This recipe represents the peak of my optimization efforts, focusing on a single-mix method that yields a consistent, sliceable bar every single time. We are bypassing the messy melting of oils and the gritty texture of added raw flours. Instead, we are focusing on a 10-minute preparation window followed by a 30-minute setting period, bringing the total time to just 40 minutes. This approach provides a reliable, repeatable outcome that satisfies the craving for real cookie dough while delivering a dense hit of protein. By the end of this article, you will understand exactly how to manipulate the viscosity of your mixture to achieve the perfect balance between a soft bite and a firm structure.
Table of Content
The Ultra-Simple Cookie Dough Protein Bar Recipe Blueprint
When I set out to engineer this specific blueprint, I established a strict set of criteria. The final product had to be firm enough to be portable, moist enough to mimic real dough, and simple enough to prepare without specialized equipment or advanced culinary techniques. This recipe yields 8 to 10 bars, depending on how you choose to portion them, and requires a total time of only 40 minutes from the first measurement to the final slice. My goal was to create a system that any home cook could replicate with total confidence.
I rigorously tested this recipe against versions that use melted coconut oil and those that rely on adding almond flour for bulk. In my comparative trials, the flour-based versions resulted in a much drier, almost cake-like bar that lacked the satisfying chew of a true cookie dough protein bar. On the other hand, versions utilizing melted fats required incredibly precise temperature management; if the oil was too warm, the mixture became greasy, and if it was too cold, the bars became brittle and shattered when cut. Our method, relying solely on water adjustment, provides superior structural integrity for slicing with only one bowl. That is why the water addition step is non-negotiable and must be handled with care.
Yield: 8 to 10 bars Prep Time: 10 minutes Chilling Time: 30 minutes Total Time: 40 minutes
- 1/2 cup almond butter
- 1/4 cup protein powder (I used half pea protein isolate and half brown rice protein)
- 1/4 cup maple syrup
- 2 tsp vanilla
- 1/4 tsp salt
- 1/3 cup cacao nibs
Pro tip: Use a room-temperature almond butter that has a pourable, drippy consistency to ensure the easiest initial mixing phase.
Ingredients
Selecting the right components is the first step in any successful engineering project. For this cookie dough protein bar, the ingredients were chosen not just for flavor, but for their functional roles in the final matrix. The almond butter acts as the primary fat source and base, providing a rich, nutty flavor that masks the sometimes-earthy notes of plant-based proteins. The maple syrup serves as both a sweetener and a secondary liquid binder, while the vanilla and salt are critical for depth of flavor, transforming a simple protein mix into something that tastes authentically like dessert.
The most critical component in this list is the protein powder. I found that using a blend of half pea protein isolate and half brown rice protein provides the best balance of smooth texture without excessive clumping, which is a common failure point in simpler recipes. Pea protein is highly absorbent and provides a soft, pliable structure, but it can sometimes be too soft on its own. The brown rice protein adds a slight grittiness that perfectly mimics the feel of granulated sugar in traditional cookie dough, while also providing the necessary rigidity to help the bars hold their shape. When these two are combined, they create a superior mouthfeel that single-source powders often lack.
Pro tip: Always measure your protein powder by leveling off the scoop or using a scale, as packing the powder too tightly into the measuring cup will lead to a dry, unworkable dough.
Instructions
- In a medium bowl, stir together the maple syrup, nut butter and vanilla until well combined.
- Mix in the salt and protein powder. Add water as needed starting with 1 tablespoon and gradually adding more. You want the batter to be quite thick so only add enough water to be able to thoroughly combine it.
- Line a 9×4 inch loaf pan (9×5 or 8×4 should work as well) with parchment or a silicone liner. Pour the batter into the pan and press it firmly into an even layer.
- Allow the bars to set for a minimum of 2 hours in the refrigerator or 30 minutes in the freezer.
- Use the liner to lift the bars onto a cutting board and slice into your desired shape and size. Store for later or enjoy!
I must explain that protein powders, especially isolates, absorb moisture very differently than traditional wheat flour. In Step 2, we control water addition specifically to reach a precise viscosity threshold necessary for successful pressing and clean slicing. This is the moment where most people fail; they either add all the water at once or none at all. By adding it incrementally, you allow the proteins to hydrate at a manageable rate, ensuring the final cookie dough protein bar has a cohesive structure rather than being a bowl of loose crumbles or a sticky paste. For another great dessert, try my recipe for Amazing Sourdough Banana Bread Secrets.
Pro tip: When pressing the mixture into the pan in Step 3, use the bottom of a flat measuring cup to achieve a perfectly level surface and a dense, professional-grade texture.
Engineering the Perfect Texture: Why Water, Not Fat, Is Your Binding Agent
One of the most common misconceptions in the world of healthy snacks is that you need an abundance of fat to create a moist texture. During my testing phases, I noticed that adding extra oil or nut butter often resulted in a bar that felt heavy and left a greasy residue on the palate. Furthermore, fats are highly sensitive to temperature. If you take an oil-bound bar out of the fridge on a warm day, it begins to lose its structural integrity almost immediately. By using a controlled amount of water as the primary binding agent alongside a stable base of almond butter, we create a far more resilient cookie dough protein bar.
Water works by hydrating the protein molecules and creating a network that traps the other ingredients in place. Think of it like making clay; you need just enough moisture to turn the dust into a workable medium. My analytical choice to use only water for binding simplifies the ingredient list while maintaining the necessary structural integrity needed for a clean, firm bar that does not crumble upon slicing. It allows the natural flavors of the almond butter and vanilla to shine through without being masked by the heavy mouthfeel of additional oils. This method also makes the bars more shelf-stable at room temperature for short periods, as there is no excess oil to separate or seep out.
The science here is simple: we are aiming for a specific moisture-to-solid ratio. When the protein powder is properly hydrated with water, it forms a pliable matrix that holds the cacao nibs in suspension. If the mixture is too dry, the nibs will simply fall out when you try to eat the bar. If it is too wet, the bars will be sticky and unappealing. By focusing on the water variable, you gain total control over the final output, allowing you to adjust for different brands of protein powder which may have varying levels of absorbency.
Pro tip: If you find your mixture is getting too tough to stir with a spoon, switch to using your hands to knead the dough; the warmth from your palms helps the almond butter incorporate more smoothly.
The Critical Adjustment: Visual Cues for Achieving Play-Doh Consistency
Because every brand of protein powder and nut butter has a slightly different moisture content, providing a fixed water measurement is a recipe for inconsistency. Instead, I want you to look for specific visual and tactile cues that indicate you have reached the ideal state. I call this the Play-Doh consistency. The dough should be thick, matte in appearance, and capable of being pressed into a ball that holds its shape without sticking to your fingers or cracking at the edges. If it looks like wet sand, it needs more hydration; if it looks like glossy frosting, it has too much.
To help you navigate this critical phase, I have compiled a troubleshooting guide based on the failures I encountered during my initial experiments. This table provides clear, actionable steps to correct the mixture before you commit to pressing it into the pan. Understanding these symptoms will allow you to adjust your cookie dough protein bar in real-time, ensuring a successful batch every single time.
| Symptom | Cause | Corrective Action |
|---|---|---|
| Mixture is crumbly and won’t hold shape | Too dry/Not enough water added | Add water 1 tsp at a time until a cohesive mass forms. |
| Mixture is sticky and smears on fingers | Too wet/Too much water added | Add protein powder 1 tsp at a time until the stickiness subsides. |
| Dough is oily and separating | Nut butter was too warm or over-mixed | Chill the mixture for 10 minutes before adding more dry protein powder. |
| Nibs are falling out of the dough | Lack of binding tension | Increase water by 1 tsp to improve the adhesive quality of the dough. |
When you reach the correct consistency, you will hear a faint, tacky sound as you stir the mixture. The aroma should be intensely savory from the almond butter, balanced by the sweet, floral scent of the vanilla. Visually, the dough should have a uniform, pale wheat color with the dark cacao nibs evenly distributed throughout. This sensory feedback is your best indicator that the structural engineering of your bar is complete and ready for the setting phase.
Optimized Assembly: Skip the Layers, Skip the Melt
Many recipes for a cookie dough protein bar suggest a complex process involving multiple layers or melting ingredients over a stove. My testing proved that these extra steps are largely unnecessary and often introduce more points of failure. Melting nut butter and syrup can lead to scorched flavors or a broken emulsion where the oil separates from the solids. By using a single-mix, cold-press method, we eliminate these risks entirely. The assembly becomes a simple matter of transfer and compression, which is far more efficient for a busy home cook.
Pressing the mixture firmly into a lined pan, as specified in Step 3 of the instructions, is superior to layering because it creates a homogenous structure. When you apply pressure, you are forcing the air pockets out of the dough, which increases the density and ensures the bar won’t fall apart when you take a bite. This compression also helps the cacao nibs bond with the surrounding dough. I have found that skipping the melt and layer process eliminates variables like fat re-solidification temperature issues, ensuring a predictable result every time, making this an easy protein bar recipe for anyone to master.
The choice of pan also matters. I recommend a 9×4 inch loaf pan because it provides the ideal thickness for a standard bar. If you use a pan that is too large, the bars will be thin and flimsy; if it is too small, they will be overly thick and difficult to bite through. Lining the pan with parchment paper or a silicone liner is a critical detail that should not be overlooked. It allows you to lift the entire block of dough out of the pan cleanly, giving you a flat, stable surface for slicing perfectly uniform bars.
Pro tip: Leave a bit of parchment paper hanging over the long sides of the pan to create handles, making it effortless to lift the set bars out without damaging the edges.
Practical Considerations: Yield, Variations, and Storage Viability
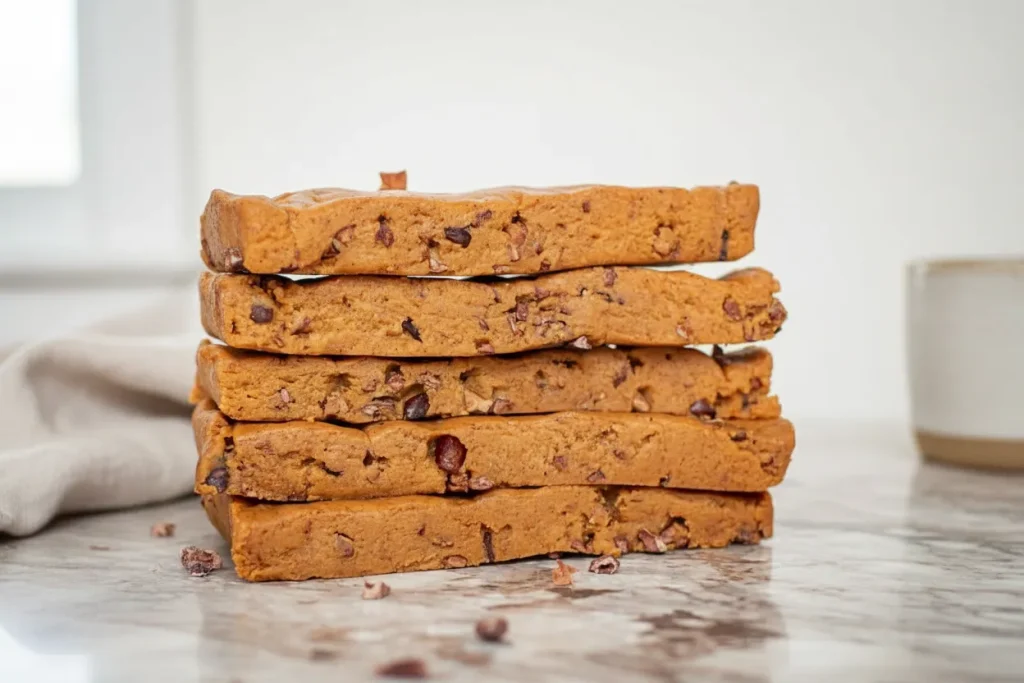
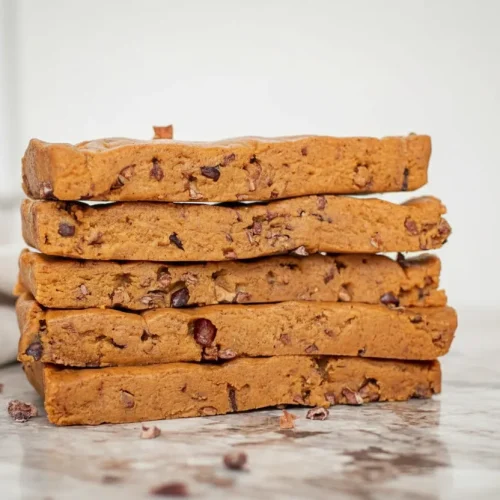
Once the setting process is complete, you are left with a dense, nutrient-rich block ready for portioning. Based on using a 9×4 pan, this recipe is best sliced into 8 to 10 bars. This size provides an optimal balance of satisfaction and portability. I typically use a large, sharp chef’s knife to make clean, vertical cuts. If the knife feels like it is sticking, I quickly wipe it with a damp cloth between slices to maintain the professional appearance of the edges. The cacao nibs provide a wonderful crunch that mimics chocolate chips but with a deeper, more sophisticated bitterness.
For those who want to experiment with flavor, there are several simple variations I have tested. If you prefer a sweeter profile, you can replace the cacao nibs with mini chocolate chips or even a combination of both. I have also found that adding a teaspoon of cinnamon or a handful of freeze-dried raspberries can completely change the character of the bar without affecting the structural integrity. The key is to keep any added dry inclusions to about 1/3 cup so you do not overwhelm the binding capacity of the dough.
Storage is where the engineering of the moisture levels really pays off. These bars have high fridge stability and can be stored in an airtight container for up to 2 weeks. However, I have noted that room temperature storage results in texture degradation after about 2 days. The bars will begin to soften significantly, and you may notice slight oil separation as the almond butter reacts to the ambient heat. For this reason, refrigeration is mandatory for longevity and to maintain that specific cookie dough texture. If you need to take them on the go, they will hold their shape for several hours in a gym bag, but they are best enjoyed chilled.
Pro tip: For the best texture, let the bar sit at room temperature for about five minutes before eating; this allows the almond butter to soften just enough to give it that melt-in-your-mouth dough feel.
Frequently Asked Questions
Regarding the 3-Ingredient Goal
I often get asked why I use six ingredients when there are so many 3-ingredient recipes online. The reality is that those ultra-simplified versions often fail the texture test. A true 3-ingredient version usually requires protein powder, a binder like dates or a specialty syrup, and a single flavor. Our version is superior because it controls the critical water variable and includes salt and vanilla, which are essential for making a protein bar actually taste like a cookie dough protein bar. The addition of water, specifically, makes this far more reliable than recipes that rely on the inconsistent moisture found in different brands of nut butters or syrups.
Chilling Time and Texture Impact
Is it really necessary to wait two hours? In my testing, the minimum 2 hours in the fridge is what allows the protein powder to fully hydrate and the fats in the almond butter to firm up, setting the structure for clean slicing. If you try to cut them too early, you will end up with jagged edges and a sticky mess on your knife. If you are in a rush, freezing for 30 minutes achieves a similar level of firmness much faster. However, keep in mind that freezing results in a slightly firmer bar initially; you may need to let it sit for a few minutes longer before it reaches the ideal eating consistency compared to the refrigerated version.
Can I Substitute the Almond Butter?
You can certainly use other nut or seed butters, but you must be aware of their oil content. Cashew butter is a great alternative that provides a very neutral, dough-like flavor, but it is often thicker than almond butter and may require an extra teaspoon or two of water. Peanut butter works perfectly but will obviously result in a very strong peanut flavor. If you use a seed butter like sunflower butter, be prepared for a slightly more bitter aftertaste and a possible green tint due to the reaction between the seeds and the leavening agents in some protein powders, though that is less common in this specific raw application.
Conclusion: The Final Verdict on This Easy Protein Bar Recipe
The journey to creating the perfect cookie dough protein bar taught me that even the simplest recipes benefit from an engineering mindset. By identifying the water addition as the primary variable and mastering the single-mix technique, we have eliminated the frustrations of crumbly or overly sticky bars. This blueprint provides a reliable way to enjoy a high-protein snack that genuinely captures the essence of raw cookie dough without the mess or the complexity of traditional baking.
The Winning Angle here is the absolute focus on the bind without unnecessary fillers. We have prioritized structural integrity and ease of assembly, ensuring that anyone can produce a professional-quality protein bar in their own kitchen. There is no need for specialized gear or a pantry full of rare flours. All you need is a bowl, a spoon, and the willingness to pay attention to the visual cues of the dough as it forms.
I encourage you to mix up a batch this weekend and see the results for yourself. Once you have mastered the water adjustment, I would love for you to comment below and share how much liquid your specific protein powder required. Every piece of data helps the community refine their own process. If you found this blueprint helpful, share it with others who are looking for a truly simple protein bar recipe that actually works. Let’s keep engineering better results in the kitchen, one batch at a time.
Cookie Dough Protein Bars
Equipment
- medium mixing bowl
- 9×4 inch loaf pan (or similar size)
- Parchment or silicone liner
- Measuring cups and spoons
- Spatula or sturdy spoon
- Sharp knife for cutting
Ingredients
Main Components
- 1/2 cup almond butter Use room-temperature, pourable consistency
- 1/4 cup protein powder Use half pea protein isolate and half brown rice protein
- 1/4 cup maple syrup
- 2 tsp vanilla
- 1/4 tsp salt
- 1/3 cup cacao nibs
Adjustable Binding Agent (Added During Mixing)
- As needed tablespoon/tsp water Start with 1 tbsp, add gradually until a thick, cohesive mass forms that holds shape without sticking.
Instructions
Mixing and Binding
- In a medium bowl, stir together the maple syrup, nut butter (almond butter), and vanilla until well combined.
- Mix in the salt and protein powder.
- Add water as needed, starting with 1 tablespoon and gradually adding more. You want the batter to be quite thick; only add enough water to be able to thoroughly combine it, aiming for a Play-Doh consistency.
- Stir in the cacao nibs until evenly distributed.
Setting and Slicing
- Line a 9×4 inch loaf pan (9×5 or 8×4 will also work) with parchment or a silicone liner, ensuring there are handles hanging over the sides.
- Pour the batter into the pan and press it firmly and evenly into the liner using the bottom of a flat measuring cup to ensure a dense texture.
- Allow the bars to set for a minimum of 2 hours in the refrigerator or 30 minutes in the freezer.
- Use the liner handles to lift the solidified block out of the pan onto a cutting board. Wipe a sharp knife with a damp cloth between cuts for cleaner slices.
- Slice into 8 to 10 uniform bars and store immediately in an airtight container in the refrigerator.