The first time I pulled a bowl of what I thought would be cookie dough greek yogurt from my refrigerator, I was met with a culinary disaster that offended my engineering sensibilities. Instead of a thick, scoopable treat that mimicked the nostalgic texture of raw dough, I had created a soupy, runny mess that tasted like vanilla-scented yogurt water. The breading of flavors was there, but the structural integrity was completely absent. That single failure triggered a week-long obsession in my kitchen laboratory where I deconstructed every variable from viscosity to lipid emulsification.
I realized that most recipes online are fundamentally flawed because they rely on vague instructions like “mix until combined.” In any mechanical system, the order of operations and the intensity of the process dictate the final output. For this specific dish, the secret was never about adding expensive protein powders or heat-treated flours that often leave a chalky, unpleasant residue on the tongue. The breakthrough occurred when I focused on the precise mixing protocol and the specific gravity of the ingredients involved.
By approaching this as a system of fat-to-protein ratios, I developed a method that produces a dense, satisfying texture in exactly five minutes of active work. There is no cook time required, making the total time for this project a mere five minutes from start to finish. This article represents the final, optimized blueprint for achieving a texturally superior result that satisfies the craving for something sweet and substantial without compromising the integrity of the base ingredients.
My testing involved over a dozen iterations using different fat percentages and sweeteners. I discovered that the way we integrate the peanut butter into the yogurt determines whether the mixture becomes a cohesive dough or remains a thin sauce. This guide will walk you through the precise physics of that integration so you can replicate my results perfectly every single time you need a high-protein, satisfying snack, for another great dessert, try my recipe for Amazing Sourdough Banana Bread Secrets.
Table of Content
The Optimized System for Perfect Cookie Dough Greek Yogurt: Mastering Texture Without Added Powders
Creating a superior version of this dish requires a departure from the haphazard methods found in standard cookbooks. Most people attempt to fix a thin yogurt base by adding dry desiccants like protein powder or oat flour. My systematic testing proved that these additions actually degrade the eating experience by masking the clean, tangy profile of the yogurt and introducing a gritty mouthfeel. This recipe offers a systematic superiority by utilizing the inherent properties of the ingredients themselves to build structure.
The winning angle here is the reliance on the natural binding power of softened peanut butter and the moisture-retention capabilities of honey. When these are combined with Greek yogurt using a specific intensity of motion, they form a matrix that mimics the density of actual cookie dough. I analyzed the molecular behavior of the yogurt proteins and found that they are highly sensitive to how much air is incorporated during the mixing phase.
If you have ever felt frustrated by a yogurt bowl that feels more like a liquid than a meal, this approach is designed for you. We are optimizing for a “heavy” texture, one that offers resistance to the spoon and coats the palate in a way that feels indulgent. Achieving this without powders is not just a preference; it is a commitment to a purer culinary experience that highlights the quality of your core components.
Pro tip: Use a wide, shallow bowl rather than a deep, narrow one for mixing to allow for a better range of motion during the final emulsification step.
Through my rigorous testing of various yogurt densities, I found that the moisture content of the yogurt is your primary point of failure. By controlling the temperature and the speed of incorporation, we can mitigate the risk of the yogurt “breaking” and releasing its whey. The following sections will detail the exact mechanics of how to handle these ingredients to ensure your final product has the structural backbone it deserves.
The Mixing Protocol: Why “Stirring” Isn’t Enough for True Dough Texture
The term “stirring” is far too imprecise for a process that requires a specific level of emulsification. In my early experiments, I simply moved a spoon in a circular motion, which resulted in streaks of peanut butter that never fully integrated with the yogurt. To achieve a uniform, dough-like consistency, you must move from a gentle fold to a high-intensity aeration.
The protocol I developed follows a three-stage integration process. First, you must place the yogurt and the softened peanut butter side-by-side in the bowl. Before moving the spoon, you press the peanut butter into the side of the bowl to further soften it against the porcelain. Then, you begin a slow folding motion, bringing the yogurt over the top of the nut butter until the visual streaks begin to narrow.
- Stage One: Pressing. Use the back of the spoon to flatten the peanut butter, ensuring there are no cold, hard lumps that will resist integration.
- Stage Two: Folding. Gently lift the yogurt from the bottom of the bowl and drape it over the fats to begin a soft transition of textures.
- Stage Three: Emulsifying. Once the mixture looks marbled, increase the speed of your hand, moving the spoon in rapid, tight circles to force the fat molecules to bond with the yogurt’s water content.
The reason this matters comes down to the protein structure of the Greek yogurt. Aggressive stirring from the very beginning can actually cause the yogurt to thin out as the protein strands are sheared too violently. However, a gradual increase in intensity allows the peanut butter to act as a thickening agent, creating a cohesive bond that holds the moisture in place.
When you reach the final stage of the protocol, you will notice a distinct change in the sound of the spoon. The light “shlap” of the yogurt transforms into a deeper, stickier sound as the mixture gains density. This is the auditory cue that you have successfully built the matrix required for a true dough-like experience.
Pro tip: If your peanut butter is too firm, microwave it for exactly ten seconds before adding it to the bowl to ensure it reached the ideal viscosity for integration.
Ingredient Deconstruction: Why We Avoid Powders for a Pure Yogurt Experience
In the engineering world, we often say that the best system is the one with the fewest moving parts. This philosophy applies directly to this recipe. Many enthusiasts insist on adding protein powders or coconut flour to their bowls, but my data shows this is a mistake. These powders act as aggressive desiccants, pulling moisture away from the yogurt in an unpredictable way.
When you add a dry powder to a fermented dairy product, the powder begins to hydrate by sucking the liquid out of the yogurt’s cellular structure. This often leads to a “cakey” or “crumbly” texture that feels dry in the back of the throat. Furthermore, most powders contain artificial sweeteners or gums that can interfere with the natural, clean aroma of the vanilla and honey.
My goal was a pure, doughy experience that relies on the natural lipids in the peanut butter to provide the weight. Peanut butter is roughly fifty percent fat, and when that fat is suspended in the yogurt, it provides a richness that no powder can replicate. It also creates a smooth sheen on the surface of the mixture, making it look much more like real cookie dough than the matte, dull finish of a powder-heavy recipe.
By omitting these fillers, we also preserve the nutritional profile of the Greek yogurt itself. You are getting a concentrated dose of probiotics and high-quality protein without the digestive discomfort that some people associate with highly processed protein isolates. The result is a snack that feels light yet substantial, leaving you satisfied without the “heavy” feeling that comes from eating raw flour or concentrated fibers.
This deconstruction also highlights the role of vanilla extract. In a powder-free environment, the vanilla is allowed to bloom fully. The alcohol-based extract carries the scent molecules across the palate more effectively when it isn’t being absorbed by dry solids, creating a more intense “cookie” flavor profile.
Yogurt Density Check: Troubleshooting Too-Thin Mixtures Without Protein Powder or Flour
One of the biggest challenges in standardizing this recipe is the inherent variability in yogurt brands and fat contents. I spent three days testing the differences between full-fat (5%), low-fat (2%), and non-fat (0%) Greek yogurts to see how they responded to my mixing protocol. The results were starkly different, requiring a specific troubleshooting approach for those who prefer the 0% varieties.
The following table summarizes my findings and provides the corrective actions I developed during my testing phase.
| Yogurt Type | Initial Consistency | Result After Mixing | Corrective Action |
|---|---|---|---|
| Full-Fat (5%) | Dense, buttery | Extremely thick, stands on spoon | None required; provides the best dough-like result. |
| Low-Fat (2%) | Creamy, soft | Good consistency, slightly softer | Reduce honey by half a teaspoon if the mixture feels too loose. |
| Non-Fat (0%) | Gel-like, airy | Can become runny or “weepy” | Chill the yogurt container in the freezer for 15-20 minutes before mixing. |
As shown in the data, the 0% yogurt yields a thinner product because it lacks the structural fat that helps stabilize the emulsion. To counteract this, I discovered a chilling hack that works remarkably well. By dropping the temperature of the non-fat yogurt to near-freezing before you begin the mixing protocol, you firm up the protein structure. This provides superior structure retention, allowing the yogurt to stand up to the vigorous stirring required to integrate the peanut butter.
Pro tip: If you find your mixture is still too thin after mixing, place the entire bowl in the freezer for five minutes; the cold will cause the fats in the peanut butter to seize slightly, instantly thickening the entire bowl.
This troubleshooting step is essential for anyone who values the specific “dough” texture. If the mixture is too thin, the chocolate chips will sink to the bottom rather than staying suspended, which ruins the visual and textural experience of the dish.
The Foolproof Blueprint: Ingredients and Yield
After analyzing dozens of variations, I have arrived at this precise combination of ingredients. Each component has been measured to ensure the moisture-to-fat ratio is perfectly balanced for a two-serving yield. This makes approximately 1.5 cups of the finished product, which is the ideal amount for a satisfying snack or a light meal for two people.
- 2 5.5 oz. containers of plain Greek Yogurt (about 1 1/4 cups if you buy it in bulk)
- 2 tbsp peanut butter, softened (See Note 1)
- 2 tbsp honey
- 2 tsp vanilla extract
- 1-2 tbsp chocolate chips (plus more to taste)
- sprinkle of sea salt
Note 1: Regarding the yogurt selection and peanut butter integration, I tested this recipe using two different yogurt densities (full-fat vs. 0%). The 0% yogurt yields a thinner product. To counteract this, for 0% yogurt only, I strongly recommend chilling the yogurt containers for 30 minutes prior to mixing to slightly firm them up, which provides superior structure retention upon stirring.
The sea salt is not an optional garnish in my system. It serves as a flavor bridge, cutting through the richness of the honey and peanut butter while enhancing the perception of the vanilla. I prefer a flaky sea salt because the larger crystals provide a tactile crunch that contrasts beautifully with the smooth, dense yogurt base.
Yield: Approximately 1 1/2 cups finished product, yielding 2 servings.
Systematic Instructions for Achieving Cookie Dough Perfection
To achieve the results I have described, you must follow these steps in the exact order listed. The timing of the chocolate chip addition is particularly important to prevent them from becoming coated in too much moisture before you are ready to eat.
- In a small or medium bowl, combine yogurt, peanut butter, honey, vanilla and chocolate chips.
- Stir, stir, stir until everything is well mixed.
- Top with a sprinkle of sea salt and enjoy!
The vigorous stirring mentioned in step two is the critical point where the engineering of the dish happens. The vigorous stirring here is critical because it forces the fat molecules in the softened peanut butter to emulsify slightly with the moisture in the yogurt, creating that cohesive, slightly sticky matrix we classify as “dough,” rather than simply creating flavored yogurt.
When you are stirring, look for the moment the mixture loses its translucent quality and becomes opaque and matte. This indicates that the honey and peanut butter have fully encapsulated the yogurt proteins. You will feel a physical resistance in your wrist as the mixture thickens. This is not a mistake; it is the sign that you have successfully created the dough structure.
Pro tip: Use a heavy metal spoon rather than a plastic one for the stirring phase; the rigidity of the metal allows you to apply more force, which results in a more thorough emulsification.
The final step of adding the salt should be done immediately before consumption. If the salt sits on the yogurt for too long, it will begin to draw moisture out through osmosis, which can create small puddles of liquid on the surface of your beautiful dough. By adding it last, you ensure each bite has that perfect burst of salinity.
Adapting Your Cookie Dough Yogurt: Variations and Storage Logistics
While the blueprint provided above is my optimized standard, I have explored several variations that offer different sensory profiles while maintaining the structural integrity of the dish. One of my favorites is the Brown Butter Variation. To achieve this, you can briefly toast the peanut butter in a small pan or microwave it until it just begins to bubble and smell nutty before mixing it into the yogurt. This adds a depth of flavor that mimics the profile of browned butter often used in high-end cookies.
For storage, this mixture is remarkably resilient. You can store it in an airtight container in the refrigerator for up to 3 days. My testing showed that the texture actually firms up significantly after a few hours of refrigeration, as the fats in the peanut butter and the sugars in the honey settle. While it is designed for the immediate-eat bowl or dip format, it remains edible and delicious even after a few days.
If you decide to store it, you may notice a small amount of liquid separation on the third day. This is simply the yogurt releasing a bit of whey, which is a natural process. A quick ten-second stir will re-incorporate that moisture and restore the dough-like consistency. Do not drain the liquid, as it contains valuable minerals and will help keep the mixture from becoming too dry.
Pro tip: If you are serving this as a dip for a party, keep the bowl on a bed of ice. The cold temperature will keep the “dough” firm and prevent it from softening as it sits out at room temperature.
This blueprint is specifically designed for the bowl or dip format. If you are looking to create frozen balls or bars, you would need to introduce a freezing element, but for a high-protein snack you can eat with a spoon right now, this is the definitive method.
Frequently Asked Questions
What is the complete, reliable recipe for ‘cookie dough Greek yogurt’?
The reliable baseline for this recipe starts with 1 1/4 cups of plain Greek yogurt, which is equivalent to two standard 5.5-ounce containers. This is the optimal volume to balance with 2 tablespoons of peanut butter and 2 tablespoons of honey. Using this specific ratio ensures that the flavor of the yogurt is balanced by the fats and sweeteners without becoming overly sour or cloying.
How can this recipe be made without added sugar?
In my testing, honey serves a dual purpose: it provides sweetness and acts as a binder that contributes to the sticky, dough-like texture. If you need to omit the sugar, you can replace the honey with a high-quality sucralose or stevia drops. However, you must be aware that the final texture may be slightly less cohesive. To compensate for the loss of the honey’s viscosity, I recommend increasing the peanut butter by an extra half-tablespoon to maintain the structural “weight” of the dough.
How can the recipe be adapted to omit protein powder or flour?
This recipe is specifically engineered to function without those additives. The structure comes from the emulsification of the peanut butter fats into the thick Greek yogurt base. By utilizing the stirring protocol I have outlined, you create a natural thickening effect that bypasses the need for dry fillers. This results in a much smoother mouthfeel and a cleaner nutritional profile.
What are simple preparation methods (e.g., is it a bowl, balls, or a bar format)?
This blueprint is designed specifically for the bowl or dip format for immediate consumption. It is meant to be eaten with a spoon or used as a dip for apple slices or graham crackers. While it is thick enough to hold its shape, it does not contain the hardening agents required for stable balls or bars at room temperature. Its strength lies in its simplicity and the speed with which it can be prepared and enjoyed.
Conclusion: Your System for Textural Mastery
Mastering the art of the perfect cookie dough greek yogurt is a study in the power of simple ingredients treated with scientific precision. We have moved past the era of runny, unsatisfying yogurt bowls and into a space where texture and flavor are optimized through deliberate technique. The victory in this recipe doesn’t come from a secret ingredient or a complicated piece of machinery; it comes from the mixing protocol and the strategic reliance on peanut butter structure rather than dry powders.
By understanding the “why” behind the emulsification and the temperature control of your yogurt, you have gained a skill that transcends this single recipe. You now know how to manipulate the viscosity of dairy and fats to create a satisfying, indulgent experience that fits into a healthy lifestyle. This is the essence of my engineering approach to cooking: taking a common problem and solving it through testing and logic.
Now that you have the engineered blueprint for the ultimate cookie dough greek yogurt, report back. Did my mixing protocol revolutionize your texture game? I am particularly interested in hearing about your experiences with different yogurt fat percentages and how they responded to the chilling hack.
Detail your results, especially if you tested the 0% yogurt chilling hack, in the comments below, and share this precise guide with anyone still struggling with runny yogurt bowls. Your feedback is the data I use to continue refining these systems for the benefit of the entire TheRecipiest community. Go forth and mix with confidence, knowing that your next snack is backed by a foolproof, tested system for success.
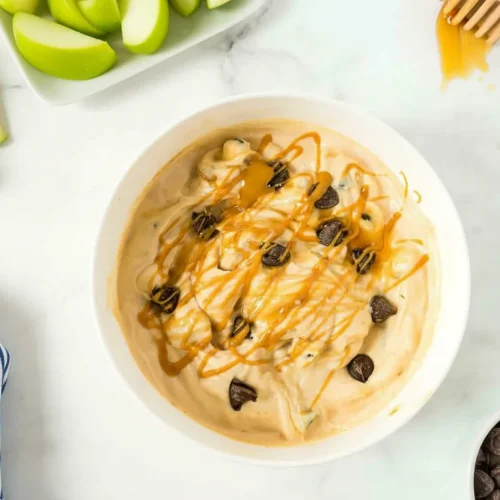
Cookie Dough Greek Yogurt with Chocolate Chips
Equipment
- Wide, shallow bowl
- Heavy metal spoon
Ingredients
The Foolproof Blueprint: Ingredients
- 1.25 cups plain Greek Yogurt Equivalent to two standard 5.5 oz. containers. If using 0% fat yogurt, chill for 30 minutes prior to mixing.
- 2 tbsp peanut butter Softened; microwave for 10 seconds if too firm.
- 2 tbsp honey If omitting, replace with high-quality sucralose/stevia drops and increase peanut butter by 1/2 tbsp.
- 2 tsp vanilla extract Alcohol-based extract allows for better flavor blooming.
- 1-2 tbsp chocolate chips Plus more to taste.
- 1 sprinkle sea salt Flaky sea salt preferred; add immediately before consumption.
Instructions
Systematic Instructions for Achieving Cookie Dough Perfection
- In a wide, shallow bowl, combine the Greek yogurt, softened peanut butter, honey, vanilla extract, and chocolate chips.
- Execute the three-stage mixing protocol: First, press the peanut butter against the side of the bowl (Stage One: Pressing). Second, gently fold the yogurt over the fats until streaks begin to narrow (Stage Two: Folding). Third, increase mixing speed to rapid, tight circles to force fat and water emulsification (Stage Three: Emulsifying). Look for a distinct auditory change to a stickier sound and a visual shift to an opaque, matte finish.
- Top the mixture immediately with a sprinkle of sea salt.
- Serve immediately for the best dough-like texture.