
My journey to mastering the chicken oyakodon recipe was paved with a few early missteps. My first attempts resulted in chicken that was far too tough and eggs that resembled rubber more than a silky, flavorful topping. I knew there had to be a better way to unlock that authentic, comforting taste.
Then came the “aha!” moment: a touch of apple cider vinegar in the broth and a specific egg-cooking technique. These two adjustments transformed the dish completely. The vinegar tenderized the chicken, while the egg technique created the perfect balance of textures.
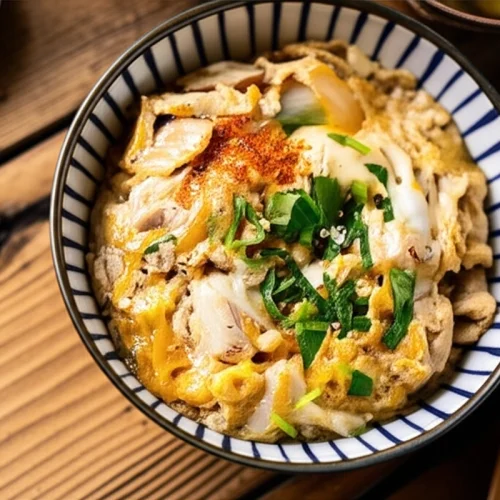
This is my precise guide to authentic Oyakodon, designed to help you unlock the true flavors of this classic dish while avoiding common pitfalls. Prep time is about 15 minutes, cook time is 10 minutes, bringing the total time to just 25 minutes. I’m confident this chicken oyakodon recipe will become a regular in your kitchen.
Table of Content
Broth Brilliance: Why Apple Cider Vinegar is the Key to Tender Chicken
I consider a seemingly small addition, apple cider vinegar, to be the unsung hero of this recipe. Marinating the chicken in a broth containing apple cider vinegar isn’t just about adding flavor; it’s a crucial step in achieving that melt-in-your-mouth tenderness.
The secret lies in the acetic acid present in the vinegar. This acid works to gently denature the proteins in the chicken.
I’ve found that this process subtly breaks down the protein structure, resulting in a more tender texture when cooked. It’s a delicate balance; too much vinegar, and the chicken can become mushy, but just a teaspoon creates a noticeable difference. I use only 1 teaspoon of apple cider vinegar.
The tenderizing effect is also amplified by the sogigiri cutting technique, which I’ll explain in the instructions. It is a one-two punch of flavor and texture.
Egg-cellent Technique: The Secret to the Perfect Oyakodon Egg Texture
Achieving the ideal egg texture in Oyakodon requires a bit of finesse. I’ve learned that a few common mistakes can lead to less-than-perfect results, but thankfully, each has a simple solution. The goal is a harmonious blend of creamy and slightly set eggs, blanketing the chicken and rice.
| Mistake | Solution |
|---|---|
| Over-whisking the eggs | Gently “cut” the egg whites with chopsticks instead of whisking. Aim for a marbled appearance with distinct whites and yolks. This prevents a homogenous, rubbery texture. |
| Cooking at too high a heat | Maintain medium-low heat to prevent the eggs from cooking too quickly and becoming rubbery. Adjust the heat as needed to ensure a gentle simmer. If the egg is moving toward the edges of the pan, gently gather it toward the center where the heat is not as strong. |
| Not adding eggs in two stages | Drizzle two-thirds of the eggs first, allowing them to partially set, before adding the remaining one-third. This creates a layered texture with both set and runny portions. |
| Uneven egg distribution | When drizzling the eggs, focus on adding more egg whites in the first stage, as they take longer to cook. In the second stage, prioritize egg yolks for a vibrant color and richness. You can add a beaten extra yolk at the end for a better presentation. |
Ingredients
- ½ onion ((4 oz, 113 g; peeled))
- 10 oz boneless, skinless chicken thighs
- 1 Tbsp broth ((for marinating the chicken; add 1 tsp apple cider vinegar))
- 3-4 large eggs (50 g each w/o shell)
- ½ cup dashi (Japanese soup stock)
- 2 Tbsp soy sauce
- 2 Tbsp mirin
- 2 tsp sugar
- 2 servings cooked Japanese short-grain rice ((typically 1⅔ cups (250 g) per donburi serving))
- 4 sprigs mitsuba (Japanese parsley) ((or green onion/scallion))
- shichimi togarashi (Japanese seven spice) ((optional))
- Japanese sansho pepper ((optional))
I tested this recipe with and without the apple cider vinegar. The batch made without ACV resulted in chicken that was noticeably tougher and less flavorful, so it is an essential ingredient. The key to a great chicken oyakodon recipe starts with quality ingredients.
Instructions
- For the steamed rice, please note that 1½ cups (300 g, 2 rice cooker cups) of uncooked Japanese short-grain rice yield 4⅓ cups (660 g) of cooked rice, enough for 2 donburi servings (3⅓ cups, 500 g). See how to cook short-grain rice with a rice cooker, pot over the stove, Instant Pot, or donabe.
- This recipe includes both cooking methods—using a medium frying pan (about 10 inches/25 cm) and an oyakodon pan or small frying pan (8 inches/20 cm). Typically, oyakodon is made individually for each serving using an oyakodon pan, which lets you slide the cooked ingredients onto the rice bowl easily. See the separate cooking instructions below.
- Gather all the ingredients. Do not make more than two servings in a medium frying pan. I explained a bit more in the blog post (under Oyakodon Cooking Tips). If you are making four servings, use two medium frying pans.
- Combine ½ cup dashi (Japanese soup stock), 2 Tbsp soy sauce, 2 Tbsp mirin, and 2 tsp sugar in a bowl or a liquid measuring cup and mix all together until the sugar is dissolved.
- Slice ½ onion lengthwise, about ¼ inch (6 mm) wide.
- Chop 4 sprigs mitsuba (Japanese parsley) ½ inch (1.3 cm) wide.
- Trim the extra bits of fat and connective tissue from 10 oz boneless, skinless chicken thighs with the knife. Cut the chicken thigh along the grain into strips ¾–1 inch (2–2.5 cm) wide. Next, angle your knife back and diagonally (nearly parallel to the cutting board), and then slice the chicken strips against the grain into pieces about ¾–1 inch (2–2.5 cm) square. This sogigiri cutting technique gives the chicken pieces equal thickness and creates more surface area for fast cooking and better absorption of the flavors.
- Transfer the chicken to a bowl or tray and sprinkle with 1 Tbsp broth. Set aside for 5 minutes.
- Crack 3-4 large eggs (50 g each w/o shell) into a bowl. Using a pair of chopsticks, lift the egg whites to “cut“ them 5–6 times into a few smaller clumps. This will prevent the egg whites from falling into the frying pan all at once. Do not whisk or beat the eggs together. Tip: Aim for high color contrast between the white and yellow parts of the eggs in your finished dish.
- While “cutting“ the egg whites, you may have accidentally broken some of the egg yolks. That‘s okay. If the yolks haven‘t broken yet, you can poke them to gently break them, but do not blend the egg whites and yolks. The eggs should resemble a marble pattern.
- With the stove off, add the sliced onions to a medium frying pan (I use a well-seasoned 11” carbon steel pan) in a single layer. Then, add the seasonings mixture. It should just cover the onions. If not, your frying pan is too big and you need to either increase the seasoning or use a smaller pan.
- Turn on the heat to medium and bring it to a simmer. Once simmering, add the chicken on top of the onions.
- Make sure the onions and chicken are evenly distributed. Once simmering again, lower the heat to medium low. Cook, uncovered, for 5 minutes or until the chicken is no longer pink and the onions are tender. Halfway through, flip the chicken. Tip: Evaporation reduces the sauce and intensifies the flavor.
- We will add the eggs in two stages: Two-thirds of the eggs first, then the remaining one-third later. Now, increase the heat to medium. With the cooking liquid simmering (small bubbles around the edges), drizzle two-thirds of the eggs in a circular pattern over the chicken and onions, avoiding the edges of the pan where the eggs can easily overcook. Tip: Only drizzle the eggs if the cooking liquid is simmering, as with Egg Drop Soup. Also, try to add more egg whites at this stage, as the whites take longer to cook than the yolks. Ideally, we want to keep the yolks soft and runny for the final presentation.
- If the heat is too strong, lower the heat. If the egg is moving toward the edges of the pan, gently gather it toward the center where the heat is not as strong. Optionally, you can cover the pan if the egg whites are taking a long time to set.
- When the eggs are still runny but just set, add the rest of the eggs to the center and around the edges of the pan. Add the mitsuba (or green onion) on top and cook on medium low until the egg is done to your liking. Usually, oyakodon in Japan is served while the egg is almost set but still runny (raw eggs are safe to consume in Japan). Tip: For the remaining one-third of the egg, try to distribute more egg yolks so the oyakodon will have a bright yellow color on top. For a good presentation, you can add a beaten extra yolk at the end.
- Serve steamed rice in individual serving bowls. Spoon the cooked chicken and egg mixture onto the steamed rice and drizzle the desired amount of pan sauce on top.
- Cook the chicken and egg in two batches, one serving at a time. Make sure to divide the ingredients in half. With the stove off, add half of the sliced onions to the pan in a single layer. Add half of the seasonings mixture (it should just cover the onions).
- Turn on the heat to medium and bring it to a simmer. Once simmering, add half of the chicken on top of the onions.
- Make sure the onions and chicken are evenly distributed. Once simmering, lower the heat to medium low. Cook, uncovered, for 4 minutes or until the chicken is no longer pink and the onions are tender. Halfway through, flip the chicken. Tip: Evaporation helps to reduce the sauce and intensify the flavor.
- We will add the eggs in two stages: Two-thirds of the eggs first, then the remaining one-third later. Now, increase the heat to medium. With the cooking liquid simmering (small bubbles around the edges), drizzle two-thirds of the eggs in a circular pattern over the chicken and onions, avoiding the edges of the pan where the eggs can easily overcook. Tip: Only add the eggs if the cooking liquid is simmering, as with Egg Drop Soup. Also, try to add more egg whites at this stage, as they take longer to cook than the yolks. Ideally, we want to keep the yolks soft and runny for the final presentation.
- When the eggs are still runny but just set, add the rest of the eggs to the center and around the edges of the pan. Add the mitsuba (or green onion) on top and cook on medium low until the egg is done to your liking. Usually, oyakodon in Japan is served while the egg is almost set but still runny (raw eggs are safe to consume in Japan). Tip: For the remaining one-third of the egg, try to distribute the egg yolk so the oyakodon will have a bright yellow color on top. For a good presentation, you can add a beaten extra yolk at the end.
- Portion 2 servings cooked Japanese short-grain rice into individual donburi or other serving bowls. Slide the cooked chicken and egg mixture onto the steamed rice and drizzle the desired amount of pan sauce on top. Repeat Steps 1 to 6 with the remaining ingredients.
- Serve the Oyakodon with optional shichimi togarashi (Japanese seven spice) for a spicy kick and Japanese sansho pepper for a peppery fragrance on the side.
- You can keep the leftovers in an airtight container and store in the refrigerator for up to 2–3 days.
Following these instructions closely is the surest path to a perfect chicken oyakodon recipe.
Frequently Asked Questions
What makes an oyakodon “good”? (flavor secrets, techniques)
In my opinion, a truly great oyakodon hinges on a harmonious balance of flavors and textures. The flavor secrets lie in the quality of the dashi and the balance of soy sauce, mirin, and sugar; I prefer a dashi with a rich umami. Beyond ingredients, though, the sogigiri cut for the chicken and the two-stage egg cooking technique are essential. These create a tender chicken and beautifully layered egg texture.
Can oyakodon be made without dashi, and if so, how?
While dashi is traditional, I’ve found that it’s possible to make a passable oyakodon without it. A flavorful chicken broth can serve as a substitute, though the umami depth will be different. I would suggest adding a small amount of mushroom powder to amplify the savory notes and compensate for the missing dashi.
Is oyakodon a healthy meal option?
Oyakodon can be a relatively balanced meal, providing protein from the chicken and eggs and carbohydrates from the rice. The nutritional value can vary based on portion sizes and ingredients used. I recommend incorporating plenty of mitsuba or green onions for added vitamins and minerals.
What are common mistakes to avoid when making oyakodon?
From my experience, a few common mistakes can derail the perfect oyakodon. Overcooking the chicken leads to a dry, tough result, which is why the vinegar marinade is so important. Similarly, overcooking the eggs results in a rubbery texture. Also, be sure to monitor the heat and add the eggs in two stages for the best consistency. Avoiding these pitfalls will elevate your chicken oyakodon recipe.
Variations
While the classic chicken oyakodon recipe is a favorite, I sometimes like to explore variations to suit different tastes or dietary needs. One satisfying adaptation I often make is a Chicken Breast Oyakodon. It offers a leaner alternative without sacrificing flavor.
To make this variation, I substitute the 10 oz of chicken thighs with an equal amount of boneless, skinless chicken breast. Slicing the chicken breast thinly is even more crucial than with the thighs; I aim for ¼-inch thick pieces to ensure even cooking and prevent dryness. I also recommend increasing the marinating time in the broth with apple cider vinegar to 10 minutes.
The cooking process remains largely the same, but I’ve found that chicken breast cooks faster than thighs. So, I reduce the initial cooking time to 3 minutes before adding the eggs. Monitoring the chicken closely to prevent it from becoming overcooked is very important. The result is a lighter, yet equally delicious, take on the classic oyakodon. For another great recipe, try my easy chicken wrap recipe.
Yield and Storage
This chicken oyakodon recipe makes 2 servings. I portion it into two bowls after cooking.
Leftover oyakodon can be stored, though I will admit it is best enjoyed fresh. However, I always try to minimize food waste, so here’s what I’ve found works best: transfer the leftover chicken and egg mixture to an airtight container as soon as it has cooled. It’s important to refrigerate it promptly. From my experience, leftovers can be kept in the refrigerator for up to 2–3 days.
Conclusion
This precise guide is designed to help you create an authentic chicken oyakodon recipe in your own kitchen, avoiding the common pitfalls that can lead to tough chicken or rubbery eggs. The key takeaways are the importance of the apple cider vinegar marinade and the careful egg-cooking technique. I firmly believe that mastering these steps unlocks a depth of flavor and texture that elevates this humble dish to something truly special.
I’m eager to hear about your own oyakodon adventures. What variations have you tried, or what challenges did you encounter? Share your experiences and questions in the comments below, and don’t forget to share this recipe with friends and family who appreciate a perfectly crafted meal!
Easy & Authentic Chicken Oyakodon Recipe
Equipment
- Medium frying pan (about 10 inches/25 cm)
- Oyakodon pan or small frying pan (8 inches/20 cm)
Ingredients
Ingredients
- ½ onion ((4 oz, 113 g; peeled))
- 10 oz boneless, skinless chicken thighs
- 1 Tbsp broth ((for marinating the chicken; add 1 tsp apple cider vinegar))
- 3-4 large eggs (50 g each w/o shell)
- ½ cup dashi (Japanese soup stock)
- 2 Tbsp soy sauce
- 2 Tbsp mirin
- 2 tsp sugar
- 2 servings cooked Japanese short-grain rice ((typically 1⅔ cups (250 g) per donburi serving))
- 4 sprigs mitsuba (Japanese parsley) ((or green onion/scallion))
- shichimi togarashi (Japanese seven spice) ((optional))
- Japanese sansho pepper ((optional))
Instructions
Instructions
- For the steamed rice, please note that 1½ cups (300 g, 2 rice cooker cups) of uncooked Japanese short-grain rice yield 4⅓ cups (660 g) of cooked rice, enough for 2 donburi servings (3⅓ cups, 500 g). See how to cook short-grain rice with a rice cooker, pot over the stove, Instant Pot, or donabe.
- This recipe includes both cooking methods—using a medium frying pan (about 10 inches/25 cm) and an oyakodon pan or small frying pan (8 inches/20 cm). Typically, oyakodon is made individually for each serving using an oyakodon pan, which lets you slide the cooked ingredients onto the rice bowl easily.
- Gather all the ingredients. Do not make more than two servings in a medium frying pan. I explained a bit more in the blog post (under Oyakodon Cooking Tips). If you are making four servings, use two medium frying pans.
- Combine ½ cup dashi (Japanese soup stock), 2 Tbsp soy sauce, 2 Tbsp mirin, and 2 tsp sugar in a bowl or a liquid measuring cup and mix all together until the sugar is dissolved.
- Slice ½ onion lengthwise, about ¼ inch (6 mm) wide.
- Chop 4 sprigs mitsuba (Japanese parsley) ½ inch (1.3 cm) wide.
- Trim the extra bits of fat and connective tissue from 10 oz boneless, skinless chicken thighs with the knife. Cut the chicken thigh along the grain into strips ¾–1 inch (2–2.5 cm) wide. Next, angle your knife back and diagonally (nearly parallel to the cutting board), and then slice the chicken strips against the grain into pieces about ¾–1 inch (2–2.5 cm) square. This sogigiri cutting technique gives the chicken pieces equal thickness and creates more surface area for fast cooking and better absorption of the flavors.
- Transfer the chicken to a bowl or tray and sprinkle with 1 Tbsp broth. Set aside for 5 minutes.
- Crack 3-4 large eggs (50 g each w/o shell) into a bowl. Using a pair of chopsticks, lift the egg whites to “cut“ them 5–6 times into a few smaller clumps. This will prevent the egg whites from falling into the frying pan all at once. Do not whisk or beat the eggs together. Tip: Aim for high color contrast between the white and yellow parts of the eggs in your finished dish.
- While “cutting“ the egg whites, you may have accidentally broken some of the egg yolks. That‘s okay. If the yolks haven‘t broken yet, you can poke them to gently break them, but do not blend the egg whites and yolks. The eggs should resemble a marble pattern.
- With the stove off, add the sliced onions to a medium frying pan (I use a well-seasoned 11” carbon steel pan) in a single layer. Then, add the seasonings mixture. It should just cover the onions. If not, your frying pan is too big and you need to either increase the seasoning or use a smaller pan.
- Turn on the heat to medium and bring it to a simmer. Once simmering, add the chicken on top of the onions.
- Make sure the onions and chicken are evenly distributed. Once simmering again, lower the heat to medium low. Cook, uncovered, for 5 minutes or until the chicken is no longer pink and the onions are tender. Halfway through, flip the chicken. Tip: Evaporation reduces the sauce and intensifies the flavor.
- We will add the eggs in two stages: Two-thirds of the eggs first, then the remaining one-third later. Now, increase the heat to medium. With the cooking liquid simmering (small bubbles around the edges), drizzle two-thirds of the eggs in a circular pattern over the chicken and onions, avoiding the edges of the pan where the eggs can easily overcook. Tip: Only drizzle the eggs if the cooking liquid is simmering, as with Egg Drop Soup. Also, try to add more egg whites at this stage, as the whites take longer to cook than the yolks. Ideally, we want to keep the yolks soft and runny for the final presentation.
- If the heat is too strong, lower the heat. If the egg is moving toward the edges of the pan, gently gather it toward the center where the heat is not as strong. Optionally, you can cover the pan if the egg whites are taking a long time to set.
- When the eggs are still runny but just set, add the rest of the eggs to the center and around the edges of the pan. Add the mitsuba (or green onion) on top and cook on medium low until the egg is done to your liking. Usually, oyakodon in Japan is served while the egg is almost set but still runny (raw eggs are safe to consume in Japan). Tip: For the remaining one-third of the egg, try to distribute more egg yolks so the oyakodon will have a bright yellow color on top. For a good presentation, you can add a beaten extra yolk at the end.
- Serve steamed rice in individual serving bowls. Spoon the cooked chicken and egg mixture onto the steamed rice and drizzle the desired amount of pan sauce on top.
- Cook the chicken and egg in two batches, one serving at a time. Make sure to divide the ingredients in half. With the stove off, add half of the sliced onions to the pan in a single layer. Add half of the seasonings mixture (it should just cover the onions).
- Turn on the heat to medium and bring it to a simmer. Once simmering, add half of the chicken on top of the onions.
- Make sure the onions and chicken are evenly distributed. Once simmering, lower the heat to medium low. Cook, uncovered, for 4 minutes or until the chicken is no longer pink and the onions are tender. Halfway through, flip the chicken. Tip: Evaporation helps to reduce the sauce and intensify the flavor.
- We will add the eggs in two stages: Two-thirds of the eggs first, then the remaining one-third later. Now, increase the heat to medium. With the cooking liquid simmering (small bubbles around the edges), drizzle two-thirds of the eggs in a circular pattern over the chicken and onions, avoiding the edges of the pan where the eggs can easily overcook. Tip: Only add the eggs if the cooking liquid is simmering, as with Egg Drop Soup. Also, try to add more egg whites at this stage, as they take longer to cook than the yolks. Ideally, we want to keep the yolks soft and runny for the final presentation.
- When the eggs are still runny but just set, add the rest of the eggs to the center and around the edges of the pan. Add the mitsuba (or green onion) on top and cook on medium low until the egg is done to your liking. Usually, oyakodon in Japan is served while the egg is almost set but still runny (raw eggs are safe to consume in Japan). Tip: For the remaining one-third of the egg, try to distribute the egg yolk so the oyakodon will have a bright yellow color on top. For a good presentation, you can add a beaten extra yolk at the end.
- Portion 2 servings cooked Japanese short-grain rice into individual donburi or other serving bowls. Slide the cooked chicken and egg mixture onto the steamed rice and drizzle the desired amount of pan sauce on top. Repeat Steps 1 to 6 with the remaining ingredients.
- Serve the Oyakodon with optional shichimi togarashi (Japanese seven spice) for a spicy kick and Japanese sansho pepper for a peppery fragrance on the side.
- You can keep the leftovers in an airtight container and store in the refrigerator for up to 2–3 days.
- Following these instructions closely is the surest path to a perfect chicken oyakodon recipe.


