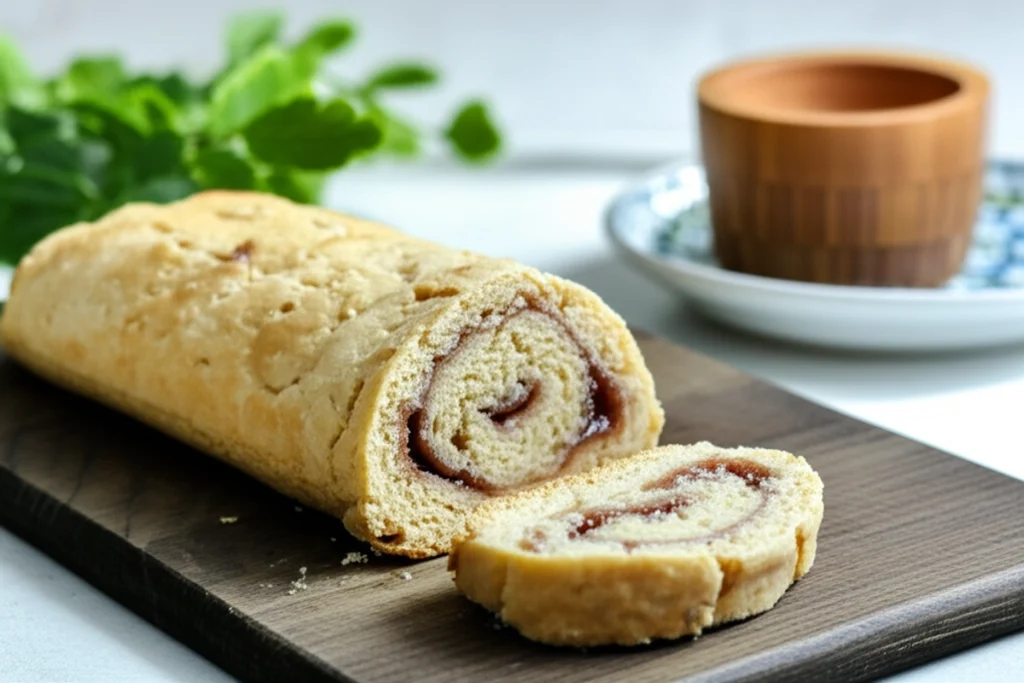
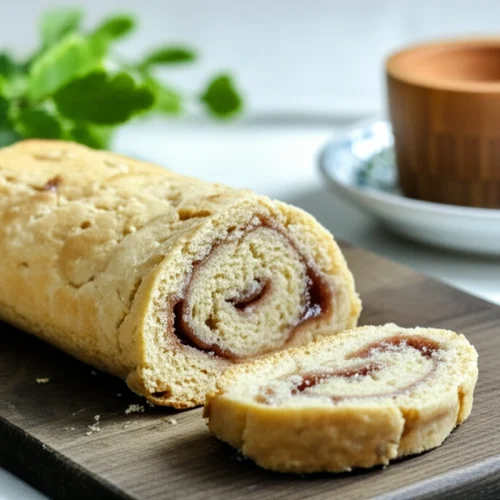
The secret to a perfect Jam Roly Poly, that most comforting of traditional British puddings, lies in mastering a single, critical element: the dough. My first attempts were a disaster. I struggled, battling dough that was either too dry and crumbly or a sticky, unmanageable mess. The “aha!” moment came when I realized that the precise balance of ingredients, and how they interact, is absolutely key to achieving the correct consistency.
This is your foolproof guide to Jam Roly Poly, designed to deliver perfect, repeatable results every time. With a prep time of just 20 minutes and a cook time of 60 minutes, this recipe will soon become a family favorite. I’ll show you how to create a Roly Poly that’s light, tender, and bursting with your favorite jam, so you can create your own favorite version of this classic bake.
Table of Content
Decoding Dough Consistency: Visual Cues for the Perfect Roly Poly
Getting the dough consistency right is the single most important step for creating a light and airy Jam Roly Poly. Too dry, and it will crack and crumble; too wet, and it will be dense and heavy. I’ve compiled this handy guide based on numerous test batches to help you diagnose and correct any dough-related issues.
| Problem | Solution |
|---|---|
| Dough is too dry and crumbly | Gradually add more milk, a teaspoon at a time, until the dough just comes together. Be patient; it’s better to add too little than too much. |
| Dough is too sticky and wet | Add flour, one tablespoon at a time, until the dough is soft and slightly tacky but no longer sticks to your hands or the work surface. |
| Dough is tough and elastic | Avoid over-kneading. Gently knead for just a minute or two to bring the dough together. Overworking the gluten will result in a tough Roly Poly. |
| Dough lacks flavor | Ensure you’re using high-quality butter or margarine with a good flavor profile. The fat contributes significantly to the taste of the final product. |
The key to avoiding these problems is to pay close attention to the dough’s texture as you mix the ingredients. I’m looking for a dough that is soft, slightly sticky, and holds its shape without being overly wet. This level of familiarity only comes through practice.
The Art of the Roll: Achieving a Tight Seal and Avoiding Explosions
Once you’ve achieved the correct dough consistency, the next critical step is mastering the art of the roll. The goal is to create a tight seal that prevents the jam from escaping during baking, while also allowing enough room for the Roly Poly to expand. I cannot stress how important this step is to avoid a soggy mess.
To roll, start by spreading your chosen jam evenly over the dough, leaving a 1-2cm gap along the far edge. This gap is crucial; I learned the hard way that skipping it results in an uneven seal. Brush this gap with a little milk; it acts like glue, creating a secure closure that holds during baking.
Pro tip: Use a pastry brush for even milk distribution.
When rolling, begin from the edge opposite the gap, gently folding the dough over itself to start, before rolling firmly to the end. A key lesson I learned is not to roll too tightly; you want to allow space for the dough to expand as it bakes. Leaving too little space results in “explosions”—bursting seams that let the jam out.
Finally, ensure your foil parcel is sealed well but with plenty of internal space. I typically leave at least an inch or two of extra foil around the Roly Poly to accommodate rising. This prevents bursting and ensures a perfectly formed dessert every time.
Ingredients
Here’s what you’ll need to make a perfect Jam Roly Poly. I tested this recipe with various flours, including all-purpose and bread flour. While all-purpose flour works, I found that self-raising flour provides the best lift and texture for a lighter, more airy Roly Poly. That’s why it’s specifically called for in the ingredients.
- 250 g Self-raising Flour
- 50 g Butter or Block Margarine (cold & cubed)
- 50 g Caster Sugar (Superfine Sugar)
- 50 g Vegetable Shortening
- 150 ml Milk
- 150 g Jam (Jelly)
Instructions
Follow these instructions carefully, and you’ll be enjoying your own perfect Jam Roly Poly in no time. The instructions are deceptively simple, but following them precisely is key to success.
- Pre-heat your oven to 180°c (160°c for fan assisted oven, Gas Mark 4 or 350°F) and place a roasting tin with some boiling water at the bottom of your oven; this helps create steam in your oven to aid the baking of your Jam Roly Poly.
- Lay a couple of large pieces of tin foil (approx. 50cm long) so they overlap a little, on a flat surface. Place a piece of greaseproof paper (approx. 40cm) on top. This will be used to wrap your Roly Poly for baking.
- Sift your flour into a large bowl, before adding the butter/margarine. Rub the butter/margarine into the flour with your finger tips, to create a breadcrumb-like consistency. Add the sugar and stir-through to combine.
- Add the vegetable shortening and mix through, before gradually adding the milk, stirring through until you have a soft, slightly sticky dough; you may not need to use all the milk. Vegetable shortening is crucial for creating a tender, flaky texture in the Roly Poly. Unlike butter or margarine, it has a higher fat content and lower water content, which prevents gluten development and results in a more delicate crumb. It is a critical component of the overall baking system, and is what makes this recipe so unique!
- Tip the pastry dough onto a well-floured surface and gently knead for a couple of minutes to bring the dough together. Using a generous amount of flour on your hands, worksurface and rolling pin, roll your dough to a square approx. 25cm x 25cm. Trim the edges if necessary.
- Spread the jam over your square of dough, leaving a 1-2cm gap on one edge (the furthest away to you edge is best, as it will make it easier when it comes to rolling). To roll your Jam Roly Poly, take the edge opposite the gap and start to roll it towards the gap; initially it will be more of a folding action, as opposed to a roll. Continue to roll until you reach the other end. Brush your gap with a little excess milk before rolling right over to seal your Roly Poly.
- Bring your prepared tin foil and greaseproof paper to your now-rolled Roly Poly. Gently lift your Roly Poly onto the greaseproof paper; using a large palette knife can make this easier. Pull the greaseproof paper and tin foil around your Roly Poly and fold the tin foil to seal the edges. You want to create a sealed parcel around your Roly Poly, but leave lots of space around it inside, to allow it to rise as it bakes.
- Place your Jam Roly Poly parcel onto a tray and bake in your pre-heated oven for 50 minutes – 1 hour. Once baked, remove from the oven and open the parcel to let out the steam, and let it cool a little before serving.
Jam Variations: Elevate Your Roly Poly with Flavor Pairings
While a classic strawberry jam Roly Poly is hard to beat, experimenting with different fillings is a fantastic way to put your own stamp on this beloved pudding. I’ve found that the key is to choose jams that complement the richness of the dough without overpowering it. A Roly Poly is the perfect blank canvas for jam flavors.
Classic options like strawberry jam or raspberry jam never fail, but for a twist, I’ve been experimenting with raspberry jam and a hint of lemon zest. The bright citrus notes really cut through the sweetness and add a refreshing dimension. I fold the zest directly into the jam before spreading, and it gives it that little something extra.
Apricot jam, paired with a few drops of pure almond extract, creates a sophisticated flavor profile that I particularly enjoy. A little goes a long way; too much almond extract can be overpowering, so I advise starting with just a drop or two and adjusting to taste.
Pro tip: For a festive variation, a cranberry filling or even a layer of mincemeat adds a wonderful seasonal touch. These are great options for the holidays, and I’ve found that the spice from the mincemeat pairs wonderfully with the dough.
Frequently Asked Questions
What are the traditional ingredients and their roles in achieving the correct texture and flavor?
Traditional Jam Roly Poly relies on a few key ingredients, each playing a vital role in the final result. The self-raising flour provides the structure, creating a light and airy texture. I discovered that the combination of butter/margarine and vegetable shortening creates a tender crumb; the shortening inhibits gluten development, while the butter adds flavor and richness. Finally, the milk binds the dough together, and the jam provides the signature sweetness and flavor.
How does Roly Poly Pudding differ from similar desserts like Swiss Roll or other British puddings?
Jam Roly Poly distinguishes itself from similar desserts through its unique cooking method and dough. Unlike a Swiss roll, which is a sponge cake baked flat and then rolled, Roly Poly uses a suet pastry dough that is rolled and steamed or baked in a foil parcel. While other British puddings, like steamed suet puddings, are often denser and richer, the Roly Poly aims for a lighter, more tender texture thanks to the self-raising flour and the cooking method, which allows the dough to rise. This creates a unique and comforting texture all its own.
What is the historical and cultural significance of Roly Poly Pudding, particularly its association with Beatrix Potter?
Jam Roly Poly holds a special place in British culinary history, often associated with childhood memories and school dinners. Its cultural significance is further cemented by Beatrix Potter, who featured “roly-poly pudding” prominently in The Tale of Samuel Whiskers. This cemented its place in the imaginations of families across the globe! I imagine many folks have had their first introduction to this dessert through her work.
Can Roly Poly Pudding be made without suet, and if so, how does this affect the recipe?
While traditional recipes often call for suet, my recipe uses a combination of butter and shortening. I found that omitting suet altogether and relying solely on butter results in a slightly different texture, one that lacks that unique tenderness. The vegetable shortening is crucial, as it keeps the dough more pliable and tender. I’ve found that this substitution works remarkably well, offering a lighter, more accessible version of the classic pudding without sacrificing the essential flavor and texture.
Conclusion
Through meticulous testing, I’ve engineered this foolproof guide to traditional Jam Roly Poly to deliver perfect results every time. The key takeaways? Pay close attention to your dough consistency; it should be soft and slightly sticky, as this dictates the overall texture. A tight seal is also crucial to prevent jam leakage during baking, achieved through careful rolling and a milk-brushed edge.
This recipe yields approximately 6-8 servings. I have found that any leftovers can be stored in an airtight container in the refrigerator for up to 3 days. For longer storage, wrap individual slices tightly in plastic wrap and freeze for up to 2 months. Thaw completely before serving.
Now that you’ve mastered the art of the Roly Poly, I would love to hear about your personal touch! What fillings and variations did you use? Leave a comment below and share your experiences, and don’t forget to share this recipe with your fellow baking enthusiasts!
Jam Roly Poly
Ingredients
Ingredients
- 250 g Self-raising Flour
- 50 g Butter or Block Margarine (cold & cubed)
- 50 g Caster Sugar (Superfine Sugar)
- 50 g Vegetable Shortening
- 150 ml Milk
- 150 g Jam (Jelly)
Instructions
Instructions
- Pre-heat your oven to 180°c (160°c for fan assisted oven, Gas Mark 4 or 350°F) and place a roasting tin with some boiling water at the bottom of your oven; this helps create steam in your oven to aid the baking of your Jam Roly Poly.
- Lay a couple of large pieces of tin foil (approx. 50cm long) so they overlap a little, on a flat surface. Place a piece of greaseproof paper (approx. 40cm) on top. This will be used to wrap your Roly Poly for baking.
- Sift your flour into a large bowl, before adding the butter/margarine. Rub the butter/margarine into the flour with your finger tips, to create a breadcrumb-like consistency. Add the sugar and stir-through to combine.
- Add the vegetable shortening and mix through, before gradually adding the milk, stirring through until you have a soft, slightly sticky dough; you may not need to use all the milk. Vegetable shortening is crucial for creating a tender, flaky texture in the Roly Poly. Unlike butter or margarine, it has a higher fat content and lower water content, which prevents gluten development and results in a more delicate crumb. It is a critical component of the overall baking system, and is what makes this recipe so unique!
- Tip the pastry dough onto a well-floured surface and gently knead for a couple of minutes to bring the dough together. Using a generous amount of flour on your hands, worksurface and rolling pin, roll your dough to a square approx. 25cm x 25cm. Trim the edges if necessary.
- Spread the jam over your square of dough, leaving a 1-2cm gap on one edge (the furthest away to you edge is best, as it will make it easier when it comes to rolling). To roll your Jam Roly Poly, take the edge opposite the gap and start to roll it towards the gap; initially it will be more of a folding action, as opposed to a roll. Continue to roll until you reach the other end. Brush your gap with a little excess milk before rolling right over to seal your Roly Poly.
- Bring your prepared tin foil and greaseproof paper to your now-rolled Roly Poly. Gently lift your Roly Poly onto the greaseproof paper; using a large palette knife can make this easier. Pull the greaseproof paper and tin foil around your Roly Poly and fold the tin foil to seal the edges. You want to create a sealed parcel around your Roly Poly, but leave lots of space around it inside, to allow it to rise as it bakes.
- Place your Jam Roly Poly parcel onto a tray and bake in your pre-heated oven for 50 minutes – 1 hour. Once baked, remove from the oven and open the parcel to let out the steam, and let it cool a little before serving.


