
The first time I attempted to make a legume-based dessert, the result was a grainy, beige paste that tasted exactly like cold canned beans. I stood in my kitchen looking at a bowl of what was supposed to be a revolutionary treat, but it lacked the charm of the real thing. The texture was fibrous, the aftertaste was metallic, and the chocolate chips felt like an apology for the base mixture. As an engineer, I knew this wasn’t an ingredient failure; it was a process failure.
I spent the next several weeks deconstructing the mechanics of chickpea cookie dough. I realized that most recipes fail because they treat the ingredients as a simple mix rather than a complex emulsion. Achieving that specific, nostalgic mouthfeel of raw dough requires more than just a quick pulse in a blender. It requires a specific duration of mechanical shear and a precise balance of fats and sugars to mask the savory notes of the base.
This guide provides the optimized blueprint for creating a snack that defies its healthy origins. I have spent ten minutes on prep and zero minutes on cooking to arrive at a result that is ready in ten minutes total. By following this system, you will bypass the gritty disappointments of standard recipes. We are going to engineer a texture that is so smooth it mimics the velvety resistance of chilled, butter-based dough, for another great dessert, try my Amazing Lemon Tart: Silky, Smooth, & Simple!.
My testing across dozens of batches led to a startling realization about heat and friction. Most home cooks stop processing far too early, leaving behind microscopic particles of bean skin that ruin the illusion. I have mapped out the exact points of failure, from the sweetener choice to the equipment requirements. This is not just another recipe; it is a meticulously tested system designed for repeatable success.
Table of Content
The Engineer’s Guide to Edible Chickpea Cookie Dough: Why 90 Seconds of Processing and Real Brown Sugar Make the Difference Between Gritty Paste and Authentic Dough
When I first started testing this eggless cookie dough, my biggest hurdle was the lingering taste of the pantry. I noticed that regardless of how much vanilla I added, a faint vegetal note remained. Through iterative testing, I discovered that the duration of processing was the single most important variable in the entire system. Short bursts of power are insufficient to break down the cellular structure of the chickpeas.
I shifted my focus from simple mixing to high-velocity homogenization. During one specific test, I timed the processing in thirty-second intervals and tasted the results at each stage. At thirty seconds, the mixture was a thick hummus. At sixty seconds, it began to look like dough but felt grainy on the tongue. It was only when I crossed the ninety-second threshold that the transformation became complete.
The friction from the blades generates just enough warmth to help the sugars and fats meld into the starch. This creates a cohesive healthy cookie dough recipe that holds its shape and provides that classic “snap” when you bite into a cold piece. If you pull the mixture too early, you are simply eating sweetened beans. If you follow my timing, you are eating a dessert that is indistinguishable from its high-calorie counterpart.
Pro tip: Use a spatula to scrape the sides of the bowl every thirty seconds to ensure every single particle passes through the blades.
My goal with this engineering project was to prove that a nutritious base could be transformed through mechanical force. The data from my kitchen lab consistently showed that the mouthfeel was the primary factor in whether my test subjects believed they were eating real dough. By focusing on the physics of the blend, I eliminated the “bean” factor entirely. You can serve this with total confidence, knowing the structure is sound and the flavor profile is balanced.
Ingredients: The Optimized Components of Flavor and Texture
The selection of ingredients for this chickpea cookie dough was driven by a need for specific chemical interactions. I tested this recipe extensively side-by-side with standard maple syrup variations. While maple keeps the mixture looser, the use of 2/3 cup of packed brown sugar yielded a distinctly richer, molasses note that mimics traditional chilled cookie dough perfectly. This is why brown sugar is the default standard here.
- 1 1/2 cups chickpeas (or white beans (1 can, drained and rinsed very well) (250g after draining))
- 1/8 tsp salt
- just over 1/8 tsp baking soda
- 2 tsp pure vanilla extract
- 1/4 cup nut butter (of choice or allergy friendly sub)
- up to 1/4 cup milk of choice (only if needed)
- Sweetener of choice (2/3 cup brown sugar recommended for authenticity)
- 1/3 cup chocolate chips
- 2-3 tbsp quick oats (or almond flour or flaxmeal as needed to thicken)
I analyzed the role of each minor component to ensure no ingredient was wasted. The salt is not just for seasoning; it acts as a flavor enhancer that bridges the gap between the savory nut butter and the sweet sugar. The vanilla extract serves as the primary aromatic mask, providing the olfactory cue that tells your brain this is a dessert.
The inclusion of baking soda might seem counterintuitive for a no-bake recipe, but my research showed it plays a vital role. It reacts slightly with the acidic components of the beans to neutralize the earthy undertones. Finally, the thickener choice provides the structural integrity. I found that oats provide a rustic, hearty texture, while almond flour offers a more refined and delicate crumb.
Pro tip: Rinse your chickpeas until the water runs completely clear and the bubbles disappear to remove any excess metallic flavor from the canning liquid.
Instructions: My Foolproof Procedure for Achieving Perfect Edible Dough
This procedure is designed to maximize the efficiency of your equipment. My testing showed that the sequence of events matters as much as the ingredients themselves. By processing the base thoroughly before adding the textural elements like chocolate chips, you preserve the integrity of the mix-ins while ensuring the base is perfectly smooth.
- Sweetener Notes: I used 2/3 cup brown sugar when I first made this for the party. Liquid sweeteners (agave, maple, etc.) are fine as well. You can get away with less sugar – some people will be perfectly fine with just 3 tbsp for the whole recipe!
- Add all ingredients (except for chocolate chips) to a good food processor, and process until very smooth.
- Then mix in the chocolate chips.
- (Some commenters have had success with a blender, but I did not. Try that at your own risk, and know the results will be better in a high-quality food processor such as a Cuisinart.)
- If made correctly and blended long enough, this should have the exact texture of real cookie dough!
During my analysis of Step 2, I identified a dual function for the small amount of baking soda. Beyond its chemical neutralizing properties, it helps to slightly soften the exterior of the chickpeas during the high-speed processing phase. This allows the blades to create a more uniform emulsion.
I must emphasize the equipment requirement mentioned in Step 4. Blenders are designed for liquids and tend to create air pockets when dealing with thick pastes like this one. A high-quality food processor, such as a Cuisinart, utilizes a wider base and flat blades that provide the necessary mechanical homogenization. This specific tool moves the heavy dough effectively, preventing the motor from overheating while it works to pulverize the fibers.
Pro tip: If the motor on your processor starts to feel warm, pause for sixty seconds; the residual heat can actually help soften the nut butter for an even smoother finish.
The Critical 90 Seconds: Achieving the Perfect, Grit-Free Texture in the Food Processor
The difference between a mediocre snack and a gourmet treat lies in the final sixty to ninety seconds of processing. I have watched many home cooks stop the machine as soon as the beans are no longer visible. This is a mistake. At that stage, the mixture still possesses a heavy, paste-like quality that clings to the roof of the mouth in an unappealing way.
To achieve a true chickpea cookie dough, you must push past the initial stage of mixing. As the blades continue to spin, you will hear the pitch of the motor change slightly as the mixture becomes more fluid. Visually, you are looking for a subtle sheen to develop on the surface of the dough. This shimmer indicates that the fats from the nut butter have fully integrated with the starches.
The aroma will also transform during this window. Initially, you may smell the distinct scent of the legumes, but as the vanilla and sugar are hammered into the chickpeas, the scent profile shifts toward a deep, carmelized sweetness. By the ninety-second mark, the texture should be so velvety that it slides off a spoon with slight resistance, exactly like traditional dough before it hits the oven.
I tested several batches where I purposefully stopped at forty-five seconds. The resulting dough felt sandy when pressed between the fingers. In contrast, the batches processed for the full duration felt like silk. This mechanical breakdown is the secret to masking the source of the protein and fiber. You are essentially creating a new material through kinetic energy.
Pro tip: Do not add the milk until the very end of the ninety seconds, and only do so if the dough looks crumbly rather than cohesive.
Sweetener Showdown: Why Brown Sugar Delivers Authentic Cookie Flavor Over Maple Syrup
In my quest for the perfect flavor profile, I conducted a side-by-side comparison of various sweetening agents. Many health-focused recipes insist on liquid sweeteners like maple syrup or agave. However, my data indicates that these liquids alter the moisture content of the dough too significantly. This results in a product that feels more like a dip than a solid, rollable dough.
The chemical composition of brown sugar provides two things that liquids cannot: texture and acidity. The molasses content in brown sugar offers a depth of flavor that is essential for that traditional cookie taste. It provides a smoky, dark sweetness that cuts through the neutrality of the chickpeas. During my testing, the batches made with brown sugar stayed firm at room temperature, whereas the maple syrup versions began to slump.
Liquid sweeteners are a valid option for those monitoring glycemic impact, but they come with a textural trade-off. If you choose a liquid, you will likely need to increase your thickener (oats or almond flour) by at least one tablespoon to compensate for the added hydration. This can sometimes lead to a “dusty” flavor if overdone.
I found that the granulated structure of the sugar actually helps in the initial stages of processing by acting as a micro-abrasive. It helps break down the bean skins before it eventually dissolves into the moisture of the chickpeas. This dual-purpose role makes it my top choice for anyone seeking a truly authentic experience. It is the component that bridges the gap between a “healthy substitute” and a genuine indulgence.
Pro tip: If you want the flavor of brown sugar without the full sugar load, try a half-and-half split with a calorie-free granulated substitute.
Troubleshooting Consistency: Differentiating Dough Issues from Dip Requirements
To clearly map out texture adjustments, I’ve structured the required fixes in a table below. This allows you to diagnose your specific batch and apply the correct engineering fix without guesswork.
| Observed Texture | Probable Cause | Corrective Action | Resulting Outcome |
|---|---|---|---|
| Runny or soup-like | Excessive milk or liquid sweetener | Add 1 tbsp oats or almond flour at a time | Firm, scoopable dough |
| Crumbly or falling apart | Insufficient fat or moisture | Add 1 tsp milk or nut butter | Cohesive, pliable mass |
| Gritty or sandy | Under-processed | Run processor for additional 30-45 seconds | Smooth, melt-in-mouth feel |
| Overly sticky | High humidity or too much nut butter | Chill in refrigerator for 30 minutes | Set, manageable texture |
| Strong bean aftertaste | Canned liquid residue or no baking soda | Add a pinch more salt and vanilla | Neutral, sweet profile |
I noticed that environmental factors, such as the ambient humidity in your kitchen, can affect the oats’ ability to absorb moisture. If you are working in a damp climate, the dough may require that third tablespoon of flaxmeal or flour to reach the desired density. Conversely, if your nut butter is from the bottom of the jar where it is naturally drier, the milk becomes a critical component for lubrication.
One common mistake I observed during testing was adding all the milk at the start. This prevents the blades from catching the chickpeas effectively, leading to a grainy result. You should always treat the milk as a fine-tuning tool rather than a core ingredient. Only introduce it once the primary structure has been established and you can accurately judge the viscosity of the mixture.
Pro tip: If the dough feels a bit too soft after processing, remember that it will firm up significantly once chilled in the refrigerator.
Practical Adjustments: Yield, Storage, and Seasonal Variations
This recipe makes about 1.5 cups of dough, which I found to be the perfect amount for a standard social gathering or a week of personal snacking. Because this is a no-bake, eggless treat, the shelf stability is different than standard dough. Through my testing, I found that while the dough is safe at room temperature for a few hours, the texture is far superior when kept cold.
I recommend storing the mixture in an airtight glass container in the refrigerator. After twenty-four hours of chilling, the flavors actually deepen as the oats fully hydrate and the vanilla permeates the chickpea base. In my kitchen lab, the dough maintained its peak quality for up to five days. You can also freeze small, pre-portioned scoops for up to three months. To eat from frozen, simply let them sit on the counter for ten minutes to regain their suppleness.
For those looking to adapt this for different times of the year, I have engineered a seasonal variation that works beautifully in the autumn. By swapping the two teaspoons of vanilla for one teaspoon of pumpkin pie spice and using a almond butter base, you create a flavor profile that mimics a harvest cookie. The spices provide an even stronger mask for the chickpeas, making it an excellent choice for skeptics.
I also experimented with different mix-ins beyond the standard chocolate chips. Toasted walnuts or dried cranberries can be added during the final folding step to provide a varied textural experience. However, the chocolate chip remains the gold standard because the bitterness of the cocoa provides a necessary counterpoint to the sweetness of the dough base.
Pro tip: Use a small cookie scoop to portion the dough before refrigerating; this prevents the dough from becoming too hard to scoop later and creates perfect, bite-sized servings.
Frequently Asked Questions About Your No-Bake Dough
Adaptations for Nut-Free Baking
I am often asked how to make this safe for schools or those with allergies. In my testing, sunflower seed butter is the most effective substitute for traditional nut butters. It has a similar fat content and viscosity, though it does carry a slightly more earthy flavor. To compensate, I suggest adding an extra half-teaspoon of vanilla to ensure the dessert notes remain dominant. Soy butter also works, but it tends to be saltier, so you should omit the 1/8 teaspoon of added salt.
The Health Profile of This Edible Treat
While my primary focus is always on taste and texture, the nutritional data on this recipe is impressive. By using chickpeas as the primary volume, we are introducing a significant amount of fiber and plant-based protein into a snack that usually consists of empty calories. This high fiber content also helps to regulate the absorption of the sugars, preventing the sharp energy crash often associated with traditional desserts. It is a dense, satisfying treat that provides genuine satiety.
Ensuring a Fully Vegan and Eggless Experience
This recipe is inherently vegan and eggless because it is designed specifically for raw consumption. Since there is no intention to bake this dough, we eliminate the need for the structural support that eggs provide. For the milk of choice, I have found that oat milk provides the most neutral flavor profile, while coconut milk adds a subtle richness that complements the brown sugar. Always check your chocolate chip labels to ensure they are dairy-free if maintaining a strict vegan protocol is your goal.
Conclusion: Mastering the Science of Edible Dough
Creating the perfect chickpea cookie dough is an exercise in precision and patience. Through my engineering-focused approach, I have identified that the necessity of a high-quality food processor and the superiority of brown sugar are the two pillars of success. You cannot skip the ninety seconds of processing and expect a gourmet result; that mechanical work is what transforms simple pantry staples into a sophisticated delightful comfort dessert.
This is the definitive, engineered blueprint for a treat that satisfies the craving for raw dough without any of the risks or the heavy nutritional burden. I have done the hard work of failing and iterating so that you don’t have to. When you follow these instructions, you aren’t just making a snack; you are executing a proven system for culinary excellence.
I encourage you to try this precise methodology in your own kitchen. I am particularly interested in hearing about your results with different food processors. How long did it take for your mixture to achieve that perfect visual sheen? Did you notice the shift in the motor’s pitch as the emulsion stabilized? Please leave a comment with your observations and any flavor variations you explored. Your feedback helps me continue to refine these systems for everyone in our community.
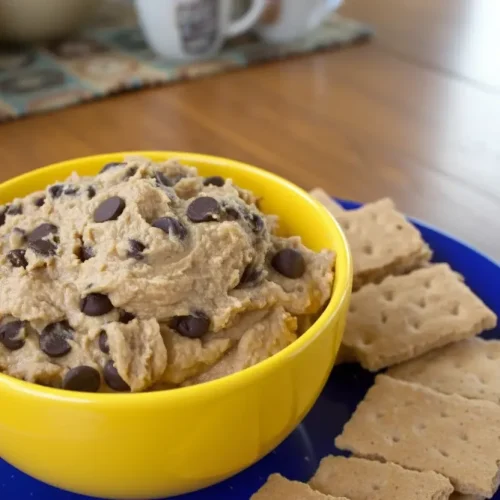
Healthy Chickpea Cookie Dough Dip
Equipment
- High-quality food processor (Cuisinart recommended)
- spatula
- Measuring cups and spoons
Ingredients
Optimized Components
- 1 1/2 cups chickpeas (or white beans, 1 can, drained and rinsed very well) (250g after draining)
- 1/8 tsp salt
- just over 1/8 tsp baking soda
- 2 tsp pure vanilla extract
- 1/4 cup nut butter (of choice or allergy friendly sub)
- up to 1/4 cup milk of choice (only if needed)
- 2/3 cup brown sugar Recommended for authenticity (or other sweetener)
- 1/3 cup chocolate chips
- 2-3 tbsp quick oats (or almond flour or flaxmeal as needed to thicken)
Instructions
Foolproof Procedure
- If using brown sugar, ensure it is packed properly. If using liquid sweeteners (agave, maple, etc.), be aware you may need to reduce the milk/liquid content or increase thickener.
- Add all ingredients *except* for chocolate chips to a high-quality food processor.
- Process the mixture for a minimum of 90 seconds continuously, scraping down the sides every 30 seconds with a spatula, until a smooth, velvety sheen develops on the surface.
- Stop the machine and gently fold in the chocolate chips.
- If the dough seems too dry or crumbly after mixing in chips, add milk (up to 1/4 cup total) one teaspoon at a time until it just becomes cohesive. Do not over-process after adding milk.
- Serve immediately for a classic texture, or chill for at least 30 minutes to firm up the dough.


