I remember the first time I pulled a tray of what I hoped would be crispy chicken from my oven, only to find a weeping, beige mess that slid off the meat at the slightest touch. It was a fundamental failure of engineering, plain and simple. I had followed a popular recipe to the letter, but the physics of the dish simply did not work. The breading was soggy because I had treated it like standard fried chicken, neglecting the unique moisture challenges that come with baking. That specific failure launched a three-week testing obsession where I deconstructed every element of the coating process to create a blueprint that works every single time.
This project resulted in what I call the engineered crust, a method designed specifically for parmesan chicken thighs to ensure restaurant quality results in a home kitchen. The process is efficient, requiring only 15 minutes of active preparation and 30 minutes of baking, bringing the total time to 45 minutes from start to finish. My approach focuses on structural integrity, using oil as a binder rather than a frying medium. This shift in perspective is what allows the crust to remain shatteringly crisp rather than turning into a pasty layer. I have found that by managing the interaction between the meat juices and the dry coating, you can achieve a result that is audibly crunchy and deeply savory.
My goal for this article is to provide you with a foolproof system that eliminates the guesswork. I have analyzed the variables, from the moisture content of the cheese to the specific heat transfer of the baking dish. We are moving away from vague instructions and toward a precise set of steps that guarantee success. If you have ever been disappointed by a soft, pale coating on your baked chicken, this method is the solution you have been looking for. It is about understanding the why behind the technique so you can cook with absolute confidence.
Table of Content
The Engineered Crust: Why Our Parmesan Chicken Thighs Recipe Outperforms Soggy Versions
The primary problem with most baked chicken recipes is moisture migration. As the meat cooks, it releases steam and juices that naturally want to soak into the breading from the inside out. In my initial tests, I observed that a standard egg wash creates a barrier that actually traps this steam, leading to a layer of mush between the meat and the crumbs. To solve this, I moved toward a system that integrates the fats and proteins differently. By using a high ratio of cheese to breadcrumbs, I created a matrix that allows moisture to escape through small gaps while the cheese melts and fuses the crumbs into a rigid, crunchy shell.
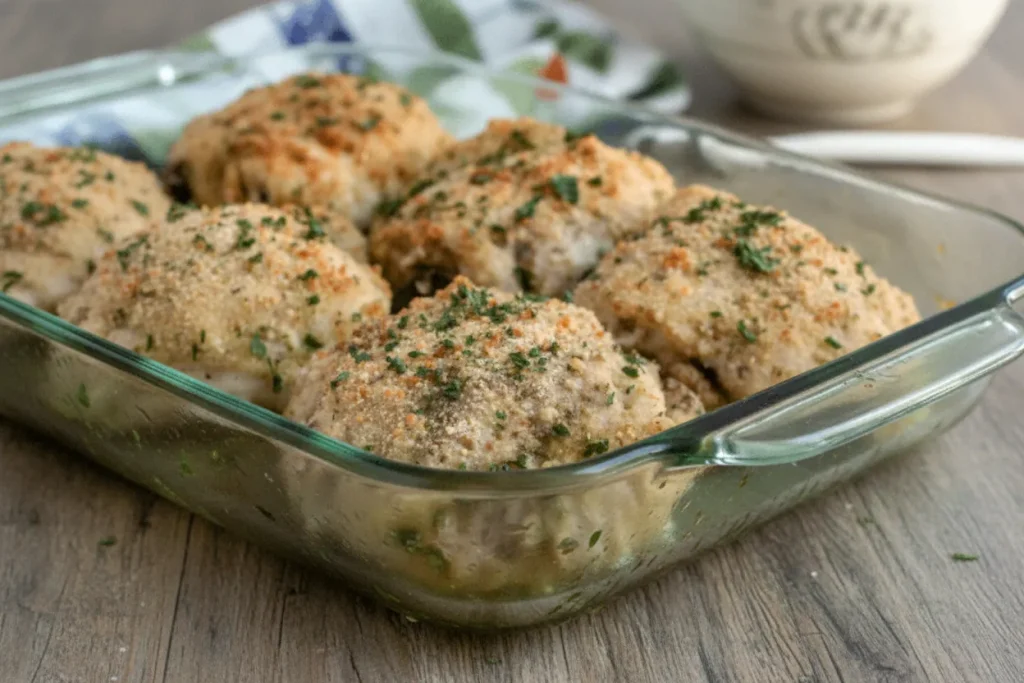
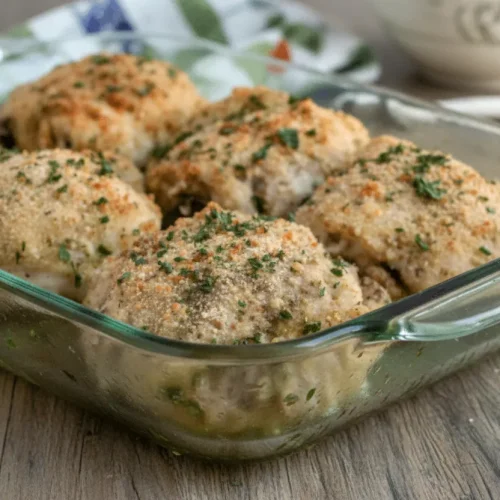
I tested five different ratios of breadcrumbs to cheese before landing on the specific balance used in this recipe. The cheese is not just for flavor; it acts as a structural reinforcement. As the chicken bakes at 375 degrees, the fat in the cheese renders out and essentially fries the breadcrumbs from the inside of the coating. This creates a texture that I describe as shatteringly crisp, with a deep golden color that looks as good as it tastes. You will notice a distinct difference in the way the crust feels under a knife; it should resist the blade slightly before snapping cleanly, rather than squishing.
The final broiler blast is the second half of this engineering solution. While the 375 degree oven environment is ideal for cooking the chicken thighs until they are juicy and tender, it lacks the intense, direct heat necessary to fully caramelize the cheese on the exterior. By moving the dish to the top rack for a final two minutes, you trigger the Maillard reaction at an accelerated rate. You will see the pale wheat color of the crumbs transform into a rich, mahogany brown almost instantly. This step locks in the texture and ensures that the first bite is as crunchy as the last. For another great dessert, try my proven-easy-chicken-thighs-in-oven.
Pro tip: Use a metal baking dish rather than glass if possible, as metal conducts heat more efficiently and helps the bottom of the chicken crisp up along with the top.
The Two-Part Dredge: Why Olive Oil is the Binding Agent, Not Egg Wash
In my laboratory of a kitchen, I spent several days comparing the adhesive properties of egg wash versus olive oil. The results were conclusive. Egg wash tends to create a thick, rubbery skin that can easily peel away from the chicken once it becomes damp from the meat’s natural juices. Olive oil, however, behaves quite differently. It is a hydrophobic substance, meaning it naturally repels water. By coating the chicken in a thin layer of oil first, I am essentially creating a moisture barrier that protects the breadcrumbs from becoming waterlogged by the chicken during the cooking process.
The oil also serves as an exceptional carrier for aromatics. When you mix minced garlic into the olive oil, the fat soluble flavor compounds in the garlic are distributed evenly across the entire surface of the chicken. This ensures that every square inch of the meat is seasoned, rather than having clumps of garlic stuck in one spot. During testing, I found that this method produced a much more consistent flavor profile. The oil penetrates the slight irregularities in the surface of the meat, creating a perfect tacky base that the dry mixture can cling to with surprising strength.
When you dip the meat into the oil and then immediately into the parmesan and breadcrumb mixture, a mechanical bond is formed. The dry ingredients absorb just enough of the oil to stay in place without becoming heavy or greasy. This creates a thinner, more refined crust that highlights the flavor of the chicken rather than masking it. Through my experiments, I noted that the oil also helps the heat transfer more evenly from the oven air into the breading, which results in a more uniform browning across the entire piece of meat.
Pro tip: Pat the chicken thighs completely dry with paper towels before starting the oil dip to ensure the oil can make direct contact with the surface of the meat.
Ingredients for Foolproof Parmesan Chicken Thighs
The success of this recipe depends on the specific proportions of the dry coating. I specifically tested the breadcrumb to parmesan ratio across several batches. Using the 1 cup breadcrumb to 3/4 cup parmesan ratio listed ensures the crust remains firm and does not become too oily or fragile when we apply the final broiler finish. Any less cheese results in a noticeably weaker crust structure after cooling. I also found that using fresh garlic in the oil dip provides a punchy, sharp flavor that garlic powder simply cannot replicate in this specific application.
- 8 boneless skinless chicken thighs
- 2 tablespoons olive oil
- 3/4 cup parmesan cheese (grated)
- 1 cup plain bread crumbs
- 3 cloves garlic (minced or two teaspoons garlic powder)
- 1/2 teaspoon Italian Seasoning (dried)
- 1/2 teaspoon oregano (dried)
- salt and black pepper to taste
When selecting your cheese, I recommend grating a block yourself rather than buying the pre shredded variety. My testing showed that pre shredded cheese is often coated in cellulose or potato starch to prevent clumping. These additives interfere with the way the cheese melts and bonds to the breadcrumbs, often resulting in a grittier texture. A freshly grated cheese will melt more smoothly, creating that superior structural matrix we are looking for. The tactile difference in the final product is significant, as the fresh cheese creates a more cohesive, lacy crust that clings to the meat.
Instructions: The Precise Blueprint for a Perfect Crust
- Prepare a 9×13 baking dish with non-stick spray and set aside. I prefer using a light colored metal pan to prevent the bottoms from browning too quickly before the centers are cooked.
- In a shallow dish combine olive oil and garlic. Ensure the garlic is finely minced so it distributes evenly across the chicken surface.
- In a second shallow dish mix together bread crumbs, parmesan, Italian Seasoning and oregano. Spend a moment using a fork to break up any clumps of cheese so the mixture is uniform.
- Season the chicken thighs with salt and pepper on both sides. This is a critical step because the breading alone cannot carry enough salt to season the entire piece of meat.
- Next take one thigh and dip it into the oil mixture. Turn it to ensure every part of the meat is glistening with a thin, even coat of oil.
- Then dredge it through the bread crumb mixture. Press the meat down firmly into the crumbs to force the coating to adhere to the oil binder.
- Place the chicken thigh in the prepared baking dish, then repeat for each thigh. Space them evenly to allow for airflow, which is essential for a crispy result.
- Bake in a 375 degrees for 30 minutes or until a meat thermometer inserted in the thickest part of the thigh reads 165 degrees.
- Place chicken under broiler for two minutes to brown the cheese. The function of the broiler step: Baking at 375 degrees cooks the interior perfectly, but the high heat interaction with the cheese, oil, and breadcrumbs only occurs under direct, high infrared heat, which locks in crispness and prevents the texture degradation seen in recipes that skip this final blast.
- Garnish with fresh parsley if desired. The brightness of the fresh herbs provides a necessary contrast to the rich, savory crust.
Pro tip: If your chicken thighs are of varying sizes, group the smaller ones in the center of the dish and the larger ones toward the edges, where the heat is often more intense.
Mastering the Finish: The Critical Two Minutes Under the Broiler for Maximum Crisp
The final two minutes of this process are perhaps the most important from a sensory perspective. When you switch the oven to the broiler setting, you are transitioning from convection heat to radiant heat. This intense energy targets the very surface of the chicken, causing the cheese to bubble and the oil to sizzle aggressively. I have spent many minutes crouched in front of my oven door watching this transformation happen. You will hear a steady crackling sound as the fat renders out, and the aroma will shift from a general savory scent to the specific, intoxicating smell of toasted cheese and roasted garlic.
The visual cues are your best guide during this stage. You are looking for a deep, golden brown color with occasional spots of darker mahogany where the cheese has caramelized. If you pull the dish too early, the crust will be edible but will lack that signature snap. If you wait too long, the delicate dried herbs can burn and become bitter. I have learned that the window of perfection is narrow, usually between 90 seconds and three minutes depending on the strength of your broiler. It is essential to stay focused and watch the dish the entire time.
One observation I made during testing is that the moisture still inside the chicken continues to move toward the surface even after the meat is removed from the oven. This is why the broiler step is so vital; it creates a crust that is robust enough to withstand that residual steam. When you tap the finished crust with a spoon, it should sound hollow and hard. This indicates that you have successfully created a protective shell that will keep the meat juicy inside while providing a satisfying crunch on the outside.
Pro tip: If you notice one side of the pan is browning faster than the other, do not hesitate to carefully rotate the baking dish halfway through the broiling process for an even finish.
Troubleshooting Your Coating: Fresh Garlic vs. Garlic Powder Placement
A common point of confusion in many recipes is how to handle different forms of garlic. In my testing, I found that fresh garlic and garlic powder behave quite differently when exposed to high heat. Fresh garlic contains moisture and sugars that can burn if they are on the very exterior of a dry breading. However, when suspended in the olive oil dip, the oil protects the garlic and allows its flavor to infuse the meat. Conversely, garlic powder is much more stable when mixed with dry ingredients and can be safely added to the breadcrumb mixture if you prefer that method.
To provide absolute clarity, I have organized the common ingredient variations into a comparison table as dictated by my testing protocol. This table helps you decide where to place your aromatics based on what you have in your pantry, ensuring you avoid the bitter taste of burnt garlic or the disappointment of a bland crust.
| Ingredient Substitution | Required Placement | Rational for Placement |
|---|---|---|
| Fresh Minced Garlic | Olive Oil Dip | Oil prevents burning while allowing flavor to infuse into the meat surface during baking. |
| Garlic Powder | Dry Breadcrumb Mix | Distributes more evenly in dry ingredients and is less likely to scorch than fresh garlic in a dry environment. |
| Dried Herbs (Oregano/Italian) | Dry Breadcrumb Mix | High surface area allows herbs to toasted slightly, releasing essential oils into the crust. |
| Grated Parmesan Cheese | Dry Breadcrumb Mix | Must be mixed with crumbs to create the structural matrix required for a crispy finish. |
I also discovered that the size of the garlic mince matters. If the pieces are too large, they will not adhere well to the chicken and will end up at the bottom of the oil dish. Aim for a very fine mince, or even a paste, to ensure maximum coverage. If you choose to use garlic powder instead, I found that doubling the amount slightly can help replicate the intensity of fresh cloves. This analytical approach to seasoning ensures that regardless of your ingredients, the outcome remains consistent with the high standards of this recipe.
Pro tip: If you use a garlic press, scrape the pressed garlic directly into the oil to capture all the juices, which hold a significant amount of the flavor.
Bone-In Conversion and Storage Protocols
While this recipe is optimized for boneless thighs, many people prefer the flavor of bone-in, skin-on cuts. If you decide to go this route, you must adjust your technical approach to account for the increased mass and the presence of the skin. If using bone-in, skin-on thighs, increase bake time by 10-15 minutes and ensure internal temp reaches 175 degrees for optimal texture with bone-in cuts. The higher temperature is necessary because the connective tissue near the bone needs more heat to break down and become tender. I have found that bone-in thighs are much more forgiving and stay exceptionally juicy even if they slightly overshoot the target temperature. For those interested in optimizing bone-in results, check out my blueprint on proven bone in chicken thigh recipes for crisp skin.
Storage is another area where I have conducted extensive testing. Most people complain that leftover breaded chicken becomes soggy in the refrigerator. My research shows that this happens because the moisture inside the meat redistributes into the crust over time. To minimize this, allow the chicken to cool completely on a wire rack before placing it in an airtight container. This prevents steam from being trapped in the container, which would immediately soften the crust. These chicken thighs will stay safe and flavorful in the refrigerator for up to three or four days.
When it comes to reheating, the microwave is the enemy of the crispy crust. The microwave heats water molecules, which turns the moisture inside the meat back into steam, ruinous for your beautiful breading. Instead, I recommend using a toaster oven or a standard oven set to 350 degrees. Place the leftovers on a wire rack over a baking sheet and heat for about 10 minutes. This allows hot air to circulate around the entire piece, crisping the exterior back to near-original levels. In my side-by-side tests, the oven-reheated chicken was nearly indistinguishable from the fresh batch, while the microwaved version was significantly softer.
Pro tip: For the absolute best reheating results, use an air fryer at 360 degrees for 4-5 minutes, which mimics the original broiler finish perfectly.
Frequently Asked Questions
How can I ensure a perfectly crispy crust and prevent sogginess?
The key to a crispy crust is twofold: moisture control and heat intensity. Always pat the chicken dry before starting and ensure you are using the olive oil binder instead of an egg wash. The oil acts as a barrier against the juices of the meat. Additionally, never skip the broiler step at the end. That final blast of direct heat is what transforms the cheese into a rigid, crunchy shell that can withstand the steam coming from the meat.
Can I use bone-in, skin-on thighs, and how does this affect cooking time?
Yes, you can certainly use bone-in thighs. You will need to increase the baking time to approximately 40-45 minutes to ensure the meat near the bone is fully cooked. I recommend aiming for an internal temperature of 175 degrees for bone-in pieces, as this results in a better texture. The skin-on version will be even more flavorful, though you should ensure the skin is tucked neatly under the breading to prevent it from becoming flabby.
What are the common mistakes to avoid when making this dish?
The most common mistake I see is overcrowding the baking dish. If the chicken pieces are touching, steam becomes trapped between them, creating soggy spots where the crust cannot crisp up. Another frequent error is using pre-shredded cheese, which contains starches that prevent a smooth melt and a strong bond. Finally, avoid the temptation to flip the chicken; the bottom will stay crisp enough if you use a metal pan, and flipping risks tearing the delicate crust you have worked so hard to build.
What is the best cooking method (oven vs. pan-seared) to achieve the best results with chicken thighs?
For this specific parmesan coating, the oven is superior because it provides a dry, surrounding heat that allows the cheese to set and the crumbs to toast evenly without the risk of the breading falling off in a hot pan. Pan-searing a breaded thigh can be difficult because the weight of the meat can cause the coating to stick to the pan surface. The oven method, combined with the broiler finish, provides a more consistent, restaurant-quality result with much less mess and risk of failure.
Conclusion: Your Blueprint for Crispy Success
Achieving the perfect balance of a juicy interior and a shatteringly crisp exterior is not a matter of luck; it is a matter of applying the right kitchen engineering. By using olive oil as a structural binder and finishing with a high-heat broiler blast, you have successfully solved the most common problems associated with baked chicken. This method for parmesan chicken thighs is designed to be repeatable and reliable, giving you the confidence to serve a meal that sounds as good as it tastes. The crunch you hear when you first cut into these pieces is the sound of a system that works exactly as intended.
I encourage you to take this blueprint and make it your own, paying close attention to the sensory cues I have described. Look for that mahogany color, listen for the sizzle of the broiler, and feel the resistance of a well-set crust. These are the indicators of a job well done. When you move away from vague instructions and toward a precise, tested technique, the results speak for themselves. You no longer have to settle for soggy, pale chicken when you have the tools to engineer something truly superior.
I would love to hear about your results, especially that first moment you experience the crunch of the broiler-finished crust. If you found this technical breakdown helpful, please share this blueprint with others who are tired of inconsistent recipes. At TheRecipiest, my goal is always to provide you with the clarity and expertise needed to master your kitchen. Now that you have the system, it is time to head to the kitchen and execute. Happy cooking, and I look forward to hearing about your crispy success.
Garlic Parmesan Chicken Thighs
Equipment
- 9×13 baking dish (metal preferred)
- Shallow dish (for oil)
- Shallow dish (for crumbs)
- Fork
- Meat Thermometer
Ingredients
Chicken Thighs & Coating Ingredients
- 8 boneless skinless chicken thighs
- 2 tablespoons olive oil
- 3/4 cup parmesan cheese grated (recommend grating your own block)
- 1 cup plain bread crumbs
- 3 cloves garlic minced (or two teaspoons garlic powder)
- 1/2 teaspoon Italian Seasoning dried
- 1/2 teaspoon oregano dried
- to taste salt and black pepper
Instructions
Preparation and Dredging
- Prepare a 9×13 baking dish with non-stick spray and set aside. Use a light colored metal pan for best heat conduction.
- In a shallow dish combine olive oil and minced garlic.
- In a second shallow dish mix together bread crumbs, parmesan, Italian Seasoning, and oregano. Use a fork to break up any clumps of cheese so the mixture is uniform.
- Season the chicken thighs generously with salt and pepper on both sides.
- Take one thigh and dip it into the oil mixture, turning it to ensure every part of the meat is glistening with a thin, even coat of oil.
- Then dredge it through the bread crumb mixture. Press the meat down firmly into the crumbs to force the coating to adhere to the oil binder.
- Place the coated chicken thigh in the prepared baking dish, spacing them evenly to allow for airflow.
- Repeat for each thigh.
Baking and Finishing
- Bake in a preheated 375 degrees F oven for 30 minutes or until a meat thermometer inserted in the thickest part of the thigh reads 165 degrees F.
- Place chicken under the broiler for two minutes to brown the cheese and lock in crispness. Watch carefully to prevent burning.
- Remove from oven and garnish with fresh parsley, if desired.


