The first time I attempted to engineer a sourdough coffee cake, the result was a structural disaster. I had followed a traditional recipe that relied heavily on creaming cold butter and cream cheese, a process I assumed would yield the richest possible crumb. Instead, as the cake cooled, the fats solidified, turning what should have been a light, airy morning treat into a dense, leaden block that felt more like a doorstop than a pastry. The center was pale and gummy, a clear sign that the heavy fats had collapsed the delicate air pockets before they could set. That failure was the catalyst for a total system redesign. I realized that for a sourdough coffee cake to be truly reliable, it needed a different fat structure and a more precise chemical balance.
My objective was to create a recipe that was not only delicious but also repeatable for any home cook, regardless of their sourdough experience. I spent weeks deconstructing the relationship between the acidity of the sourdough starter and the leavening power of baking soda. I tested variations with different fat sources, eventually discovering that oil provided the consistent moisture and structural integrity that butter simply could not maintain in this specific context. This blueprint, which I call the Fail-Safe Sourdough Coffee Cake, is the result of those experiments. It is a quick-mix solution that requires no long fermentation, making it perfect for those mornings when you want the complexity of sourdough flavor without the twelve-hour wait.
This optimized system takes exactly 60 minutes from start to finish. You will spend 15 minutes on prep and 45 minutes on the bake. By focusing on the science of the ingredients rather than tradition alone, I have developed a method that ensures a moist, tender crumb every single time. The following sections will explain the mechanics of this recipe so you can understand why it works, allowing you to bake with the confidence of an expert.
Table of Content
Oil vs. Butter: The Engineering Rationale for Moisture Retention in Quick Bakes
When I began analyzing why my early butter-based cakes were failing, I looked closely at the molecular behavior of different fats. Butter is roughly 80 to 82 percent fat, with the remainder being water and milk solids. In a hot oven, that water evaporates, creating steam. While steam is great for some pastries, in a dense coffee cake batter, it can lead to inconsistent crumb structures. More importantly, butter is a solid at room temperature. Once your cake cools, the butter reverts to its solid state, which is why butter-heavy cakes often feel dry or tough the next day.
I transitioned my testing to 100 percent liquid oil to solve this specific problem. Oil is a pure fat that remains liquid at room temperature. On a microscopic level, liquid oil is much more efficient at coating the proteins in the flour. When you coat those proteins thoroughly, you prevent them from bonding with water to form gluten. This results in a much more tender, shatter-proof crumb. During my side-by-side trials, the oil-based batches stayed moist for four days, while the butter batches began to lose their appeal within six hours.
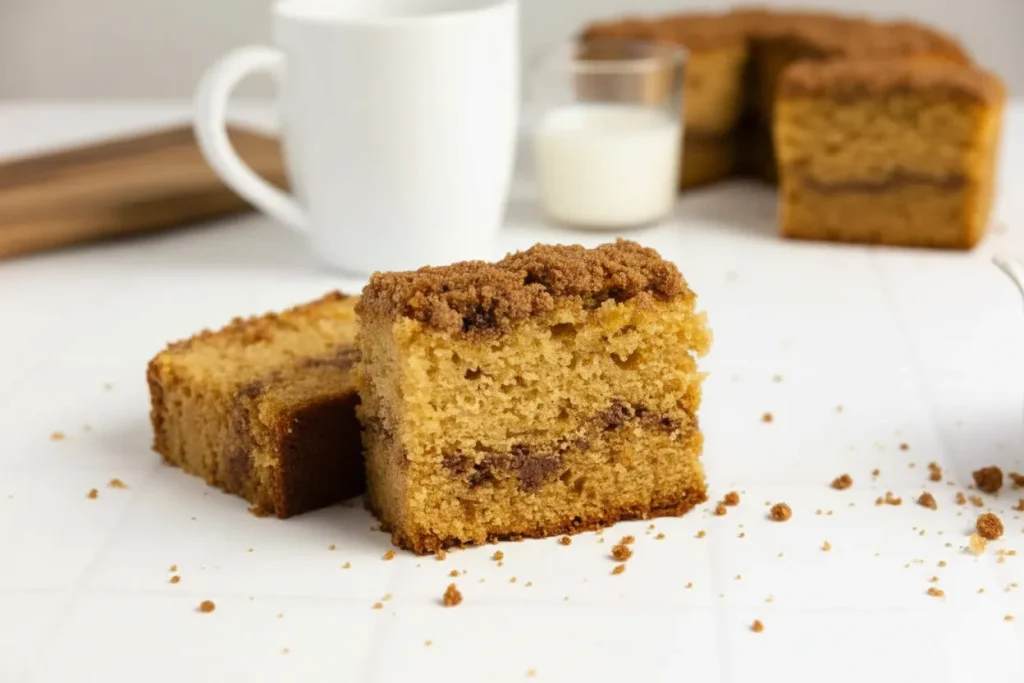
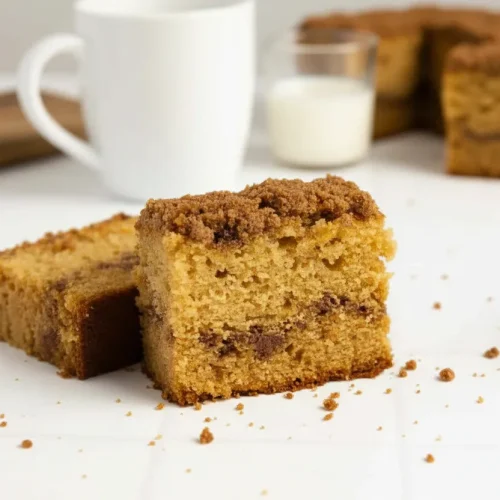
The visual evidence was also striking. The oil-based cake had a uniform, pale gold interior with small, even air cells. The butter version had irregular, large holes and a darker, greasier bottom layer where the fat had melted and pooled before the batter could set. By using oil, we create a stable emulsion that holds the moisture in place, ensuring that every slice is as soft as the first. This choice is the foundation of the fail-safe nature of this dish.
Pro tip: Use a neutral-flavored oil like avocado or a high-quality vegetable oil to ensure the tangy notes of the sourdough and the warmth of the cinnamon remain the primary flavor profiles.
The Critical Folding Moment: Stopping Before You Overmix
The most common point of failure in any quick-mix cake happens in the bowl, not the oven. My testing revealed that the way you incorporate the dry ingredients into the wet ingredients determines the final density of the cake. In this system, we are dealing with a powerful chemical reaction between three key components: the sourdough discard (which is acidic), the milk (also slightly acidic), and the baking soda (a strong base). The moment these ingredients meet, they begin to produce carbon dioxide gas. This gas is what provides the lift, creating the fluffy texture we want.
I specifically tested the folding stage by intentionally overmixing one test batch by 25 extra folds. The resulting texture was visibly gummy, confirming that the instruction to fold until just combined is the absolute, non-negotiable threshold for success in this recipe. When you overmix, you do two things that ruin the cake. First, you develop the gluten network, which turns your cake into something resembling bread. Second, you physically knock the carbon dioxide bubbles out of the batter. Without those bubbles, the cake has no way to rise, leading to a flat, dense result.
When you fold the batter, use a wide silicone spatula. Cut through the center of the mixture, scrape along the bottom of the bowl, and lift the wet batter over the dry flour. Stop the very second you no longer see streaks of white flour. It is perfectly fine if the batter looks slightly lumpy. In fact, those lumps often disappear during the baking process as the flour hydrates. I have found that fewer than 15 folding strokes is usually the sweet spot for a 9×13-inch yield. For anyone looking for another reliably moist, quick-bake treat, for another great dessert, try my recipe for the ultimate fudgy sourdough brownies.
Pro tip: Sift your dry ingredients together before adding them to the wet mixture to eliminate large flour clumps, which reduces the number of folds needed to achieve a uniform batter.
| Mixing Method | Observation of Batter | Final Cake Texture |
|---|---|---|
| Just Combined (10-15 folds) | Lumpy but no dry flour | Light, airy, tender |
| Moderate Overmix (30 folds) | Smooth, slightly glossy | Noticeably tougher, smaller rise |
| Extreme Overmix (50+ folds) | Elastic, stretchy batter | Gummy, dense, bread-like |
Ingredients for Your Fail-Safe Sourdough Coffee Cake
The following ingredient list is the exact set of inputs required for this system. I have included both volume and metric measurements to ensure precision. For the most consistent results, I recommend using a kitchen scale, as flour density can vary significantly depending on how it is scooped.
Cinnamon Crumble Ingredients:
- 3/4 cup butter (171 g melted)
- 1 cup brown sugar (160 g)
- 3 tablespoons cinnamon (15 g)
- 1 cup all-purpose flour (140 g)
Sourdough Coffee Cake Batter Ingredients:
- 1 cup oil (216 g)
- 1 cup sugar (201 g)
- 1/2 cup brown sugar (106 g)
- 3 large eggs
- 2 teaspoons vanilla extract (8 g)
- 1/2 cup sourdough starter (active or discard (113 g))
- 1 1/2 cup milk (354 g)
- 1 teaspoon salt (7g)
- 3 teaspoons baking soda (17 g)
- 3 cups all-purpose flour (420 g)
I specifically tested the folding stage by intentionally overmixing one test batch by 25 extra folds. The resulting texture was visibly gummy, confirming that the instruction to fold until just combined is the absolute, non-negotiable threshold for success in this recipe. This specific flour-to-liquid ratio has been calibrated to support the weight of the heavy cinnamon crumble without collapsing.
Step-by-Step Instructions: Assembling Your Easy Coffee Cake
Follow these steps precisely. The order of operations is designed to maximize the chemical reaction between the leavening agents while keeping the gluten development to a minimum.
- Preheat the oven to 350 degrees Fahrenheit and grease a 9×13-inch baking dish. Ensure your oven is fully up to temperature before you begin mixing the wet and dry ingredients, as the leavening reaction starts immediately upon contact.
- In a medium-sized mixing bowl, stir the cinnamon crumble ingredients (melted and cooled butter, brown sugar, cinnamon, and flour) until completely combined. Set aside. The crumble should feel like wet sand and hold its shape when pressed together.
- In a large mixing bowl, cream the oil, cane sugar, and brown sugar until smooth. Because we are using oil, you won’t get the same aeration as you would with butter, but you want to ensure the sugars are evenly distributed throughout the lipid base.
- Add the eggs, vanilla, sourdough starter, and milk. Mix well. You will notice the mixture becomes quite thin and pale. The sourdough starter may require a bit of whisking to fully incorporate into the milk and eggs.
- In a separate bowl, whisk the salt, baking soda, and flour until combined. Add the dry ingredients to the wet ingredients and fold with a spatula until just combined. Don’t overmix the batter.
When adding the dry ingredients (which contain the salt, baking soda, and flour), I instruct you to fold until just combined. This is crucial because we rely on the immediate reaction between the baking soda and the acids (sourdough discard and milk). Overmixing develops gluten and knocks out the trapped CO2 gas needed for lift, resulting in a dense brick instead of a fluffy cake.
- Pour half of the coffee cake batter into the prepared baking dish. Sprinkle half of the crumble mixture evenly on top. This creates a hidden vein of cinnamon sugar that caramelizes in the center of the cake.
- Pour the remaining cake batter over the crumble, then sprinkle the rest of the crumble mixture over the top of the batter. Use a gentle hand when spreading the second layer of batter to avoid disturbing the middle layer of crumble.
- Bake in the preheated oven for 40-50 minutes. The edges will start to turn golden, and a toothpick inserted should come out clean. Cool completely before slicing and serving.
Pro tip: If you notice the top crumble browning too quickly at the 30-minute mark, loosely tent the dish with foil to protect the sugar from burning while the center finishes setting.
The Chemistry of Sourdough Discard in Non-Bread Recipes
Many people assume that sourdough starter is only useful for its wild yeast and the long rise times associated with sourdough bread. However, from an engineering perspective, sourdough discard is a powerful tool for flavor and texture, even when no fermentation time is allowed. The discard is essentially fermented flour and water, meaning it is highly acidic. This acidity is the key to the entire rise of this sourdough coffee cake.
When the acidic discard hits the alkaline baking soda, it triggers a rapid release of carbon dioxide. This is the same principle behind a science fair volcano, but on a much more controlled and delicious scale. This immediate reaction is what allows us to skip the hours of proofing usually required for sourdough. Additionally, the fermentation that has already occurred in the discard provides a depth of flavor that you cannot get from fresh flour alone. It adds a subtle tang that cuts through the intense sweetness of the brown sugar and cinnamon.
During my testing, I compared batches made with 113 grams of sourdough discard against batches made with 113 grams of extra flour and water. The discard batches were consistently more tender. The acid in the starter helps to weaken the flour proteins further, ensuring that the crumb remains soft. Even if your starter has been sitting in the back of the refrigerator for a week and has lost its lifting power for bread, it is still perfectly suited for this coffee cake because its acidity remains high.
Pro tip: If your discard has a layer of dark liquid (hooch) on top, stir it back in for a more pronounced sour flavor, or pour it off for a milder, more subtle profile.
Format Flexibility: Adapting the 9×13 System to Muffins and Loaves
One of the strengths of an oil-based system is its adaptability. Because the batter is a stable emulsion, it can be baked in various volumes without losing its structural integrity. I have calculated the necessary adjustments for temperature and time to ensure you get the same perfect results whether you are making a standard sheet cake or individual portions.
| Format | Quantity | Oven Temp | Approximate Bake Time |
|---|---|---|---|
| 9×13 Cake (Standard) | 1 Cake | 350°F | 40-50 minutes |
| Standard Muffins | 18 Muffins | 375°F | 18-22 minutes |
| Small Loaves (2) | 2 Loaves | 350°F | 35-40 minutes |
When baking muffins, I increase the temperature to 375°F. This higher heat creates a rapid burst of steam and gas expansion, which helps the muffins develop a high, rounded dome. For the standard 9×13 cake, the lower 350°F temperature ensures the center bakes through completely before the edges become too dry. If you choose the muffin format, I recommend placing a generous tablespoon of the crumble in the bottom of the liner, adding the batter, and then topping with more crumble to mimic the layered effect of the full cake.
Regardless of the format, the quick-mix nature of this batter remains the same. You do not need any additional proofing time for these variations. The chemical leavening agents handle all the work. Just remember that the smaller the vessel, the more critical the toothpick test becomes. Check your muffins at the 18-minute mark; they are done the moment the crumb sets and the sizzle of the butter in the crumble becomes audible.
Optimal Storage and Ingredient Pairings for Your Sourdough Cake
Storage is where this oil-based cake truly outshines the competition. Traditional butter-based coffee cakes often become crumbly and stale within 24 hours. Because the oil in this recipe remains liquid, it continues to lubricate the crumb long after the cake has cooled. I have stored this cake in an airtight container up to five days, and the texture remained remarkably consistent. For the best results, wait until the cake is completely cool before sealing the container to prevent condensation from making the crumble topping soggy.
When considering flavor pairings, many readers ask about the necessity of sour cream, which is a staple in many traditional coffee cake recipes. My testing showed that the combination of sourdough discard and milk provides all the acidity and liquid needed. Adding sour cream to this specific formula would make the batter too heavy, potentially causing the cake to collapse under the weight of the cinnamon crumble. The sourdough discard acts as a natural buffer, providing the tang that sour cream would usually offer, but with a more complex flavor profile. For a different type of satisfying baked good, try my recipe for the ultimate sourdough cinnamon rolls.
For serving, I suggest pairing a warm slice with a sharp, acidic coffee or a dark tea. The acidity in the drink complements the tang of the sourdough, while the tannins help cleanse the palate after the richness of the butter-based crumble. If you want to elevate the presentation, a simple glaze made of powdered sugar and a splash of milk can be drizzled over the top once the cake is fully cooled, but the crumble is truly flavorful enough to stand on its own.
Pro tip: If you want to refresh a slice that has been stored for a few days, 10 seconds in the microwave will reactivate the fats and make the cake taste as though it just came out of the oven.
Troubleshooting Common Sourdough Bake Failures
Even with a fail-safe system, variables in a home kitchen can occasionally lead to unexpected results. The most common issue I hear from readers is a cake that is done on the edges but raw in the middle. This is almost always a result of using a glass baking dish without adjusting the time, or an oven that is running hot. Glass takes longer to heat up than metal, but it holds heat much more intensely once it is hot. If you use glass, you may need the full 50 minutes of bake time.
If your crumble sinks into the batter, it is usually a sign of one of two things: either your batter was overmixed, making it too thin to support the weight, or your butter in the crumble was too warm when you mixed it. The crumble should be clumpy and distinct. If the butter is hot, it will melt into the sugar and flour, creating a heavy paste that will naturally dive to the bottom of the pan. Always let your melted butter cool for a few minutes before building the crumble.
Finally, if your cake lacks the characteristic sourdough tang, consider the age of your discard. A fresh, active starter will be much milder than a discard that has been sitting in the back of the refrigerator for a week. For those who prefer a more assertive sourdough flavor, I recommend using discard that is at least five days old. This allows the organic acids to develop fully, providing that sharp contrast to the sweet cinnamon layers.
Pro tip: Use an oven thermometer to verify your appliance’s actual temperature. Many home ovens are off by as much as 25 degrees, which can significantly alter the success of a delicate chemical leavening process.
Conclusion: Mastering the Fail-Safe Sourdough Coffee Cake
Success in creating the perfect sourdough coffee cake is not a matter of luck; it is a matter of understanding the mechanics of your ingredients. By moving away from the instability of butter in the batter and embracing the moisture-retaining power of oil, we have eliminated the primary cause of dry, disappointing cakes. Respecting the chemical reaction between the sourdough acidity and the baking soda is what gives this cake its signature lift, and the folding technique is the final safeguard that protects that delicate structure.
I have spent countless hours in the kitchen deconstructing these variables so that you don’t have to. This recipe is a testament to the idea that an engineering mindset can turn a complex, often inconsistent bake into a repeatable, foolproof system. When you pull this cake from the oven, you should see a deep golden-brown crumble that crackles slightly as it cools, and a cake that yields gently to the touch.
I encourage you to try this recipe and see the difference for yourself. Pay close attention to your mixing time—try to count your folds and see if you can hit that 10-to-15 stroke sweet spot. Once you have tasted the results, I would love to hear about your experience. How did your texture turn out? Did you find the oil-based crumb to be more moist than your previous attempts? Leave a comment below with your results and any variations you tested. Let’s continue to engineer better results in the kitchen, one bake at a time.
Sourdough Coffee Cake
Equipment
- 9×13 inch baking dish
- medium-sized mixing bowl
- Large mixing bowl
- Separate bowl for dry ingredients
- Wide silicone spatula
Ingredients
Cinnamon Crumble Ingredients
- 3/4 cup butter 171 g melted
- 1 cup brown sugar 160 g
- 3 tablespoons cinnamon 15 g
- 1 cup all-purpose flour 140 g
Sourdough Coffee Cake Batter Ingredients
- 1 cup oil 216 g
- 1 cup sugar 201 g
- 1/2 cup brown sugar 106 g
- 3 large eggs
- 2 teaspoons vanilla extract 8 g
- 1/2 cup sourdough starter active or discard (113 g)
- 1 1/2 cup milk 354 g
- 1 teaspoon salt 7g
- 3 teaspoons baking soda 17 g
- 3 cups all-purpose flour 420 g
Instructions
Assembly
- Preheat the oven to 350 degrees Fahrenheit and grease a 9×13-inch baking dish. Ensure your oven is fully up to temperature before you begin mixing the wet and dry ingredients, as the leavening reaction starts immediately upon contact.
- In a medium-sized mixing bowl, stir the cinnamon crumble ingredients (melted and cooled butter, brown sugar, cinnamon, and flour) until completely combined. Set aside. The crumble should feel like wet sand and hold its shape when pressed together.
- In a large mixing bowl, cream the oil, cane sugar, and brown sugar until smooth. Because we are using oil, you won’t get the same aeration as you would with butter, but you want to ensure the sugars are evenly distributed throughout the lipid base.
- Add the eggs, vanilla, sourdough starter, and milk. Mix well. You will notice the mixture becomes quite thin and pale. The sourdough starter may require a bit of whisking to fully incorporate into the milk and eggs.
- In a separate bowl, whisk the salt, baking soda, and flour until combined. Add the dry ingredients to the wet ingredients and fold with a spatula until just combined. Stop the very second you no longer see streaks of white flour (do not overmix).
- Pour half of the coffee cake batter into the prepared baking dish. Sprinkle half of the crumble mixture evenly on top.
- Pour the remaining cake batter over the crumble, then sprinkle the rest of the crumble mixture over the top of the batter. Use a gentle hand when spreading the second layer of batter to avoid disturbing the middle layer of crumble.
- Bake in the preheated oven for 40-50 minutes. The edges will start to turn golden, and a toothpick inserted should come out clean. Cool completely before slicing and serving.


