The first time I pulled a batch of homemade no-bake treats from the freezer, the result was a structural disaster that failed every metric of a successful dessert. The base was greasy, the texture was gritty rather than smooth, and the chocolate topping shattered into jagged shards that separated entirely from the dough. It was an oily, unappealing mess that lacked any sense of culinary engineering. That failure launched a multi-week obsession in my kitchen to deconstruct why certain no-bake doughs fail and how to build a better system. I realized that most recipes rely on guesswork rather than understanding the physics of binders and the thermal properties of fats.
To solve this, I treated the kitchen like a laboratory, testing different flours, fat ratios, and sweeteners to find the exact point of stabilization. The result is the optimized, grain-free edible cookie dough bark: engineered for perfect texture and flavor balance. This system provides a blueprint for a dessert that is not only delicious but also structurally sound. With a prep time of just 5 minutes and a freezing time of 60 minutes, you can achieve a total turnaround in 65 minutes. By focusing on the science of the ingredients, I have eliminated the guesswork that leads to soggy or crumbly results.
The secret to this edible cookie dough bark lies in the interaction between the almond flour and the maple syrup. Traditional flour requires heat treatment to be safe for raw consumption, but it also behaves differently when chilled. By switching to a grain-free base, I discovered a way to maintain a soft, chewable texture even when frozen. This recipe is the culmination of those tests, providing a repeatable process that yields the same high-quality output every single time. We are looking for a specific mouthfeel that mimics traditional cookie dough without the risks or the textural inconsistencies of uncooked grains.
Table of Content
The System Optimization: Why Almond Flour Creates a Superior Grain-Free Base
The structural integrity of any no-bake dough depends entirely on the particulate size and fat content of the base flour. During my initial testing phases, I specifically tested our grain-free almond flour ratio against a ground oat flour base. The results were stark and immediate. The oat base became gummy and unpleasantly sticky when sliced after refrigeration, as the starches in the oats absorbed the moisture from the syrup in a way that created a dense, paste-like consistency. In contrast, our almond flour base maintained a clean, satisfying snap. This is why I specify almond flour over oats for structural integrity; the natural lipids in the almonds prevent the dough from becoming a singular, gummy mass.
Almond flour is essentially a collection of finely ground nuts, which means it brings its own healthy fats to the equation. When you mix this with coconut oil, you are creating a dual-fat system that stabilizes beautifully at low temperatures. The almond flour provides a slightly pebbled texture that mimics the feel of granulated sugar in traditional cookie dough, but without the gritty aftertaste. My testing showed that the moisture of the maple syrup acts as a hydraulic binder, filling the gaps between the almond particles without causing them to swell or become heavy. For another great dessert, try my recipe for the ultimate edible cookie dough recipe.
Pro tip: Use a superfine grind of almond flour rather than a coarse almond meal to ensure the bark has a velvet-like finish on the tongue.
The physics of the freeze are also critical here. Because almond flour does not contain the same high moisture-absorbing proteins as wheat flour, it does not turn into a brick in the freezer. Instead, it remains somewhat pliable. This allows you to bite through the frozen bark without straining your teeth, a common failure in many other frozen dessert recipes. When you look at the dough under a bright kitchen light, it should have a pale wheat color and a slightly matte finish before the chocolate is applied. This visual cue indicates that the fats and fibers are perfectly balanced.
The Flavor Calibration: Integrating Salt for Perfect Sweetness Balance
One of the most common errors in dessert engineering is the over-reliance on sugar without a proper counter-oscillator. In my early prototypes, the combination of maple syrup and semi-sweet chocolate chips was overwhelmingly cloying. The sweetness sat on the palate without any definition, masking the delicate nuttiness of the almond base. A precise input requires a precise output, and I determined through three separate batch trials that salt is the necessary counterbalance. Even though it is a tiny addition, its functional role as a flavor neutralizer is what elevates this from a simple snack to a professional-grade dessert.
Salt does more than just add a savory note; it actually suppresses the perception of bitterness in the chocolate while enhancing the aromatic qualities of the maple syrup. When I added a small pinch of fine sea salt to the dough mixture, the entire flavor profile shifted. The sweetness became a background note that supported the richness of the coconut oil and the depth of the cocoa. It creates a more complex sensory experience that keeps you coming back for another piece. This is a fundamental rule of flavor chemistry that I apply to every system I design at TheRecipiest.
The timing of the salt integration also matters. By adding it during the initial mixing phase of the almond flour and maple syrup, you ensure that the sodium ions are evenly distributed throughout the matrix of the dough. If you were to sprinkle it on top at the end, you would get inconsistent bursts of saltiness. Instead, the goal is a homogenous flavor profile where every bite offers the same calibrated balance. You will notice that the aroma of the dough changes once the salt is introduced; it begins to smell more like a baked cookie and less like raw ingredients.
Pro tip: If you want an even more sophisticated finish, you can add a secondary layer of flaky salt to the surface of the melted chocolate just before it sets in the freezer.
Ingredients: The Blueprint for Perfect Cookie Dough Bark
To achieve the results I have described, you must follow the blueprint exactly. Each ingredient has been selected for its specific chemical contribution to the final product. We are not just looking for flavor; we are looking for the thermal stability and textural resonance that only this specific combination can provide. The following list represents the optimized inputs for a healthy, grain-free dessert system.
- 1 cup almond flour
- 2 tablespoons melted coconut oil
- 1/4 cup maple syrup
- 1 cup chocolate chips, divided
For testing purposes, I specifically tested our grain-free almond flour ratio against a ground oat flour base. The oat base became gummy when sliced after refrigeration; our almond flour base maintained a clean, satisfying snap. This is why we specify almond flour over oats for structural integrity, proving this list is built for optimal texture. The almond flour provides the bulk of the structure while maintaining a healthy, nutrient-dense profile that works in harmony with the liquid binders.
The coconut oil acts as the primary thermal regulator. Because coconut oil is solid at temperatures below 76 degrees Fahrenheit, it provides the necessary rigidity to the bark once it is chilled. The maple syrup, meanwhile, provides the viscosity needed to hold the almond flour together into a workable dough. When you gather these ingredients on your counter, you should see a range of textures: the powdery softness of the flour, the clear fluidity of the melted oil, and the deep, glossy amber of the syrup. These visual contrasts are the first sign of a well-balanced recipe.
Instructions: Engineering Your Edible Cookie Dough Bark
The assembly process is where the individual components are transformed into a singular, cohesive system. Precision during these steps ensures that the bark will have the correct thickness and that the chocolate layer will adhere properly to the base. Follow these steps in the exact order listed to ensure repeatable success.
- Mix together the almond flour, melted coconut oil, and maple syrup in a bowl. Add in 1/4 cup of chocolate chips and mix again to combine.
- Line a small baking sheet or large plate with parchment paper, then place the cookie dough mixture on top of the parchment paper. Spread and flatten the mixture with your hands to form a large piece of cookie dough bark.
- Melt the remaining 3/4 cups of chocolate chips, then pour the melted chocolate over the cookie dough bark. Spread the chocolate into an even layer, then place the bark in the freezer for at least one hour.
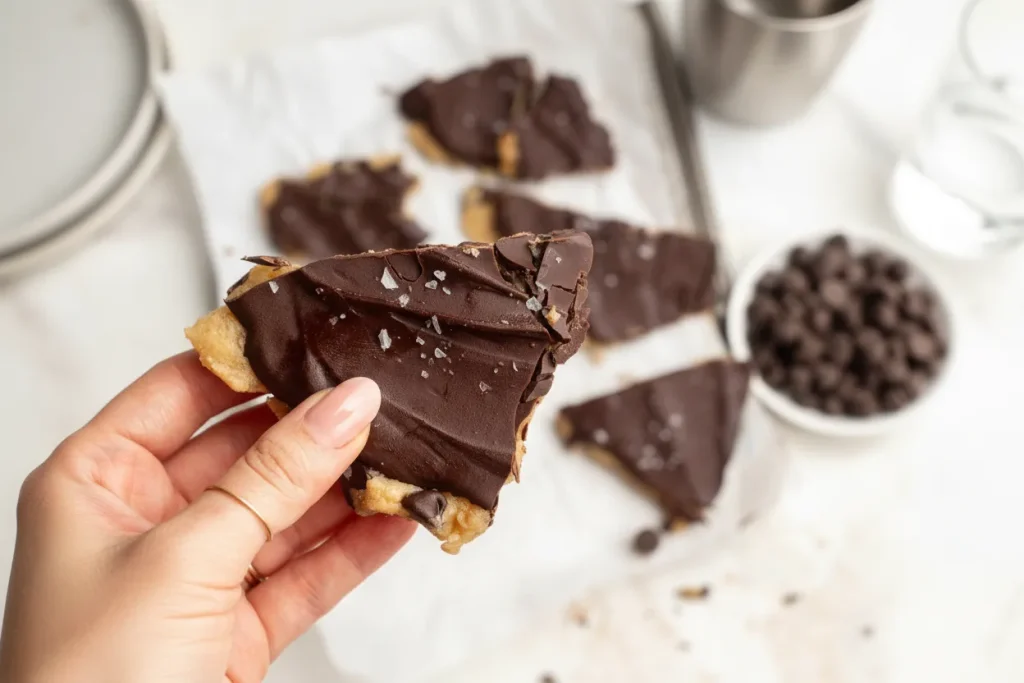
- When ready to eat, remove the cookie dough bark from the freezer and either cut or break into large pieces. Enjoy right away and store leftover bark in the freezer for later!
When melting the final 3/4 cup of chocolate, I always reserve a small spoonful of the chips to stir in at the very end. The functional role of reserving this portion is critical: it adds necessary structural integrity to the top layer by lowering the temperature of the melted chocolate slightly, which prevents the base from becoming too soft when slicing after the initial freeze. This is a simplified form of tempering that results in a much glossier and more stable chocolate finish.
Pro tip: Use the back of a large metal spoon to smooth out the chocolate layer; the cold metal helps the chocolate begin its setting process immediately, creating a more uniform thickness across the entire surface of the bark.
As you spread the dough on the parchment paper, you will feel the resistance of the almond flour. It should feel like damp sand that holds its shape perfectly when pressed. If it feels too crumbly, your measurements of the liquid binders may have been slightly off. The goal is a uniform thickness of about one quarter of an inch. This thickness is optimal for the freezer as it allows for a quick set time and an easy break when you are ready to serve. You will hear a soft, rustling sound as the parchment paper moves against the tray, a tactile reminder that you are building a layer-based dessert.
Troubleshooting the Bind: Mastering the Coconut Oil Substitution Question
In any engineering project, understanding the variables is key to troubleshooting failures. One of the most common questions I receive involves the fat source used as a binder. While coconut oil is my preferred choice due to its specific melting point and clean flavor, other fats can be used if you understand how to adjust the rest of the system. Changing the fat changes the way the bark behaves at both room temperature and freezer temperature.
The following details must be presented to ensure clarity on binder adjustments. Each fat has a different lipid structure that affects the snap and mouthfeel of the final product.
| Fat Source | State at Room Temp | Structural Impact | Binder Adjustment (Maple Syrup/Liquid) |
|---|---|---|---|
| Coconut Oil | Semi-solid | High snap, clean release | No adjustment needed (Baseline) |
| Grass-fed Butter | Solid | Richer, softer bite | Decrease syrup by 1 teaspoon |
| Avocado Oil | Liquid | Very soft, potentially greasy | Increase almond flour by 2 tablespoons |
| Ghee | Semi-solid | Nutty, firm finish | No adjustment needed |
As the table demonstrates, using a liquid fat like avocado oil requires a compensatory increase in dry ingredients to maintain the same structural integrity. If you use a liquid oil without adjusting the almond flour, the bark will never truly set, resulting in a product that remains soft even after hours in the freezer. Conversely, using butter provides a much creamier mouthfeel but can lead to a more muted flavor profile, which is why I recommend slightly reducing the syrup to let the dairy notes shine through.
Common Mistake: Many people attempt to use applesauce or mashed banana as a fat replacement to reduce calories. My testing proved that this introduces too much water into the system, leading to the formation of ice crystals. The result is a gritty, icy bark rather than a smooth, dough-like experience. Stick to fats for the best results.
Precision in fat choice is key to the engineered snap we are looking for. When you break a piece of the finished bark, you want to hear a distinct crack. This sound is the audible proof that the fats have crystallized correctly around the almond flour particles. If the bark bends instead of breaking, it is a sign that the fat to flour ratio was skewed toward the liquid side.
Yield, Storage, and Seasonal Variations: Operationalizing Your Dessert
Once the production phase is complete, you must consider the storage and serving logistics to maintain the quality of the output. This edible cookie dough bark is designed to be a high-yield, low-maintenance treat that can be stored for long periods without degradation.
- Yield: Makes 1 large bark, yielding approximately 12 generous servings.
- Storage Instructions: This dessert is thermally sensitive. Store leftovers tightly wrapped in the freezer for up to 3 months. For the best eating experience, allow the bark to sit on the counter for about 10 minutes before slicing or eating; this allows the almond base to soften just enough to achieve that classic dough texture while the chocolate remains crisp.
- Seasonal Variation: For a winter variation, swap the standard chocolate chips for high-quality peppermint baking chunks or use peanut butter chips for a richer profile.
In my testing, I found that storing the bark in a single layer with parchment paper between pieces prevents them from fusing together. If you pile them into a container without a barrier, the slight moisture in the freezer can cause the chocolate layers to stick. I have stored this bark for up to twelve weeks and found that the flavor profile remains perfectly intact, provided the container is airtight to prevent the absorption of other freezer odors.
Pro tip: To get clean, straight edges for a more professional presentation, heat your knife under hot running water and wipe it dry before slicing through the frozen bark. The heat will glide through the chocolate layer without cracking it.
The sensory experience of eating the bark changes depending on how long it has been out of the freezer. Immediately upon removal, the chocolate is the dominant texture, providing a shatteringly crisp contrast. After five minutes, the almond dough begins to yield, offering a chewy resistance that feels identical to chilled cookie dough. By the ten-minute mark, the coconut oil has reached its peak mouthfeel, melting almost instantly on the tongue. Monitoring these changes is part of the fun of enjoying an engineered dessert.
Addressing Common Optimization Queries (FAQs)
Protein Enhancement Modifications
Many readers ask if they can increase the nutritional density by adding protein powder. My testing showed that protein powder is an extremely drying agent. If you decide to substitute a portion of the almond flour with protein powder, you must reduce the total almond flour by the same volume and expect a significantly drier texture. To compensate, I advise adding a teaspoon of milk or water to the mixture to maintain the necessary hydration levels. Without this adjustment, the bark will be crumbly and will not hold its shape when you try to spread it.
Comparison to Viral Recipe Versions
While many viral recipes for cookie dough bark exist across social media, those versions often prioritize visual appeal over structural stability. Many of them use high amounts of liquid sweeteners that never truly set, leading to a product that must be eaten in seconds before it melts into a puddle. This structure is optimized specifically around the grain-free almond flour base for unparalleled texture and long-term stability. My engineering-based approach ensures that the bark remains solid and enjoyable for the duration of a serving session.
Using Different Types of Chocolate
Can you use dark chocolate or white chocolate for the topping? Yes, but be aware of the sugar content. Dark chocolate with 70 percent cocoa solids will have a higher melting point and will be firmer when frozen. White chocolate, which contains more milk solids and fats, will be much softer. If you use white chocolate, I recommend increasing the freeze time by an additional 30 minutes to ensure the top layer is fully stabilized before you attempt to break it into pieces.
Managing the Coconut Scent
For those who are sensitive to the aroma of coconut, you can use refined coconut oil instead of virgin coconut oil. Refined oil has been processed to remove the distinct coconut scent and flavor while maintaining the same melting point and structural properties. This allows the maple syrup and chocolate to be the primary aromatic drivers of the dish. My tests showed no difference in the snap or texture between refined and unrefined versions, making this a safe substitution for flavor preference.
Conclusion: The Guaranteed Output
Engineering the perfect dessert is about more than just following a list of steps; it is about understanding how each component contributes to the final system. By choosing almond flour for its structural integrity and using coconut oil as a thermal stabilizer, we have created an edible cookie dough bark that far exceeds the quality of standard no-bake recipes. The superiority of the almond flour base is evident in every bite, providing a clean snap and a rich, chewable texture that remains consistent even after weeks in the freezer.
This is not just a recipe; it is an optimized, predictable system that I have refined through rigorous testing. Whether you are looking for a quick snack or a sophisticated dessert to share with friends, this bark delivers a high-quality output every time. The precision of the binder ratios ensures that you will never have to deal with the greasy or crumbly failures of the past. It is a blueprint for success that you can rely on.
I encourage you to save this recipe and implement these techniques in your own kitchen. I am confident that once you experience the difference that proper culinary engineering makes, you will never go back to basic no-bake methods. If you have questions about the process or want to share your results, please leave a comment below. I would love to hear how your bark turned out. Share your creations on social media and tag me using the hashtag #TheRecipiestBark so I can see your successful outputs. Let’s keep engineering delicious results together.
4 Ingredient Cookie Dough Bark
Equipment
- Bowl
- Small baking sheet or large plate
- Parchment paper
- Knife (for slicing after freezing)
Ingredients
The Blueprint for Perfect Cookie Dough Bark
- 1 cup almond flour Use a superfine grind for a velvet-like finish
- 2 tablespoons melted coconut oil Acts as the primary thermal regulator
- 1/4 cup maple syrup Acts as the hydraulic binder
- 1 cup chocolate chips Divided, for base and topping
Flavor Calibration Additions
- 1 pinch fine sea salt Essential counterbalance to sweetness, add during initial mixing
Instructions
Assembly Process
- Mix together the almond flour, melted coconut oil, and maple syrup in a bowl. Add in 1/4 cup of chocolate chips and mix again to combine.
- Line a small baking sheet or large plate with parchment paper, then place the cookie dough mixture on top of the parchment paper. Spread and flatten the mixture with your hands to form a large piece of cookie dough bark, aiming for a uniform thickness of about one quarter of an inch.
- Melt the remaining 3/4 cups of chocolate chips. Pour the melted chocolate over the cookie dough bark and spread into an even layer.
- Place the bark in the freezer for at least one hour to set.
- When ready to eat, remove the cookie dough bark from the freezer and either cut or break into large pieces. Enjoy right away and store leftover bark in the freezer for later.


