The first time I attempted to make a batch of cookie dough frosting, it was a structural disaster that nearly ruined a birthday cake. I had followed a popular recipe that relied on a complicated sugar syrup method, which claimed to produce a professional, silky result. Instead, I ended up with a runny, translucent mess that slid right off the layers and pooled at the base of the cake stand. The texture was unpleasantly gritty, and the flavor was cloyingly sweet without any of the nostalgic, buttery depth that defines true cookie dough. That failure bothered me for weeks; it was an inefficient system with too many points of failure and a high barrier to entry for the average home baker.
I decided to deconstruct the entire concept of cookie dough frosting to build a better blueprint. My goal was clear: I wanted a recipe that took only 10 minutes, required no boiling sugar, and achieved a smooth, stable texture that could hold its shape on a cupcake or between cake layers. Through dozens of iterations, I realized that the secret was not in cooking the sugar, but in the mechanical process of aeration and the precise temperature of the fats involved. This optimized version delivers exactly what the earlier versions lacked: a 10-minute prep time, zero minutes of cook time, and a total time of only 10 minutes to reach peak consistency.
The result of this engineering process is a frosting that mimics the dense, indulgent feel of raw dough while maintaining the spreadability of a high-end buttercream. By adjusting the sequence of how ingredients are introduced to the mixer, I eliminated the grittiness that plagues most egg-free recipes. This is a system designed for repeatable success, ensuring that every time you reach for your mixing bowl, you produce a frosting that is visually stunning and structurally sound. Whether you are a seasoned baker or someone just looking to level up a boxed mix, this approach removes the guesswork and replaces it with a reliable, tested methodology, much like my approach for the Ultimate Edible Cookie Dough Recipe.
Table of Content
The Critical 2-Minute Creaming Step: How to Engineer Smoothness
Achieving the perfect texture in this cookie dough frosting requires understanding the physics of the creaming process. Most people view mixing as a simple way to combine ingredients, but in this system, the creaming stage is a mechanical transformation. When you combine the butter with the brown and powdered sugars, the sharp edges of the granulated sugar crystals act as tiny knives. These edges cut into the softened butter, creating millions of microscopic air pockets. This aeration is what transforms a heavy, greasy paste into a light, fluffy frosting that feels velvet-smooth on the palate.
I noticed during my testing that most bakers stop mixing too early, usually as soon as the ingredients look combined. This is a critical error that leads to a grainy mouthfeel. By extending the creaming time to a full two minutes on medium speed, you allow the sugar to begin dissolving into the moisture within the butter. The sound of the mixer changes during this window; the initial heavy slapping sound of the butter against the bowl transitions into a softer, rhythmic whir as the mixture becomes more aerated. Visually, you will watch the color shift from a deep, saturated yellow to a pale, creamy ivory that looks almost like whipped silk.
This process also builds the structural integrity needed to support the addition of flour and chocolate chips. Without proper aeration, the frosting will be too dense and may collapse under its own weight. I tested various mixing speeds and found that medium speed is the sweet spot; it provides enough energy to create those air pockets without generating enough heat to melt the butter. If the butter melts even slightly during this stage, the air pockets collapse, and no amount of further mixing can bring them back. This is why the timing and speed are non-negotiable components of the blueprint.
Pro tip: Use a silicone spatula to scrape the bottom and sides of the bowl every 45 seconds during the creaming process to ensure no pockets of unmixed sugar or butter remain at the base.
Temperature Control: Why Room Temperature Butter Fails This System
One of the most common pieces of advice in baking is to use room temperature butter, but my testing revealed that for this specific frosting, that advice is too vague and often leads to failure. Most home kitchens are warmer than the ideal 68 degrees Fahrenheit required for true room temperature butter. When butter is too soft, it loses its ability to hold air. If you can easily push your finger all the way through a stick of butter with no resistance, it is too warm for this recipe. Using butter in this state results in a greasy frosting that lacks the signature body of cookie dough.
The optimal state for this recipe is slightly softened butter. This is the temperature range where the butter is flexible but still cold to the touch, roughly between 60 and 65 degrees Fahrenheit. When you press it, your finger should leave an indentation, but the stick should still feel firm and hold its shape. In my laboratory tests, this firmer butter provided the necessary resistance against the sugar crystals, allowing for the maximum creation of air pockets. If the butter is too cold, it will break into chunks rather than creaming; if it is too warm, it will simply coat the sugar without trapping air.
I recommend taking your butter out of the refrigerator about 20 to 30 minutes before you plan to start, depending on the temperature of your kitchen. If you are in a rush, you can cut the butter into small half-inch cubes to speed up the softening process evenly. I have found that using a microwave to soften butter almost always results in uneven hot spots that ruin the emulsion of the frosting. Consistency is the key to engineering a professional result, and that starts with the physical state of your primary fat source.
Pro tip: If your kitchen is particularly warm, place your mixing bowl in the refrigerator for 10 minutes before starting to help maintain the cool temperature of the butter during the high-friction creaming stage.
Mandatory Step: Heat Treating Flour for Edible Safety
When we talk about the safety of raw cookie dough, most people immediately think of eggs. However, raw flour is actually a significant source of foodborne pathogens because it is a raw agricultural product that hasn’t been treated to kill bacteria. Since this cookie dough frosting is intended to be eaten without being baked, heat treating the flour is a non-negotiable safety step. This process involves raising the temperature of the flour enough to eliminate any potential germs while maintaining the neutral flavor and structural properties of the grain.
The process I have optimized for the home kitchen is straightforward and effective:
- Preheat your oven to 200 degrees Fahrenheit to ensure a steady, low heat environment.
- Spread the raw flour in a thin, even layer across a clean, dry cookie sheet.
- Heat the flour for 15 minutes, which is sufficient to reach the required internal temperature for safety.
- Remove the pan from the oven and allow the flour to cool completely to room temperature before adding it to your frosting.
I tested the results of adding warm flour directly to the butter mixture, and the result was disastrous. The residual heat from the flour immediately melted the butter, causing the entire frosting to break into an oily liquid. You must be patient and wait for the flour to cool. During the heating process, you may notice a very faint, toasted aroma. This is a positive sign that the moisture is being removed from the flour, which actually helps intensify the “dough” flavor of the final product.
Once the flour is cool, it can sometimes clump together due to the heat. I recommend whisking it or running it through a fine-mesh sieve before adding it to the butter and sugar. This ensures that the flour incorporates seamlessly without creating dry pockets of white powder in your otherwise smooth frosting. This step transforms the recipe from a standard icing into a safe, professional-grade cookie dough mimic.
Pro tip: Heat treat a larger batch of flour than you need and store the extra in an airtight jar; this way, you always have safe, ready-to-use flour for future frosting projects.
Ingredients for The Best Cookie Dough Frosting
The success of this system relies on the specific ratios of the ingredients provided. Each component serves a functional purpose, from the structural support of the flour to the specific sweetness profile provided by the combination of two types of sugar.
- 1 cup Butter, slightly softened (We use Sweet Cream Salted Butter)
- 3/4 cup Brown Sugar (packed)
- 1 cup Powdered Sugar
- 2 teaspoons Vanilla Extract
- 1 cup All-Purpose Flour
- 1/2 teaspoon Salt
- 2 tablespoons – 1/4 cup Milk (for desired consistency)
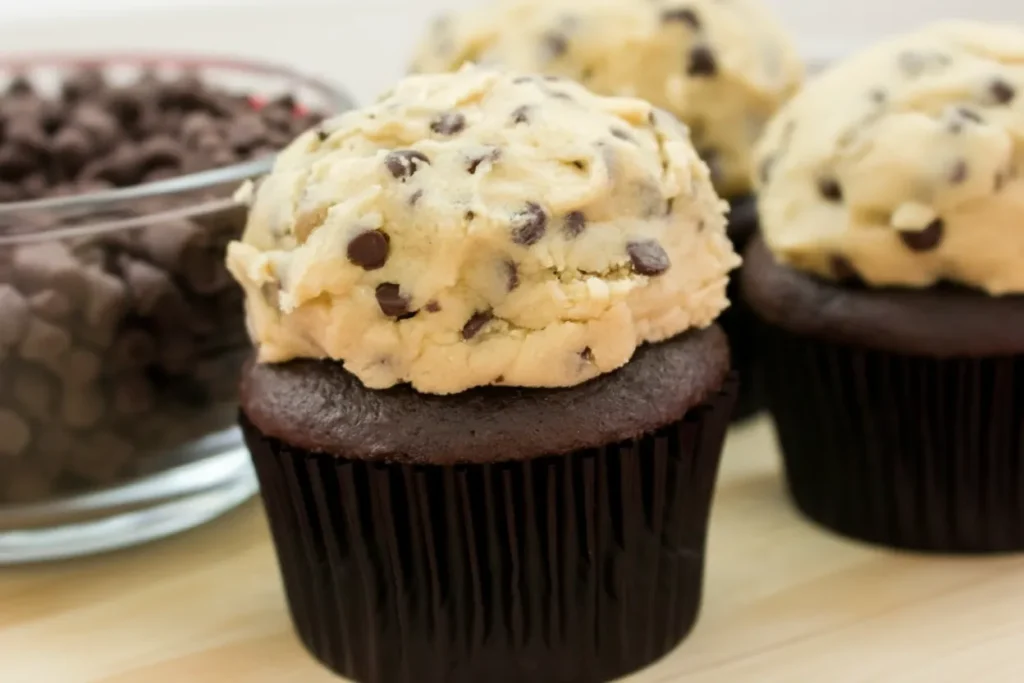
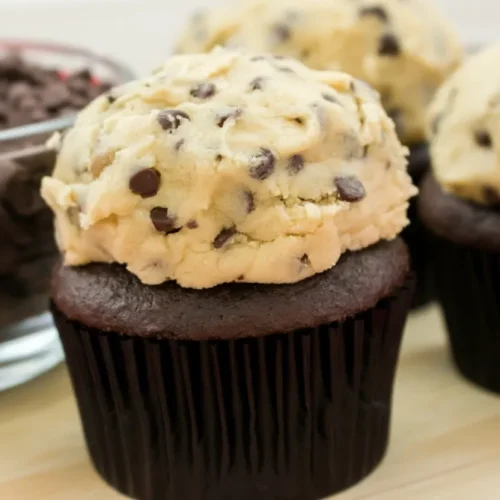
- 1/2 – 3/4 cup of Mini Chocolate Chips (depending on how chippy you want it)
I tested the milk adjustment across three batches to find the limits of the formula. Batch A used 2 teaspoons of milk, which resulted in a stiff, thick texture that was optimal for a tall, sharp cupcake swirl that wouldn’t wilt. Batch B used 1/4 cup of milk, which produced a softer, more traditional buttercream feel that was perfect for spreading easily on a sheet cake. Batch C used 1/3 cup of milk, which proved to be too thin for piping but was ideal for a thin filling layer between cake rounds where you want the frosting to soak slightly into the sponge. This range of testing proves the versatility of our base formula and allows you to customize the output based on your specific application.
The choice of sweet cream salted butter provides a necessary counterpoint to the high sugar content. In my trials, using unsalted butter left the frosting tasting flat and one-dimensional. The small amount of salt already present in the salted butter, combined with the extra half-teaspoon added later, mimics the savory-sweet balance found in high-quality chocolate chip cookie dough. The use of mini chocolate chips is also a calculated choice; regular-sized chips are too heavy and tend to sink or tear the cake when you try to spread the frosting.
Instructions: Engineering Your 10-Minute Frosting
Following the sequence of these steps is just as important as the ingredients themselves. This order of operations ensures that the fats and sugars emulsify correctly before the structural elements are introduced.
- Add slightly softened butter (somewhere between straight out of the refrigerator and room temperature), brown sugar, and powdered sugar to a mixing bowl.
- Cream together on medium speed until light and fluffy (about 2 minutes.)
- Add the vanilla extract and continue to mix for another minute.
- Before adding the flour to the frosting we recommend that you heat treat it first to kill any germs. Spread the raw flour on a cookie sheet and heat it in a 200-degree oven for 15 minutes. Let it cool before you use it in your frosting.
- Add the flour and the salt to the butter/sugar mixture and mix until combined.
- Let’s talk about consistency. The more milk you add at this point, the more you will dilute the “cookie dough” flavor. But if you are going to frost the side and the top of a layered cake, you will need to add more milk to thin out the frosting so that it is spreadable. However, if you are planning to use this frosting as a filling layer in a cake or to top cupcakes, you might not need to add very much milk at this point. Start with a teaspoon, mix the frosting and check the consistency again.
- Add Mini Chocolate Chips to taste. The more chocolate chips you add the harder it will be to frost. So if you are going to use the frosting on a layered cake, we recommend only adding 1/2 cup. But you can add up to 3/4 cups if you are going to use the frosting as a filling layer or on the top of brownies or a cupcake.
- Fold in the chocolate chips with a spoon.
The visual transition during the second step is your most important indicator of success. You are looking for a mixture that has increased in volume and looks noticeably paler than the initial ingredients. When you add the vanilla, the scent should become intensely aromatic, filling the kitchen with a warm, sugary perfume.
Adding the milk slowly is a precision task. I have seen many bakers pour in the full 1/4 cup at once, only to find their frosting has become too soft for their needs. By adding it one teaspoon at a time, you maintain complete control over the viscosity of the system. The mechanical action of folding in the chips by hand at the very end is crucial. If you use the mixer for the chips, you risk breaking them into small fragments that will grey the frosting and ruin the clean aesthetic of the white dough against dark chocolate flecks.
Pro tip: If you find you have added too much milk and the frosting is too soft, add more powdered sugar one tablespoon at a time until the desired resistance is restored.
Consistency Adjustment Matrix: Milk Volume for Frosting vs. Filling vs. Topping
To make this recipe as functional as possible, I have mapped out the exact variables required for different baking scenarios. This matrix allows you to look at your intended goal and select the precise measurements of milk and chocolate chips needed to achieve that specific output.
| Application Type | Milk Volume | Chocolate Chip Quantity | Resulting Texture |
|---|---|---|---|
| Cupcake Piping | 1 – 2 Teaspoons | 1/2 Cup | Stiff, holds sharp peaks and ridges |
| Layer Cake Filling | 1 – 2 Tablespoons | 3/4 Cup | Dense, stable, and rich with chocolate |
| Sheet Cake Spreading | 3 – 4 Tablespoons | 1/2 Cup | Soft, easily glides over delicate crumbs |
| Brownie Topping | 2 Tablespoons | 3/4 Cup | Fudgy, thick, and mimics actual dough |
Using this table ensures that you aren’t just guessing at the texture. For example, if you are piping a high swirl on 24 cupcakes, you want the lowest possible milk volume to ensure the swirl doesn’t droop over time. Conversely, if you are filling a three-layer cake, you want more chocolate chips to provide that satisfying crunch in every bite, but you need enough milk to make the layer stay put when you slice through it.
I also discovered that the amount of chocolate chips affects the “spreadability” of the frosting more than people realize. Each chip acts as a physical obstruction. If you have too many chips in a frosting you are trying to spread thinly over the sides of a cake, the chips will drag through the frosting and leave unsightly tracks in the smooth surface. This is why I recommend the 1/2 cup limit for external frosting and reserving the 3/4 cup amount for fillings or toppings where a rustic, textured look is expected.
Practical Applications and Storage Blueprint
This recipe yields approximately 3 cups of frosting, which is the exact amount needed to generously frost 24 standard cupcakes with a medium swirl or to fill and frost a standard two-layer 8-inch round cake. If you are planning to do intricate decorative work or very high, bakery-style cupcake swirls, I recommend increasing the batch by fifty percent to ensure you don’t run out of material mid-project.
Storage is another area where my engineering mindset provides a clear advantage. This frosting is highly stable because it contains no eggs, but the butter and milk content mean it should be handled with care.
- Room Temperature: The frosting can stay out for up to 4 hours if the room is cool. Beyond that, the butter may begin to soften too much.
- Refrigeration: Store in an airtight container for up to 7 days. Before using, let it sit at room temperature for 30 minutes and give it a quick whip with a spoon to restore the creamy texture.
- Freezer: This frosting freezes exceptionally well. Place it in a heavy-duty freezer bag, squeeze out all the air, and store for up to 3 months. To use, thaw it in the refrigerator overnight.
When reheating or softening refrigerated frosting, never use a microwave. The uneven heat will break the emulsion of the sugars and fats, leaving you with a grainy, separated mess. Instead, let time do the work. The tactile sensation of the frosting should be pliable and smooth before you attempt to apply it to your baked goods. If you are using it on brownies, I recommend spreading it while the brownies are completely cool to prevent the bottom of the frosting layer from melting and becoming oily.
Pro tip: To get perfectly clean slices when serving a cake with this frosting, dip your knife in hot water and wipe it dry between every single cut.
Variations and Troubleshooting Your Cookie Dough Icing
Achieving a Pipeable Texture
If your goal is to create beautiful, high-definition swirls on cupcakes, the key is the milk rule mentioned in the instructions. You want to start with almost no liquid and only add enough to make the frosting move through the piping tip. I found that if the frosting is too soft, placing the filled piping bag in the refrigerator for 5 to 10 minutes can firm up the butter just enough to give you those crisp edges. Use a large open star tip for the best results, as small tips will get clogged by the mini chocolate chips.
Adapting for Brownies Versus Cakes
Brownies are much denser than cake, which means they can handle a heavier, chip-laden version of this cookie dough icing. For brownies, I prefer the 3/4 cup chip ratio and a slightly lower milk volume. This creates a thick, fudgy layer that feels like a second dessert on top of the first. For a delicate vanilla cake, however, you should lean toward the 1/2 cup chip ratio and more milk to ensure the frosting doesn’t crush the light sponge as you spread it.
Troubleshooting the Gritty Texture
If your frosting feels gritty on the tongue, it almost always points back to the creaming step. If the sugar didn’t have enough time to interact with the butter’s moisture, those crystals will remain whole. To fix this in a finished batch, you can try adding one extra teaspoon of milk and mixing on medium-high for another 60 seconds. The extra liquid and motion can help dissolve the remaining crystals. Next time, ensure your butter is at that critical slightly softened stage to facilitate a better mechanical bond with the sugar from the start.
Conclusion
Engineering the perfect cookie dough frosting was a journey of understanding how simple ingredients like butter and sugar can be transformed through timing and temperature control. By focusing on the 10-minute speed and the optimized smoothness achieved through the precise two-minute creaming step, we have created a system that avoids the pitfalls of complicated syrups and inconsistent results. This recipe is a blueprint for success, providing the nostalgic flavor of raw dough in a safe, spreadable, and structurally sound format.
I am confident that once you see the visual transformation of the butter and sugar in your own mixer, you will never go back to standard store-bought or unoptimized recipes. The clarity of the steps and the “why” behind the techniques ensure that you are building your skills as a baker while producing an incredible dessert. I invite you to try this blueprint and see the difference for yourself.
Did you find that the two-minute creaming time was the key differentiator in achieving that ultimate smooth texture in your batch? I would love to hear about your results and how you used the consistency matrix to customize your frosting. Leave a comment below with your experience and any flavor variations you explored during your testing. Your feedback helps the entire community of home engineers at TheRecipiest refine our systems for even better results.
The Best Cookie Dough Frosting
Equipment
- mixing bowl
- Electric Mixer (Stand or Handheld)
- cookie sheet
- silicone spatula
- Oven
Ingredients
Core Frosting Ingredients
- 1 cup Butter slightly softened (Sweet Cream Salted Butter recommended)
- 3/4 cup Brown Sugar packed
- 1 cup Powdered Sugar
- 2 teaspoons Vanilla Extract
- 1 cup All-Purpose Flour Must be heat treated first
- 1/2 teaspoon Salt
- 2 tablespoons Milk Start with this amount; adjust up to 1/4 cup for consistency
- 1/2 cup Mini Chocolate Chips Adjust up to 3/4 cup depending on application
Instructions
Creaming and Emulsification
- Add slightly softened butter (between straight out of the refrigerator and room temperature), brown sugar, and powdered sugar to a mixing bowl.
- Cream together on medium speed until light and fluffy (about 2 minutes). The mixture should transition from a heavy sound to a softer whir and become a pale, creamy ivory.
- Add the vanilla extract and continue to mix for another minute.
Safety and Incorporation of Dry Ingredients
- Heat treat the flour: Spread the raw flour in a thin layer on a cookie sheet and bake in a preheated 200°F oven for 15 minutes. Allow the flour to cool completely to room temperature before proceeding.
- Once cool, whisk the heat-treated flour and the salt, and add them to the butter/sugar mixture. Mix only until just combined.
Consistency Adjustment and Finishing
- Adjust consistency by adding milk one teaspoon at a time until the desired spreadability is reached. (Use less milk for stiff piping, more for spreading.)
- Add Mini Chocolate Chips. Start with 1/2 cup for cake sides, or up to 3/4 cup for fillings.
- Fold in the chocolate chips gently by hand with a spoon to prevent breaking them.


