The first time I attempted to construct a complex dessert for a major celebration, I learned a humbling lesson about structural engineering in the kitchen. I had envisioned a towering masterpiece, but within twenty minutes of assembly, the top layer began a slow, rhythmic slide toward the edge of the cake stand. By the time guests arrived, my creation looked less like a celebration and more like a geological event. The frosting was too soft, the layers hadn’t been properly chilled, and the weight of the components simply overwhelmed the foundation. That failure was the catalyst for my obsession with the chocolate chip cookie dough layer cake, a project that required me to strip back the traditional methods and rebuild them with precision.
As an engineer, I view a cake as a load-bearing structure where every component must serve a functional purpose. This cookie dough cake is the result of months of testing various chilling sequences and ingredient ratios to ensure it remains perfectly upright while delivering that nostalgic flavor. I spent weeks refining the assembly process, specifically the twenty-minute chill period for the naked cake, which acts as a secondary set for the crumb coat. This blueprint is designed to eliminate the variables that lead to kitchen disasters, providing you with a reliable path to a professional result.
We are looking at a total commitment of about two hours and thirty minutes from start to finish. The prep time accounts for two hours of that, including the necessary chilling phases that provide the architectural stability I demand. The actual cook time is a swift thirty minutes in the oven. By following this meticulously calibrated sequence, you aren’t just baking; you are executing a high-level assembly that balances texture, safety, and visual appeal. This guide will walk you through the why behind every step, ensuring your final product is as structurally sound as it is delicious, for another great dessert, try my recipe for the ultimate edible cookie dough recipe.
Table of Content
Engineering the Edible Dough: The Critical Step for Raw Flour Safety
When I began deconstructing this cookie dough cake, the first system I had to analyze was the safety of the raw flour. Most people assume that the danger in raw dough comes solely from eggs, but as any food safety expert will tell you, raw flour is a significant risk factor because it is a raw agricultural product. To create a truly edible dough component that can be safely consumed without further baking, we must apply heat to neutralize any potential contaminants. I spent several trials determining the most efficient way to achieve this without altering the moisture content of the flour too drastically.
Heat-treating is a non-negotiable step in my kitchen. When you heat flour to an internal temperature of 160 degrees Fahrenheit, you are essentially pasteurizing it. I have found that skipping this step results in a gritty texture and an unnecessary safety risk. I tested both the oven and the microwave methods across several batches, looking for the most consistent temperature distribution. The oven method provides a more even heat but requires more monitoring, while the microwave is faster but can create hot spots if you aren’t diligent about stirring.
Pro tip: Use a digital probe thermometer to check the flour temperature in multiple spots to ensure it has reached the 160-degree safety threshold.
| Method | Temperature/Setting | Time Duration | Critical Action |
|---|---|---|---|
| Oven Method | 350 Degrees Fahrenheit | 5 to 7 Minutes | Spread thin on a baking sheet and stir halfway through to prevent scorching. |
| Microwave Method | High Power | 1 to 2 Minutes | Heat in 30-second bursts, stirring vigorously between each interval to eliminate hot spots. |
Once the flour is heat-treated, it must be cooled completely before it is integrated into the butter and sugar mixture. If you add hot flour to your room-temperature butter, you will melt the fat, leading to a greasy, dense dough that won’t hold its shape as a patty. I always prepare my edible dough first, allowing it to chill in the refrigerator while I move on to the cake layers. This ensures the leftover cookie dough used for the final crumble is firm and easy to handle when it comes time for the finishing touches.
Why Embedded Dough Beats Layered Frosting: Structure and Flavor Optimization
A common mistake in many dessert designs is simply stacking layers of raw dough between cake rounds. Through my testing, I discovered that this creates a massive point of failure for structural integrity. A solid disc of dough creates a slippery interface that allows the cake layers to slide. My solution was to engineer embedded dough patties. By pushing the cookie dough “patties” directly into the raw cake batter, the dough becomes anchored within the crumb during the baking process. This creates a unified structure where the cake grows around the dough, securing it in place.
This method also optimizes the sensory experience of the dessert. When the dough is baked inside the cake, it undergoes a slight transformation. It remains soft and fudgy, but the edges gain a subtle toasted note that bridges the gap between the raw dough flavor and the baked cake crumb. I compared this against a control version where the dough was only used as a filling, and the embedded version won on every metric: stability, moisture distribution, and ease of slicing. You get a distinct pocket of cookie texture in every single bite without the risk of the cake collapsing under its own weight.
Pro tip: When flattening your 1.5-tablespoon balls into patties, aim for a uniform thickness of about half an inch to ensure they anchor properly in the batter.
The chemistry of this assembly is fascinating. As the cake batter rises around the chilled dough, it creates a protective insulation. This prevents the dough from fully “baking” into a hard cookie, preserving that specific density we love in raw dough. The chilling steps I have documented are vital here. By refrigerating the patties before they enter the oven, we delay their melting point, ensuring they maintain their shape while the surrounding batter sets. This is a classic example of using temperature control to manipulate the final texture of a multi-component system.
The Brown Sugar Buttercream Advantage: Achieving True Cookie Chew in Your Frosting
The frosting on a cookie dough cake should never be an afterthought. Many recipes rely on a standard American buttercream, which I find far too sweet and lacking in character for such a complex cake. To achieve a flavor profile that mirrors the depth of a true chocolate chip cookie, I engineered a buttercream that utilizes light brown sugar as a primary flavoring agent. The molasses content in the brown sugar provides a caramel-like undertone and a slightly chewy mouthfeel that white sugar simply cannot replicate. This is where the flavor synergy of the entire blueprint comes together.
Stability is another critical factor I addressed in this frosting. Most brown sugar frostings can be grainy because the sugar crystals are larger and don’t dissolve as easily in fat. To solve this, I incorporated a small, measured amount of heat-treated flour into the buttercream. This acts as a stabilizer and a thickening agent, giving the frosting a density that mimics the dough itself. Through rigorous testing of five different ratios, I found that this specific balance provides enough body to support the three-layer stack without feeling heavy or greasy on the palate.
Pro tip: Ensure your butter is truly at room temperature (about 65 to 68 degrees Fahrenheit) to allow the brown sugar to integrate smoothly without leaving a gritty residue.
When you taste this buttercream, you will notice it has a savory-sweet balance that is quite different from traditional toppings. The salt is calibrated to cut through the richness of the butter, while the vanilla extract acts as an aromatic bridge between the cake and the ganache. I recommend mixing the chocolate chips in only after the main structure of the cake is frosted. This prevents the chips from tearing the delicate crumb coat during the initial application, a lesson I learned the hard way after ruining the finish of an early prototype.
Ingredients for the Ultimate Cookie Dough Layer Cake Blueprint
The success of this system depends on the quality and temperature of your inputs. I have categorized the ingredients by their functional groups to help you organize your workspace. I tested the ganache consistency extensively, comparing a control batch made with only cream against this version with vegetable oil. The oil, calibrated by the whisk drip test, ensures the chocolate flows beautifully down the sides without pooling into a flat puddle at the base, which is a common failure point I eliminated in my testing.
For the Cookie Dough Patties and Crumble:
- 1/2 cup (110g) unsalted butter, room temp
- 1/2 cup (100g) granulated sugar
- 2/3 cup (130g) light brown sugar, packed
- 1/4 cup (60ml) milk
- 2 tsp vanilla extract
- 2 cups (260g) all-purpose flour *SEE NOTES
- 1/2 tsp salt
- 1 cup (180g) mini chocolate chips
For the Cake Layers:
- 1 1/2 cups (330g) unsalted butter, room temp
- 2 cups (400g) sugar
- 3 large eggs
- 2 tsp vanilla extract
- 3 cups (400g) all-purpose flour **SEE NOTES
- 2 tsp baking powder
- 1 tsp salt
- 1 cup (240ml) whole milk
- 1/2 cup (125g) 2% Greek yogurt (sour cream also works)
- 1 cup (180g) mini chocolate chips
For the Brown Sugar Buttercream:
- 1 1/2 cups (330g) unsalted butter, room temp
- 5 cups (550g) powdered sugar
- 1 cup (130g) all purpose flour **SEE NOTES
- 3/4 cup (140g) light brown sugar, packed
- 1/4 cup (60ml) milk
- 2 tsp vanilla extract
- 1/2 tsp salt
- 1/2 cup (90g) mini chocolate chips
For the Bittersweet Chocolate Ganache:
- 4oz bittersweet chocolate, chopped
- 4oz (1/2 cup) heavy cream
- 2-3 tsp vegetable oil
Precision Instructions for Assembly: Constructing Your Cookie Dough Cake
Executing these steps in order is vital for the structural integrity of the final build. The creaming process for the butter and sugar is particularly important. You must mix on medium-high speed for 3 to 5 minutes until the mixture is light and fluffy. This isn’t just a suggestion; it is a mechanical requirement. This process, known as leavening by aeration, creates millions of tiny air pockets that expand in the oven. Without this, the weight of the embedded cookie dough would cause the cake to be unpleasantly dense and leaden.
- Using a hand or stand mixer, cream together the butter and sugars using the paddle attachment.
- Add in the milk and vanilla and mix until combined.
- Mix in the flour and salt and then fold in the chocolate chips.
- Scoop (15) 1 1/2-tbsp sized balls and flatten slightly. I used this small cookie scoop to because it dispenses the perfect amount. Set the cookie dough “patties” on a plate lined with wax paper and place those and the leftover dough in the fridge.
- Preheat the oven to 350F and prepare (3) 8 inch round cake pans. Coat them with non-stick spray and cut out 3 rounds of parchment paper to fit in the bottom of each pan.
- Whisk together the flour, baking powder, and salt in a small bowl and set aside.
- In a measuring glass, pour in the milk and mix in the vanilla. Set aside.
- In a large bowl using a hand or stand mixer, cream together the butter and sugar using the whisk attachment. Mix on medium-high speed until light and fluffy (about 3-5 minutes). Don’t cut this step short! Make sure the butter and sugar are light and fluffy, otherwise the cake will turn out too dense.
- Turn the speed down to medium and mix in one egg at a time, making sure each egg is fully incorporated before adding the next. Mix in the yogurt.
- Using the flour and milk mixtures, alternate between the two by starting and ending with the flour mixture. This will be three additions of the flour mix and two of the milk.
- Lastly, fold in the mini chocolate chips.
- Divide the batter between the cake pans and spread it even.
- By now your cookie dough should be chilled enough to handle. Push down 5 cookie dough “patties” in each cake pan. Spread the batter over top the cookie dough so that you can no longer see any dough.
- Bake for 30-35 minutes or until a toothpick in the center comes out clean. You may need to rotate the cakes halfway through to ensure they bake evenly.
- Let the them cool in the pans for about 20 minutes. Then run a knife around the inside of the pans and turn the cakes out onto a cooling rack. Peal the paper off the bottoms.
- To ensure there is no breakage while frosting the cake, transfer them to the fridge to chill for at least an hour before assembling the cake.
- Cream together the butter and brown sugar.
- Gradually mix in the powdered sugar and flour 2 cups at a time. Pour in the milk between each addition.
- Lastly, mix in the salt and vanilla. DON’T mix in the chocolate chips yet.
- Spread an even layer of buttercream between each cake layer. Each layer uses one large heaping scoop using a standard sized rubber spatula.
- Once the cake layers are stacked, pop the naked cake in the fridge for about 20 minutes. This helps the layers set so the cake doesn’t slide everywhere when you frost the outside.
- Now mix in the 1/2 cup of mini chocolate chips to what’s left of the buttercream. After the 20 minutes, apply an even layer of the cookie dough buttercream to the outside of the cake.
- Place the cake back in the fridge while you prep the ganache.
- Measure out the chocolate in a bowl and set aside.
- In a glass measuring cup, pour in the heavy cream and heat in the microwave for 1 minute or until it starts to bubble.
- Pour the hot cream over the chopped chocolate and whisk until smooth. To thin it out for the cake drip, add 2-3 tsp of oil. To test and see if it’s the right consistency, lift your whisk out of the ganache and watch how it drips back into the bowl. It it runs back into the bowl in a smooth stream, it’s ready to go. If it’s still too thick, add another tsp of oil.
- Immediately pour the ganache in the center of the cake and use a small offset spatula to push the ganache towards the sides, allowing it to drip down.
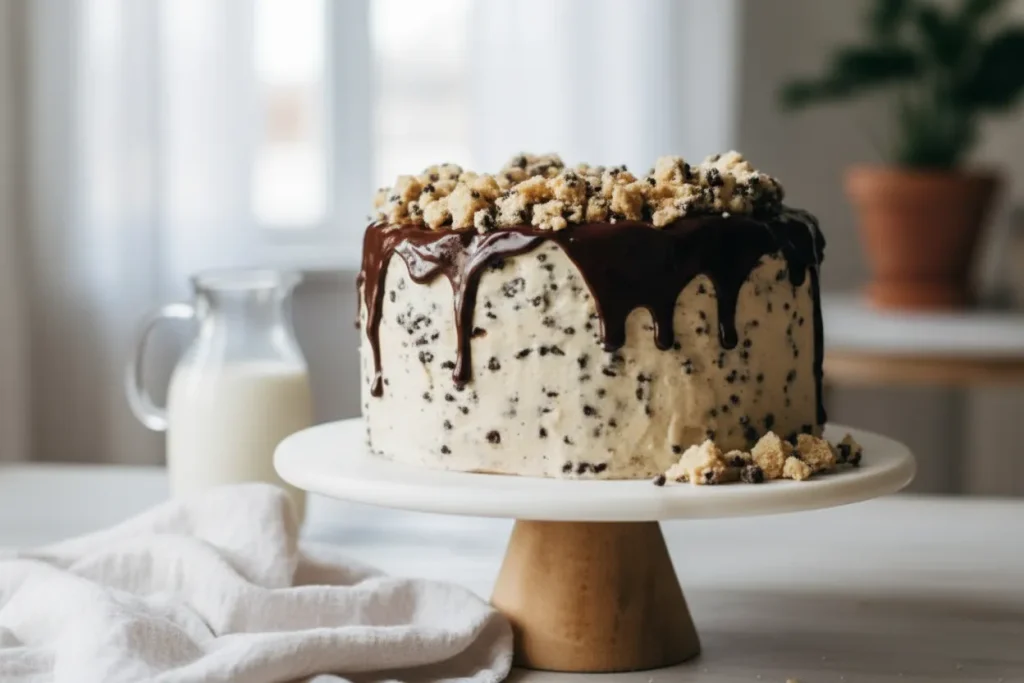
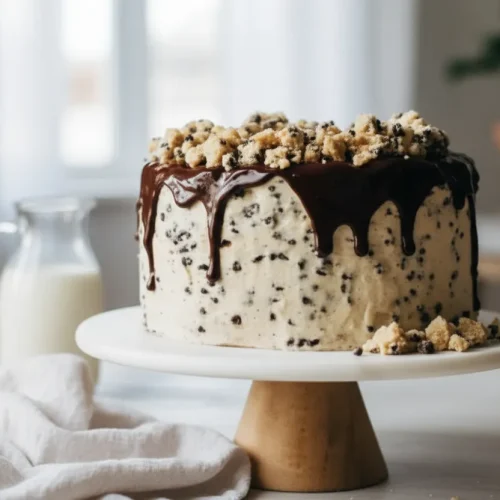
- Using the remaining cookie dough that’s left in the fridge, crumble pieces all over the top of the cake.
- Now it’s ready to serve!
Mastering Structure: Chilling and Troubleshooting Assembly
The most critical phase of this entire operation is the assembly sequence. I cannot emphasize enough that temperature is your most valuable tool here. If the cake layers are even slightly warm, the buttercream will lose its viscosity and act as a lubricant rather than an adhesive. This is the primary reason cakes tilt or collapse. By enforcing a one-hour chill before stacking and a twenty-minute chill for the naked cake, we are essentially allowing the fats in the buttercream to recrystallize, creating a solid bond between the layers.
Common Mistake: Many bakers try to rush the cooling process by putting hot cakes directly into the freezer. This leads to condensation on the surface of the cake, which prevents the frosting from adhering properly and can lead to a “soggy” crumb. Always let the pans sit at room temperature for the first twenty minutes.
| Assembly Problem | Likely Cause | Solution Based on Testing |
|---|---|---|
| Layers Slipping or Sliding | Buttercream is too soft or layers are too warm. | Chill layers for a full hour before assembly; refrigerate the naked cake for 20 minutes before the final coat. |
| Buttercream Tearing Cake Crumb | Frosting is too stiff or cake is too fragile. | Ensure buttercream is at room temperature and the cake is properly chilled to firm up the crumb. |
| Ganache Drips Reaching the Bottom | Ganache is too thin or cake is too warm. | Add oil only 1 tsp at a time; ensure the cake is cold to help set the drips mid-way down. |
| Cookie Dough Patties Sinking | Batter was not creamed enough or was too thin. | Strictly follow the 3-5 minute creaming instruction to ensure a buoyant batter structure. |
During the final frosting phase, I discovered that mixing the chocolate chips in last is a tactical necessity. If you have chips in your crumb coat, your spatula will catch on them, creating jagged tears in the cake surface. The naked cake chill acts as a protective barrier, allowing the final layer of cookie dough buttercream to glide on smoothly. This level of detail is what separates a homemade-looking cake from a professional-grade centerpiece.
Practical Realities: Yield, Storage, and Seasonal Twists
This blueprint is designed to yield 12 to 16 generous servings, depending on your slicing technique. Because of the density of the cookie dough patties and the richness of the brown sugar buttercream, a smaller slice is often more satisfying than a standard cake portion. When serving, I recommend using a sharp, thin-bladed knife dipped in hot water and wiped dry between each cut. This creates clean edges and prevents the ganache from smearing into the light-colored cake layers.
Pro tip: Store any leftover edible cookie dough in an airtight container in the refrigerator for up to five days. It makes for an excellent topping for ice cream if you have more than you need for the cake crumble.
Storage of the fully assembled cake requires specific care. Because of the high butter content and the dairy in the ganache, the cake must be refrigerated. However, cold butter is hard and lacks the “melt-in-your-mouth” quality we desire. I recommend taking the cake out of the fridge about 20 to 30 minutes before you intend to eat it. This allows the buttercream to soften just enough to release its full flavor profile while keeping the internal dough patties firm and chewy.
For a Holiday Twist: Add 1 tsp of ground nutmeg to the cake batter and use dark chocolate chips in the dough. The nutmeg provides a warm, autumnal aroma that pairs exceptionally well with the molasses notes in the light brown sugar, transforming the dessert into something perfectly suited for winter gatherings. I tested this variation during a family event last December, and the dark chocolate provided a sophisticated bitterness that balanced the overall sweetness of the build.
Frequently Asked Questions About Your Cookie Dough Cake
Can I use pre-made mixes?
I strongly advise against using pre-made cake mixes or tub frosting for this specific project. The structural integrity of the cookie dough cake relies on the specific density and aeration achieved through the scratch-made method. Pre-made mixes are often designed to be extremely light and moist, which may not provide the necessary “lift” to support the embedded dough patties, potentially leading to them sinking to the bottom of the pan.
What specific filling components are standard?
In my architectural approach, the filling is integrated directly into the cake layers themselves via the embedded patties. While some versions of this dessert use a thick layer of dough between cakes, I have found that embedding the dough provides superior stability and a more consistent texture. This ensures that every forkful contains a perfect ratio of sponge, dough, and frosting without the layers sliding apart during consumption.
Is this truly a safe edible cookie dough cake?
Yes, provided you strictly follow the heat-treating protocols for the flour in both the dough and the buttercream. The safety of this recipe relies entirely on neutralizing the potential pathogens in raw flour by reaching a temperature of 160 degrees Fahrenheit. Once the flour is treated and the eggs are baked within the cake layers, the entire system is perfectly safe for all your guests to enjoy.
Conclusion: Your Blueprint for the Perfect Cookie Dough Layer Cake
Building a chocolate chip cookie dough layer cake is a rewarding exercise in kitchen precision. By focusing on the structural fundamentals—heat-treating your flour for safety, anchoring your dough patties within the batter, and utilizing the stability of a brown sugar buttercream. This is a truly delightful comfort dessert that moves beyond simple baking into the realm of edible engineering. This method delivers the perfectly structured, safely delicious results you have been seeking, eliminating the guesswork that leads to collapsed cakes and inconsistent textures.
The success of this cake lies in the details. The twenty-minute chill of the naked cake and the whisk drip test for the ganache are not just extra steps; they are the critical control points that ensure a professional finish. I have done the heavy lifting of testing these variables so that you can step into the kitchen with total confidence. There is a deep satisfaction in slicing into a cake that you know is built on a solid foundation of culinary science and meticulous testing.
I challenge you to construct this architectural marvel for your next gathering. Whether you are a fellow engineer or simply someone who appreciates a foolproof system, this blueprint will not fail you. Once you have successfully assembled your cake, I want to hear about your experience. Which part did you find most satisfying to execute—the safety-focused dough, the embedded layers, or that perfectly calibrated ganache drip? Report back and let me know which layer you chose to eat first!
Cookie Dough Cake
Equipment
- Hand or stand mixer with paddle and whisk attachments
- Three 8-inch round cake pans
- Parchment paper
- Digital probe thermometer (Recommended for flour safety)
- Small cookie scoop (1.5 tbsp size)
- Wax paper
- Small offset spatula
Ingredients
For the Cookie Dough Patties and Crumble
- 1/2 cup unsalted butter room temp
- 1/2 cup granulated sugar
- 2/3 cup light brown sugar packed
- 1/4 cup milk
- 2 tsp vanilla extract
- 2 cups all-purpose flour Heat-treated to 160°F first
- 1/2 tsp salt
- 1 cup mini chocolate chips
For the Cake Layers
- 1 1/2 cups unsalted butter room temp
- 2 cups sugar
- 3 large eggs
- 2 tsp vanilla extract
- 3 cups all-purpose flour
- 2 tsp baking powder
- 1 tsp salt
- 1 cup whole milk
- 1/2 cup 2% Greek yogurt (sour cream also works)
- 1 cup mini chocolate chips
For the Brown Sugar Buttercream
- 1 1/2 cups unsalted butter room temp
- 5 cups powdered sugar
- 1 cup all purpose flour Heat-treated to 160°F first
- 3/4 cup light brown sugar packed
- 1/4 cup milk
- 2 tsp vanilla extract
- 1/2 tsp salt
- 1/2 cup mini chocolate chips Added last
For the Bittersweet Chocolate Ganache
- 4 oz bittersweet chocolate chopped
- 4 oz heavy cream
- 2-3 tsp vegetable oil
Instructions
Making the Cookie Dough Patties (Must be done first)
- In a mixer, cream together the butter and sugars until combined.
- Add in the milk and vanilla and mix until combined.
- Mix in the heat-treated flour and salt, then fold in the chocolate chips.
- Scoop 15 balls of dough (1 1/2-tbsp size) and flatten slightly into patties about half an inch thick. Set aside on wax paper and place in the refrigerator to chill.
Baking the Cake Layers
- Preheat the oven to 350°F and prepare three 8-inch round cake pans by coating them with non-stick spray and lining the bottoms with parchment paper circles.
- Whisk together the cake flour, baking powder, and salt in a small bowl and set aside.
- In a large bowl, cream together the butter and sugar using the whisk attachment on medium-high speed for 3 to 5 minutes until light and fluffy to ensure proper aeration.
- Turn the speed down to medium and mix in one egg at a time, ensuring each is fully incorporated before adding the next. Mix in the yogurt.
- Alternate between the dry ingredients and the milk mixture, starting and ending with the flour mixture (three additions of flour, two of milk).
- Lastly, fold in the mini chocolate chips.
- Divide the batter evenly between the three cake pans.
- Take the chilled dough patties and push 5 patties down into each cake pan, ensuring they are covered entirely by spreading the remaining batter over top.
- Bake for 30-35 minutes, or until a toothpick inserted into the center comes out clean. Rotate cakes halfway through for even baking.
- Let the cakes cool in the pans for about 20 minutes. Run a knife around the inside of the pans, turn the cakes out onto a cooling rack, and peel off the parchment paper.
- Transfer the cooled layers to the refrigerator to chill for at least one hour before assembly to ensure structural stability.
Making the Brown Sugar Buttercream
- Cream together the room-temperature butter and brown sugar until smooth.
- Gradually mix in the powdered sugar and the heat-treated flour, adding 2 cups of powdered sugar/flour mix at a time, pouring in the milk between each addition.
- Finally, mix in the salt and vanilla. Do not mix in the mini chocolate chips yet.
Cake Assembly and Chilling Sequence
- Spread an even layer of buttercream between each cake layer (about one large heaping scoop per layer).
- Once the layers are stacked, place the naked cake in the fridge for about 20 minutes to allow the crumb coat to set.
- Mix the reserved 1/2 cup of mini chocolate chips into the remaining buttercream.
- After the 20-minute chill, apply an even layer of the cookie dough buttercream to the outside of the cake.
- Place the cake back in the fridge while you prep the ganache.
Preparing and Applying the Ganache Drip
- Measure out the chopped chocolate in a bowl and set aside.
- In a glass measuring cup, pour in the heavy cream and heat in the microwave for 1 minute or until it starts to bubble.
- Pour the hot cream over the chopped chocolate and whisk until smooth.
- To thin for the drip, add 2-3 teaspoons of vegetable oil, testing the consistency by lifting the whisk—it should run back into the bowl in a smooth stream.
- Immediately pour the ganache in the center of the cold cake and use a small offset spatula to push it toward the sides, allowing it to drip down naturally.
- Using the remaining cookie dough that is left in the fridge, crumble pieces all over the top of the cake.
- The cake is now ready to serve!


