I once trusted a recipe that skipped the heat-treating step for the flour, which led to an uncomfortable, overly cautious experience. I remember sitting at the table, looking at a beautiful slice of dessert, yet feeling a nagging sense of hesitation because I knew the raw flour hadn’t been processed for safety. That failure is exactly why, now, the very first action I take is creating a structurally sound and completely safe dessert blueprint. My engineering background taught me that a system is only as strong as its weakest point of failure, and in a dessert containing unbaked elements, that point is the raw grain.
Building this cookie dough cheesecake requires a commitment to a specific timeline and a series of calculated steps. The Prep Time for this project is 12 hours 40 minutes, which includes the essential overnight chilling phase that allows the fats to stabilize. The Cook Time is 1 hour 20 minutes, though your actual active time in the kitchen will be much shorter. In total, the project spans 14 hours from the first microwave burst to the final whipped cream swirl. This definitive guide will show you how to build the safest and most decadent cookie dough cheesecake available, using a method that prioritizes both flavor and food safety.
I have spent months refining the balance between the dense cream cheese filling and the chewy inclusions to ensure that every bite offers a consistent experience. Many recipes produce a cheesecake where the dough all sinks to the bottom, creating a soggy layer that ruins the crust. Through my testing, I discovered that the secret lies in the viscosity of the dough and the specific temperature of the batter during assembly. By following this engineered approach, you will produce a result that is repeatable and professional every single time you step into the kitchen.
Table of Content
The Critical First Step: Heat-Treating Flour for Edible Cookie Dough Safety
Safety is a non-negotiable part of any kitchen system I design. We must address the flour before anything else because it represents a significant safety risk when consumed in an unbaked or partially baked state. Most people assume the eggs are the primary concern in raw dough, but flour is a raw agricultural product that can harbor harmful bacteria. By heating the flour in the microwave for 90 seconds, we raise the internal temperature enough to neutralize these risks without significantly altering the starch structure.
I previously tested a version that only used the cookie dough for the crust, much like some of the more basic versions you might find online. That texture was heavy and one-note because the cheesecake itself lacked the textural contrast that defines this style of dessert. This optimized recipe, with the soft, chilled dough balls suspended in the filling, delivers a superior textural surprise in every slice, but only after we ensure the dough base is safe. It is a simple step that provides total peace of mind while you are enjoying your creation. For a purer look at the foundational element, I highly recommend reviewing the ultimate edible cookie dough recipe blueprint as well.
When you remove the flour from the microwave, you will notice it smells slightly toasted, almost like a pale wheat field in the summer sun. It might form small clumps due to the steam released during heating, so I always recommend sifting it or whisking it vigorously once it has cooled. This ensures that when it hits the butter and sugar later, it integrates smoothly without leaving dry pockets of grain. Skipping the cooling phase is a mistake I made early on, which resulted in the butter melting prematurely and ruining the dough consistency.
Pro tip: Use a digital thermometer to ensure your flour reaches 160 degrees Fahrenheit during the heat-treating process to guarantee total safety.
System Optimization: Why We Use Three Distinct Cookie Dough Elements
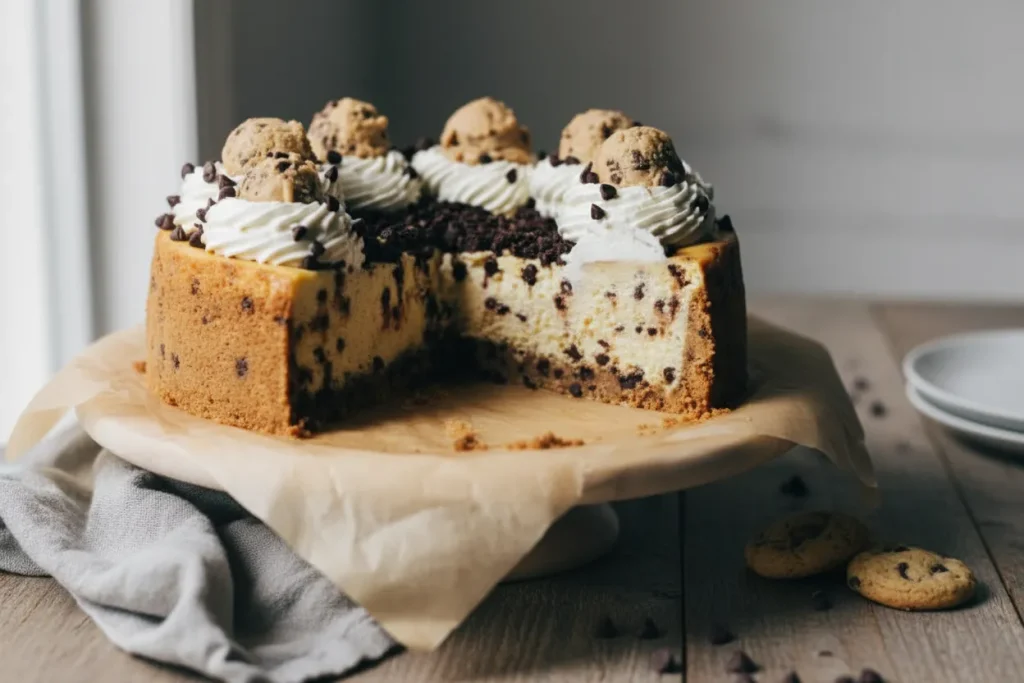
When I deconstructed the traditional cookie dough cheesecake, I identified three functional roles that the dough must play to create a perfect slice. The first is the foundation, where the dough is mixed with graham crackers to provide a sturdy, chocolate-studded base that can support the weight of the filling. The second role is as a suspended inclusion, where small drops of dough are distributed throughout the batter to provide soft, chewy pockets that mimic the experience of eating raw dough. The third role is the aesthetic and textural finish, where chilled balls of dough are placed on top of whipped cream swirls.
This multi-stage design is what elevates this from a standard dessert to the best cookie dough cheesecake experience I have ever developed. By separating the dough into these roles, we solve the structural engineering problem of a heavy dessert. If you simply dumped a container of pre-made dough into a batter, the weight would cause the entire system to collapse or result in a gummy texture. My testing showed that by tailoring the dough for each specific layer, we can control exactly how the final product feels on the tongue.
The crust provides a crunch that contrasts with the silkiness of the cream cheese, while the inclusions provide a different level of resistance when you bite through a slice. The visual appeal of the topping is not just for show; it serves as a sensory indicator of the flavors within. When you see those perfect spheres of dough on top, your brain prepares for the combination of vanilla, brown sugar, and chocolate. This level of intentionality is what separates an engineered recipe from one that is merely thrown together.
Precision Assembly: Preparing the Components
To begin the assembly of this complex system, you must organize your workspace and gather all the necessary inputs. I have found that having every ingredient at the correct temperature is the single most important factor in preventing lumps in the batter.
Crust Ingredients:
- 1 1/2 cups (180g) ground graham crackers (about 1 1/2 sleeves)
- 2 tbsp granulated sugar
- Pinch of kosher salt
- 6 tbsp unsalted butter, melted
- 1/2 cup (80g) mini chocolate chips
Cookie Dough Ingredients:
- 1/2 cup (110g) unsalted butter, room temp
- 1 cup (205g) light brown sugar, packed
- 3 tbsp milk
- 2 tsp vanilla extract
- 1 cup (132g) all-purpose flour, heat treated
- 1/2 tsp kosher salt
- 3/4 cup (120g) mini chocolate chips
Cheesecake Filling Ingredients:
- 4 8oz blocks full fat cream cheese, room temp
- 1 cup (200g) granulated sugar
- 2 tbsp cornstarch
- 3 large eggs + 1 egg yolk, room temp
- 1 tbsp vanilla extract
- 1 cup (250g) sour cream, room temp
- 3/4 cup (120g) mini chocolate chips, plus more for topping
Whipped Cream Topping Ingredients:
- 1 cup (240g) heavy whipping cream
- 1/2 tsp vanilla extract
- 2 tbsp powdered sugar
- 1 tbsp dry milk powder (optional)
Remember the test I ran regarding the dough consistency? This specific soft, sticky dough consistency is essential for the suspended effect once baked atop the cheesecake filling. If the dough is too dry, it will become crumbly and detach from the batter; if it is too wet, it will bleed into the cream cheese and lose its identity. The instructions provided below are the result of several iterations to find that perfect middle ground.
Pro tip: Always use full-fat cream cheese in the blocks, as the spreadable versions in tubs contain more air and moisture which will compromise the structural integrity of your bake.
The Instructions
- First, heat treat the flour for the cookie dough by heating it in the microwave for about 90 seconds. This kills any potential bacteria, as some of the dough will be consumed raw. This is done first as the flour needs time to cool before use.
- Now for the crust, position one oven rack in the middle of the oven and one rack at the bottom of the oven.
- Preheat the oven to 350F and grease and line the bottom and sides of a 9 inch springform pan with parchment paper. Allow the paper to reach about an inch above the sides of the pan.
- Mix together the ground graham crackers, sugar, and salt, followed by the butter.
- Once the mixture is evenly moistened, mix in the chocolate chips.
- Tightly pack the crust into the bottom and up the sides of the prepared pan. I like to use a measuring cup with a flat bottom to help press the crust into the pan. A jar or cup can also be used.
- Bake on the middle rack for 8 minutes.
- Once it is done, reduce the oven temperature to 325F.
- While the crust bakes, make the cookie dough.
- Using a wooden spoon, mix together the softened butter and brown sugar. (The cookie dough is mixed by hand as we do not want to whip air into the dough. That air will try to escape while baking, potentially causing a crack on the surface of the cheesecake).
- Once smooth, mix in the milk and vanilla.
- Then mix in the heat treated flour and salt, followed by the chocolate chips. The dough should be pretty soft and sticky. Set it aside.
- Place a large roasting pan on the bottom rack of the oven. Fill a medium sized pot with about 5 cups of water and place it over high heat to boil.
- While the water is heating, add the cream cheese, sugar, and cornstarch to a large bowl. Using a hand or stand mixer with the paddle attachment, slowly mix until smooth.
- Scrape down the bowl and mix in the eggs one at a time on low speed.
- When all the eggs are mixed in and smooth, scrape down the bowl again and mix in the vanilla.
- Mix in the sour cream, again on low speed, then remove the bowl from the mixer.
- Scrape down the bowl one more time and then fold in the chocolate chips.
- To assemble, first scoop out 8 1-tablespoon-sized cookie dough balls from the bowl of cookie dough. Place those balls on a plate lined with parchment paper and chill. These will be for decoration on top.
- With the remaining dough, drop spoonfuls all throughout the bottom of the crust and gently spread even. If the crust is moving around too much, just spread as best you can. It does not have to be perfect!
- Pour the cheesecake batter on top and spread it even. It should fill the entire pan so that wall of parchment paper will help keep the batter in.
- Now back to the water. It should now be boiling, so turn off the heat and very carefully pour the boiling water into the roast pan inside the oven.
- Then quickly place the cheesecake pan in the middle rack right above the water-filled roast pan.
- Quickly shut the door and bake for 1 hour and 20-30 minutes.
- It is done with the edges are well puffed and the very center has a slight jiggle when the pan is nudged.
- When it is done, keep the cheesecake inside the oven and turn off the oven temperature. Crack open the oven door and allow the cheesecake to sit in there for 45 minutes.
- After 45 minutes, remove the cheesecake from the oven and sprinkle the top with a handful of mini chocolate chips. The warm surface will allow the chips to stick.
- Let the cheesecake cool at room temp for 30 minutes, then transfer the cheesecake to the refrigerator to chill overnight uncovered.
- After the cheesecake has chilled and before you are ready to serve, make the whipped cream.
- To the bowl of a hand or stand mixer with the whisk attachment, add the whipping cream, vanilla, sugar, and dry milk powder (this is used for stability so it is optional).
- Whip on high speed until you reach stiff peaks.
- Pipe 8 large swirls around the perimeter of the cheesecake and place the cookie dough balls on top. Sprinkle with more chocolate chips and enjoy!
Preventing Failure: The Hand-Mixing Rule for Flawless Cheesecake Surface
The visual appeal of a cheesecake is often judged by the smoothness of its surface. Cracks are the most common failure point for home bakers, and they almost always stem from two issues: over-mixing and thermal shock. When you use a mechanical mixer for the cookie dough inclusions, you inevitably incorporate tiny air bubbles into the fat. These bubbles expand in the heat of the oven and then collapse as the cake cools, creating a physical fracture in the surface of the dessert.
This is why I mandate mixing the cookie dough by hand. Using a wooden spoon allows you to combine the butter and sugars without aerating them. This from-scratch dough mixing technique is crucial for air control, something pre-made dough cannot account for. Commercial doughs often contain leavening agents like baking soda or powder which are designed to make cookies rise; in a cheesecake, those same agents will cause the inclusions to swell and crack the surrounding batter.
When you mix the cream cheese filling, keep the mixer on the lowest possible speed. The goal is to create a homogenous emulsion, not a fluffy mousse. You will see the texture change from a stiff block to a thick, glossy liquid as the sugar and cornstarch integrate. This dense consistency is what allows the cookie dough drops to remain suspended rather than sinking through a thin, over-beaten batter.
Pro tip: To eliminate any remaining air bubbles after pouring the batter into the pan, gently tap the springform pan on the counter three or four times to force the bubbles to the surface.
Precision Cooling Protocol: The Anti-Crack Shutdown Sequence
The final stage of the baking process is just as important as the first. A cheesecake is essentially a custard, and custards are sensitive to rapid temperature changes. If you move a hot cheesecake directly from the oven to a cold counter, the proteins will contract too quickly, pulling away from the edges or splitting down the middle. My engineered cooling sequence mimics a controlled laboratory descent, ensuring the internal structure settles gradually.
By using a water bath on the rack below the cheesecake, we create a humid environment that prevents the top from drying out and becoming brittle. When the timer goes off, you are not finished; you are merely moving into the cooling phase. The residual heat in the oven, combined with the steam from the water pan, allows the cheesecake to finish setting without the harsh direct heat of the elements.
| Step | Action | Purpose |
|---|---|---|
| Oven Shutdown | Turn off heat immediately | Stops active protein coagulation |
| Door Crack | Open door 1-2 inches | Initiates gradual heat release |
| Resting Period | Wait exactly 45 minutes | Allows internal pressure to equalize |
| Room Temp Transition | Move to counter for 30 min | Prepares fats for refrigeration |
| Final Stabilization | Refrigerate overnight | Completes the molecular set of the filling |
This protocol is a critical, engineered sequence that I have refined over dozens of bakes. Many competitors suggest much shorter cooling times or skip the oven-door resting period entirely, which is a recipe for disaster. You will know the cheesecake is ready for the cooling sequence when the edges have puffed up slightly and have a pale golden hue, while the center still moves like firm gelatin when nudged.
Pro tip: If you see a crack starting to form during the cooling phase, do not panic; the chocolate chip topping and whipped cream swirls are excellent at masking minor surface imperfections.
Serving Yield, Storage, and Seasonal Adaptations
This blueprint yields exactly 12 perfect servings, provided you use a sharp, thin-bladed knife for slicing. To get the cleanest cuts, I have found that dipping the knife in hot water and wiping it dry between every single slice prevents the sticky cookie dough and cream cheese from clinging to the blade. This results in professional-grade slices where the layers of dough and filling are clearly visible and distinct.
Storage is another area where many home cooks fail. This cheesecake must be chilled overnight and stored uncovered in the refrigerator for the first twelve hours. Covering a warm cheesecake with plastic wrap creates condensation, which will drip onto the surface and create a soggy, unappealing texture. Once it is fully chilled, you can cover it loosely, but always serve it cold for the best structural integrity. The fats in the cream cheese and butter provide the best mouthfeel when they are firm yet starting to soften slightly on the plate.
For those looking to experiment with the base system, I have tested several seasonal variations. For a sophisticated twist, I highly recommend integrating espresso powder into the cheesecake filling layer to create a robust coffee-dough variation. The bitterness of the coffee perfectly offsets the sweetness of the brown sugar in the dough inclusions. You could also substitute the mini chocolate chips in the crust for crushed chocolate sandwich cookies for an even deeper, darker foundation.
Troubleshooting Common Cheesecake Failures
Is This Recipe No-Bake?
No, this is a fully baked cheesecake, but the flavor profile mimics raw dough thanks to the safety-treated flour and the specific way we handle the inclusions. The baking process is what gives the cream cheese its signature dense, velvety texture that no-bake versions simply cannot replicate. By baking the flour first, we get the safety of a cooked product with the nostalgic flavor of raw dough.
Best Serving Format?
I have tested various formats, but the springform pan slice remains the superior serving method. The structural integrity needed to support the whipped cream swirl and chilled dough ball topping presentation requires the height and stability of a 9-inch pan. If you try to make these as bars in a square pan, the ratio of crust to filling becomes unbalanced, and the dough inclusions tend to clump together.
Why is my crust soggy?
A soggy crust usually happens if the butter was not fully integrated or if the graham crackers were ground too coarsely. I have found that using a flat-bottomed measuring cup to press the crumbs into the pan creates a dense barrier that prevents the cheesecake batter from seeping in during the long bake. If you see the crust moving while you spread the dough drops, simply be as gentle as possible; the weight of the batter will eventually hold everything in place.
What if I don’t have a roasting pan?
If you lack a large roasting pan for the water bath, any wide, oven-safe dish will work. The goal is surface area for evaporation, not depth. I have successfully used a large rectangular cake pan in a pinch. The presence of the steam is the critical variable, as it keeps the oven environment moist and prevents the eggs in the batter from becoming rubbery or overcooked.
Conclusion: Mastering the Engineered Dessert
You have now mastered the engineered cookie dough cheesecake, a dessert that combines rigorous food safety with a layered texture superior to any standard recipe. By treating the flour, mixing by hand, and following a precise cooling sequence, you have eliminated the common points of failure that plague most home bakers. This process is about more than just a list of ingredients; it is about understanding the physics and chemistry that create a perfect slice of delightful comfort dessert.
The combination of the crunchy graham cracker base, the soft pockets of dough within the filling, and the whimsical topping creates a sensory experience that is truly unmatched. I take great pride in deconstructing these complex recipes so that you can approach your kitchen with the confidence of an engineer. When you pull that springform collar away and see the clean, high sides of your cheesecake, you will know that the time and precision were worth the effort.
I need to know: Which layer—the crust, the filling inclusion, or the topping—will you assemble first? Each part of the system is essential, but everyone has a favorite element to build. Document your process, pay attention to the jiggle of the center, and share your structurally perfect slice below! I look forward to hearing how this blueprint worked in your kitchen.
Cookie Dough Cheesecake
Equipment
- 9-inch springform pan
- Large roasting pan
- Measuring cup with a flat bottom
- wooden spoon
- Hand or stand mixer with paddle attachment
- Hand or stand mixer with whisk attachment
- Digital thermometer (recommended)
Ingredients
Crust Ingredients
- 1 1/2 cups ground graham crackers (about 1 1/2 sleeves)
- 2 tbsp granulated sugar
- 1 pinch kosher salt
- 6 tbsp unsalted butter melted
- 1/2 cup mini chocolate chips
Cookie Dough Ingredients
- 1/2 cup unsalted butter room temp
- 1 cup light brown sugar packed
- 3 tbsp milk
- 2 tsp vanilla extract
- 1 cup all-purpose flour heat treated
- 1/2 tsp kosher salt
- 3/4 cup mini chocolate chips
Cheesecake Filling Ingredients
- 4 8oz blocks full fat cream cheese room temp
- 1 cup granulated sugar
- 2 tbsp cornstarch
- 3 large eggs room temp
- 1 large egg yolk room temp
- 1 tbsp vanilla extract
- 1 cup sour cream room temp
- 3/4 cup mini chocolate chips plus more for topping
Whipped Cream Topping Ingredients
- 1 cup heavy whipping cream
- 1/2 tsp vanilla extract
- 2 tbsp powdered sugar
- 1 tbsp dry milk powder optional
Instructions
Pre-Bake Preparation and Flour Safety
- First, heat treat the flour for the cookie dough by heating it in the microwave for about 90 seconds. This kills any potential bacteria, as some of the dough will be consumed raw. This is done first as the flour needs time to cool before use.
- Pro tip: Use a digital thermometer to ensure your flour reaches 160 degrees Fahrenheit during the heat-treating process to guarantee total safety.
Crust Preparation and Bake
- Now for the crust, position one oven rack in the middle of the oven and one rack at the bottom of the oven.
- Preheat the oven to 350F and grease and line the bottom and sides of a 9 inch springform pan with parchment paper. Allow the paper to reach about an inch above the sides of the pan.
- Mix together the ground graham crackers, sugar, and salt, followed by the butter.
- Once the mixture is evenly moistened, mix in the chocolate chips.
- Tightly pack the crust into the bottom and up the sides of the prepared pan. Use a measuring cup with a flat bottom to help press the crust into the pan.
- Bake on the middle rack for 8 minutes.
- Once it is done, reduce the oven temperature to 325F.
Cookie Dough Preparation (Inclusions)
- While the crust bakes, make the cookie dough.
- Using a wooden spoon, mix together the softened butter and brown sugar. (Hand mix to avoid incorporating air).
- Once smooth, mix in the milk and vanilla.
- Then mix in the heat treated flour and salt, followed by the chocolate chips. The dough should be pretty soft and sticky. Set it aside.
Cheesecake Filling Preparation
- Place a large roasting pan on the bottom rack of the oven. Fill a medium sized pot with about 5 cups of water and place it over high heat to boil.
- While the water is heating, add the cream cheese, sugar, and cornstarch to a large bowl. Using a hand or stand mixer with the paddle attachment, slowly mix until smooth on low speed.
- Scrape down the bowl and mix in the eggs one at a time on low speed.
- When all the eggs are mixed in and smooth, scrape down the bowl again and mix in the vanilla.
- Mix in the sour cream, again on low speed, then remove the bowl from the mixer.
- Scrape down the bowl one more time and then fold in the chocolate chips.
Assembly and Water Bath Bake
- To assemble, first scoop out 8 1-tablespoon-sized cookie dough balls from the bowl of cookie dough. Place those balls on a plate lined with parchment paper and chill. These will be for decoration on top.
- With the remaining dough, drop spoonfuls all throughout the bottom of the crust and gently spread even.
- Pour the cheesecake batter on top and spread it even.
- Now back to the water. It should now be boiling, so turn off the heat and very carefully pour the boiling water into the roast pan inside the oven.
- Then quickly place the cheesecake pan in the middle rack right above the water-filled roast pan.
- Quickly shut the door and bake for 1 hour and 20-30 minutes.
- It is done with the edges are well puffed and the very center has a slight jiggle when the pan is nudged.
Engineered Cooling Protocol
- When it is done, keep the cheesecake inside the oven and turn off the oven temperature.
- Crack open the oven door and allow the cheesecake to sit in there for 45 minutes.
- After 45 minutes, remove the cheesecake from the oven and sprinkle the top with a handful of mini chocolate chips. The warm surface will allow the chips to stick.
- Let the cheesecake cool at room temp for 30 minutes, then transfer the cheesecake to the refrigerator to chill overnight uncovered.
Final Topping Assembly
- After the cheesecake has chilled and before you are ready to serve, make the whipped cream.
- To the bowl of a hand or stand mixer with the whisk attachment, add the whipping cream, vanilla, sugar, and dry milk powder (optional).
- Whip on high speed until you reach stiff peaks.
- Pipe 8 large swirls around the perimeter of the cheesecake and place the cookie dough balls on top. Sprinkle with more chocolate chips and enjoy!


