The first time I pulled a batch of what were supposed to be sourdough molasses cookies from my oven, I was met with a deep sense of engineering failure. Instead of the flat, crinkly, intensely chewy discs I envisioned, I had produced small, rounded ginger cakes. The texture was airy and bread-like, lacking that essential resistance when you bite into the center.
As someone who spent years optimizing mechanical systems, I knew the flaw wasn’t in the flavor, but in the structural blueprint. I had followed a standard creaming method, beating softened butter and sugar until light and fluffy. While that process is perfect for a birthday cake, it is the enemy of a dense, chewy cookie. It incorporates far too much air, which acts as a leavening agent that lifts the dough into a cakey puff.
I went back to the drawing board to deconstruct the chemistry of the ingredients. By replacing softened butter with melted butter and carefully balancing the acidity of the sourdough discard with the alkalinity of the baking soda, I finally engineered the perfect result. This recipe is the culmination of those trials.
It produces a cookie with a shatteringly crisp sugar crust and a center that stays soft for days. This blueprint is optimized for efficiency: Prep Time: 10 minutes, Cook Time: 10 minutes, Total Time: 20 minutes (plus chilling). By following this specific method, you will achieve the ultimate version of sourdough molasses cookies without the risk of a cakey texture. for another great dessert, try my recipe for The Ultimate Easy Key Lime Pie Inspired Recipe.
Table of Content
Why Melted Butter Beats Creamed Butter for Ultimate Chewiness (The Structural Difference)
The primary goal of this recipe is to maximize chewiness while completely eliminating any cake-like qualities. To understand why we use melted butter, we have to look at the physics of the dough. When you cream softened butter with sugar, the sharp edges of the sugar crystals carve tiny air pockets into the fat. These air pockets expand in the heat of the oven, creating a light, aerated structure.
In my testing, I found that even a brief creaming session resulted in a cookie that stood too tall and felt too dry. Melted butter behaves differently because it does not hold air. When butter is liquefied, it coats the flour proteins more thoroughly. This inhibits the formation of a strong gluten network just enough to keep the cookie tender while ensuring the final product remains dense and heavy.
There is also a significant difference in the moisture distribution. Melted butter allows the sugars to dissolve more readily before the tray even enters the oven. As the granulated and dark brown sugars dissolve into the liquid fat and molasses, they create a viscous syrup. This syrup is what gives these ginger-spiced rounds their signature bend and pull.
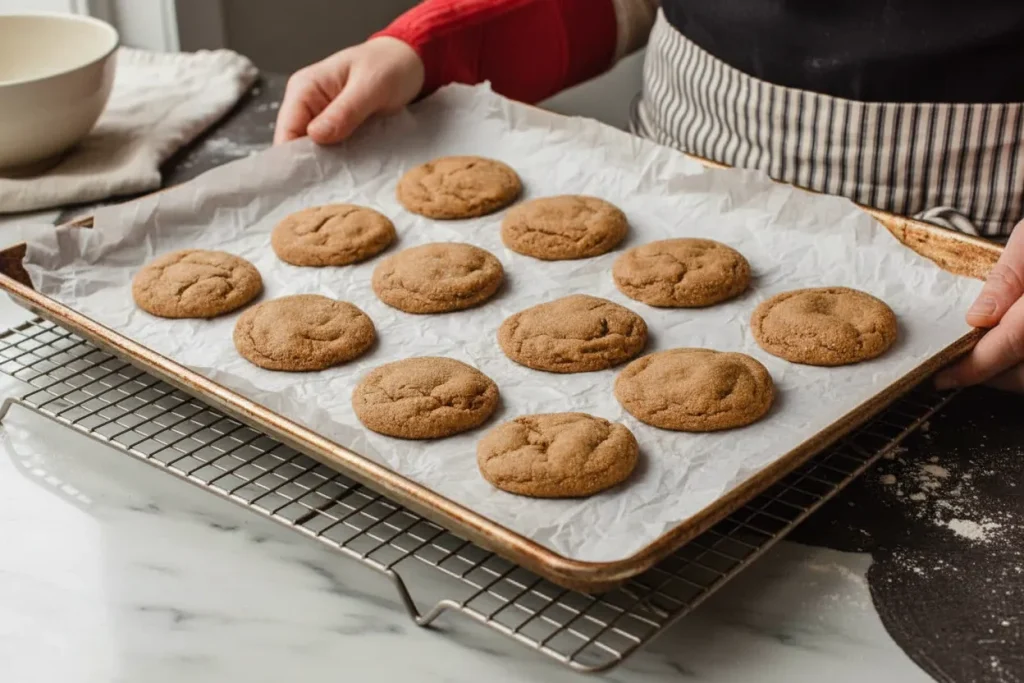
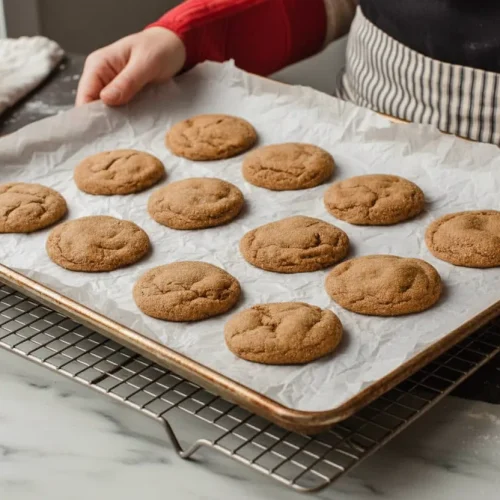
I observed that the cookies made with melted butter had a much more attractive surface. Because the dough is denser, it spreads more predictably, causing the top to crack in a beautiful, geometric pattern as the edges set. The sound of the dough hitting the sugar for rolling is a dull thud, indicating a heavy, moisture-rich consistency that promises a superior mouthfeel.
Pro tip: Allow your melted butter to cool slightly before adding the sugar and egg; if the butter is boiling hot, it can partially cook the egg proteins and negatively impact the dough’s emulsification.
Mastering the Mix: Tactile Cues for Perfect Sourdough Discard Dough Consistency
Working with sourdough discard adds a layer of complexity because every starter has a slightly different level of hydration. Some discards are as thick as pancake batter, while others are thin and runny. During my three-week testing phase, I realized that a rigid measurement for flour isn’t always enough to guarantee success in every kitchen.
You must rely on tactile cues to ensure your dough is properly calibrated. When you combine the wet and dry components, pay close attention to the resistance against your spoon. I noted that if the dough felt like a thick, heavy paste that clung stubbornly to the spatula, it was likely too hydrated and needed exactly 2 tablespoons of additional flour.
Conversely, the ideal state is when the dough feels slick and slightly oily from the melted butter. It should hold its shape when pressed but should not leave a sticky residue on your fingertips. This balance is critical because the sourdough starter discard provides both acidity and moisture. The acidity reacts with the baking soda to provide just enough lift to create those beautiful surface cracks, but the moisture must be managed to prevent the cookie from becoming a puddle.
The sourdough discard also introduces an enzymatic element that breaks down some of the starches in the flour over time. This is why I recommend a minimum one-hour chill. I tested batches with no chill time versus a twenty-four-hour rest. The rested dough had a much deeper, more complex flavor profile where the tang of the starter perfectly cut through the intense sweetness of the molasses.
Pro tip: If your sourdough discard has been sitting in the fridge for more than a week, it will be more acidic; this actually improves the flavor of the cookie by providing a sharper contrast to the dark brown sugar.
Ingredients for Superior Sourdough Molasses Cookies
I have refined this list to ensure that every gram serves a specific purpose in the final structure and flavor profile. Use these exact measurements for the best results.
- 2 1/2 cups all-purpose flour
- 2 teaspoons baking soda
- 2 teaspoons ground cinnamon
- 1 1/4 teaspoons ground ginger
- 1/2 teaspoon fine sea salt
- 8 tablespoons unsalted butter (melted)
- 1/4 cup dark brown sugar
- 1/3 cup granulated sugar
- 1/4 cup molasses
- 1 large egg
- 1/3 cup sourdough starter discard
- 1/4 cup sugar (you may need more, for rolling)
As I detailed in my testing notes, this recipe naturally contains cinnamon and ginger. For the most complex flavor profile, I highly recommend testing the optional addition of 1/4 teaspoon each of ground cloves and nutmeg alongside these spices. These extra warm spices interact with the dark notes of the molasses to create a much more sophisticated aromatic profile that fills the entire house as they bake.
Step-by-Step Instructions: Baking the Ultimate Chewy Cookie
Follow these steps precisely to ensure the engineering of the dough remains intact from the bowl to the cooling rack.
- Combine the dry ingredients, flour, baking soda, salt, ground cinnamon, and ground ginger, in a large mixing bowl. Whisk them together thoroughly and set the bowl aside. Ensuring the baking soda is evenly distributed is vital for an even rise and consistent cracking.
- In another bowl, blend the wet ingredients, sourdough starter, melted butter, brown sugar, granulated sugar, molasses, and egg, until the mixture achieves a smooth and creamy consistency. You will see the molasses and butter emulsify into a dark, glossy liquid that looks like liquid velvet.
- Transfer the wet ingredients to the bowl containing the dry ingredients. Use a spatula or wooden spoon to carefully blend all the ingredients together. (Make sure the dough is smooth and not sticky. If it is sticky, mix in 2-3 tablespoons of flour.) This adjustment is key to managing the hydration levels of your specific sourdough discard and ensuring the dough has enough body to hold its shape. Cover the bowl with plastic wrap or a lid and refrigerate the dough, allowing it to chill for at least one hour (up to 5 days).
- When you’re ready to bake, place the oven rack in the center position and preheat your oven to 350°F (176°C). Line a baking sheet with parchment paper or a silicone mat. This prevents the sugars in the molasses from scorching on the bottom of the pan.
- Place 1/4 cup of granulated sugar on a plate or in a small bowl. Use a cookie scoop to measure out the cookie dough, with each portion being approximately 2 tablespoons. Take a portion in your hands and roll it to form a smooth ball. Roll the ball around in the sugar to evenly coat the outside of the dough ball. The sugar coating is what creates the crunch and helps draw moisture from the surface to encourage cracking.
- Place 12 cookie dough balls on a baking sheet lined with parchment paper. Bake the cookies for 10-12 minutes until they spread and the tops begin to crack. You will notice the aroma change from raw spice to a toasted, caramelized scent when they are nearing completion. Transfer the cookies to a wire rack to cool completely before serving them.
Pro tip: Do not overbake these; they should still look slightly soft in the center when you pull them out, as they will continue to firm up from the residual heat of the baking sheet.
Troubleshooting Texture: Fixing Cakey Cookies or Excessive Spread
Even with a perfect blueprint, environmental variables like humidity or oven calibration can affect your results. I have compiled the most common issues I encountered during my development process to help you course-correct in real time.
| Observed Problem | Corrective Action/Scientific Reason |
|---|---|
| Excessive Spreading | Chill the dough for a full 24 hours. Cold dough slows the rate at which the melted butter liquifies further in the oven, allowing the edges to set before the center collapses. |
| Cakey or Puffy Texture | Avoid whisking the egg and sugars too vigorously. Excessive aeration leads to a cake-like crumb. Also, ensure the butter was fully melted, not just softened. |
| No Surface Cracks | Your oven may be too cool, or the dough may be too dry. The cracks are caused by the surface drying out and setting while the center is still expanding. Ensure you use the full amount of molasses. |
| Tough or Hard Cookies | You may have overmixed the flour. Once the dry ingredients are added, fold them in just until no white streaks remain to prevent excess gluten development. |
The most important factor in preventing a cakey texture is the butter state. If you mistakenly used softened butter and creamed it, you can partially save the batch by chilling the dough for a much longer period, but the internal structure will always be lighter than the intended engineered result.
Pro tip: Use a heavy-duty baking sheet; thin, flimsy pans warp in the oven and cause uneven heat distribution, which can lead to one side of your cookie spreading more than the other.
Flavor Variations and Essential Storage Instructions
Once you have mastered the base blueprint, you can begin to experiment with flavor modifications. I have found that adding a teaspoon of freshly grated orange zest to the sugar used for rolling adds a bright, citrusy note that complements the ginger beautifully. Another variation I tested involved adding 1/2 cup of finely chopped crystallized ginger to the dough. This adds a chewy, spicy pop that reinforces the heat of the ground ginger.
If you want to emphasize the earthy notes, the optional addition of 1/4 teaspoon each of ground cloves and nutmeg is highly recommended. These spices bridge the gap between the sharp ginger and the bitter-sweet molasses, creating a much more traditional “gingersnap” flavor while maintaining the soft, sourdough-driven texture.
Proper storage is critical for maintaining the specific moisture level we engineered. Once the cookies have cooled completely on a wire rack, place them in an airtight container. I noticed that they actually become even softer and more flavorful on the second day as the spices continue to bloom and the sourdough acidity mellows. They will stay fresh at room temperature for up to five days.
For long-term planning, you can freeze the unbaked dough balls. After rolling them in sugar, place them on a tray and freeze until solid, then transfer them to a freezer-safe bag. They will keep for up to three months. When you are ready for a fresh cookie, bake them directly from the freezer, adding an extra 2 minutes to the total bake time.
Pro tip: Place a small piece of bread in the container with your baked cookies; the cookies will absorb the moisture from the bread, keeping them incredibly soft for a longer duration.
Answering Your Key Questions About Sourdough Molasses Cookies
Are these cookies healthier than traditional recipes?
While these are still a decadent treat, utilizing sourdough discard does offer some unique benefits over standard recipes. The fermentation process that the starter undergoes before it becomes discard breaks down some of the anti-nutrients in the flour, making it slightly easier on the digestive system for some people. Additionally, the presence of the discard adds a layer of complex organic acids that you simply cannot find in a recipe that uses only commercial leavening agents.
How do I successfully incorporate molasses with sourdough?
The key to balancing these two intense ingredients lies in the chemistry of pH levels. Both molasses and sourdough starter are acidic. If you do not have enough of a base, like baking soda, to neutralize that acidity, the cookies will be sour and flat. This recipe uses 2 teaspoons of baking soda, which is higher than many other cookie recipes. This specific amount is engineered to react with the acids to create carbon dioxide, which provides the lift necessary for those beautiful cracks while leaving behind a perfectly balanced, neutral flavor.
Conclusion: Your Blueprint for Guaranteed Chewy Sourdough Molasses Cookies
After months of deconstructing what makes a spice cookie successful, I am confident that this melted butter method is the ultimate solution for anyone tired of cakey, bread-like results. By treating the recipe as a system and understanding the role of each component, we have engineered a cookie that balances the tang of sourdough with the deep, nostalgic warmth of molasses and ginger.
The success of these fermented spice treats lies in the details: the tactile feel of the dough, the deliberate chill time, and the refusal to incorporate unnecessary air into the fat. When you pull these from the oven and see that geometric crackle across the surface, you will know the system worked. The kitchen will be filled with a scent that is both spicy and earthy, a true testament to the power of sourdough discard.
I encourage you to try this specific method and see the difference that an engineering mindset makes in your baking. There is a profound satisfaction in creating something that is not just good by accident, but delicious by design. Once you have tasted the dense, chewy center and the crisp sugar crust of these sourdough molasses cookies, please return and share your results in the comments. I would love to hear how the tactile cues helped you navigate your specific sourdough discard hydration and how the melted butter transformed your cookie game.
Sourdough Ginger Molasses Cookies
Equipment
- Large mixing bowl
- Second mixing bowl
- Spatula or wooden spoon
- Plastic wrap or lid
- baking sheet
- Parchment paper or silicone mat
- Small plate or bowl (for rolling sugar)
- Cookie scoop (approx. 2 tablespoons)
- wire rack
Ingredients
Dry Ingredients
- 2 1/2 cups all-purpose flour
- 2 teaspoons baking soda
- 2 teaspoons ground cinnamon Recommended addition: 1/4 teaspoon ground cloves and 1/4 teaspoon ground nutmeg for complexity
- 1 1/4 teaspoons ground ginger Recommended addition: 1/4 teaspoon ground cloves and 1/4 teaspoon ground nutmeg for complexity
- 1/2 teaspoon fine sea salt
Wet Ingredients
- 8 tablespoons unsalted butter melted and slightly cooled
- 1/4 cup dark brown sugar
- 1/3 cup granulated sugar
- 1/4 cup molasses
- 1 large egg
- 1/3 cup sourdough starter discard
For Rolling
- 1/4 cup sugar May need more for rolling
Instructions
Mixing and Chilling
- Combine the dry ingredients (flour, baking soda, salt, ground cinnamon, and ground ginger) in a large mixing bowl. Whisk them together thoroughly and set the bowl aside.
- In another bowl, blend the wet ingredients (sourdough starter, slightly cooled melted butter, brown sugar, granulated sugar, molasses, and egg) until the mixture achieves a smooth and glossy consistency.
- Transfer the wet ingredients to the bowl containing the dry ingredients. Use a spatula or wooden spoon to carefully blend all the ingredients together until smooth and not sticky. If sticky, mix in 2-3 tablespoons of extra flour.
- Cover the bowl with plastic wrap or a lid and refrigerate the dough, allowing it to chill for at least one hour (up to 5 days).
Baking Procedure
- Place the oven rack in the center position and preheat your oven to 350°F (176°C). Line a baking sheet with parchment paper or a silicone mat.
- Place 1/4 cup of granulated sugar on a plate. Use a cookie scoop to measure out dough portions (approximately 2 tablespoons each). Roll each portion into a smooth ball, then roll the ball around in the sugar to evenly coat the outside.
- Place 12 coated cookie dough balls on the prepared baking sheet. Bake the cookies for 10-12 minutes until they spread and the tops begin to crack. They should look slightly soft in the center when removed.
- Transfer the cookies to a wire rack to cool completely before serving.


