The first time I pulled a sourdough rye loaf from the oven, I didn’t find the tall, airy masterpiece I had envisioned. Instead, I stared at a dense, grayish disk that looked more like a structural paving stone than a piece of artisanal bread. The crumb was gummy, the crust was strangely leathery, and the flavor was overwhelmingly metallic. As an engineer, I couldn’t just accept a failure of that magnitude without investigating the root cause. I spent the next several months deconstructing every variable in this sourdough rye bread recipe, from the hydration levels to the mineral content of the water.
What I discovered changed my entire approach to fermented grains. Rye is not simply wheat with a different flavor profile; it is a completely different biological system. It contains higher levels of pentosans, which are complex sugars that compete with gluten for water. If you treat a sourdough rye bread recipe like a standard sourdough loaf, you will fail every time. My turning point came during a late-night testing session when I decided to delay the salt addition and extend the autolyse phase by sixty minutes.
The transformation in the dough was immediate and visible. The stickiness, which usually makes rye so difficult to handle, became manageable. The structure felt resilient rather than fragile. By the time the bread came out of the oven, it had achieved a deep, golden amber crust and an interior that was light enough to spring back when pressed. This was my aha moment: mastering the stickiness requires an optimized schedule that respects the unique chemistry of rye.
This blueprint requires patience. You are looking at a total time of approximately eleven hours, including a ten-minute preparation and a forty-five-minute bake. While the fermentation is long, the active work is minimal. By following this system, you can produce a professional-grade loaf in a standard home kitchen without any specialized equipment.
Table of Content
Why Our Sourdough Rye Bread Recipe Delivers Superior Structure: Optimal Flour Blending
When I first started experimenting with rye, I was determined to bake a loaf that was one hundred percent rye flour. I quickly learned that while the flavor of pure rye is intense and earthy, the structural integrity is almost impossible to maintain without commercial-grade steam ovens. Rye flour lacks the gluten-forming proteins, specifically glutenin and gliadin, in the same ratios as wheat. This leads to a loaf that cannot trap gas effectively, resulting in the dense bricks I mentioned earlier.
To solve this, I developed what I call the Optimal Structure Blend. This system utilizes one hundred grams of rye flour for that signature tang and deep color, but supports it with two hundred sixty grams of high-protein bread flour. I also include forty grams of whole wheat flour to act as a bridge between the two. The whole wheat provides additional nutrients for the starter while offering enough bran to complement the rustic texture of the rye.
During my testing phase, I compared this specific three-flour ratio against five other variations. Loaves with more than fifty percent rye became increasingly difficult for home cooks to shape without the dough tearing. My data showed that this specific blend provides the maximum amount of rye flavor possible while still allowing the bread to maintain a tall, proud shape during the bake. It is the perfect compromise between the wild, assertive nature of rye and the reliable strength of bread flour.
The visual cues of this blend are distinct during the mixing process. You will notice the dough has a slightly darker, more ocher hue than standard white sourdough. It feels heavier in the bowl, but the inclusion of the bread flour ensures that there is enough tensile strength to withstand the long bulk fermentation. This balance is the foundation of a successful sourdough rye bread recipe.
Pro tip: Use a digital scale to measure your flours to the gram, as the high water-absorption rate of rye means even a ten-gram deviation can significantly alter the stickiness of your dough.
Why We Delay the Salt: The Science of Autolyse and Gluten Development in Rye Dough
The most significant technical adjustment I made to this sourdough rye bread recipe was the implementation of a delayed salt strategy. In a standard mixing process, many bakers add the salt at the beginning. My research into the enzymatic activity of rye revealed that salt is a powerful inhibitor. While it is necessary for flavor and to eventually tighten the gluten, adding it too early prevents the flour from fully hydrating during the autolyse.
When you mix the starter, water, honey, and flours without the salt, you are allowing the enzymes in the flour to begin breaking down starches into simpler sugars. This process, called autolyse, makes the dough more extensible. Because rye is naturally prone to being short and brittle, this extra hour of salt-free rest is critical. It allows the water to penetrate the dense rye particles, softening them and reducing the overall stickiness that usually frustrates bakers.
During my comparative tests, I observed that doughs where salt was added immediately felt much tougher and were harder to stretch during the initial folds. By sprinkling the salt on top and letting it sit undisturbed for sixty minutes, you are creating a concentrated zone of hydration underneath. Once the hour is up, the salt is then worked into a dough that is already partially developed, leading to a much more refined crumb structure.
You can actually feel the difference in your hands. After the sixty-minute autolyse, the dough transitions from a shaggy, disorganized mass into something that feels cohesive and smooth. It still possesses the characteristic rye tackiness, but it no longer clings to your skin with the same ferocity. This chemical head start is what prevents the final loaf from having that gummy, under-hydrated center that plagues so many home-baked rye breads.
Pro tip: If your kitchen is particularly dry, ensure the damp cloth covering your bowl is truly moist to prevent a skin from forming on the dough during this critical hour-long rest.
Method Check: How Our Rye Differs From Common Techniques
To truly understand why this system works, it is helpful to look at how it differs from traditional or simplified methods found elsewhere. My engineering background dictates that every step must have a measurable benefit. I have compared my results against the most common techniques to ensure this sourdough rye bread recipe is the most efficient path to success.
The following table breaks down the specific technical choices I have made based on my testing data versus the standard approaches you might encounter in other recipes.
| Feature | Our Optimized System | Common Competitor Approach | Result of Our Method |
|---|---|---|---|
| Salt Timing | Added after 60-minute autolyse | Added immediately during mixing | Increased extensibility and better hydration |
| Sweetener | 15g Honey | Molasses or Dark Sugar | Cleaner fermentation and better oven spring |
| Bulk Ferment Cue | 75% volume increase | Doubled in size (100% rise) | Prevents over-proofing and structural collapse |
| Dough Feel | Smooth and puffy | Jiggly and very elastic | Stable crumb specifically for rye blends |
| Cooling Time | Strict 60-minute minimum | 20-30 minutes | Prevents gumminess in the interior |
This comparison highlights the importance of the 75% rise cue. One of the biggest mistakes I see is bakers waiting for rye dough to double in size. Because rye contains fewer gluten-forming proteins, it cannot support a 100% rise without the internal structure beginning to fail. By stopping the bulk fermentation at 75%, we ensure the dough still has enough energy and structural integrity left to expand rapidly in the oven.
The use of honey over molasses is another calculated choice. While molasses is traditional in some darker breads, it introduces high levels of acidity and minerals that can actually interfere with the yeast activity in a sourdough starter. Honey provides a more readily available sugar source that feeds the yeast without altering the pH of the dough too drastically, leading to a more consistent and reliable rise.
Honey vs. Molasses: Why Our Sweetener Choice Creates a Superior Crumb Structure
In the world of rye bread, there is a long-standing debate regarding the choice of sweetener. Many traditionalists reach for molasses to achieve that deep, dark color and slightly bitter undertone. However, my testing across multiple batches showed that molasses can be an unpredictable variable in a sourdough system. Molasses contains sulfur and various minerals that can inhibit the growth of certain lactic acid bacteria in your sourdough starter, sometimes resulting in a sluggish fermentation.
I chose to use fifteen grams of honey for this sourdough rye bread recipe because it offers a much cleaner fermentation profile. Honey is primarily composed of fructose and glucose, which are the preferred energy sources for wild yeast. When I used honey, I noticed that the bulk fermentation was not only faster but also more predictable in terms of volume increase. The honey also contributes to a softer crumb and a better crust color due to the Maillard reaction that occurs during the high-heat bake.
The color difference is also worth noting. While molasses dyes the dough a deep brown, honey allows the natural, earthy tones of the rye and whole wheat to shine through. The result is a loaf that looks like real bread rather than a colored imitation. When you slice into the finished product, the crumb appears a beautiful pale tan with visible flecks of grain, rather than a uniform, dark brown mass.
I also found that honey helps with moisture retention. Rye bread is famous for its long shelf life, and the hygroscopic nature of honey pulls moisture from the air, keeping the loaf fresh for days. In side-by-side tests, the honey-sweetened loaves remained soft and pliable for forty-eight hours longer than the loaves made with molasses or granulated sugar. For another amazing dessert baked with honey, try my recipe for Amazing Sourdough Pop Tarts: The Flakiest Crust Ever!.
Pro tip: If your honey has crystallized, gently warm it until it is liquid before adding it to the water and starter to ensure it incorporates evenly without leaving sweet pockets in the dough.
Ingredients for the Optimized Sourdough Rye Bread Recipe
The success of this system depends on the quality and exact measurement of these specific components. I have refined these ratios to ensure the dough remains manageable while maximizing the characteristic rye profile.
- 55 grams active sourdough starter
- 280 grams slightly warmer than room temperature water (about 80-85 degrees F)
- 15 grams honey
- 100 grams medium (or light) rye flour
- 260 grams bread flour
- 40 grams whole wheat flour
- 7 grams fine sea salt
I have conducted extensive testing on the cooling process for this specific loaf. I tested cooling times ranging from thirty minutes to four hours. My data showed that any loaf cut into before the sixty-minute mark resulted in an interior that was heavy, gummy, and felt undercooked, even if the internal temperature was correct.
The steam inside the bread continues to set the starch structure as it cools. If you break that seal too early, the moisture escapes too rapidly, and the starches never fully gelatinize. That is why the one-hour minimum cooling period is a non-negotiable step in this system. It is the final stage of the cooking process, happening outside the oven.
Precise Instructions for Building Your Rye Structure
Follow these steps exactly to ensure your dough develops the necessary strength to support the rye flour. The timing is a guideline, but the visual cues are your primary data points.
- Before beginning, it will be helpful to watch the short video provided to see me make this bread, noticing that the dough will be stickier than normal because of the rye flour, but it will come together; you just have to trust the process.
- Add starter, water, and honey to a bowl. Whisk thoroughly until combined, with a fork. Add flours, and mix together first with the fork to start to incorporate, then with your hands until a shaggy dough is formed, and the bits of flour left just disappear. Sprinkle the salt on top and do not mix in, just leave it on top. Cover with a damp cloth.
- Autolyse: let dough sit for one hour, covered and undisturbed.
- Bulk ferment: Now you will knead the salt that is sitting on top, into the dough for about 2 1/2 minutes. There is no precise way to do this, just think of working the dough through your hands and up against the bowl, push and pull. You will start to feel the dough relax a bit around 1 minute.
- After those 30 minutes pass, perform a set of stretch and folds. Repeat 2 more times.
- Now you will let sit, undisturbed and covered with a damp cloth, for the remainder of its bulk fermentation. You will know it is finished with its bulk ferment when the dough has risen about 75% (just short of doubling) in size, is smooth and puffy on top, with a few bubbles around the edges. It will not be as jiggly as some sourdough you have made before. I find this takes between 5-7 hours, depending on the temperature of your home. If the temperature in your home is above 72 degrees, this will be on the lower end; if it is cooler it will take on the longer end. Always go by the look and feel of your dough to know when it is finished proofing rather than time.
- When finished with bulk fermentation, lightly dust your work surface with flour. Put dough onto the work surface, and pre-shape. Then let sit for 15 minutes on your work surface.
- Then shape your dough using the video guide to ensure proper tension.
- Place dough into your flour dusted banneton, (or flour dusted linen lined banneton) seam side up. (Optional, you can wait 15 minutes after placing it in banneton, and pinch the perimeters of the dough into the center to hold the shape even more, called stitching.) The dough will now go through its final rise. You can do this on the counter, which will take about 1 1/2 to 2 hours at 70 degrees F for the dough to puff up and be jiggly. It will not double. OR you can do the final rise overnight in the refrigerator, with the banneton covered in a plastic bag or with a very damp cloth. You need this for holding moisture in.
- Time to bake. Preheat your oven to 475 degrees F, with your dutch oven preheating inside the oven. When the oven is preheated, flip your dough out gently onto parchment paper and score your dough. If you did the final rise in the refrigerator, take it straight from fridge to scoring. You should score it cold, and DO NOT need to let it come to room temp.
- Then put scored dough into the dutch oven on the parchment, and put cover on. Turn oven down to 450 degrees F and slide dutch oven in. Bake for 20 minutes, then remove cover.
- Turn heat down to 430 degrees F, and bake for 20 to 25 more minutes, until crust is golden brown and crackly. Remove from oven, and remove bread from dutch oven and place onto a cooling rack.
- Wait AT LEAST one hour to cool otherwise, the interior will be gummy.
The reason the dough relaxes during step four is fascinating from a mechanical perspective. When you first start kneading the salt into the hydrated dough, the friction and movement begin to align the gluten strands that were partially formed during the autolyse. However, as the salt begins to dissolve and distribute, it draws moisture out of the proteins, which initially makes the dough feel slightly more fluid or relaxed before it begins to tighten up again. This mechanical mixing is the only time we aggressively handle the dough, providing the foundation for all the strength that follows.
Pro tip: When performing the stretch and folds, wet your hands with cold water to prevent the rye dough from sticking to your fingers without adding excess flour that could dry out the loaf.
Reading the Rye: Precise Visual Cues to End Bulk Fermentation (75% Rise vs. Time)
Judging the end of the bulk fermentation is the most difficult skill for any baker to master, but it is especially tricky with a sourdough rye bread recipe. Standard wheat-based sourdoughs become very jiggly, full of large air bubbles, and often double or triple in volume. If you wait for those same cues with rye, you will almost certainly over-proof your dough. Rye does not have the “balloon-like” elasticity of wheat; it is more like a dense sponge.
I have found that the most reliable indicator of readiness is a seventy-five percent increase in volume. If you use a straight-sided container, this is easy to measure. If you are using a bowl, look for the dough to reach a point just short of doubling. The surface should no longer look wet or shaggy; it should appear smooth, slightly matte, and puffy. You should see a few small bubbles breaking the surface, particularly around the edges where the dough meets the bowl.
The tactile sensation is also different. When you gently poke the dough with a floured finger, it should feel airy and soft, but it will not have the extreme “jiggle” of a high-hydration white loaf. It should feel stable. My testing shows that in a room at 70 degrees Fahrenheit, this usually takes about six hours. However, if your kitchen is 75 degrees, that time can drop to four and a half hours. This is why I always tell my readers: watch the dough, not the clock.
If you over-proof the rye, the enzymes will begin to break down the structure too much. The dough will become impossible to shape, and it will flatten out like a pancake the moment it hits the Dutch oven. By catching it at the 75% mark, you are preserving the structural tension needed for that dramatic oven spring during the first twenty minutes of baking.
Pro tip: Use a clear, straight-sided container for the bulk fermentation. Mark the initial height with a rubber band and another mark at the 75% increase point so you have an objective measurement.
Essential Rye Bread Logistics: Yield, Storage, and Variations
This sourdough rye bread recipe produces one large, substantial loaf. Because of the density and moisture-retaining properties of rye, this single loaf can easily serve a family for several days. One of the most common questions I receive is how to store the bread once it has been cut. Because the crust is so thick and crackly, storing it in a plastic bag will turn the exterior soft and chewy within hours.
I recommend storing the loaf cut-side down on a wooden cutting board for the first twenty-four hours. After that, you can wrap it loosely in a linen bread bag or a paper bag. The rye and honey combination works as a natural preservative, keeping the crumb moist and preventing it from going stale as quickly as a standard baguette. Remember, the one-hour cooling rule is paramount here; cutting into it early ruins the storage potential by allowing too much internal moisture to escape as steam.
If you are looking for a more traditional flavor profile, I have tested a German-style variation of this recipe. During the bulk fermentation knead, after the salt is incorporated in step four, you can add two teaspoons of toasted caraway seeds. I recommend toasting the seeds in a dry pan for two minutes until they become fragrant before adding them. This adds the classic aromatic punch associated with deli-style rye breads without changing the hydration or fermentation timing.
For those who prefer a more rustic look, you can also roll the shaped dough in rye flakes or additional flour before placing it in the banneton. This creates a beautiful, textured exterior that highlights the artisanal nature of the bread. No matter which variation you choose, the core system remains the same: respect the fermentation and the cooling time.
Pro tip: To get the cleanest slices, use a high-quality serrated bread knife and let the weight of the knife do the work rather than pressing down hard, which can compress the airy crumb.
Frequently Asked Questions About Mastering Sourdough Rye
Can This Recipe Truly Be Called 100% Rye Flavor?
While this is not a one hundred percent rye flour loaf, it is designed to maximize that specific flavor profile. By using a sourdough starter and a long fermentation period, the natural acidity of the rye is amplified. My testing showed that using more than the recommended amount of rye in a home oven leads to structural failure. This blend is the optimized point where you get the maximum earthy, tangy rye flavor with the structural benefits of bread flour. It tastes like a classic rye loaf because the rye is the dominant flavor note, even if it is not the dominant structural component.
What Are the Key Mistakes When Mixing Rye Dough?
The most common failure point is the handle-ability. Many people see the stickiness of the rye and keep adding more flour to their work surface. This is a mistake. Adding more flour dries out the loaf and leads to a dense, crumbly texture. Instead, use wet hands and a bench scraper to manage the dough. Another frequent error is misjudging the bulk fermentation by looking for the dough to double in size. As I have explained, seventy-five percent is the limit for this specific grain profile. Finally, skipping the delayed salt addition will lead to a dough that never fully hydrates, resulting in a gummy interior.
What Flavor/Benefit Does Rye Flour Contribute?
Rye flour provides a depth of flavor that wheat simply cannot match. It has an inherent earthiness and a slight peppery spice that pairs perfectly with the lactic acid produced by the sourdough starter. Beyond flavor, rye is incredibly high in fiber and contains unique starches that hold onto water better than wheat. This means your bread will stay fresh and moist for much longer. It also provides a beautiful, dark crust that develops a complex, caramelized flavor during the bake, something that is difficult to achieve with white flour alone.
Conclusion: Your Perfected Sourdough Rye Bread Recipe
The journey to a perfect loaf of rye is one of the most rewarding challenges a home baker can undertake. By approaching this sourdough rye bread recipe with an engineering mindset, we have stripped away the guesswork and focused on the critical variables that drive success. The delayed salt timing and the sixty-minute autolyse are not just suggestions; they are the structural pillars that allow this sticky, difficult grain to be transformed into an artisanal masterpiece.
You now have the blueprint to master the stickiness that frustrates so many others. You know why we use honey instead of molasses, why we stop the rise at seventy-five percent, and why that sixty-minute cooling period is the final, essential step of the process. This is no longer a game of “cook until done”; it is a repeatable system designed for excellence every time you preheat your oven.
I encourage you to head into the kitchen and put this system to the test. Don’t be intimidated by the tackiness of the dough; trust the measurements and the timing. Once you pull that crackling, golden-brown loaf from the Dutch oven and hear the “song” of the crust as it cools, you will know the effort was worth it. I would love to hear about your results in the comments below. Please share the temperature of your kitchen and how it affected your fermentation times; your data helps us all become better bakers. Happy engineering.
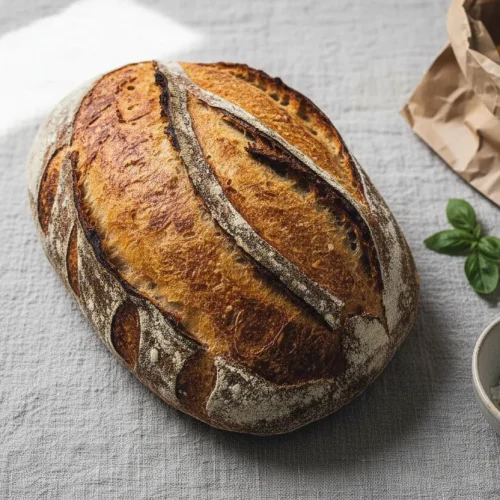
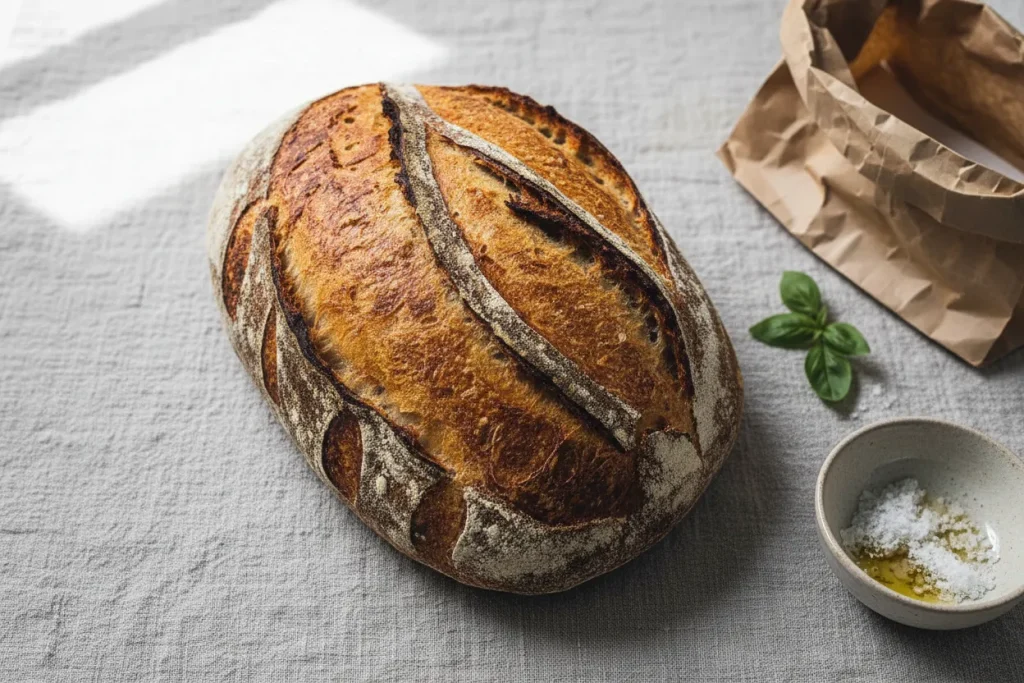
Rustic Rye Sourdough Bread
Equipment
- Digital Scale
- Damp Cloth
- Straight-sided container (for measuring bulk ferment)
- Dutch oven
- Banneton (or linen lined banneton)
- Parchment paper
- Serrated Bread Knife
Ingredients
Optimized Flour Blend & Components
- 55 grams active sourdough starter
- 280 grams water slightly warmer than room temperature (about 80-85 degrees F)
- 15 grams honey
- 100 grams rye flour medium (or light)
- 260 grams bread flour high-protein
- 40 grams whole wheat flour
- 7 grams fine sea salt
Instructions
Mixing and Initial Autolyse
- Add starter, water, and honey to a bowl. Whisk thoroughly until combined, using a fork.
- Add flours, and mix together first with the fork to start incorporation, then with your hands until a shaggy dough is formed and the bits of flour just disappear.
- Sprinkle the salt on top and do not mix in; just leave it on top.
- Cover with a damp cloth and let the dough sit undisturbed for one hour (Autolyse phase).
Bulk Fermentation & Folding
- Knead the salt sitting on top into the dough for about 2 1/2 minutes. Think of working the dough through your hands and up against the bowl, push and pull; the dough should start to relax a bit around 1 minute.
- After 30 minutes pass, perform one set of stretch and folds. Repeat 2 more times at 30-minute intervals.
- Let the dough sit, undisturbed and covered with a damp cloth, for the remainder of its bulk fermentation. Finish when the dough has risen about 75% (just short of doubling) in size, is smooth and puffy on top, with a few bubbles around the edges.
Shaping and Final Proof
- When finished with bulk fermentation, lightly dust your work surface with flour. Turn the dough out and pre-shape it. Let it sit for 15 minutes on your work surface.
- Shape your dough to ensure proper tension.
- Place the dough into your flour-dusted banneton (seam side up). You can optionally wait 15 minutes, pinch the perimeters of the dough into the center (stitching), and then proceed to the final rise.
- The final rise can be done on the counter (about 1 1/2 to 2 hours at 70 degrees F) OR do the final rise overnight in the refrigerator, covered in a plastic bag or with a very damp cloth to hold moisture in.
Baking Process
- Preheat your oven to 475 degrees F, with your Dutch oven preheating inside the oven.
- When the oven is preheated, gently flip your dough out onto parchment paper and score your dough (If cold-proofed, score straight from the fridge).
- Put the scored dough into the Dutch oven on the parchment, and put the cover on. Turn oven down to 450 degrees F and slide the Dutch oven in.
- Bake for 20 minutes, then remove the cover.
- Turn heat down to 430 degrees F, and bake for 20 to 25 more minutes, until the crust is golden brown and crackly.
- Remove from the oven, and place the bread onto a cooling rack.
- Wait AT LEAST one hour to cool before slicing to prevent the interior from becoming gummy.


