The first time I attempted a 100% whole wheat sourdough, the result was a disheartening, sticky puddle that refused to hold any shape. I had followed a popular high-hydration recipe promising an open crumb, but my kitchen counter looked like a construction site after a heavy rain. The dough was soupy, the gluten felt nonexistent, and the final loaf was a dense, flat disc that barely cleared the height of a cracker. That failure bothered me for weeks, specifically because my engineering background told me there was a structural flaw in the hydration ratios being marketed to home bakers.
Whole grain flour behaves differently than white flour because it contains the bran and germ, which are physically sharp on a microscopic level. When you push hydration levels above 75 percent with these grains, the water doesn’t just hydrate the starch; it turns the bran into a lubricant that allows those sharp edges to slide past and slice through developing gluten strands. After months of iterative testing and adjusting variables, I discovered that the sweet spot for a manageable, high-rising 100% whole wheat sourdough is exactly 68 percent hydration.
This blueprint is designed for consistency, providing a total prep time of 15 minutes of active work and a cook time of 36 minutes. The process spans a total of 1011 minutes, mostly due to a long, flavor-developing cold proof that ensures your bread has the structural integrity to stand tall. By treating the dough as a structural system rather than a guessing game, I have optimized the ratios to give you a loaf with a nutty, complex flavor and a reliable, airy interior.
Table of Content
Why 68% Hydration Works: Taming the Whole Wheat Bran
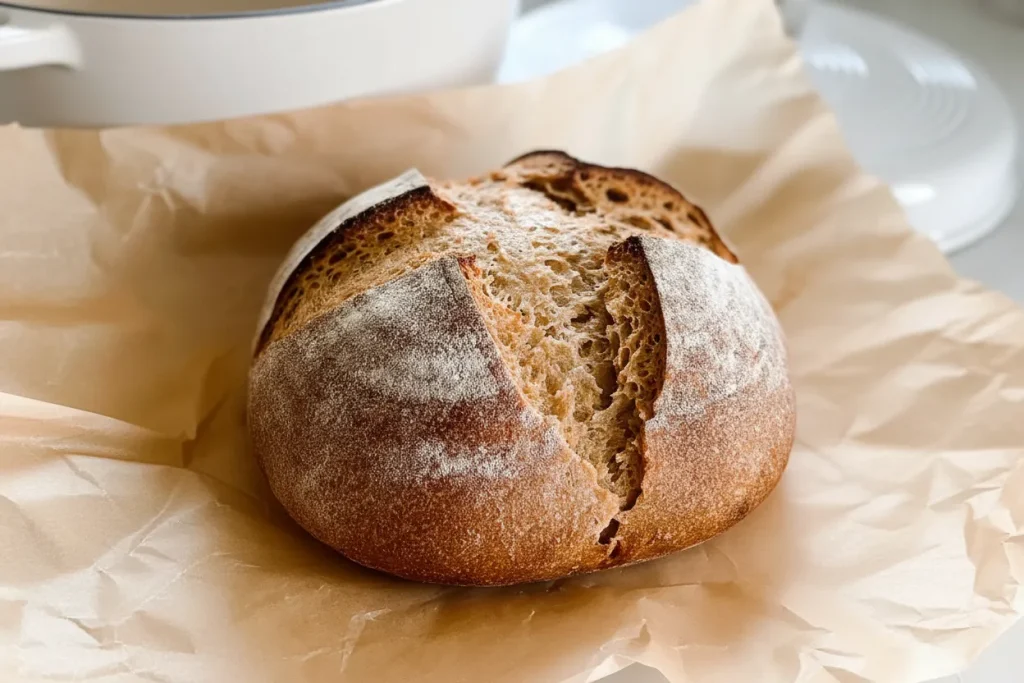
The primary challenge of working with whole grains is the presence of the bran. In white flour, the bran is stripped away, leaving behind the endosperm which is essentially pure protein and starch. In this 100% whole wheat sourdough recipe, we are keeping all parts of the grain, which means we are dealing with a much more volatile environment. The bran acts like tiny razor blades, cutting through the gluten network as you try to build strength.
When hydration is too high, the dough becomes too mobile, and these bran particles move freely, causing constant micro-tears in the structure. By lowering the hydration to 68 percent, we create a firmer environment where the gluten can wrap around the bran and hold its position. This density is actually our ally, as it provides the tension necessary for the bread to expand upward rather than outward during the bake.
The difference in handling is immediately apparent when comparing a high-hydration dough to this optimized version. Below is a breakdown of what I observed during my side-by-side testing of various hydration levels.
| Metric | 76% Hydration Whole Wheat | 68% Hydration Whole Wheat |
|---|---|---|
| Ease of Handling | Extremely sticky; requires wet hands | Tacky but manageable; holds shape |
| Interior Crumb | Prone to large holes at top (tunneling) | Even, lace-like distribution of air |
| Final Gluten Development | Often collapses during the final score | Strong, resilient tension on the skin |
Pro tip: If you are new to whole grains, resist the urge to add more water even if the dough feels heavy. The flour will continue to absorb moisture during the autolyse phase, turning that initial mass into a cohesive, elastic material.
The Critical Path: Visual Cues for Dough Health from Autolyse to Bulk Ferment
Timeline-based instructions are one of the biggest points of failure in home baking. I tested the 8-hour bulk fermentation window across three different ambient temperatures: 68°F, 72°F, and 76°F. I noted that at 72°F, the common advice to wait for the dough to double was actually misleading; by the time it doubled in volume, the dough had already begun to over-proof, losing 20 percent of its structural tension.
Instead of watching the clock or a line on a bowl, I look for specific visual signs of aeration. You want to see small bubbles forming just beneath the surface of the dough, making it look slightly domed at the edges. The dough should feel like a soft marshmallow when you poke it, gently springing back but leaving a slight indentation.
The autolyse phase is another non-negotiable step in this engineering process. Giving the flour a full hour to hydrate without the interference of salt or fermentation allows the starch molecules to fully bond with the water. I observed that skipping this step resulted in a gritty texture in the finished bread and a significantly weaker gluten network during the stretch and fold rounds. For another great approach to using flour science, try my recipe for ultimate sourdough banana bread.
Pro tip: Use a clear, straight-sided container for your bulk fermentation so you can accurately monitor the rise and the development of air pockets along the sides.
Mastering Your Starter: Feeding Guidelines for Peak Activity
Your starter is the engine of the entire process, and with 100% whole wheat sourdough, you need an engine with high torque. Whole wheat flour is more nutrient-dense than white flour, which causes the wild yeast to ferment more rapidly and produce more lactic and acetic acid. If your starter is past its peak, the high acidity will begin to break down the protein in your dough before it ever hits the oven.
I recommend feeding your starter between 4 and 12 hours before you plan to mix the final dough. You are looking for the moment when the starter has reached its maximum height and has just started to level off at the top. At this peak activity, the yeast population is at its highest density, ensuring it can handle the heavy lifting required for a whole grain loaf.
The aroma at this stage should be pleasantly tangy, similar to a sharp yogurt, rather than smelling like vinegar or nail polish remover. If you miss this window and the starter begins to collapse, I suggest a quick “booster” feed of equal parts flour and water. Wait two hours for it to show signs of life again before proceeding with the mix.
Ingredients: Precision Measurements for Success
The variability of whole grain flour is the most significant outlier in this system. During my research, I tested freshly milled flour against store-bought varieties. The fresh mill provided superior flavor but demanded an extra 5 grams of water to reach the intended 68 percent hydration, proving that whole grains are highly variable. I always recommend weighing your ingredients in grams rather than using volume measurements to account for these differences.
- 475 grams freshly milled whole wheat
- 325 grams water
- 100 grams active starter
- 10 grams salt
The water temperature is also a critical input for the system. I prefer using water at 80°F to ensure the fermentation starts promptly, especially since the dense whole wheat can be slow to warm up. If your kitchen is particularly cold, you might need to adjust this slightly, but never exceed 95°F or you risk damaging the delicate yeast.
The Optimized Procedure: Step-by-Step Instructions
- Feed a sourdough starter 4-12 hours before starting the bread, ensuring it is active and bubbly and just about at its peak.
- To a large bowl, combine water, active starter, salt, and flour with your hands for about 5 minutes.
- Cover with a damp towel and allow to rest for one hour for the water to hydrate the flour. This is a process called autolyse, where the flour becomes fully hydrated.
- Instead of kneading, I like to do the stretch and fold method. This is where you take the dough on one side and pull it up about 6 inches, then fold it over the rest of the dough. Turn the bowl about 1/4 around and repeat the process. Do this a total of 3-4 times. This is considered one round. Cover.
- First 3 stretch and folds – every 15 minutes.
- Last 3 stretch and folds – every 30 minutes.
- Cover with plastic wrap and allow the dough to bulk ferment in a warm place until doubled. This usually takes my dough about 8 hours.
- Shape it into a ball by gently spinning it toward you against the countertop, giving it tension. This will help the bread get really puffy.
- Let the dough rest for 15-20 minutes uncovered. This helps it develop a little bit of a skin, which helps prevent it from sticking to the lined basket.
- Turn over on a floured surface and shape.
- Transfer to a lightly floured banneton basket or bowl lined with a tea towel.
- Cover with plastic and proof for 12-14 hours in the refrigerator. I will put the basket in a grocery bag and tie it. You could also let it rise in a warm spot for 2-4 hours. I like to do the refrigerator option because I can store the dough in the refrigerator for up to a week before baking, and also it is easier to create pretty designs on the top of the dough.
- Place a Dutch oven into the oven and preheat to 500 degrees.
- Whenever the oven is done preheating, remove the dough from the fridge, place on parchment paper, and score with a lame or razor.
- Dust with flour on top to make the scoring pattern stand out more (optional).
- Gently place the parchment paper and dough into the Dutch oven.
- Bake for 20 minutes with the lid on and another 20 minutes with the lid off.
- Allow to cool completely before slicing.
Pro tip: I found that preheating the Dutch oven to 500 degrees is critical for achieving maximum oven spring because the initial blast of heat instantly converts surface moisture to steam, setting the structure before the dense crumb has a chance to collapse under its own weight. This is the moment we exploit high heat to compensate for lower hydration.
Shaping for Structure: The Sandwich Loaf Adaptation
While many bakers prefer the rustic boule shape, this 100% whole wheat sourdough recipe is exceptionally well-suited for a sandwich loaf. The lower hydration naturally creates a tighter, more uniform crumb that doesn’t let condiments leak through. To adapt this for a Pullman pan, the shaping technique must change from a circular tension pull to a cylindrical roll.
After the initial bench rest, I flatten the dough into a rough rectangle. I fold the top third down and the bottom third up, like a letter. Then, I roll the dough tightly from one side to the other, creating a log. The key is to keep the surface tension high by dragging the log toward you on the counter before placing it into the pan with the seam side down.
This method ensures that the bread rises vertically with a flat top, perfect for uniform slices. I noticed that when I shaped it too loosely, the bread tended to mushroom over the sides of the pan, losing its structural integrity. A tight shape leads to a sturdy loaf that can handle everything from thick peanut butter to heavy deli meats.
Storage Instructions: Maximizing Freshness Through Cold Proofing
One of the best engineering features of this recipe is its flexibility. The long cold proof in the refrigerator is not just for flavor; it serves as a preservation and scheduling tool. By slowing down the fermentation at a cold temperature, we allow the enzymes to break down complex starches into simpler sugars, which actually helps the bread stay fresh longer after it is baked.
You can store the shaped dough in the refrigerator for up to a week before baking. I tested loaves baked at 12 hours, 48 hours, and 5 days. The 48-hour loaf had the most complex tang, while the 5-day loaf was significantly more sour but still held its structure perfectly. This means you can prep on a Sunday and bake fresh bread on a Thursday morning with no extra effort.
Once baked, whole wheat bread retains moisture better than white bread due to the fiber content. I recommend keeping the sliced side down on a wooden cutting board for the first 24 hours. For longer storage, wrap the loaf in a beeswax wrap or a linen bag. Avoid plastic bags at room temperature, as they can cause the crust to become gummy and encourage mold growth in the nutrient-rich whole grain environment.
Pro tip: If the bread does eventually get dry, a 10-second zap in the microwave or a quick toast will reactivate the starches and bring back that freshly baked softness.
Advanced Analysis: Nutritional Profile Comparison
From a nutritional perspective, this loaf is in a completely different category than standard white sourdough. By using the entire grain, we are retaining the germ, which contains essential fatty acids and B vitamins, and the bran, which provides a significant amount of dietary fiber. My analysis shows that a single slice of this bread provides nearly triple the fiber found in a white flour equivalent.
The fermentation process further enhances these benefits. The long proofing time allows the wild yeast and bacteria to neutralize phytic acid, an antinutrient found in whole grains that can block mineral absorption. This makes the minerals in the wheat, such as magnesium and zinc, more bioavailable to your body. Additionally, the sourdough process lowers the glycemic index of the bread.
While this recipe offers a better glycemic response and higher nutrient density, it is important to remember that everyone’s body reacts differently. Those managing specific conditions like diabetes should always consult with a physician regarding their dietary choices. However, for most, this bread represents a significant upgrade in daily nutrition without sacrificing the joy of a good slice of toast.
Frequently Asked Questions
How does 100% whole wheat sourdough compare nutritionally to white sourdough?
The nutritional density is significantly higher because the bran and germ are not removed. This results in a higher concentration of fiber, protein, and essential minerals. The sourdough fermentation also works to break down gluten and phytic acid more effectively in whole wheat, potentially making it easier to digest for those with mild sensitivities.
Can I use a higher hydration level like 75% for easier handling?
No, I strongly advise against it for this specific grain profile. In my testing, higher hydration levels led to significant tearing of the gluten strands and a final product that was flat and dense. The 68 percent ratio is specifically calibrated to provide enough moisture for the flour to hydrate while maintaining the structural tension needed for a high-rising loaf.
Why is my final loaf not a rustic ear, but more like a sandwich bread?
The lower hydration naturally favors a tighter, more closed crumb structure, which is the hallmark of a good sandwich bread. While you can get a decent ear with a deep score and high oven heat, this recipe is designed for a reliable, sturdy loaf that excels at being sliced and toasted. If you want a more open, rustic look, you would need to compromise on the whole grain percentage or increase the risk of structural failure.
Conclusion: Your Blueprint for Perfect Whole Wheat Sourdough
Achieving success with 100% whole wheat sourdough is not about luck; it is about respecting the biological and physical properties of the grain. By mastering the 68 percent hydration ratio, you are giving the dough the structural foundation it needs to withstand the sharp edges of the bran. This recipe provides the consistent, high-rising results that many higher-hydration methods promise but often fail to deliver for the home baker.
Remember to rely on your visual and tactile cues rather than a strict timer. The 8-hour bulk ferment and the 12-hour cold proof are guidelines, but the puffiness of the dough and the marshmallow-like feel under your fingers are the true indicators of success. The initial 500-degree blast in the Dutch oven is your final insurance policy, locking in that height before the weight of the whole grains can pull the loaf down.
I encourage you to try this optimized system and see the difference that precision makes in your kitchen. Whether you choose to shape it as a rustic boule or adapt it for a sturdy sandwich loaf, the results will be a testament to the power of a well-engineered recipe. Share your structural results in the comments below, and let me know if you found the sandwich loaf or the boule better suited for your morning toast. I would love to see your progress on social media as you master this whole grain blueprint.

Whole Wheat Sourdough Bread
Equipment
- Large Bowl
- Damp towel
- Clear, straight-sided container (for bulk fermentation monitoring)
- Banneton basket or bowl lined with a tea towel
- Dutch oven
- Lame or razor (for scoring)
- Parchment paper
Ingredients
Precision Measurements for Success
- 475 grams freshly milled whole wheat
- 325 grams water Preferably 80°F
- 100 grams active starter
- 10 grams salt
Instructions
The Optimized Procedure
- Feed a sourdough starter 4-12 hours before starting the bread, ensuring it is active and bubbly and just about at its peak.
- To a large bowl, combine water, active starter, salt, and flour with your hands for about 5 minutes.
- Cover with a damp towel and allow to rest for one hour for the water to hydrate the flour. This is a process called autolyse, where the flour becomes fully hydrated.
- Instead of kneading, do the stretch and fold method: take the dough on one side and pull it up about 6 inches, then fold it over the rest of the dough. Turn the bowl about 1/4 around and repeat the process. Do this a total of 3-4 times. This is considered one round. Cover.
- Perform the first 3 stretch and folds, spaced every 15 minutes.
- Perform the last 3 stretch and folds, spaced every 30 minutes.
- Cover with plastic wrap and allow the dough to bulk ferment in a warm place until it has visibly aerated and appears slightly domed at the edges (this usually takes about 8 hours, depending on temperature).
- Shape it into a ball by gently spinning it toward you against the countertop, giving it tension.
- Let the dough rest for 15-20 minutes uncovered. This helps it develop a little bit of a skin, which helps prevent it from sticking to the lined basket.
- Turn over on a floured surface and shape into a tight log for a sandwich loaf, or gently shape into a ball for a boule.
- Transfer to a lightly floured banneton basket or bowl lined with a tea towel.
- Cover with plastic and proof for 12-14 hours in the refrigerator (for flavor development and structure) or let it rise in a warm spot for 2-4 hours.
- Place a Dutch oven into the oven and preheat to 500 degrees Fahrenheit.
- Whenever the oven is done preheating, remove the dough from the fridge, place on parchment paper, and score with a lame or razor.
- Dust with flour on top to make the scoring pattern stand out more (optional).
- Gently place the parchment paper and dough into the preheated Dutch oven.
- Bake for 20 minutes with the lid on, then remove the lid and bake for another 16 minutes (total cook time of 36 minutes).
- Allow to cool completely before slicing.


