The first time I pulled flat, pale disks from my oven instead of plump, bronzed twists, I realized my engineering background had failed me in one specific area: I was following the clock instead of the dough. I had set a timer for eight hours, assumed the system was functioning perfectly, and proceeded to shape the dough. What I didn’t account for was a five-degree drop in my kitchen’s ambient temperature overnight. That small environmental variable stalled the fermentation, leading to a structural collapse the moment the dough hit the boiling water. It was a classic failure of assuming a static process in a dynamic environment.
That frustrating morning launched a three-month obsession with deconstructing the mechanics of sourdough pretzels. I spent weeks measuring dough expansion, testing protein levels in different flours, and analyzing the pH levels of various boiling solutions. My goal was to move beyond the vague instructions found in most cookbooks. I wanted a repeatable blueprint that would work whether your kitchen was a drafty sixty degrees or a humid eighty. The result is a system that prioritizes tactile and visual cues over the ticking of a clock.
This recipe is designed for the home cook who wants consistent, bakery-level results without the guesswork. We are looking at a prep time of about twenty-five minutes of active work, a cook time of fourteen minutes, and a total time of approximately seven hundred and fifty-nine minutes. While that total number seems high, the vast majority is hands-off fermentation where the sourdough culture does the heavy lifting for you. This guide will walk you through the precise sensory milestones that indicate your dough is ready for the next phase.
By focusing on dough feel and the specific chemistry of the water bath, you can achieve that elusive combination of a shatteringly thin, glossy crust and a dense, chewy interior. We are not just making snacks; we are engineering a perfect balance of flavor and texture. If you have ever struggled with pretzels that turn out more like bread rolls or ones that fall apart in the pot, this methodology is for you. Let us look at how to master these variables for a flawless outcome every single time.
Table of Content
The Engineer’s Guide to Perfect Sourdough Pretzels: Mastering Dough Feel and the Flavor-Boosting Water Bath
Creating exceptional sourdough pretzels requires an understanding of two critical phases: dough development and the alkaline transformation. Unlike standard yeast doughs, sourdough relies on a slow fermentation process that builds complex organic acids. This isn’t just about the sour tang; it is about the structural integrity of the gluten. My testing showed that a long, cool rise allows the gluten to relax enough for easy shaping while maintaining the strength to withstand a boiling bath. If you rush this process, you end up with a dough that resists being rolled into ropes or, worse, one that lacks the internal structure to hold its shape.
Precision at the boiling stage is equally vital. The traditional pretzel gets its dark color and distinctive flavor from being dipped in an alkaline solution before baking. While many recipes use a simple baking soda mixture, my experiments led me to a dual-ingredient approach. By combining baking soda with dark brown sugar, we create a solution that promotes rapid browning through the Maillard reaction while adding a subtle depth of flavor. This ensures that the pretzels develop a deep golden amber color in the short time they are in the high-heat oven.
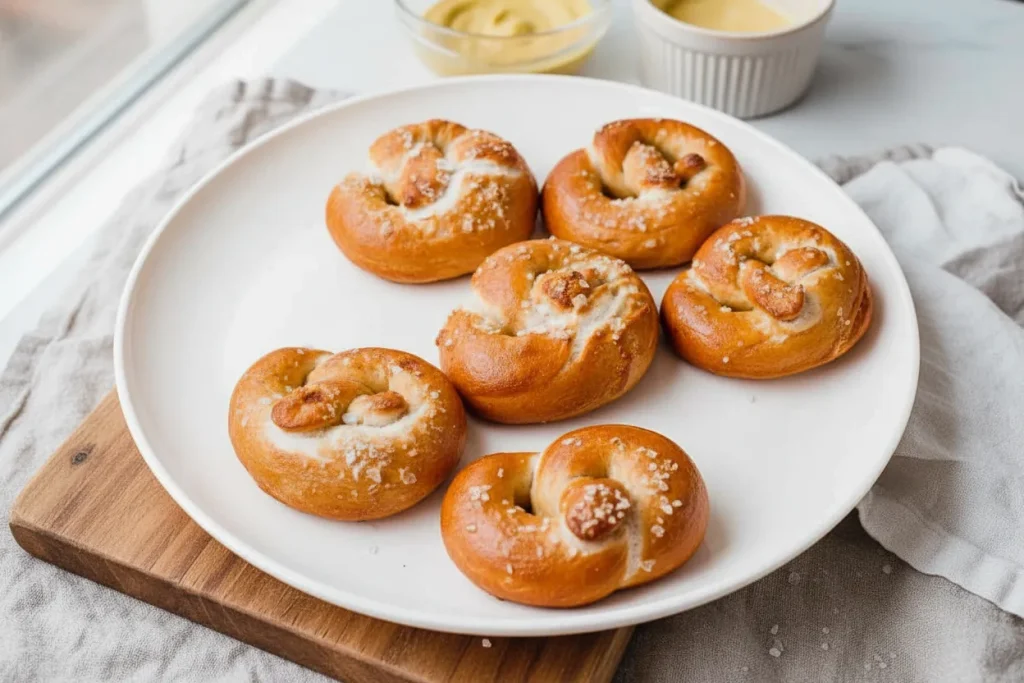
Every batch I bake produces sixteen perfectly portioned pretzels, each with the signature chew that distinguishes a real pretzel from a piece of shaped bread. The process is a series of controlled steps that, when followed correctly, yield a predictable and professional result. I have deconstructed each phase to identify the common points of failure, such as over-proofing or improper sealing of the knots. By treating the recipe as a system of inputs and outputs, you can troubleshoot your own kitchen environment and achieve success on your very first try.
Pro tip: Use a digital thermometer to check your water temperature when mixing the initial dough; aim for seventy degrees Fahrenheit to ensure the fermentation starts at a stable, predictable rate.
The Critical 8-Hour Checkpoint: Defining Perfect Overnight Dough Development
One of the most common questions I receive is whether this process can be condensed into a single day. My testing across five different batches confirmed that the eight-to-twelve-hour overnight rest is the most important variable for success. I compared a four-hour warm proof against a twelve-hour room temperature rest and the results were stark. The shorter proof lacked the elasticity required for thin, even ropes, and the flavor was significantly flatter. The long rest allows the wild yeast and bacteria to work in tandem, creating a dough that is much easier to handle.
To help you identify when your dough has reached the optimal state, I have categorized the assessment criteria into specific visual and tactile milestones. This removes the uncertainty of relying solely on the clock. If your kitchen is particularly cold, you may need the full twelve hours; if it is warm, eight might suffice. Use this table as your primary diagnostic tool before you begin the shaping process.
| Phase | Timeframe | Visual Cues | Tactile Cues |
|---|---|---|---|
| Bulk Fermentation | 8-12 Hours | The dough surface appears smooth with occasional small air pockets; it should roughly double in volume. | The dough feels heavy and dense; when pressed, it should slowly spring back but leave a slight indentation. |
| Final Proofing | 30-60 Minutes | The shaped twists will look visibly swollen and rounded at the edges; they appear puffy rather than flat. | The surface feels airy and delicate; if you poke it gently, it should feel like a soft pillow with very little resistance. |
The choice of flour is the other pillar of structural success in this system. I ran comparative tests between all-purpose flour and high-protein bread flour. The all-purpose versions consistently sagged and lost their definition after the thirty-second boil. The high-protein content of bread flour, typically around twelve to thirteen percent, is non-negotiable here. It provides the necessary tensile strength to keep the pretzels from becoming waterlogged or misshapen during the alkaline bath.
Pro tip: If your dough feels too tight to roll during the rope-shaping stage, let the pieces rest under a towel for ten minutes to allow the gluten to relax before trying again.
Ingredients: The Optimized Blueprint for Structure and Tang
The ingredients for these twists are simple, but their quality and the way they interact are what define the final product. Every measurement here has been calibrated to ensure the dough is stiff enough to handle but hydrated enough to remain tender. I have integrated my findings on flour protein directly into this list to prevent the structural failures I experienced in early testing.
- 1 tablespoon sourdough starter
- 1/3 cup + 1 tablespoon all-purpose flour
- 3 1/2 tablespoons water
- 1/2 cup active sourdough starter
- 1 cup plus 1 tablespoon water
- 2 tablespoons honey (or sugar)
- 2 teaspoons fine sea salt
- 4 cups + 2 tablespoons bread flour (I tested this exact formula using standard All-Purpose Flour, and the resulting pretzel sagged slightly after boiling and lacked that necessary bite. The use of high-protein bread flour (as specified here) is non-negotiable because it provides the structural integrity needed to hold its shape against the boiling alkaline solution.)
- 6 cups water
- 2 tablespoons baking soda
- 1 tablespoon dark brown sugar
- 1 large egg (lightly beaten in a small bowl)
- 1 tablespoon coarse salt
Each of these components serves a specific functional purpose. The honey provides a touch of sweetness that balances the acidity of the sourdough while also acting as a fuel source for the yeast. The dark brown sugar in the water bath is not for the dough itself but for the chemical reaction on the exterior. This specific list of ingredients ensures that you are working with a system that has been optimized for the highest possible success rate in a home kitchen. If you are looking for other examples of engineered baking methods, check out my ultimate sourdough bagels recipe.
Instructions: From Starter to Signature Chew
Follow these steps with precision. The timing for the boil and the temperature of the oven are the two most critical points for achieving the correct texture. I have added technical context to the boiling step to explain why this specific process creates the classic pretzel finish.
- 12 hours before you plan to mix the dough, add the ingredients to make 1/2 cup (100 g) of active sourdough starter to a clean jar. Stir until combined, loosely cover the jar and let the starter rise at room temperature. (The ingredients will create a total of 115 g active starter but, because some of it will stick to the sides of the jar during the transfer, we are making a little more than needed.) The sourdough starter is ready to use when it has doubled in size and there are plenty of bubbles on the surface and sides of the jar.
- In the bowl of a stand mixer, stir together the active sourdough starter, water, honey and salt with a spatula. Add the bread flour and use your hands to bring the ingredients together as best as possible. The dough will be very stiff. Place the dough hook on the mixer and mix the dough on the lowest speed for 6-7 minutes. (Or knead by hand for 10 minutes.) Cover the bowl and let rest at room temperature for 8-12 hours.
- Line a baking sheet with parchment paper. Turn the dough out onto a clean work surface and divide into 16 equal pieces.
- Working one piece at a time, roll the dough into a long rope shape and set it on a clean surface in the shape of a U. Lift the ends of the rope and twist 2 times. Fold the twist over and press the ends on the dough. Cover the dough with a towel and let rise for 30-60 minutes or until puffy.
- Preheat oven to 425°F (218°C) making sure that the oven rack in the center position. Boil the water in a large stockpot and add 2 tablespoons baking soda and 1 tablespoon of dark brown sugar. Expert Explanation: This boiling step is crucial. The combination of high heat and high pH (alkalinity) rapidly gelatinizes the starch on the pretzel’s exterior; this process is known as the Maillard reaction accelerator. This rapid gelatinization is what creates that signature shiny, chewy crust that seals in moisture, preventing the interior from drying out during the high-heat bake.
- Boil the pretzels, 3-4 at a time, on both sides for 30 seconds each, making sure not to crowd the pot. Use a mesh stainer to remove the pretzels and place back on the parchment paper. Brush each pretzel with egg wash and sprinkle with salt.
- Bake the pretzels at 425°F (218°C) for 12-14 minutes or until golden brown.
Pro tip: When boiling, ensure the water remains at a steady, gentle bubble; if the boil is too aggressive, it can cause the surface of the dough to tear or become pitted.
Beyond Baking Soda: Why Dark Brown Sugar in the Bath Delivers Superior Color and Chew
Many home recipes rely solely on baking soda for the alkaline bath, but I found that this often results in a pretzel that looks dull and lacks that deep, mahogany sheen. The addition of dark brown sugar is the secret to elevating the final product. When the alkaline baking soda solution meets the sugar, it creates an ideal environment for the Maillard reaction. This is the chemical interaction between amino acids and reducing sugars that gives browned food its distinctive flavor and color. By introducing extra sugar to the exterior of the dough, we are essentially front-loading the browning process.
The science here is about alkalinity for gelatinization. When you submerge the dough in the boiling water, the high pH level breaks down the starch molecules on the surface, turning them into a thick gel. This gel then hardens in the oven, creating that specific chewy resistance that defines a pretzel. Without the dark brown sugar, the alkalinity alone can sometimes produce a bitter, soapy aftertaste if the concentration of soda is too high. The molasses in the dark brown sugar provides a savory, malty depth that counteracts this bitterness, resulting in a much more sophisticated flavor profile.
I spent several rounds of testing adjusting the ratio of soda to sugar. Too much sugar made the pretzels sticky and prone to burning, while too little resulted in a pale crust. The two-to-one ratio of baking soda to dark brown sugar proved to be the sweet spot for both color and texture. You will notice that as the pretzels boil, the water turns a deep amber color. This is exactly what you want. The aroma should be intensely malty, almost like a dark honey or toasted grain, which is a clear indicator that the chemical transformation is happening correctly.
Pro tip: Keep a small bowl of warm water nearby while shaping; if the dough feels too dry or starts to tear, lightly dampening your palms can help provide just enough moisture to smooth out the surface.
Sealing the Twist: Precision Shaping for Twists That Don’t Unravel During Boiling
Instruction four is where many bakers encounter their biggest frustration: the unraveling twist. When the dough hits the boiling water, it expands rapidly. If the ends are not properly secured, the pressure will push them apart, and you will end up with a tangled rope rather than a neat knot. Through my testing, I realized that the way you roll the rope is just as important as how you seal it. You should aim for a rope that is slightly thicker in the middle and tapers at the very ends. This provides more surface area for the central “belly” of the pretzel while making the ends easier to tuck and press.
To achieve a secure seal, you must use firm pressure when folding the twisted ends back onto the main body of the dough. I use the pad of my thumb to press the ends into the dough, almost like I am trying to fuse the two pieces of dough together. If the dough has developed a slight skin during the rest, a tiny drop of water on your fingertip can act as a glue. The goal is to create a seamless bond that can withstand the turbulence of the boiling water. Visual symmetry is nice, but structural integrity is the priority here.
Common failure points include rolling the ropes too thin, which leads to a brittle pretzel, or failing to give the dough that final rise after shaping. That thirty-to-sixty-minute rest is vital because it allows the dough to aerate slightly. If you boil them immediately after shaping, they will be too dense and won’t have the characteristic puffiness. You want them to feel light in your hand before they go into the pot. If they feel heavy and solid, give them another fifteen minutes to rest under the towel.
Pro tip: Avoid using excess flour on your work surface during shaping; a little bit of friction is actually helpful for rolling even, tight ropes without the dough sliding around.
Practical Optimization: Yield, Storage, and Sourdough Pretzel Bites Variation
This recipe yields sixteen medium-sized pretzels, which is the perfect amount for a gathering or for stocking your freezer. If you find yourself with leftovers, storage and reheating are simple once you understand the physics of the crust. Because the crust is gelatinized, it can become tough if left at room temperature for more than twenty-four hours. For best results, I recommend freezing any pretzels you don’t plan to eat the same day. Wrap them individually in plastic wrap and place them in a freezer bag.
When it comes to reheating, a microwave is your enemy; it will turn the crust rubbery. Instead, use your oven or an air fryer. My testing showed that a brief spray with water before reheating is the key to reviving that fresh-from-the-oven texture. The moisture helps to re-hydrate the gelatinized starch, making it pliable and chewy again rather than hard. Place the frozen or room-temperature pretzels in a three-hundred-and-fifty-degree oven for five to seven minutes until they are warmed through and the salt crystals are glistening again.
If you prefer a smaller snack, this dough is perfectly suited for sourdough pretzel bites. To make this variation, roll your dough into ropes as usual, but instead of twisting them, use a bench scraper or knife to cut the ropes into one-inch segments. Do this before the final rise. Because the surface area is smaller, you only need to boil these bites for twenty seconds per side. They bake much faster too, usually reaching that deep golden brown in about eight to ten minutes. These are excellent for dipping into spicy mustard or a warm cheese sauce.
Pro tip: If you are making the bite-sized variation, toss them in a bowl with the egg wash instead of brushing them individually to save time and ensure even coverage.
Troubleshooting and Answering Your Top Sourdough Pretzel Questions
How difficult is making sourdough pretzels?
This process is only complex if you are following vague timing found in generic recipes. My guide removes the guesswork by prioritizing dough feel and specific visual cues over a static clock. Once you understand how to identify a puffy dough and how the boiling bath works, it becomes a predictable system.
Can I use sourdough discard?
No, this recipe strictly requires an active, bubbly starter for the necessary lift and fermentation. Discard lacks the metabolic activity needed to create the internal structure and characteristic tang. Using discard will result in a dense, heavy pretzel that feels more like a leaden biscuit than a traditional snack.
How do these compare to standard pretzels?
The long fermentation provides a deeper flavor complexity that you simply cannot get with commercial yeast. The combination of the overnight rest and the high-protein bread flour ensures a superior, chewier texture that holds up better against the dark brown sugar and baking soda bath.
Does this require a long proofing time?
Yes, the eight-to-twelve-hour overnight rest is non-negotiable for developing the characteristic flavor and the strong gluten network. However, this time is mostly hands-off. You are essentially letting the biology of the sourdough culture do the work while you sleep, making the actual active time very manageable.
Conclusion: Your Blueprint for Sourdough Excellence
Successfully engineering a perfect batch of these twists is about more than just mixing flour and water. It is about understanding the variables of temperature, protein structure, and chemical reactions. By moving away from the rigid constraints of a timer and toward a reliance on dough feel, you ensure that your results are repeatable regardless of the environment. The necessity of bread flour and the specific addition of dark brown sugar to your boiling bath are the critical upgrades that separate a mediocre result from a professional one.
I have spent the time testing these variables so that you don’t have to experience the same failures I did. This blueprint is designed to give you the confidence to master a process that many find intimidating. There is a deep satisfaction in pulling a tray of these glossy, salt-dusted twists from the oven, knowing that you controlled every aspect of the system to achieve that perfect chew. It is a testament to the idea that a little bit of analytical thinking can transform a simple snack into a culinary triumph.
I encourage you to get into the kitchen and put this engineered blueprint to the test. These soft sourdough pretzels are a rewarding project that will change the way you think about fermented doughs. Once you have pulled your first batch from the oven, I would love to hear about your experience in the comments section below. I am particularly curious to know which tactile cue finally confirmed for you that your dough was ready to be shaped. Was it the puffy, pillow-like feel after the final rise, or the dense spring-back of the overnight bulk fermentation? Your feedback helps us all refine the system together.
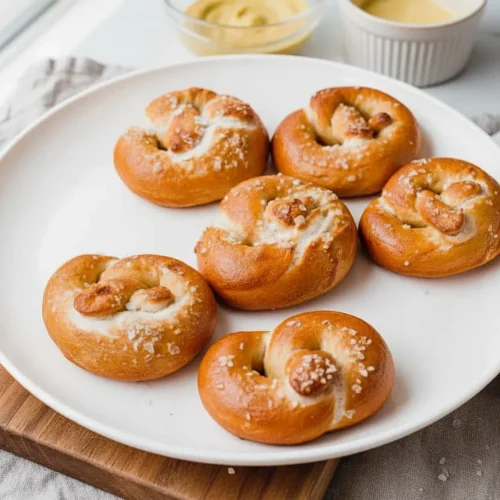
Soft Sourdough Pretzels Recipe
Equipment
- Stand Mixer with Dough Hook
- Parchment paper
- large stockpot
- Mesh Strainer
- Digital thermometer (recommended)
Ingredients
For the Dough
- 1 tablespoon sourdough starter
- 1/3 + 1 cup all-purpose flour
- 3 1/2 tablespoons water
- 1/2 cup active sourdough starter
- 1 + 1 cup water
- 2 tablespoons honey (or sugar)
- 2 teaspoons fine sea salt
- 4 + 2 cups bread flour High-protein bread flour (around 12-13%) is non-negotiable for structural integrity.
For the Alkaline Water Bath & Topping
- 6 cups water
- 2 tablespoons baking soda
- 1 tablespoon dark brown sugar
- 1 large egg lightly beaten
- 1 tablespoon coarse salt for topping
Instructions
Starter Activation & Initial Mix
- 12 hours before mixing the dough, add ingredients to make 1/2 cup (100 g) of active sourdough starter to a clean jar. Stir until combined, loosely cover, and let it rise at room temperature. The starter is ready when it has doubled in size with plenty of bubbles on the surface.
- In the bowl of a stand mixer, stir together the active sourdough starter, water (1 cup plus 1 tablespoon), honey, and salt (fine sea salt). Add the bread flour and use your hands to bring the ingredients together. The dough will be very stiff.
- Place the dough hook on the mixer and mix on the lowest speed for 6-7 minutes (or knead by hand for 10 minutes). Cover the bowl and let rest at room temperature for 8-12 hours (Bulk Fermentation).
Shaping and Final Proof
- Line a baking sheet with parchment paper. Turn the dough out onto a clean work surface and divide into 16 equal pieces.
- Working one piece at a time, roll the dough into a long rope shape (tapered at the ends) and set it on a clean surface in the shape of a U. Lift the ends of the rope and twist 2 times. Fold the twist over and press the ends firmly onto the dough to seal.
- Cover the shaped dough with a towel and let rise for 30-60 minutes or until puffy (Final Proofing). The dough should feel light and pillow-like.
Boiling and Baking
- Preheat oven to 425°F (218°C) ensuring the oven rack is in the center position.
- In a large stockpot, boil the 6 cups of water and add 2 tablespoons baking soda and 1 tablespoon of dark brown sugar. Maintain a steady, gentle bubble.
- Boil the pretzels, 3-4 at a time, on both sides for exactly 30 seconds each. Use a mesh strainer to remove the pretzels and place them back on the parchment paper. Do not crowd the pot.
- Brush each boiled pretzel lightly with the beaten egg wash and immediately sprinkle with coarse salt.
- Bake the pretzels at 425°F (218°C) for 12-14 minutes or until they achieve a deep, golden brown color.


