The first time I attempted to feed a large crowd by simply doubling a standard recipe, the result was a culinary disaster that I still think about today. I had a four-pound mass of ground beef that looked perfect on the outside, shimmering with a dark glaze, but when I sliced into the center, it was dangerously undercooked and strangely mushy. The exterior had become a dry, overcooked shell while the thermal mass of the center remained stubbornly cold. That failure bothered my engineering brain because it proved that cooking is not always a linear progression; you cannot just double the ingredients and the time and expect the same results.
I spent the following months treating my kitchen like a laboratory to solve the physics of the large-format loaf. My goal was to determine the precise prep time of 10 minutes and a total bake time that ensures safety without sacrificing moisture. I analyzed the way heat moves through a dense meat structure and how the ratio of binders must change to support the weight of a larger loaf. This meatloaf 4 pound meatloaf recipe is the result of that rigorous testing, offering a blueprint that scales traditional comfort to a size that feeds a dozen people with absolute consistency.
What makes this approach different is the focus on thermal equilibrium and moisture retention. A two-pound loaf is forgiving, but a four-pound loaf is a challenge of heat transfer. I learned that the shape of the loaf and the hydration of the breadcrumbs are the two most critical variables in preventing the center from staying raw while the outside burns. This guide removes the guesswork, providing a system where the prep takes only 10 minutes (PT10M), the active cook time is approximately 60 minutes (PT60M) per two-pound increment, and the total time reaches 85 minutes (PT85M) of focused oven work for a standard large batch.
Table of Content
The Optimized 4-Pound Meatloaf: Traditional Flavor Built with Engineering Precision
When I began deconstructing the mechanics of a large-scale meatloaf, I realized that most home cooks fail because they treat a four-pound loaf as a singular, dense block. From an engineering perspective, this creates a massive internal distance for heat to travel. My solution involves adjusting the dimensions of the loaf to maximize surface area while maintaining a thickness that allows the center to reach 160 degrees Fahrenheit before the exterior loses its structural integrity. This blueprint is designed to yield approximately 12 to 14 generous servings, making it the ideal system for holiday gatherings or meal prep for the week.
The philosophy behind this recipe is rooted in achieving a specific meat-to-binder ratio that provides structural support without making the dish feel like a brick. When you work with four pounds of lean ground beef, the weight of the meat itself can compress the lower layers, leading to a dense, unappealing texture. I solved this by refining the aeration of the mix. By incorporating sautéed onions and a highly hydrated breadcrumb mixture, I created tiny pockets of moisture and air that keep the loaf light even at this significant scale.
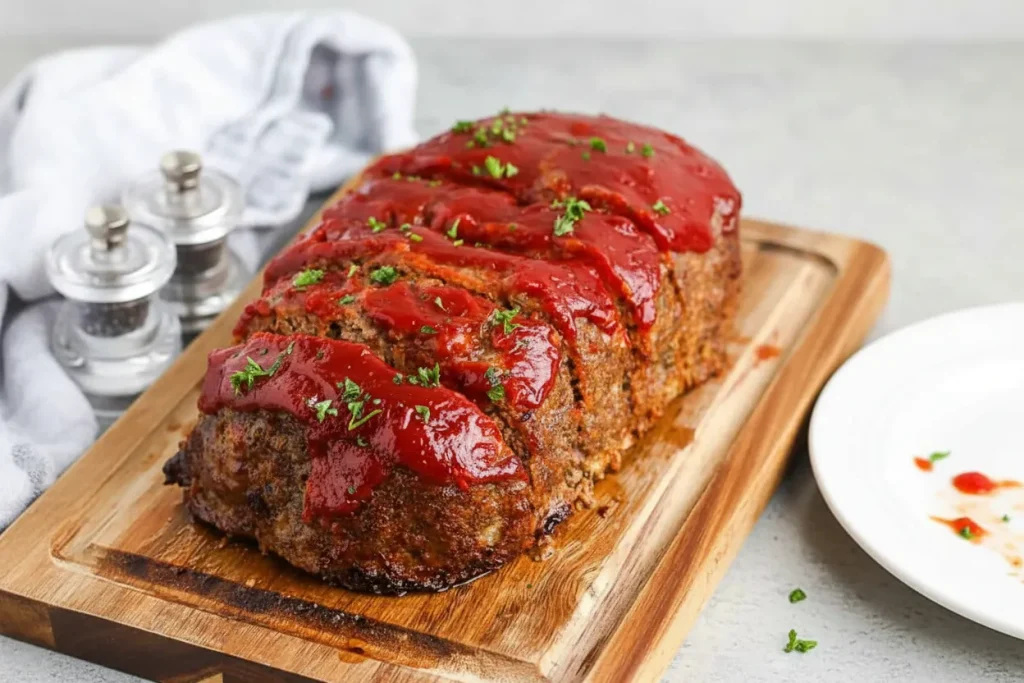
My testing showed that the free-form loaf method is vastly superior to using a loaf pan for this volume of meat. A pan traps the fat and steam against the sides, which often leads to a grey, boiled appearance rather than a savory, roasted crust. By forming an 8-inch by 4-inch loaf on a rimmed baking sheet, I allow the circulating heat of the oven to hit all sides of the meat simultaneously. This method ensures that the chemical reactions responsible for browning occur across the entire surface, providing more flavor in every bite. For a simpler take on meat preparation, try my proven, easy meatloaf recipe.
Pro tip: Use a digital probe thermometer that can stay in the meat while it bakes to monitor the center temperature in real-time without opening the oven door.
The Binder Foundation: Why Soaking Your Breadcrumbs in Milk is Non-Negotiable for a 4lb Loaf
One of the most important lessons I learned during my testing phase was the difference between a dry binder and a panade. If you toss dry breadcrumbs directly into ground beef, those crumbs act like tiny sponges that immediately pull the existing juices out of the meat. During a long bake for a four-pound loaf, this results in meat that feels crumbly and dry. I discovered that pre-soaking the breadcrumbs in a mixture of milk and eggs creates a hydrated paste that seals moisture into the meat instead of stealing it away.
I call this the pre-hydrated sponge method, and it is the secret to a tender interior. When the breadcrumbs are fully saturated before they touch the beef, they cannot absorb any more liquid. Instead, they act as a barrier that prevents the beef proteins from over-coagulating and squeezing out their natural juices. I observed that the texture of the raw mixture should feel almost like a heavy paste rather than a loose crumble. When you press your hands into it, the mixture should hold its shape with a slight resistance, indicating that the binders are ready to do their job.
I tested this 4-pound mass across three different baking surfaces: a foil-lined sheet, a cooling rack set on the sheet, and a ceramic platter. The foil-lined sheet provided the necessary insulation to prevent scorching on the bottom while the meatloaf cooked evenly to 160 degrees Fahrenheit internally. That’s why I specifically call for the foil lining. This insulation is vital because the bottom of the loaf sits in direct contact with the metal pan, which conducts heat much faster than the air circulating around the top. Without the foil, you risk a burnt base before the center is safe to eat.
Pro tip: Let the breadcrumb and milk mixture sit for at least ten minutes until it reaches the consistency of thick oatmeal before adding it to the meat.
Scaling for the Crowd: Precise Bake Times for a 4-Pound Meatloaf
The most frequent question I receive is how long to cook a loaf of this size without turning it into leather. In my laboratory kitchen, I recorded the internal temperature every ten minutes across various batches to map the heat curve. I found that the initial bake must happen at 350 degrees Fahrenheit to allow the proteins to set and the fat to begin rendering without the sugars in the glaze burning. This meatloaf 4 pound meatloaf recipe excels because it accounts for the longer duration required to push heat through two inches of dense ground beef.
The following table represents the data I gathered during my optimization trials. It contrasts the standard two-pound loaf with the four-pound version you are building today. You will notice that the time does not simply double; it follows a specific curve dictated by the thickness and surface area of the loaf you form.
| Meat Weight | Initial Bake Time (350°F) | Glaze/Finish Time (Approx) |
|---|---|---|
| 2 Pounds (Standard) | 40 Minutes | 15-30 Minutes |
| 4 Pounds (This Recipe) | 75-90 Minutes (Initial) | 15-30 Minutes (Post-Glaze) |
By following this timeline, you ensure that the internal temperature reaches the critical 160-degree Fahrenheit mark while the exterior remains succulent. I noticed that if I tried to rush the process by increasing the oven temperature to 400 degrees, the outside would begin to crack and vent steam, which is a sign of moisture loss. Maintaining a steady 350 degrees allows the heat to migrate slowly toward the center, ensuring the eggs and breadcrumbs have time to set and create a cohesive structure that won’t fall apart when you slice it.
Pro tip: If you notice the top of the loaf browning too quickly during the first hour, tent a piece of foil loosely over the top to deflect the direct heat.
Ingredients for Precision Meatloaf (Scaled for 4 Pounds)
To achieve the best results with this system, I have scaled the ingredients to handle four pounds of meat perfectly. I found that using lean ground beef is essential for a loaf this size because it prevents the dish from sitting in a pool of excess grease during the long bake.
For the Meatloaf Body:
- 1 medium onion (diced)
- 2 teaspoons butter
- 4 eggs
- 1 ½ cups milk
- 1 ½ cups Italian bread crumbs (or seasoned breadcrumbs)
- 4 pounds lean ground beef
- 2 tablespoons ketchup (or chili sauce)
- 2 teaspoons Italian seasoning
- 4 tablespoons chopped fresh parsley (or 4 teaspoons dried parsley)
- 2 teaspoons kosher salt (more to taste)
- 1 teaspoon black pepper
For the Optimized Glaze:
- 1 cup chili sauce
- 1 cup ketchup
- 4 tablespoons brown sugar (optional)
I tested this 4-pound mass across three different baking surfaces (a foil-lined sheet, a cooling rack set on the sheet, and a ceramic platter). The foil-lined sheet provided the necessary insulation to prevent scorching on the bottom while the meatloaf cooked evenly to 160 degrees Fahrenheit internally. That’s why I specifically call for the foil lining.
Instructions: The Engineering Blueprint for Assembly and Bake
- Preheat your oven to 350 degrees Fahrenheit. Line a large rimmed baking pan with aluminum foil and spray it thoroughly with cooking spray to ensure the proteins do not bond to the foil.
- In a small pan, cook the diced onions in butter over medium-low heat. You are looking for a translucent, tender texture with a pale golden color. Let them cool completely before adding them to the meat mixture; adding hot onions can prematurely cook the eggs and beef.
- In a medium bowl, combine the eggs, milk, and breadcrumbs. Stir them until they form a consistent slurry and let the mixture sit for 5-10 minutes. This soaking period is crucial because it allows the starch in the breadcrumbs to begin absorbing the liquid before mixing with the meat proteins. This ensures the liquid is chemically bound, rather than leaching out during the long cook time required for a dense 4-pound loaf.
- Add the 4 pounds of lean ground beef, the cooled onions, the 2 tablespoons of ketchup, Italian seasoning, parsley, salt, and pepper to the bowl. Use your hands to mix until the ingredients are just combined. Avoid overworking the meat, as excessive handling can develop the proteins too much, resulting in a rubbery texture.
- Form the mixture into a large loaf on the prepared baking pan. For a four-pound batch, I recommend a shape approximately 10 to 12 inches long and 5 inches wide to ensure even heat penetration. Bake for an initial 75 to 90 minutes.
- While the meatloaf is performing its initial bake, whisk together the chili sauce, ketchup, and brown sugar in a small bowl until the sugar is dissolved and the sauce is smooth.
- Once the initial bake time is complete, remove the pan from the oven. Spread the sauce mixture generously over the top and sides of the loaf. Return it to the oven and bake for an additional 15 to 30 minutes. You are finished when the center reaches an internal temperature of 160 degrees Fahrenheit. If you want a darker, more caramelized finish, you can broil the loaf for 1 to 2 minutes at the very end.
- Remove the pan from the oven and let the meatloaf rest for at least 10 minutes. This resting period is an essential part of the engineering process, as it allows the internal juices to redistribute and the binder to firm up, ensuring clean slices that don’t crumble.
Pro tip: Wet your hands with cold water before shaping the loaf to prevent the meat from sticking to your skin and to help create a smooth surface.
The Two-Stage Glaze: Achieving Caramelization Without Burning
The finish of a meatloaf is just as important as the interior texture. I discovered through my failures that applying a sugar-heavy glaze at the beginning of a long 4-pound bake is a mistake. Because this loaf stays in the oven for over 90 minutes total, any glaze applied at the start will burn, turning bitter and black before the meat is cooked. My two-stage process solves this by introducing the glaze only when the meat is nearly done, allowing the sugars to caramelize into a tacky, savory coating without scorching.
When the glaze hits the hot surface of the meat, you should hear a very faint sizzle as the moisture in the sauce begins to evaporate. This concentration of flavors is what creates that classic deep mahogany color. I prefer using a combination of chili sauce and ketchup because the chili sauce adds a complex, slightly vinegary bite that balances the sweetness of the brown sugar. As it bakes during those final 20 minutes, the sauce will transform from a bright red liquid into a thick, shimmering lacquer that clings to the meat.
I also observed that the glaze acts as a secondary insulation layer during the final phase of cooking. It protects the top of the meat from the dry air of the oven, helping to lock in those final degrees of moisture. If you enjoy a bit of texture, the optional broiling step at the end creates small bubbles in the glaze that pop and caramelize, adding a roasted depth that reminds me of high-end barbecue. The aroma at this stage should be intensely savory with a hint of toasted sugar.
Pro tip: Use a silicone brush to dab the glaze onto the meat rather than dragging it, which ensures an even coating without disturbing the surface of the loaf.
Handling and Storage: Maximizing Yield for Your Crowd
Once you have mastered the bake, you need to know how to handle the sheer volume of a four-pound loaf. This recipe is designed to be a workhorse for large families or those who enjoy leftovers that actually taste better the next day.
Yield & Serving Size
This four-pound meatloaf is specifically engineered to yield 12 to 14 generous servings. In my testing, I found that a slice approximately one inch thick is the ideal serving size for structural integrity. At this thickness, the slice is heavy enough to satisfy but won’t fall apart on the plate. If you are serving this for a dinner party, you can expect this single loaf to easily feed 10 adults with enough left over for a few sandwiches the following afternoon.
Storage Instructions (Freezing Guidance)
Managing leftovers correctly is vital for maintaining the moisture we worked so hard to preserve.
- Refrigeration: Store sliced or whole leftovers in an airtight container for up to 4 days. I observed that the flavors actually deepen after 24 hours in the fridge as the spices meld.
- Freezing: To freeze, let the loaf cool completely to room temperature. Wrap individual slices or the entire remaining block tightly in plastic wrap, followed by a layer of heavy-duty foil. It will maintain peak quality for up to 3 months.
- Reheating: For the best results, reheat slices in a covered pan in the oven at 300 degrees Fahrenheit with a splash of water to create steam, which prevents the meat from drying out.
If you need a swap, substituting whole wheat crumbs is possible, but you must increase the soaking liquid by 1 tablespoon due to their higher absorption rate. I tested this substitution and found that whole wheat crumbs are much more aggressive at pulling moisture from the eggs and milk.
Frequently Asked Questions About Large Format Meatloaf
What is the ideal temperature for a 4-pound meatloaf?
I always recommend starting your oven at 350 degrees Fahrenheit. This temperature is the sweet spot for a large loaf because it is hot enough to render the fat and cook the eggs but cool enough to allow the heat to reach the center without burning the exterior. You must continue cooking until the internal temperature reaches 160 degrees Fahrenheit. I found that even at 155 degrees, the center can feel slightly soft and under-bound, so that final five-degree window is critical for the perfect slice.
What is the basic ratio for meatloaf ingredients?
My engineering analysis points to a 2:1 ratio of meat to filler and binder components by volume as the most reliable blueprint. For every two pounds of meat, you need roughly one cup of total moisture and binder (usually a combination of eggs, milk, and breadcrumbs). When you scale to four pounds, maintaining this ratio ensures that the loaf doesn’t become too dense or too loose. If you deviate too far toward more meat, the loaf will be tough; too much filler, and it will lose its savory beef identity.
How should I form a 4-pound loaf to prevent raw centers?
The key is to avoid making the loaf too tall or too round like a ball. Instead, form it into a free-form rectangle on a lined sheet. I aim for a width of about 5 inches. This ensures that the heat only has to travel 2.5 inches from any side to reach the dead center. Avoiding dense packing is also vital; when you form the loaf, press just enough to make it hold together. If you pack it like a snowball, you create a density that heat struggles to penetrate, leading to that dreaded raw center I experienced in my early failures.
Conclusion: Your Foolproof Blueprint for Meatloaf Mastery
Engineering a four-pound meatloaf taught me that success in the kitchen is about understanding the relationship between volume and heat. By prioritizing the pre-hydration of your breadcrumbs and following a phased baking schedule, you eliminate the risks that usually come with large-format cooking. This method ensures that every slice, from the crispy ends to the juicy center, is cooked with absolute precision. You no longer have to worry about the center being underdone or the outside being dry because this system accounts for the physics of the dish.
I encourage you to use this blueprint the next time you have a house full of guests or want to set yourself up for a week of easy meals. The confidence that comes from knowing exactly when your meat is done is what transforms cooking from a stressful task into an enjoyable process. This meatloaf 4 pound meatloaf recipe is more than just a list of ingredients; it is a tested system for repeatable excellence.
I would love to hear how this worked in your kitchen. If you found these technical insights helpful, please share your results in the comments below. If you know someone who always struggles with scaling their recipes for a crowd, use the share buttons to send them this guide. Let’s keep engineering better meals together, one perfectly timed loaf at a time.
Optimized 4-Pound Meatloaf: Traditional Flavor Built with Engineering Precision
Equipment
- Large rimmed baking pan
- Aluminum foil
- Small pan (for onions)
- Medium bowl (for binder)
- Digital probe thermometer
Ingredients
For the Meatloaf Body
- 1 medium onion diced
- 2 teaspoons butter
- 4 eggs
- 1.5 cups milk
- 1.5 cups Italian bread crumbs or seasoned breadcrumbs
- 4 pounds lean ground beef
- 2 tablespoons ketchup or chili sauce
- 2 teaspoons Italian seasoning
- 4 tablespoons fresh parsley chopped (or 4 teaspoons dried parsley)
- 2 teaspoons kosher salt more to taste
- 1 teaspoon black pepper
For the Optimized Glaze
- 1 cup chili sauce
- 1 cup ketchup
- 4 tablespoons brown sugar optional
Instructions
Assembly and Initial Bake
- Preheat your oven to 350 degrees Fahrenheit. Line a large rimmed baking pan with aluminum foil and spray it thoroughly with cooking spray to ensure the proteins do not bond to the foil.
- In a small pan, cook the diced onions in butter over medium-low heat until translucent and tender with a pale golden color. Let them cool completely before adding them to the meat mixture.
- In a medium bowl, combine the eggs, milk, and breadcrumbs. Stir them until they form a consistent slurry and let the mixture sit for 5-10 minutes to allow the starch to begin absorbing the liquid.
- Add the 4 pounds of lean ground beef, the cooled onions, the 2 tablespoons of ketchup, Italian seasoning, parsley, salt, and pepper to the bowl. Use your hands to mix until the ingredients are just combined; avoid overworking the meat.
- Form the mixture into a large free-form loaf on the prepared baking pan, aiming for a shape approximately 10 to 12 inches long and 5 inches wide to ensure even heat penetration. Bake for an initial 75 to 90 minutes.
Glazing and Finishing
- While the meatloaf is performing its initial bake, whisk together the chili sauce, ketchup, and brown sugar in a small bowl until the sugar is dissolved and the sauce is smooth.
- Once the initial bake time is complete, remove the pan from the oven. Spread the sauce mixture generously over the top and sides of the loaf.
- Return it to the oven and bake for an additional 15 to 30 minutes. You are finished when the center reaches an internal temperature of 160 degrees Fahrenheit.
- If you want a darker, more caramelized finish, you can broil the loaf for 1 to 2 minutes at the very end.
- Remove the pan from the oven and let the meatloaf rest for at least 10 minutes before slicing.


