The first time I attempted to engineer a meatloaf 1lb ground beef recipe, the result was an architectural disaster. It sat on the plate like a dense, heavy brick, completely lacking the tender crumb and juicy interior I expected. The bread crumbs felt gritty, the center was somehow both greasy and dry, and the glaze was a cloying, sugary mess that did nothing to balance the beef.
As an engineer, this failure bothered me because a recipe is essentially a series of inputs and processes designed to produce a specific output. If the output is flawed, the system has a point of failure that needs to be identified and eliminated. I spent weeks deconstructing this classic comfort food, testing variables from fat ratios to binder hydration, to create the perfect blueprint for a smaller loaf.
This version, which I call The Engineer’s Meatloaf, is optimized for a 1lb batch, making it the ideal solution for smaller households or meal prep. We are looking at a Prep Time of 10 minutes and a Cook Time of 55 minutes, bringing the Total Time to 65 minutes of precision work. I have refined the mixing method and the glaze composition to ensure that every slice is as structurally sound as it is delicious.
The challenge with a 1lb loaf is its thermal mass, as it reacts to heat much faster than a standard 2lb or 3lb version. Without the right balance of moisture and heat control, you end up with a shrunken, tough piece of meat. I have solved this through a specific ratio of 90% lean beef and a high-moisture binder system that preserves the integrity of the protein.
Table of Content
The Engineer’s Meatloaf Blueprint: Yield and Preparation Overview
This recipe is optimized to serve 3-4 people reliably, providing substantial portions that maintain their shape when sliced. When working with a smaller volume of meat, the margin for error narrows significantly, which is why we treat the preparation like a pre-flight checklist. The goal is consistency, and that starts with the environment in which the meat will cook.
The first step in our protocol is to preheat the oven to 350° Fahrenheit. In my testing, I found that higher temperatures caused the exterior of a 1lb loaf to contract too quickly, squeezing out the internal juices before the center reached a safe temperature. At 350°F, the heat transfer is steady and controlled, allowing the internal temperature to rise in tandem with the setting of the exterior glaze.
Think of this section as the schematic review before the construction begins. You want your loaf pan ready and your ingredients measured out before you ever touch the raw beef. Maintaining a cold temperature for the meat until the very moment of mixing is also critical for fat retention, so keep that beef in the refrigerator until the oven alert sounds.
Pro tip: Place a baking sheet on the rack below your loaf pan to catch any potential glaze drips, ensuring your oven stays clean and smoke-free during the 55-minute cycle.
Ingredients: The Precision Components for Your 1lb Ground Beef Meatloaf
To achieve the desired output, you must use high-quality components that fulfill specific roles within the meatloaf system. The bread crumbs provide the structure, the milk and egg provide the hydration and binding, and the aromatics provide the flavor profile.
- 1 lb. 90% lean ground beef
- 1 cup dried bread crumbs
- 1/2 cup diced yellow onion
- 1/2 cup milk
- 1 large egg (beaten)
- 2 tbsp. ketchup
- 1 tbsp. Worcestershire sauce
- 1 tsp. dried parsley leaves
- 3/4 tsp. salt
- 1/2 tsp. garlic powder
- 1/4 tsp. ground black pepper
- 1/4 cup ketchup (for the topping)
- 2 tbsp. packed light brown sugar (for the topping)
- 1 tbsp. apple cider vinegar (for the topping)
I spent considerable time testing the topping to find the right chemical balance. I tested a standard red wine vinegar glaze against our apple cider vinegar glaze across four different batches. While red wine vinegar adds a certain depth, it often carries a harshness that can overwhelm the subtle notes of the dried parsley and garlic powder.
The apple cider vinegar provided a necessary, clean acidity that perfectly balanced the sweetness of the brown sugar and the richness of the 90% lean beef. It acts as a bright counterpoint to the savory, heavy notes of the Worcestershire sauce and beef fat. My testing showed that this specific acidity helps to cut through the palate-coating nature of the meat, making each bite feel fresh rather than heavy. For other robust meat preparations, try my recipe for the ultimate vibrant chimichurri sauce.
Pro tip: If you find your dried bread crumbs are very fine, like a powder, reduce the amount by two tablespoons to prevent the loaf from becoming too dense or bready.
The Critical Mix: How to Combine Ingredients Without Creating a Rubber Band
The most common point of failure in meatloaf production occurs during the mixing phase. Most home cooks treat the mixing process like kneading bread dough, which is a catastrophic mistake for meat proteins. When you over-handle ground beef, you trigger a process called myosin activation.
Myosin is a protein that, when agitated and salted, begins to cross-link and form a tight, rubbery web. In sausage making, this is desirable because you want a snappy, firm texture. In meatloaf, however, myosin activation leads to a tough, springy loaf that resembles a giant rubber band rather than a tender, succulent meal.
To avoid this, you must follow the instructions exactly. In a large bowl, add the beef, bread crumbs, onion, milk, egg, 2 tablespoons ketchup, Worcestershire sauce, parsley, salt, garlic powder, and pepper. Use your hands to mush and mix these ingredients together until well combined.
The tactile sensation should be soft and cold, and you should stop the moment you no longer see pockets of dry bread crumbs or clumps of unseasoned meat. Using your hands allows you to feel the texture and ensures you aren’t applying the mechanical shear force that a spoon or mixer would. You want to maintain the “loft” of the ground beef as much as possible to allow for moisture migration during the cook.
Pro tip: Wet your hands with cold water before mixing to prevent the meat and fat from sticking to your skin, which allows for a faster and more efficient incorporation.
Moisture Retention Variables: Milk vs. No Milk, 90% Lean vs. 80%
One of the most frequent questions I receive is whether the fat content of the beef or the choice of liquid binder really matters for a loaf of this size. To answer this, I ran a series of controlled experiments to measure moisture loss and texture quality. A 1lb loaf has a high surface-area-to-volume ratio, meaning it is prone to drying out much faster than larger loaves.
| Method | Beef Fat Ratio | Liquid Binder | Resulting Moisture & Texture |
|---|---|---|---|
| My Engineered Blueprint | 90% Lean | 1/2 Cup Milk | Superior moisture; tender crumb with minimal shrinkage. |
| Alternative Alpha | 80% Lean | 1/2 Cup Milk | Greasy mouthfeel; significant shrinkage (approx 15%). |
| Alternative Beta | 90% Lean | No Milk | Very dry; brittle structure that crumbles when sliced. |
| Alternative Gamma | 80% Lean | No Milk | Dense and chewy; the fat renders out but the meat stays tough. |
As the data illustrates, the combination of 90% lean beef and a full half-cup of milk is the engineered sweet spot. The 90% lean beef provides enough structural integrity so the loaf doesn’t swim in a pool of rendered fat, while the milk hydrates the bread crumbs to create a panade. This panade acts as a moisture reservoir, holding onto liquids even as the meat proteins contract during the baking process.
If you were to use 80% lean beef, the excess fat would actually interfere with the binding of the egg and bread crumbs, often causing the loaf to fall apart as soon as you try to lift it from the pan. The 90% lean ratio ensures that the flavor comes from the seasoning and the beef itself, not just from rendered tallow.
Pro tip: Use whole milk rather than skim, as the small amount of milk fat further assists in lubricating the protein fibers for a softer bite.
Glaze Superiority: Why Apple Cider Vinegar Cuts Through the Richness
The glaze is not merely a decorative topping; it is a functional component of the recipe that protects the meat from the direct dry heat of the oven while providing a necessary flavor contrast. A successful glaze must undergo a specific chemical transformation during the 55 minutes in the oven. It needs to reduce and thicken into a tacky, glass-like coating that clings to the meat.
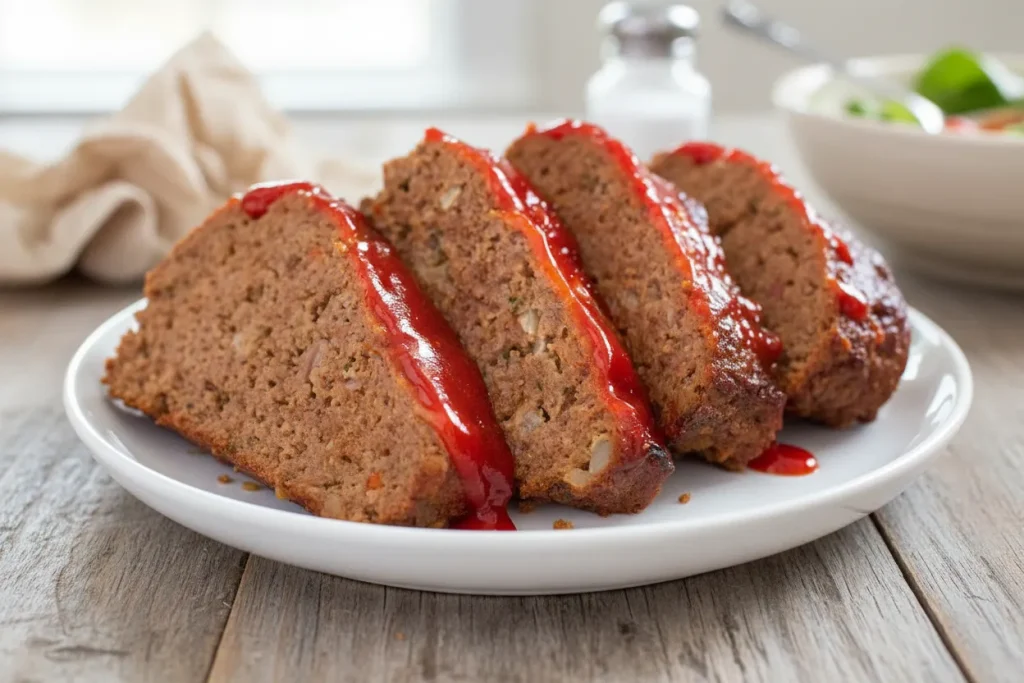
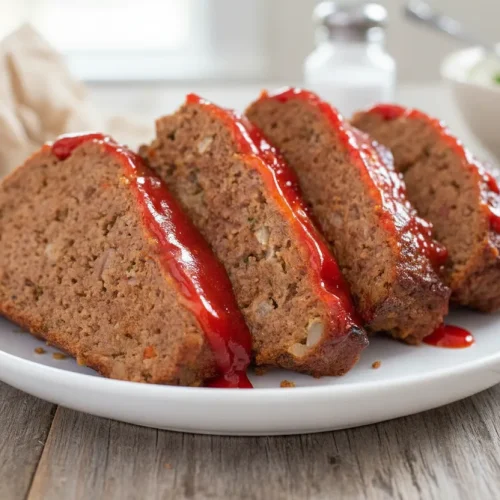
In a small bowl, add 1/4 cup ketchup, the brown sugar, and apple cider vinegar. Stir these components until the sugar is fully dissolved and the mixture is uniform in color. Pour the sauce on top of the meatloaf and spread it into an even layer, ensuring it covers the entire top surface.
The apple cider vinegar is the secret weapon here. While the brown sugar provides the sweetness needed for caramelization, the vinegar provides the acetic acid that balances the pH of the dish. This acidity triggers salivation, which makes the savory flavors of the beef feel more intense and satisfying. Without that vinegar, the glaze is just a sugary syrup that masks the flavor of the meat.
When you spread the glaze, you are creating a barrier. As the meatloaf bakes, the sugars in the glaze react with the proteins in the meat in a version of the Maillard reaction, while the vinegar slowly evaporates, leaving behind a concentrated brightness. The result is a topping that is savory, sweet, and sharp all at once.
Pro tip: If you like a thicker glaze, you can double the topping recipe and apply half at the beginning and the remaining half during the last 15 minutes of baking.
Precision Baking and Post-Cook Protocol for Your Small Batch Meatloaf
Once the meat is mixed and the glaze is applied, the loaf enters the thermal processing phase. You will bake the meatloaf uncovered for 55 minutes at 350°F. This duration and temperature were selected because they allow the heat to penetrate the core of the 1lb mass at a rate that doesn’t outpace the setting of the binder.
If you were to cook this at 400°F, the exterior would become charred and the glaze would scorch before the center reached the required 165°F. Conversely, 325°F is too low to properly set the glaze, resulting in a watery, pale topping. The 350°F environment provides the stability needed for the glaze to bubble and thicken into a deep, mahogany red while the interior stays succulent.
The most critical step in the entire process happens after the timer goes off. You must let the meatloaf rest for 8-10 minutes before serving. When meat is hot, the juices are in a state of high mobility. If you cut into the loaf immediately, those juices will flood onto the cutting board, leaving the meat dry.
During the rest, the muscle fibers relax and reabsorb the moisture. Furthermore, the proteins and binders need a few minutes to firm up as the temperature slightly drops. If you ignore this resting period, the structural integrity of your slices will fail, and the meatloaf will fall apart into a pile of crumbles. A rested loaf yields clean, beautiful slices that hold their shape from the pan to the plate. For further guidance on maintaining meat structure across different dishes, check out my ultimate tested meatloaf recipes.
Pro tip: Use a thin, flexible offset spatula to gently lift the meatloaf out of the pan after the resting period to ensure the bottom stays intact.
Practical Application: Storage and Mini Meatloaf Conversion
One of the benefits of an engineered system is its versatility. While this recipe is designed for a single 1lb loaf, I have tested its performance in other formats. If you prefer a faster cooking time or individual portions, you can convert this recipe into mini meatloaves.
To do this, divide the meat mixture into four equal portions, approximately 4 ounces each. Shape them into small ovals and place them on a parchment-lined baking sheet. Because the thermal mass of each individual unit is much smaller, you must reduce the baking time significantly. My testing showed that 25-30 minutes at 350°F is the optimal window for mini loaves to reach an internal temperature of 165°F.
Proper storage is also vital for maintaining the quality of your leftovers. Allow the meatloaf to cool to room temperature before wrapping it tightly in foil or placing it in an airtight container. It will stay fresh in the refrigerator for up to three or four days.
When reheating, avoid the microwave if possible, as it can turn the meat rubbery by vibrating the water molecules too aggressively. Instead, place a slice in a small skillet with a tablespoon of water and cover it with a lid. Heat over medium-low for 4-5 minutes. This creates a steam environment that restores the original moisture levels of the loaf without overcooking it.
Pro tip: Cold meatloaf slices make for an exceptional sandwich the next day, as the flavors continue to meld and the texture becomes even more dense and sliceable.
Frequently Asked Questions
What are the common binder substitutions for bread crumbs in a 1 lb meatloaf?
If you do not have dried bread crumbs on hand, quick-cooking oats are the most reliable substitution I have tested. However, oats are more absorbent than bread crumbs, so you must adjust your liquid input. If using one cup of oats, I recommend adding an additional two tablespoons of milk and letting the mixture sit for five minutes before mixing it into the meat. This ensures the oats are fully hydrated and won’t pull moisture away from the beef itself. Avoid using fresh bread chunks unless you toast them first, as they can become gummy and create large air pockets in your loaf.
How does one ensure the meatloaf stays perfectly moist?
Maintaining moisture is a three-factor system: the fat ratio of the beef, the hydration of the binder, and the mechanical handling of the ingredients. By using 90% lean beef, you provide enough protein for structure while the 1/2 cup of milk provides the necessary liquid. The most important factor, however, is the minimal mixing. Every second you spend over-mixing is a second spent toughening the meat and squeezing out potential moisture. If you follow the “mush until combined” rule and respect the 8-10 minute resting period, your meatloaf will be consistently moist every time.
What is the optimal cooking temperature for a 1 lb meatloaf?
Through my testing of various heat levels, 350°F remains the gold standard for a 1lb loaf. This temperature provides enough energy to trigger the Maillard reaction in the glaze without causing the small mass of meat to reach its thermal limit too quickly. Higher temperatures, such as 375°F or 400°F, often result in a “ballooning” effect where the outside cooks so fast it traps steam inside, causing the loaf to crack or the glaze to slide off. The stability of 350°F ensures that the internal temperature reaches 165°F at the exact moment the glaze has achieved its optimal thickness.
Conclusion: Your Optimized 1lb Meatloaf Blueprint is Complete
Engineering the perfect meatloaf 1lb ground beef recipe required looking past the simple instructions and understanding the physics of heat and the chemistry of protein. By focusing on the moisture-retention properties of the milk-based panade and the acidic balance of the apple cider vinegar glaze, we have created a dish that defies the common pitfalls of dry, crumbly meatloaf.
The beauty of this blueprint is its repeatability. Whether you are a seasoned cook or a beginner, following these precise steps will yield a loaf that is tender, flavorful, and structurally perfect. You no longer have to guess “if it’s done” or worry about it falling apart on the way to the dinner table. The work of deconstructing the failures has been done for you, leaving only the success of a well-executed meal.
I encourage you to take this blueprint into your kitchen and see the results for yourself. The transformation from a dense brick of meat to a light, succulent loaf is a testament to the power of precision. Once you have tasted the difference that a balanced glaze and a gentle mix can make, you will never go back to the old, unoptimized ways of cooking.
Please share your results in the comments below. Did you find the apple cider vinegar glaze as transformative as I did? Did the manual mixing method change your perspective on meat texture? I look forward to hearing how this engineered blueprint works in your home kitchen. Let’s continue to engineer better meals together, one recipe at a time.
The Engineer’s Meatloaf
Equipment
- Loaf Pan
- baking sheet
- Large Bowl
- Small bowl
- Offset spatula
Ingredients
Precision Components for Your 1lb Ground Beef Meatloaf
- 1 lb 90% lean ground beef
- 1 cup dried bread crumbs
- 1/2 cup diced yellow onion
- 1/2 cup milk
- 1 large egg beaten
- 2 tbsp ketchup
- 1 tbsp Worcestershire sauce
- 1 tsp dried parsley leaves
- 3/4 tsp salt
- 1/2 tsp garlic powder
- 1/4 tsp ground black pepper
Apple Cider Vinegar Glaze (For Topping)
- 1/4 cup ketchup
- 2 tbsp packed light brown sugar
- 1 tbsp apple cider vinegar
Instructions
Preheat and Preparation Overview
- Preheat the oven to 350° Fahrenheit.
- Place a baking sheet on the rack below your loaf pan to catch any potential glaze drips.
- Keep the ground beef cold in the refrigerator until the moment of mixing.
The Critical Mix
- In a large bowl, combine the beef, bread crumbs, onion, milk, egg, 2 tablespoons ketchup, Worcestershire sauce, parsley, salt, garlic powder, and pepper.
- Use your hands to gently mush and mix these ingredients together only until well combined, stopping the moment you no longer see pockets of dry bread crumbs or unseasoned meat (this is crucial to avoid myosin activation).
- Wet your hands with cold water before mixing to prevent sticking, ensuring a faster and more efficient incorporation.
- Press the mixture into a loaf pan, maintaining the ‘loft’ of the ground beef.
Glaze Application
- In a small bowl, add 1/4 cup ketchup, the brown sugar, and apple cider vinegar for the topping.
- Stir these components until the sugar is fully dissolved and the mixture is uniform in color.
- Pour the sauce on top of the meatloaf and spread it into an even layer, ensuring it covers the entire top surface.
Precision Baking and Post-Cook Protocol
- Bake the meatloaf uncovered for 55 minutes at 350°F.
- After the timer goes off, let the meatloaf rest for 8-10 minutes before slicing to allow juices to redistribute and the structure to firm up.
- Use a thin, flexible offset spatula to gently lift the meatloaf out of the pan after resting.


