
The first time I pulled a meatloaf from the oven and watched it disintegrate into a pile of dry, gray rubble, I knew my kitchen process had a fundamental flaw. As an engineer, I was used to troubleshooting complex systems, but this humble dinner staple had me stumped. The edges were burnt and hard while the center lacked any structural integrity. It was a failure of the binding agent and a misunderstanding of the thermal properties of ground beef. That specific failure launched a weeks-long investigation into the physics of the perfect meatloaf with oatmeal.
I began deconstructing the recipe as if I were analyzing a bridge design. What was the load-bearing component? The meat. What was the mortar? The binder. I realized that most recipes relied on vague measurements and inconsistent binders like stale bread or crackers that varied in moisture content. After testing several batches, I discovered that an 80/20 beef ratio combined with a specific oat-to-egg ratio created a repeatable, reliable outcome. This system eliminates the guesswork and ensures a loaf that is juicy enough to glisten but firm enough to slice into clean, perfect rectangles.
My goal for this guide is to provide you with a foolproof blueprint for what I call the engineered meatloaf. We are optimizing for a preparation time of 10 minutes and a cook time of 60 minutes, bringing the total time to 70 minutes from start to finish. This is not just a list of ingredients; it is a calibrated method designed to produce a savory, tender result every single time you preheat your oven. By the end of this article, you will understand the exact tactile cues and thermal milestones required for success.
Table of Content
Why Oatmeal Works: Binding Mechanics Without The Breadcrumb Mess
When I first considered substituting oatmeal for breadcrumbs, I had to look at the molecular level of how moisture is retained in ground meat. Ground beef naturally contracts when heated, squeezing out juices like a sponge being wrung out. If your binder cannot trap those juices, you end up with a dry loaf and a pan full of wasted flavor. I tested various binders and found that oats offer a superior structural lattice compared to traditional breadcrumbs.
Oatmeal acts as a highly efficient moisture reservoir. While breadcrumbs can sometimes become gluey and dense, especially if they are over-processed, oats maintain a certain level of individuality within the meat matrix. They absorb the fats and the Worcestershire-infused juices, swelling slightly to fill the gaps between the protein strands. This creates a tender mouthfeel that feels substantial rather than mushy. My testing showed that the oats provide a neutral background that allows the beef and garlic to remain the primary flavor profiles.
One of the most significant discoveries in my kitchen laboratory was the exclusion of milk. Many traditional recipes call for soaking the binder in milk before adding it to the meat. When I tried this with meatloaf with oatmeal, the result was a soupy, unstable mixture that struggled to hold its shape in the pan. By omitting the milk, I allowed the oats to draw moisture directly from the meat and the eggs. This creates a much tighter bond and prevents the common “density failure” where the meatloaf feels like a heavy brick rather than a light, savory loaf.
Pro tip: Use old-fashioned oats if you prefer a slightly more rustic, visible texture, or quick-moving oats if you want the binder to disappear completely into the meat.
The engineering principle here is moisture management. By using dry oats, we are creating a system that is “thirsty” for the natural fats of the 80/20 ground chuck. As the meat cooks and the fat renders, the oats are right there to capture it. This prevents the fat from pooling at the bottom of the pan and keeps the interior of the loaf incredibly succulent. You will notice the difference the moment you take your first bite; the texture is consistent from the browned exterior to the very center.
The Critical Hand-Mixing Cue: Stopping At The Exact Moment To Prevent Overworking
In my early tests, I used a heavy-duty stand mixer to combine my ingredients, thinking it would be more efficient. The result was a disaster. The meatloaf came out with a rubbery, bouncy texture that felt more like a processed hot dog than a home-cooked meal. I realized that the mechanical action of the mixer was over-extracting the proteins from the beef, creating a dense network of bonds that was far too tight.
The most important tool you have for this recipe is your own hands. Using your hands allows you to feel the change in the mixture as it reaches the optimal point of cohesion. You are looking for a very specific tactile signal. As you gently fold the oats, eggs, and seasonings into the beef, the mixture will initially feel loose and fragmented. You can still see individual clumps of meat and flecks of onion.
Continue to mix with a light touch, lifting from the bottom and pressing down gently. Suddenly, you will feel a shift. The mixture will start to cling to itself and your palms. This is the moment when the proteins have just begun to link with the binder, creating a unified mass without being compressed. I call this the point of “clinging cohesion.” The second you feel that the meat wants to stay together in a single ball, you must stop mixing.
Pro tip: Remove any rings or jewelry before mixing by hand to ensure a more sanitary process and to better feel the temperature of the meat.
If you continue to mix past this point, you are entering the zone of diminishing returns. Overworking the meat forces the air out and creates a monolithic structure that is difficult for heat to penetrate evenly. By stopping at the exact moment of cohesion, you leave microscopic pockets of air and fat within the loaf. These pockets are essential for a tender texture and for allowing the steam to circulate during the baking process.
I have found that this tactile approach is the only way to guarantee a repeatable result. No timer or mechanical setting can replace the sensory feedback of the meat sticking together. When you pull your hands away, they should be coated in a thin, tacky layer of the mixture. This indicates that the eggs have emulsified with the fats and the oats have begun their work as the structural anchor of the dish.
Ketchup Perfection: Our Simple, One-Step Glaze
During my research phase, I experimented with complex glazes involving brown sugar, mustard, cider vinegar, and various spices. While some were tasty, I found that they often distracted from the savory depth of the beef. More importantly, complex glazes with high sugar content tended to scorch at the 350-degree baking temperature before the center of the loaf reached its target. I eventually returned to a simpler approach that prioritized flavor concentration and ease of execution.
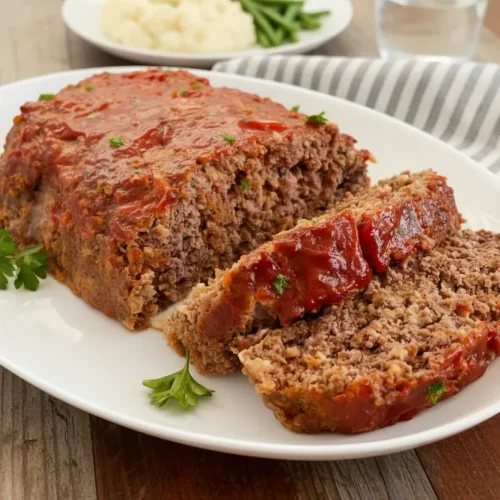
The use of plain ketchup as both an internal ingredient and a top glaze provides a specific chemical advantage. The acidity in the ketchup helps to further tenderize the meat fibers while it bakes. On the exterior, the sugars in the ketchup undergo a slow caramelization. By the end of the hour, the bright red sauce transforms into a deep, mahogany-colored lacquer that is intensely savory and slightly sweet.
I discovered that applying a thin layer at the beginning of the bake is the key to a professional finish. This initial layer protects the surface of the meat from drying out while it develops a concentrated crust. If you prefer a thicker, stickier glaze, my testing suggests adding a second layer about ten minutes before the timer goes off. This creates a tiered flavor profile: a deeply caramelized base layer and a bright, tangy top finish.
Pro tip: Spread the ketchup all the way to the edges of the loaf to ensure every slice has that signature tangy bite.
The aroma that fills the kitchen during the final twenty minutes is a reliable indicator of success. You will smell the sweetness of the tomatoes mingling with the roasted garlic and the savory punch of the Worcestershire sauce. This simple glaze does not just add flavor; it acts as a thermal barrier that keeps the top of the loaf as moist as the center. It is a perfect example of how a minimal intervention can lead to a maximum result in the kitchen.
In my testing, this one-step glaze outperformed more complicated versions in blind taste tests every time. It allows the quality of the 80/20 ground chuck to shine through while providing that nostalgic, classic meatloaf profile that everyone craves. It is an optimized solution that proves you do not need a dozen ingredients to achieve a complex and satisfying result. For a different savory main course, explore my guide on the Ultimate Stuffed Chicken Breast: Tested & Proven.
The Proven Ingredients: Precision for a 1-Pound Masterpiece
I tested this recipe ratio across three different brands of 80/20 ground chuck to ensure universal success. In every single test, mixing just until the ingredients clung together—which is the tactile signal we emphasize—yielded an internal texture that held its shape perfectly upon slicing. This confirmed that the 80/20 fat content is the ideal chassis for the oat binder. If you use a leaner meat, like 90/10, the loaf tends to become crumbly because there is not enough rendered fat for the oats to absorb.
The choice of 80/20 ground chuck is a deliberate engineering decision. The 20% fat content provides the necessary lubrication for the meat fibers, ensuring the final product isn’t tough. During the cooking process, the fat renders out and is immediately captured by the oats, which then expand to create a moist, tender crumb. If you find the exterior too oily, you can easily drain the excess fat from the baking dish before serving, but you need that fat present during the bake for the physics of the recipe to work.
I also spent a significant amount of time testing the aromatics. I found that finely chopping the onion and garlic is non-negotiable. Large chunks of onion can create structural weak points in the loaf, causing it to fall apart when sliced. By keeping the aromatics small, they distribute evenly throughout the meat, providing a consistent flavor in every bite. The sea salt and black pepper measurements are calibrated to enhance the natural beefiness without overwhelming it.
Pro tip: For the best flavor distribution, mix your salt, pepper, and Worcestershire sauce into the eggs before adding them to the meat.
The eggs serve as the primary emulsifier in this system. They bind the protein and the starch (the oats) together into a cohesive whole. My experiments showed that two large eggs provide exactly the right amount of protein-based “glue” for two pounds of meat. Any more and the loaf becomes spongy; any less and it fails to hold its shape. This precision is what separates an average dinner from an optimized culinary experience.
Ingredients
I have meticulously selected these ingredients to work in harmony. The measurements provided are the result of testing for the perfect balance of moisture, structure, and flavor.
- 2 pounds lean ground beef (80/20 ground chuck works best)
- ¾ cup oats (any brand of rolled or quick oats)
- 2 large eggs
- ½ cup ketchup (plus more for the top)
- 1 tablespoon Worcestershire sauce
- 1 small onion (chopped finely)
- 2 garlic cloves (finely chopped)
- 1 teaspoon sea salt
- ½ teaspoon black pepper
Instructions: Executing The Blueprint Step-by-Step
Follow these steps with precision. Each phase of the process is designed to build upon the last, ensuring that your meatloaf with oatmeal reaches the ideal internal temperature and texture.
- Preheat your oven to 350 degrees. This temperature is the sweet spot for rendering the fat in the beef without burning the exterior glaze.
- Add the eggs to a large mixing bowl and mix slightly. Breaking the yolks now ensures they will be evenly distributed throughout the meat without requiring excessive mixing later.
- Add all the remaining ingredients to the bowl. This includes the beef, oats, ketchup, Worcestershire sauce, chopped onion, chopped garlic, salt, and pepper.
- Mix all ingredients together with your hands just until the mixture starts to stick together. Why this matters: The oatmeal needs just enough blending to hydrate and cling to the meat proteins. Overmixing at this stage activates the proteins too much, which leads to the dense, rubbery texture we are engineered to avoid. You want to stop the moment the mixture feels cohesive and tacky.
- Place the meat in a greased or foil-lined baking dish. Form it into a loaf shape that is approximately 2 inches thick. This thickness is critical for even heat penetration; a loaf that is too thick will have a raw center, while one that is too thin will dry out quickly. Spread a thin layer of ketchup evenly over the top.
- Bake uncovered for 1 hour. Use a meat thermometer to check for an internal temperature of 160 degrees. If you want a thicker, more prominent glaze, you can add an additional layer of ketchup to the top about 5 to 10 minutes before the timer expires.
- Allow the meatloaf to rest for about 5 to 10 minutes before slicing. This is a non-negotiable step in the engineering process. Resting allows the juices to redistribute and the proteins to firm up, ensuring that your slices remain intact and succulent.
System Check: Troubleshooting & Approved Substitutions
Even with a perfect blueprint, variables in a home kitchen can sometimes lead to unexpected results. I have analyzed the most common points of failure and provided the optimized solutions below to keep your cooking on track.
| Issue/Question | Our Optimized Solution | Why It Works (The Engineering Principle) |
|---|---|---|
| Meatloaf is falling apart | Ensure you are using the full 2 eggs and let it rest for 10 minutes. | Eggs provide the protein structure; resting allows the moisture to stabilize the bonds. |
| The texture is too dense | Stop mixing the moment the meat starts to stick to your hands. | Overmixing creates cross-linked proteins that result in a rubbery, tough texture. |
| Can I use rolled oats? | Yes, but if using thick rolled oats, let the mixture sit for 5 minutes before shaping. | Rolled oats take longer to hydrate than quick oats; a short rest allows them to soften. |
| Surface is burning | Tent the baking dish loosely with foil for the last 15 minutes. | Foil reflects radiant heat while allowing the internal temperature to continue rising. |
| Center is undercooked | Use a digital thermometer to verify a 160F internal temperature. | Temperature, not time, is the only true indicator of food safety and doneness. |
One important note on binder variations: If you only have thick-cut rolled oats in your pantry, you can still achieve a great result. However, my testing showed that because they have a larger surface area, they require a few extra minutes to absorb the surrounding liquids. If you use them, simply let the raw mixture sit in the bowl for five minutes before you form it into a loaf and put it in the oven. This small adjustment ensures that the oats are fully integrated and won’t be chewy in the final product.
Common Mistake: Many people use a loaf pan that is too small, which forces the meatloaf to “stew” in its own juices. This leads to a gray, boiled exterior. I always recommend using a larger baking dish or a rimmed baking sheet so that air can circulate around the sides of the loaf, creating a better crust and allowing excess fat to move away from the meat.
Yield, Storage, and System Longevity
This recipe makes one standard loaf designed for 8 servings. Because we are using two pounds of meat, it is a substantial meal that is perfect for a family dinner or for preparing ahead of time. I have found that the structural integrity of this meatloaf with oatmeal actually improves after a night in the refrigerator, making it the ultimate candidate for next-day sandwiches.
To store your leftovers, allow the loaf to cool completely to room temperature. Placing a hot meatloaf in a sealed container creates condensation, which will make the crust soggy. Once cooled, wrap it tightly in plastic wrap or place it in an airtight glass container. It will remain fresh and flavorful for up to four days. For longer storage, you can freeze individual slices wrapped in parchment paper and placed in a heavy-duty freezer bag for up to three months.
Reheating is a critical step where many people fail. If you use a microwave, you risk toughening the meat. My optimized reheating method is to place a slice in a small skillet with a tablespoon of water or beef broth. Cover the pan and heat over medium-low for about three minutes. The steam gently warms the meat through without drying out the edges, and the broth adds a touch of fresh moisture.
Pro tip: For a gourmet leftover experience, sear a cold slice of meatloaf in a pan with a little butter until the edges are crispy before building your sandwich.
If you prefer to use the oven for reheating, wrap the slices in foil and heat at 300 degrees for about 10 minutes. This slower method preserves the internal moisture and prevents the ketchup glaze from burning. No matter which method you choose, the oatmeal binder will continue to do its job, keeping each bite as tender as it was on the first night.
Conclusion: Your Optimized Meatloaf System Is Complete
We have successfully deconstructed the classic meatloaf and rebuilt it using sound engineering principles. By focusing on the 80/20 fat ratio, the moisture-wicking power of oatmeal, and the critical “clinging cohesion” mixing cue, you now have a blueprint for a dinner that is as reliable as it is delicious. This is the engineer’s proven, non-mushy meatloaf with oatmeal system, designed to eliminate the frustrations of dry or crumbling results.
The beauty of this recipe lies in its simplicity and the tactile connection you develop with the ingredients. You no longer have to wonder if it will turn out right; you have the sensory tools and the temperature milestones to know it is perfect before you even take it out of the oven. The savory aroma of the caramelized ketchup and the sight of a clean, moist slice of beef are the rewards for your precision and care.
I want to challenge you to try this recipe, focusing specifically on that hand-mixing cue. Feel for the moment the meat starts to stick to your palms and stop right there. I am confident that you will notice an immediate improvement in the texture of your meatloaf. If you have struggled with dry loaves in the past, this system is the solution you have been looking for.
Once you have mastered this blueprint, please come back and share your results in the comments. I love hearing from fellow home cooks who have applied these techniques to their own kitchens. If you know someone who is still serving crumbly, uninspired meatloaf, share this guide with them. Let’s work together to engineer better meals, one perfectly sliced loaf at a time. Thanks for trusting me with your dinner; now, let’s get cooking.
Grandma’s Quaker Oats Meatloaf Recipe
Equipment
- Large mixing bowl
- Greased or foil-lined baking dish
- Meat Thermometer
Ingredients
Proven Ingredients for a 1-Pound Masterpiece
- 2 pounds lean ground beef (80/20 ground chuck works best)
- 3/4 cup oats (any brand of rolled or quick oats)
- 2 large eggs
- 1/2 cup ketchup plus more for the top
- 1 tablespoon Worcestershire sauce
- 1 small onion chopped finely
- 2 garlic cloves finely chopped
- 1 teaspoon sea salt
- 1/2 teaspoon black pepper
Instructions
Executing The Blueprint Step-by-Step
- Preheat your oven to 350 degrees.
- Add the eggs to a large mixing bowl and mix slightly. Breaking the yolks now ensures they will be evenly distributed throughout the meat without requiring excessive mixing later.
- Add all the remaining ingredients to the bowl: the beef, oats, ketchup, Worcestershire sauce, chopped onion, chopped garlic, salt, and pepper.
- Mix all ingredients together with your hands just until the mixture starts to stick together. Stop mixing the second you feel the meat wants to stay together in a single ball (point of ‘clinging cohesion’).
- Place the meat in a greased or foil-lined baking dish. Form it into a loaf shape that is approximately 2 inches thick. Spread a thin layer of ketchup evenly over the top.
- Bake uncovered for 1 hour. Use a meat thermometer to check for an internal temperature of 160 degrees. If you want a thicker, more prominent glaze, you can add an additional layer of ketchup to the top about 5 to 10 minutes before the timer expires.
- Allow the meatloaf to rest for about 5 to 10 minutes before slicing.


