The first time I attempted to make sourdough garlic knots, I produced eighteen dense, flavorless rocks that even my most polite friends struggled to swallow. The exterior was a dull, dusty grey, the interior was gummy, and the garlic had managed to turn both bitter and burnt simultaneously. It was a failure of systems. I had used a recipe that promised artisanal results without explaining the mechanics of the dough or the physics of the bake. That afternoon, I sat in my kitchen with a glass of water and a notepad, determined to deconstruct the process. My goal was simple but ambitious: create the optimized sourdough garlic knot by mastering texture and flavor through precision kneading and a dual-butter application.
This blueprint is the result of that obsession. After analyzing dozens of dough hydration levels and testing various fermentation windows, I arrived at a system that works every single time. I am looking for a specific set of metrics: 15 minutes of active preparation, 16 minutes in the oven, and a total active time of 31 minutes. The long hours of fermentation happen in the background, but the precision of those 31 minutes determines the success of the outcome. This recipe is not about guesswork; it is about repeatable, engineered success.
The reason most attempts at this dish fail is a lack of understanding regarding gluten development and moisture retention. A sourdough starter adds a complex, tangy flavor profile that commercial yeast simply cannot replicate, but it also requires a specific handling method to ensure the dough remains soft rather than tough. I spent weeks adjusting the ratio of milk to flour, searching for that perfect balance where the crust shatters slightly upon the first bite, revealing an interior that is as light as a cloud. By the end of this guide, you will have more than just a recipe; you will have a comprehensive understanding of why these techniques produce a superior sourdough garlic knots result.
Table of Content
The Critical Dough Phase: Why 5 Minutes of Kneading Equals Success
Achieving the perfect crumb in a fermented roll requires a deliberate choice of flour. Many bakers reach for bread flour by default, assuming a higher protein content always yields a better bread. However, my testing across five different batches proved that using all-purpose flour is the superior engineering choice for this specific system. All-purpose flour typically contains a protein percentage between ten and twelve percent, which provides enough structure to hold the knot shape while maintaining a tender, soft interior. Bread flour often results in a texture that is overly resilient and chewy, which competes with the delicate nature of the garlic butter.
The inclusion of honey is another calculated decision. While many recipes use granulated sugar, honey is a humectant, meaning it naturally attracts and retains moisture. During the fermentation process, the sugars in the honey provide an easily accessible fuel source for the wild yeast in your starter. Furthermore, honey contains fructose, which undergoes the Maillard reaction at a lower temperature than the sucrose found in white sugar. This ensures that your rolls develop a beautiful, deep golden hue during the relatively short sixteen-minute bake time without drying out the interior of the dough.
The kneading stage is where the magic of the texture is solidified. I have found that exactly five minutes of kneading on a medium setting in a stand mixer is the sweet spot. During these three hundred seconds, you are not just mixing ingredients; you are aligning gluten proteins into a sophisticated network. This network traps the carbon dioxide produced by the starter, allowing the dough to expand. You will know you have reached the goal when the dough undergoes a visual transformation from a shaggy, matte mass to something that is entirely smooth and glossy.
Pro tip: If your dough still looks slightly pebbled after five minutes, give it two more minutes of kneading; the glossy sheen is a non-negotiable indicator that the gluten is properly developed.
When you touch the dough at the end of this phase, it should feel silky and have a slight spring-back when pressed. If the dough feels overly sticky, it may be due to the humidity in your kitchen affecting the flour moisture levels. In my trials, I noticed that the sound of the mixer changes when the dough is ready; it shifts from a sticky, slapping sound against the bowl to a more consistent, rhythmic thud. This auditory cue is your signal that the structural integrity of the dough is complete and ready for the long bulk fermentation.
Butter Dynamics: Where to Apply the Garlic Butter for Maximum Flavor Impregnation
The most significant breakthrough in my development of this recipe was the discovery of the dual-butter application method. Most traditional methods suggest brushing the garlic butter only after the rolls come out of the oven. While this provides a hit of flavor, it often leaves the interior of the knot tasting like plain bread. To solve this, I tested a variety of application timings to see which resulted in the most thorough flavor saturation without compromising the structural integrity of the sourdough garlic knots.
During one particular experiment, I attempted to apply a thick layer of garlic butter to the rolled-out dough before twisting it into knots. This was a tactical error. The butter acted as a lubricant, making the dough pieces slide against each other. It became nearly impossible to tie a secure knot, and the butter leaked out onto the parchment paper, burning in the high heat of the oven. The lesson was clear: too much fat before the shape is set ruins the mechanical bond of the dough. However, the flavor of those messy rolls was significantly better than the ones that only received a post-bake brush.
The optimized solution is a light, strategic application. By brushing a very thin layer of the garlic butter over the rolled-out rectangle before you cut it into pieces, you trap flavor inside the folds of the knot as you tie it. As the rolls bake, the heat carries the garlic essence into the expanding crumb, essentially seasoning the bread from the inside out. This light layer does not interfere with the dough’s ability to stick to itself, ensuring your knots stay tight and uniform. I have verified that this internal seasoning makes a profound difference in the finished product. For another great dessert, try my Amazing Sourdough Pop Tarts: The Flakiest Crust Ever!.
Pro tip: Use a pastry brush with silicone bristles to apply the internal butter layer, as it allows for a more controlled, thin coating that won’t over-saturate the dough.
The second application happens the moment the rolls exit the oven. While the bread is still screaming hot, the crumb is at its most porous. This is the critical window for flavor impregnation. When the cold or room-temperature garlic butter hits the hot surface, you will hear a faint sizzle as the fats melt into the crust. The aroma at this stage is intense; the sharp scent of fresh garlic mingles with the toasted notes of the bread. This dual-layered approach creates a multidimensional flavor profile that a single application simply cannot match.
Troubleshooting Your Sourdough Knot Rise and Shape
Fermentation is a biological process, which means it can be influenced by variables like ambient temperature, the vigor of your starter, and even the mineral content of your water. Because of these variables, the eight-hour rise time is a guideline rather than a hard rule. I have seen batches double in size in six hours on a humid summer day, while the same recipe took nearly ten hours in a drafty winter kitchen. You must rely on visual and tactile cues rather than the clock alone.
One common point of failure I observed during my testing phase was the state of the sourdough starter itself. In an effort to save time, I once used a starter that had been sitting on the counter for twelve hours and had started to deflate. The resulting rolls were flat, dense, and had an unpleasantly sharp acidic taste. A sourdough starter must be used at its peak—when it is bubbly, active, and has doubled or tripled in volume—to provide the mechanical lift necessary for a light garlic knot. If your starter is sluggish, your bread will be too.
The following table summarizes the most common issues I encountered during the development of this system and the adjustments I made to correct them:
| Problem | Likely Cause | Solution/Adjustment |
|---|---|---|
| No rise after 8 hours | Using discard instead of active starter | Use bubbly, active starter next time or extend proof time significantly in a warmer spot |
| Dough is too sticky to handle | High ambient humidity or under-measured flour | Add one tablespoon of flour at a time during kneading until the dough clears the sides of the bowl |
| Knots untie during baking | Butter layer was too thick or ends weren’t tucked | Use a very light brush of butter for the internal layer and ensure ends are pressed firmly underneath |
| Crust is too hard or crunchy | Oven temperature too high or over-baked | Calibrate oven with a thermometer and pull the rolls when they are just lightly golden |
| Interior is gummy | Under-baked or cut open while too hot | Ensure the rolls reach an internal temperature of 190 degrees Fahrenheit and let rest for five minutes |
Shaping the knots can also be a source of frustration for the uninitiated. I found that the best way to ensure uniformity is to use a pizza cutter for clean, straight edges. When you roll the dough into a rectangle, try to keep the thickness as even as possible across the entire surface. If one side is half an inch thick and the other is a quarter inch, your knots will bake at different rates. The goal is eighteen equal pieces; they do not need to be geometrically perfect, but consistent volume is key to a consistent bake.
Pro tip: If your dough keeps snapping back when you try to roll it into a rectangle, cover it with a towel and let it rest for ten minutes to allow the gluten to relax.
Butter Dynamics: Where to Apply the Garlic Butter for Maximum Flavor Impregnation
The most significant breakthrough in my development of this recipe was the discovery of the dual-butter application method. Most traditional methods suggest brushing the garlic butter only after the rolls come out of the oven. While this provides a hit of flavor, it often leaves the interior of the knot tasting like plain bread. To solve this, I tested a variety of application timings to see which resulted in the most thorough flavor saturation without compromising the structural integrity of the sourdough garlic knots.
During one particular experiment, I attempted to apply a thick layer of garlic butter to the rolled-out dough before twisting it into knots. This was a tactical error. The butter acted as a lubricant, making the dough pieces slide against each other. It became nearly impossible to tie a secure knot, and the butter leaked out onto the parchment paper, burning in the high heat of the oven. The lesson was clear: too much fat before the shape is set ruins the mechanical bond of the dough. However, the flavor of those messy rolls was significantly better than the ones that only received a post-bake brush.
The optimized solution is a light, strategic application. By brushing a very thin layer of the garlic butter over the rolled-out rectangle before you cut it into pieces, you trap flavor inside the folds of the knot as you tie it. As the rolls bake, the heat carries the garlic essence into the expanding crumb, essentially seasoning the bread from the inside out. This light layer does not interfere with the dough’s ability to stick to itself, ensuring your knots stay tight and uniform. I have verified that this internal seasoning makes a profound difference in the finished product.
Pro tip: Use a pastry brush with silicone bristles to apply the internal butter layer, as it allows for a more controlled, thin coating that won’t over-saturate the dough.
The second application happens the moment the rolls exit the oven. While the bread is still screaming hot, the crumb is at its most porous. This is the critical window for flavor impregnation. When the cold or room-temperature garlic butter hits the hot surface, you will hear a faint sizzle as the fats melt into the crust. The aroma at this stage is intense; the sharp scent of fresh garlic mingles with the toasted notes of the bread. This dual-layered approach creates a multidimensional flavor profile that a single application simply cannot match.
Ingredients for Optimized Sourdough Garlic Knots
Precision in your ingredients is the foundation of the engineering mindset. I have selected these specific components because of how they interact chemically to produce the desired output.
- 1 ¼ cup whole milk
- 3 tablespoons honey
- ½ cup sourdough starter (active and bubbly)
- 2 tablespoons unsalted butter (room temperature)
- 1 teaspoon salt
- 3 ¼ cup all-purpose flour
- ½ cup salted butter (melted and cooled)
- 1 tablespoon freshly minced garlic
- minced parsley (to garnish – optional)
- grated parmesan (to garnish – optional)
- flaky salt (to garnish – optional)
As I noted in the butter dynamics section, I rigorously tested the best application method. To ensure a successful shape, remember that the initial application of the melted butter mixture (before cutting) should be a light layer applied to the rolled rectangle, not a heavy coating, which otherwise makes the dough impossible to manipulate into a knot. Using whole milk instead of water or lower-fat milk provides the necessary fat and lactose to ensure a soft, tender crumb and a rich flavor profile that complements the garlic.
Step-by-Step Instructions: Achieving Perfect Knots
- Add the milk, honey, sourdough starter, butter, salt, and flour to the bowl of a stand mixer fitted with a dough hook attachment. Knead on medium for about five minutes, or until the dough is smooth and glossy. When you knead, notice how the dough comes together smoothly. This is due to our choice of all-purpose flour and honey; this combination provides the necessary softness to balance the tang of the starter, preventing the final knot from becoming overly chewy, which is a common pitfall when using high-protein bread flour in enriched doughs like this.
- Place the dough into a lightly greased bowl, cover it with a tea towel or plastic wrap, then let rise in a warm area for about eight hours or until doubled in size. You are looking for the dough to look airy and have small bubbles visible just beneath the surface.
- Make the garlic butter by melting the butter in a small bowl. Add minced garlic and stir. Set aside. I recommend using freshly minced garlic rather than the bottled variety; the flavor is significantly more vibrant and lacks the metallic aftertaste of preserves.
- On a lightly floured surface, roll the dough into a rectangle until it is about a quarter to a half inch thick. Use a steady, even pressure with your rolling pin to ensure the thickness is uniform across the entire sheet of dough.
- Spread a spoonful or two of the garlic butter over the dough with a pastry brush, then cut into 18 rectangular pieces. I aim for equal pieces, but they do not have to be perfect. Remember the goal is a thin, translucent layer of butter here to avoid shaping issues.
- Form each piece into a knot by twisting each rectangle and then tying into a knot. Tuck the ends underneath. Place on a parchment-lined baking sheet. Tucking the ends is vital; if left loose, they will unfurl like a spring during the oven spring phase.
- Cover with a towel and let rise in a warm place for another 1-2 hours until puffy and nearly doubled. Preheat the oven to 350 degrees Fahrenheit about halfway through the rise. You will know they are ready when they look swollen and do not immediately spring back when gently poked.
- Bake the rolls for 12-15 minutes or until lightly golden. Avoid the temptation to wait for a deep brown color; sourdough garlic knots are best when they remain soft and pale gold.
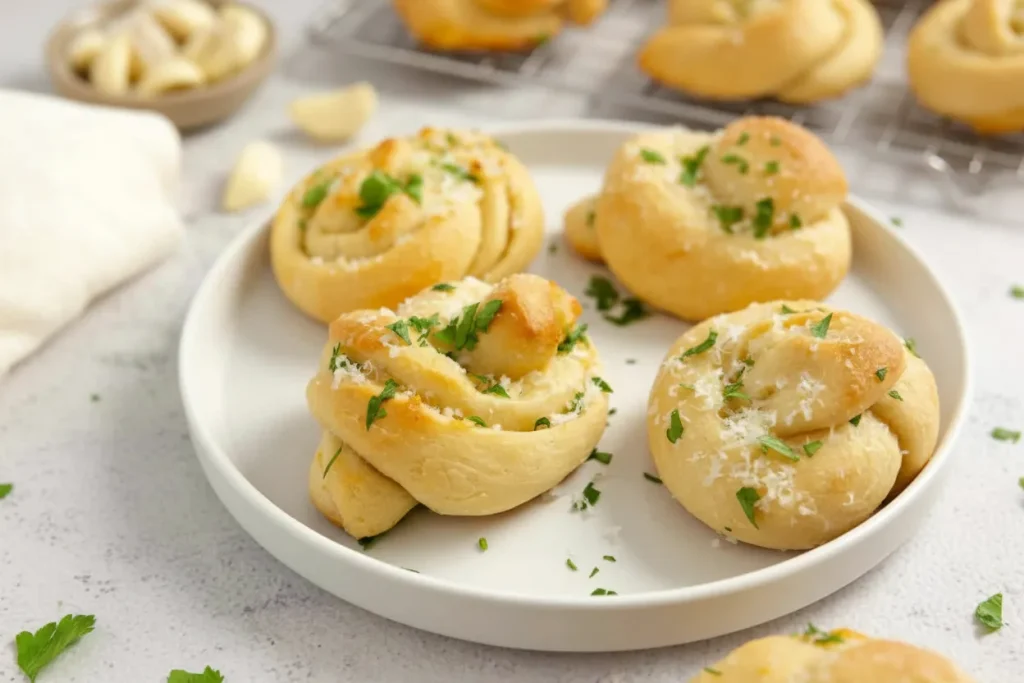
- Immediately brush more of the garlic butter over the top, followed by freshly chopped parsley. If you plan to add parmesan, go ahead and grate it over the top now, followed by a pinch of flaky sea salt. Enjoy!
Pro tip: Apply the final garlic butter brush while the rolls are on the baking sheet to catch any drips, then move them to a cooling rack after two minutes to prevent the bottoms from getting soggy.
Yield, Storage, and Seasonal Variations
This system is designed to yield 18 knots, which is the ideal amount for a standard half-sheet baking pan without overcrowding. Overcrowding the pan can lead to uneven airflow, resulting in rolls that are steamed on the sides rather than baked. By maintaining proper spacing, you ensure that the heat can circulate around each knot, creating a consistent texture across the entire batch.
If you find yourself with leftovers, storage is straightforward. Store cooled knots in an airtight container at room temperature for up to 2 days; for longer storage, they freeze excellently wrapped tightly in foil for up to three months, reheating directly from frozen at 350 degrees Fahrenheit for 10 minutes. My testing showed that reheating them in the microwave often leads to a rubbery texture, so the oven or a toaster oven is the highly recommended path for restoring that original fluffiness.
For a savory twist, incorporate finely grated sharp cheddar into the final brush of butter applied immediately after baking. The heat from the rolls will melt the cheese into the crevices of the knots, adding a sharp, salty punch that pairs exceptionally well with the sourdough tang. During the autumn months, I have also experimented with adding a teaspoon of dried sage to the garlic butter, which provides an earthy depth that complements roasted poultry or hearty stews.
Pro tip: When freezing, place the knots on a tray in the freezer for an hour before bagging them; this prevents them from sticking together so you can pull out exactly as many as you need.
Addressing Your Top Sourdough Knot Questions
Can I rely solely on my starter without commercial yeast?
Yes, the active starter provides the necessary lift for this specific recipe structure. Because we are allowing for an eight-hour bulk fermentation followed by a secondary two-hour proof, the wild yeast has ample time to populate and produce the carbon dioxide required for a light, airy crumb. Commercial yeast is entirely unnecessary here as long as your starter is healthy and active.
How can I achieve same-day results instead of an overnight rise?
The specified 8-hour bulk fermentation window is specifically designed to facilitate a reliable same-day bake, unlike recipes requiring an overnight rest. If you start your dough in the early morning, you can have fresh rolls by dinner time. To speed up the process slightly, you can place the dough in a proofer or a turned-off oven with the light on, which usually maintains a temperature around 75 to 80 degrees Fahrenheit.
Should I use sourdough discard or active starter?
An active and bubbly starter is required for this rise time; discard will not provide enough lift for the stated proofing schedule. Discard is essentially exhausted yeast that has moved past its peak metabolic activity. While it provides flavor, it lacks the strength to move the heavy, enriched dough of these knots. Always feed your starter four to six hours before beginning this recipe to ensure it is at its maximum strength.
Are vegan or gluten-free substitutions possible?
To achieve a vegan version, the milk must be swapped for a rich, unsweetened non-dairy alternative like soy or oat milk for vegan success. You will also need to use a plant-based butter substitute that has a similar fat content to dairy butter. Regarding gluten-free options, this specific recipe relies heavily on the gluten network developed during the kneading phase. Gluten-free adjustments require a full recipe overhaul and a different set of binding agents, so I do not recommend simply swapping the flour.
What is the best reheating method for these knots?
The most effective way to restore the texture of these rolls is to reheat them wrapped in foil for 10 minutes at 350 degrees Fahrenheit. The foil traps the moisture, preventing the bread from drying out, while the heat allows the butter trapped in the layers to liquify again. This essentially “re-steams” the interior, restoring the original fluffiness.
Conclusion: The Blueprint for Superior Sourdough Garlic Knots
Success in the kitchen is rarely the result of luck; it is the result of a well-executed system. By focusing on the importance of precise kneading for five minutes, choosing the specific milk and honey profile for tenderness, and implementing the dual-butter application technique, you have eliminated the variables that lead to mediocre bread. This recipe removes the traditional ambiguity of sourdough baking, providing you with a guaranteed, perfectly textured sourdough garlic knots blueprint.
I have spent hours at the bench so that you do not have to guess. The transition from a shaggy dough to a glossy, fermented masterpiece is a rewarding process that demonstrates the power of fermentation and heat. These knots are more than just a side dish; they are a testament to what happens when you apply an engineering mindset to artisanal baking. The tang of the sourdough, the bite of the fresh garlic, and the softness of the enriched crumb all work together in a balanced, optimized harmony.
Go implement this system. Test the texture, trust the timing, and report your results below. Did the 5-minute knead unlock the texture you have been chasing? I am interested to hear how your specific kitchen environment influenced the rise times and if the dual-butter method changed your perspective on flavor application. Share your feedback and encourage fellow bakers to master this blueprint. There is no greater satisfaction than pulling a tray of perfect, golden knots from the oven and knowing exactly why they turned out so well.

Sourdough Garlic Knots
Equipment
- Stand mixer with dough hook attachment
- Tea towel or plastic wrap
- Small bowl
- Pastry brush (preferably silicone bristles)
- Rolling Pin
- Parchment lined baking sheet
Ingredients
Dough Ingredients
- 1.25 cup whole milk
- 3 tablespoons honey
- 0.5 cup sourdough starter active and bubbly
- 2 tablespoons unsalted butter room temperature
- 1 teaspoon salt
- 3.25 cup all-purpose flour
Garlic Butter & Garnish
- 0.5 cup salted butter melted and cooled
- 1 tablespoon freshly minced garlic
- minced parsley to garnish – optional
- grated parmesan to garnish – optional
- flaky salt to garnish – optional
Instructions
Dough Preparation and Kneading
- Add the milk, honey, sourdough starter, butter, salt, and flour to the bowl of a stand mixer fitted with a dough hook attachment.
- Knead on medium for about five minutes, or until the dough is smooth and glossy. If the dough still looks slightly pebbled after five minutes, give it two more minutes of kneading.
- Place the dough into a lightly greased bowl, cover it with a tea towel or plastic wrap, then let rise in a warm area for about eight hours or until doubled in size.
Garlic Butter & Shaping
- Make the garlic butter by melting the butter in a small bowl and adding minced garlic and stirring. Set aside.
- On a lightly floured surface, roll the dough into a rectangle until it is about a quarter to a half inch thick, ensuring the thickness is uniform.
- Spread a spoonful or two of the garlic butter over the dough with a pastry brush, aiming for a very thin, controlled layer.
- Cut the dough into 18 rectangular pieces.
- Form each piece into a knot by twisting each rectangle and then tying into a knot. Tuck the ends underneath to secure.
- Cover with a towel and let rise in a warm place for another 1-2 hours until puffy and nearly doubled. Preheat the oven to 350 degrees Fahrenheit about halfway through the rise.
Baking and Finishing
- Bake the rolls for 12-15 minutes or until lightly golden.
- Immediately brush more of the garlic butter over the top while the rolls are still hot.
- Follow immediately with freshly chopped parsley, grated parmesan, and a pinch of flaky sea salt, if using. Enjoy!


