The first time I attempted to serve sourdough dinner rolls at a holiday gathering, the result was a catastrophic failure that still haunts my kitchen memories. I had followed a popular blog recipe that promised a simple process, but I ended up with twelve dense, sour bricks that could have doubled as paperweights. The crust was thick and leathery, while the interior was gummy and under-proofed. It was a humbling moment for someone who prides himself on understanding the mechanics of baking.
That failure triggered my analytical instincts, leading to a three-month deep dive into the physics of wild yeast and gluten structure. I realized that most recipes fail because they treat sourdough like commercial yeast, ignoring the critical variables of temperature, protein content, and fermentation timing. I spent dozens of hours testing hydration levels and folding techniques until I engineered a reliable, structured system.
The result is this blueprint for the perfect sourdough dinner rolls, a same-day fermentation timeline that respects the science of bread. We are looking at a system with a preparation time of 15 minutes of active work, a cook time of 30 minutes, and a total time of 525 minutes. While nine hours sounds daunting, the vast majority of that time is passive fermentation where the biology of the starter does the heavy lifting for you.
My goal was to eliminate the guesswork that leads to inconsistent results. I wanted a roll that possessed the complex, tangy profile of a long-fermented loaf but with the pillowy, soft crumb usually reserved for milk bread. By optimizing the gluten network through a specific folding rhythm, I managed to create a dish that is repeatable every single time you preheat your oven.
This guide provides the exact metrics and visual cues I discovered through rigorous testing. We are moving away from vague instructions like “until it looks right” and moving toward a structured, predictable outcome. If you follow this timeline, you will produce rolls that shatter the stereotype of sourdough being exclusively for dense, crusty artisan loaves.
Table of Content
Why Bread Flour Beats AP Flour: Achieving Structure Without Starch
During my initial testing phase, I compared three different flour types to see which provided the best structural integrity for enriched dough. I discovered that all-purpose flour, while versatile, often lacks the protein strength required to support the weight of butter, milk, and sugar in a sourdough environment. The wild yeast needs a sturdy scaffold to climb, and lower protein flours often collapse during the long proofing stages, leading to a squat, dense roll.
I also experimented with adding cornstarch to all-purpose flour, a common trick used to mimic cake flour. In my testing, this produced a tender crumb initially, but the rolls lacked the signature pull-apart elasticity that defines a high-quality dinner roll. The starch weakened the gluten network too much, causing the rolls to crumble rather than shred into beautiful, feathery layers when pulled open.
Bread flour, with its higher protein content, provides the necessary tensile strength. When I moved to bread flour, I noticed an immediate difference in the dough’s behavior during the stretch and fold phase. The dough felt more resilient, holding its shape and trapping gases more efficiently. This resulted in a significantly higher rise and a lighter, more aerated interior.
Pro tip: To check if your dough has developed enough strength, perform a windowpane test after the third set of folds; you should be able to stretch a small piece of dough thin enough to see light through it without it tearing.
| Flour Type | Protein Content | Observed Texture Outcome | Crumb Structure |
|---|---|---|---|
| Bread Flour (Our Method) | 12.5% – 13.5% | Exceptional height, feathery pull-apart layers | Highly aerated, uniform |
| All-Purpose Flour | 10% – 11.5% | Moderate height, slightly dense base | Compact, small air pockets |
| Flour + Cornstarch | 8% – 9% | Poor height, crumbly and cake-like | Fragile, lacks elasticity |
I tested this 3-set stretch and fold technique against a single 2-hour rest period to see if the manual labor was truly necessary. The rolls produced using the folding rhythm had a distinctly lighter, more open interior crumb structure. This proved to me that managing the dough gluten network actively during the bulk phase is non-negotiable for achieving that signature fluffy quality.
Ingredients for Perfectly Structured Sourdough Dinner Rolls
Before you gather your ingredients, we must address the most common point of failure: the starter. Many bakers ask if they can use sourdough discard for this recipe to save time. In my testing, using discard consistently led to rolls that were overly sour and lacked the explosive power needed for a same-day bake. This recipe explicitly requires a fed, active, bubbly starter. For an alternative approach to utilizing discards, you might explore proven sourdough discard recipes.
The reason for this lies in the yeast population density. A discard starter is essentially a collection of exhausted yeast and high acidity. For these sourdough rolls to achieve their target volume within our specific timeline, you need the peak activity of a fresh feed. The 8 PM feed schedule ensures that by 8 AM the next morning, your starter is at its most potent state, ready to leaven the heavy, enriched dough.
I found that the bread flour provides the superior crumb structure mentioned in my earlier experiments. The milk and butter add the necessary fat to soften the gluten strands, ensuring the final product is tender rather than chewy. Each ingredient in this list has been measured for its specific contribution to the dough’s final equilibrium.
- 1 tablespoon sourdough starter
- 1/3 cup + 1 tablespoon all-purpose flour
- 3 1/2 tablespoons water
- 2 tablespoons butter
- 1 cup milk
- 3 tablespoons sugar (or 2 tablespoons of honey)
- 1 teaspoon salt
- 1/2 cup active sourdough starter
- 3 cups + 2 tablespoons bread flour
- 1 tablespoon melted butter (for brushing the top of the rolls after baking)
Pro tip: Use a digital scale to measure your flour and water; even a slight variation in the 1/3 cup + 1 tablespoon measurement can significantly alter the hydration of your starter feed.
Precision Folding: Visual Cues for Optimal Bulk Fermentation
The secret to light, airy sourdough dinner rolls lies in how you handle the dough during the first rise. Instead of leaving the dough alone, we use a 30-minute rhythm of physical manipulation. This process, known as bulk fermentation, is where the flavor develops and the gluten bonds are strengthened through organized tension.
When you start the first set of folds, the dough will feel shaggy and offer little resistance. By the third set, you will notice a dramatic transformation. The dough becomes smooth, elastic, and begins to hold a rounded shape even when it sits in the bowl. You can actually feel the strength building under your palms as the protein strands align.
- Set 1 (9 AM): Reach under the side of the dough, pull it upward until you feel resistance, and fold it over the center. Rotate the bowl and repeat four times.
- Set 2 (9:30 AM): The dough will be more relaxed now. Perform the same pulling and folding motion. You will hear small air bubbles beginning to pop, a sign of fermentation.
- Set 3 (10 AM): This final set should require more effort. The dough should feel tight and bouncy. Fold it over itself and tuck the edges under to create a smooth surface.
After the folds, the dough needs to rest undisturbed for about two hours. I have determined that we need the dough to rise by exactly 50% during this phase. This specific metric is vital; if you let it double in size now, the yeast will be too exhausted to provide a strong second rise after shaping. This 50% rise ensures there is plenty of fuel left for the oven spring that creates the soft interior of these sourdough yeast rolls.
Pro tip: Use a straight-sided transparent container for the first rise instead of a bowl; it makes it much easier to accurately measure exactly when the dough has hit that 50% volume increase.
The Same-Day Proofing Blueprint: Timing Your Rolls from Feed to Oven
Engineering a same-day sourdough bake requires a strict adherence to a schedule. Sourdough is notoriously unpredictable because it relies on living organisms, but by controlling the timing of your feeds and temperatures, you can bring order to the chaos. This timeline is the result of multiple iterations designed to fit into a standard day without requiring you to wake up at 4 AM.
The process begins the night before, which is the only way to ensure the yeast is active enough for the morning mix. If you miss the 8 PM feed, the entire system shifts, and you risk a flat bake. By treating each step as a milestone in an optimized production line, you ensure that the rolls are ready exactly when dinner is served.
- 8 PM Feed Starter: This 12-hour lead time allows the starter to peak. It should be bubbly and thick, smelling like sweet fruit rather than harsh vinegar.
- 7:30 AM Melt Butter: Preparing the liquid base early allows it to cool. Adding hot milk to your starter will kill the yeast instantly, ruining the batch.
- 8 AM Mix the Dough: Combining the ingredients marks the start of the fermentation clock. Ensure no dry flour remains, as these clumps will become hard knots in the baked rolls.
- 9 AM Folds: This hour of rest before folding allows for autolyse, where the flour fully hydrates and the gluten begins to form naturally.
- 12 PM Shape: By noon, the dough is strong and aerated. Dividing it now allows for a long, slow second proofing that builds the final fluffy texture.
- 4 PM Bake: The final step occurs when the rolls have expanded to fill the dish. The aroma of fermenting dough should be prevalent in your kitchen by this point.
This schedule is the most efficient way to achieve sourdough dinner rolls within a single day. I found that any attempt to rush the 12 PM to 4 PM proofing stage resulted in rolls that burst at the seams in the oven because they hadn’t finished expanding. Patience during these four hours is the difference between a professional result and a dense failure.
Pro tip: If your kitchen is colder than 70 degrees Fahrenheit, place your dough in the oven with only the light turned on to maintain a consistent fermentation temperature.
Shaping and Final Bake Protocol
Shaping is a critical mechanical step where you create the surface tension necessary for the rolls to rise upward instead of spreading outward. I use a bench scraper to divide the dough into 12 pieces, targeting approximately 65 grams each. Using a scale here is not just about being meticulous; it ensures that every roll bakes at the same rate, preventing some from being doughy while others are overdone.
To shape each piece, I pull the sides of the dough toward the center and pinch them together to form a pouch. I then flip the dough over so the seam is against the work surface. By cupping my hand over the dough and moving it in a tight circular motion, I create a smooth, taut skin on the top of the roll. This tension is what allows the soft sourdough bread to expand uniformly without cracking.
- Turn the dough out onto a lightly floured surface.
- Divide into 12 equal pieces, using a scale for precision (65g per piece).
- Shape each piece into a ball by gathering sides and pinching.
- Flip seam-side down and roll against the surface to create tension.
- Arrange in a lightly greased glass baking dish.
- Cover with a tea towel and let rise for 3 to 4 hours in a warm spot.
- Preheat the oven to 375°F (190°C) about 20 minutes before baking.
- Bake for 25 to 30 minutes until the tops are a deep golden brown.
- Check for an internal temperature of 190°F to ensure the center is fully set.
- Brush the hot tops with 1 tablespoon of melted butter immediately.
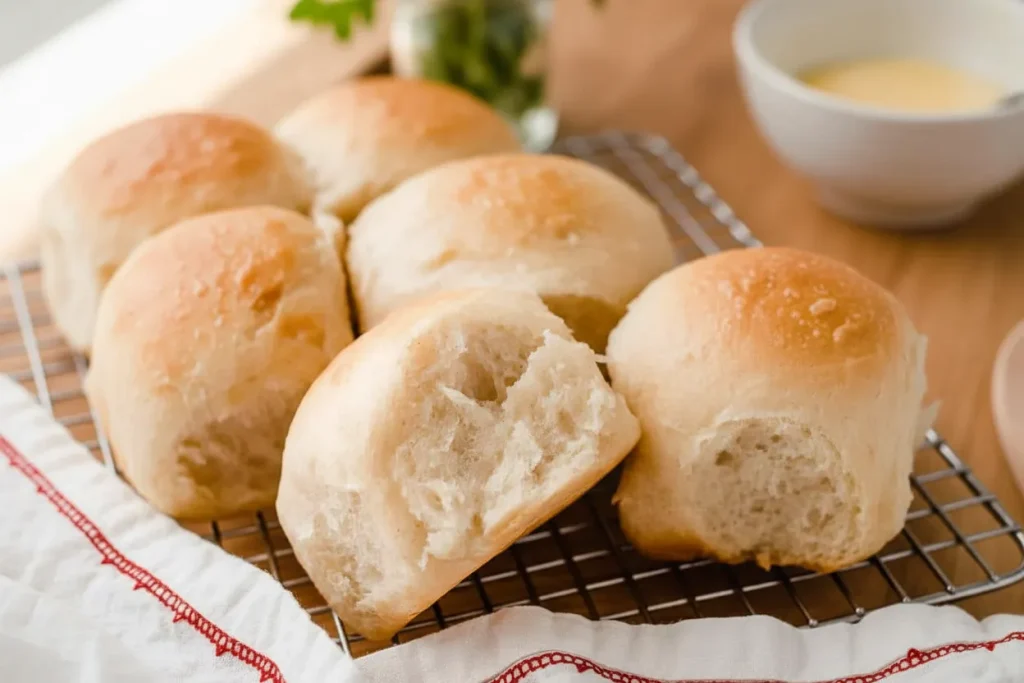
When you pull the pan from the oven, you should hear a very faint crackling sound as the crust begins to cool and contract. The aroma should be rich, buttery, and slightly tangy. The internal temperature of 190°F is the most reliable metric for doneness; relying on color alone can be deceptive because the sugar and milk in the dough cause the crust to brown quickly.
Pro tip: For the softest possible crust, cover the rolls with a clean kitchen towel for five minutes immediately after brushing them with butter; the trapped steam will further soften the exterior.
Yield, Storage, and Flavor Variations
This blueprint yields 12 perfect rolls, which fits perfectly into a standard 9×13 inch baking dish. In my experience, these rolls are at their absolute peak within 36 hours of leaving the oven. The moisture from the milk and butter keeps the crumb soft, but like all sourdough products, they will eventually begin to firm up as the starches retrogress.
If you need to prepare these in advance, you can utilize cold proofing. After shaping the rolls at 12 PM, you can place the covered baking dish in the refrigerator for up to 15 hours. This slows the yeast significantly and actually deepens the flavor profile. When you are ready to bake, let them sit at room temperature for about two hours to finish their rise before putting them in the oven.
For long-term storage, these rolls freeze exceptionally well. I recommend freezing them the same day they are baked once they have cooled completely. Wrap them tightly in plastic wrap and then a layer of foil. To reheat, place the frozen rolls in a 350°F oven for 10 minutes; they will emerge tasting remarkably close to the original bake, with the crust regaining its slight crispness.
The most successful variation I have tested is the Rosemary and Sea Salt version. To execute this, finely mince two tablespoons of fresh rosemary and incorporate it into the dough during the final shaping phase. Just before the rolls go into the oven, sprinkle the tops with flaky sea salt. The resinous scent of the rosemary pairs perfectly with the natural acidity of the sourdough, creating a more savory, sophisticated profile.
Pro tip: If you are making the rosemary variation, lightly bruise the herbs with the side of your knife before mincing to release the essential oils for a more intense aroma.
Can I substitute the Bread Flour with All-Purpose Flour?
While you can make the substitution, I do not recommend it if you want the best results. All-purpose flour has a lower protein content, which means the rolls will not have the same height or pull-apart fluffiness. You will likely end up with a flatter, denser roll that feels more like a biscuit than a traditional dinner roll.
How Can I Ensure My Rolls Are Perfectly Soft?
The key to softness is the combination of the milk in the dough and the butter brush at the end. Additionally, ensure you do not overbake them. Once the internal temperature hits 190°F, remove them immediately. Overcooking even by five minutes will dry out the interior and toughen the crust.
Is This Recipe 100% Sourdough (No Commercial Yeast Added)?
Yes, this is a pure sourdough recipe. We rely entirely on the wild yeast in your active starter for leavening. This is why the 8 PM feed and the 8 AM mix are so critical; without a healthy, active yeast colony, the dough will not have the strength to rise against the fats in the milk and butter.
What If My Starter Isn’t Doubled by 8 AM?
If your starter hasn’t doubled, your kitchen might be too cold, or your starter might be sluggish. Do not proceed with the mix. Instead, move the starter to a warmer spot and wait until it peaks. It is better to start the process two hours late with a strong starter than to start on time with a weak one.
Conclusion: Your Blueprint for Perfect Pull-Apart Rolls
Mastering these sourdough dinner rolls is a significant milestone for any home baker. By moving away from the “guess and check” method and adopting a structured, engineering-focused timeline, you have eliminated the variables that lead to dense or sour failures. The combination of high-protein bread flour and the rhythmic stretch-and-fold technique creates a gluten network that is both strong and incredibly light.
This recipe proves that you don’t need commercial yeast to achieve a pillowy, soft texture. The success of this dish lies in the details: the 190°F internal temperature, the 50% bulk rise metric, and the precision of a same-day schedule. When you pull these rolls apart and see those feathery, steaming layers, you’ll know that the meticulous process was worth every minute of fermentation.
I encourage you to try this schedule for your next big gathering. Whether it is Thanksgiving, a Sunday roast, or a simple family dinner, these rolls are guaranteed to be the highlight of the meal. I would love to hear about your results in the comments below. Did you manage to hit the 50% rise on your first try, and what was the reaction when you brought them to the table?
Let me know which serving occasion you planned these for and how the fluffiness compared to your previous attempts at sourdough. Your feedback helps refine the system for everyone in our community of kitchen engineers. Happy baking, and enjoy the reward of your precision and patience.

Soft Sourdough Dinner Rolls Recipe
Equipment
- Digital Scale
- Straight-sided transparent container
- Bench scraper
- Glass baking dish (9×13 inch)
- Tea towel
Ingredients
Starter/Dough Ingredients
- 1 tablespoon sourdough starter
- 1/3 cup all-purpose flour plus 1 tablespoon
- 3.5 tablespoons water (3 1/2 tablespoons)
- 2 tablespoons butter
- 1 cup milk
- 3 tablespoons sugar (or 2 tablespoons of honey)
- 1 teaspoon salt
- 1/2 cup active sourdough starter
- 3 cups bread flour plus 2 tablespoons
Finishing Ingredient
- 1 tablespoon melted butter for brushing the top of the rolls after baking
Instructions
Schedule & Preparation (Night Before / Morning Of)
- 8 PM Feed Starter: Allow 12 hours for the starter to peak, ensuring it is bubbly and thick, smelling sweet rather than harshly acidic.
- 7:30 AM Melt Butter: Melt the 2 tablespoons of butter required for the dough base and allow the liquid base (including milk) to cool completely before mixing.
- 8 AM Mix the Dough: Combine all dough ingredients, ensuring no dry flour clumps remain.
- 9 AM Folds: Allow 1 hour rest after mixing (autolyse phase) before starting the first set of stretch and folds.
Bulk Fermentation and Folding
- Set 1 (9 AM): Reach under the side of the dough, pull it upward until you feel resistance, and fold it over the center. Rotate the bowl and repeat this process four times.
- Set 2 (9:30 AM): Perform the same pulling and folding motion. You may hear small air bubbles beginning to pop.
- Set 3 (10 AM): This final set should require more effort. Fold the dough over itself and tuck the edges under to create a smooth surface. The dough should feel tight and bouncy.
- Rest Period: After the final fold, let the dough rest undisturbed for about two hours, monitoring closely until it has risen by exactly 50% of its original volume.
Shaping and Final Proof
- 12 PM Shape: Turn the dough out onto a lightly floured surface. Divide into 12 equal pieces, targeting approximately 65 grams each using a scale for precision.
- Shape each piece into a ball by gathering the sides of the dough toward the center and pinching them together to form a pouch.
- Flip the dough piece over so the seam rests against the work surface. Cup your hand over the dough and move it in a tight circular motion to create a smooth, taut skin on the top of the roll.
- Arrange the shaped rolls in a lightly greased glass baking dish (e.g., 9×13 inch).
- Cover the dish with a tea towel and let the rolls rise in a warm spot for 3 to 4 hours (until 4 PM based on the schedule), allowing them to finish expanding slowly.
Baking Protocol
- Preheat the oven to 375°F (190°C) approximately 20 minutes before the final proofing time is complete.
- Bake for 25 to 30 minutes until the tops are a deep golden brown. Check the internal temperature; it should register 190°F (88°C) to ensure the center is fully set.
- Immediately upon removing the pan from the oven, brush the hot tops with the reserved 1 tablespoon of melted butter.
- For an extra-soft crust, cover the rolls with a clean kitchen towel for five minutes immediately after buttering.


