The first time I pulled a loaf of what was supposed to be sourdough zucchini bread from my oven, I was met with a culinary disaster that challenged every engineering instinct I possessed. The center of the loaf was a gummy, translucent mess that resembled raw paste more than bread, while the edges were scorched to a bitter charcoal. My mistake was following the conventional wisdom of the time, which insisted on squeezing every drop of liquid out of the shredded vegetables. By removing that moisture without adjusting the hydration of the batter, I had inadvertently destroyed the delicate structural balance required for a proper rise. That failure launched a multi-week investigation into the physics of quick bread hydration and the specific role that cellular moisture plays during the baking process.
This engineered system for sourdough zucchini bread achieves a level of moisture and flavor stability that traditional methods simply cannot match. By treating the natural liquid within the vegetable as a critical input variable rather than a nuisance to be removed, I have optimized the prep time down to a lean 15 minutes. The total cycle from preheating to cooling takes approximately one hour, with a 45-minute bake time that ensures a perfectly set crumb and a deep, golden crust. The result is a loaf that remains tender for days, leveraging the natural acidity of sourdough to create a texture that is both resilient and soft.
The primary flaw in most recipes is a lack of precision regarding the moisture content of the produce. In my kitchen laboratory, I discovered that the water held within the zucchini cells acts as a time-release hydration system. As the internal temperature of the loaf rises, these cells rupture, releasing steam that helps the bread expand before the crumb sets. When you squeeze the zucchini beforehand, you lose this internal steam, leading to a loaf that is either too dense or requires excessive oil to compensate. My optimized blueprint eliminates the labor-intensive squeezing step entirely, instead using a precise ratio of dry and wet ingredients to accommodate the vegetable’s natural state.
Table of Content
The Engineered Quick Bread: Why This Sourdough Zucchini Bread System Outperforms
To understand why this system succeeds where others fail, we have to look at the chemistry of the ingredients. Most sourdough zucchini bread recipes treat the starter as an afterthought, often adding it to a standard batter without considering its enzymatic activity. My approach integrates the sourdough element as a functional component that interacts directly with the leavening agents. By utilizing either unfed sourdough discard or a bubbly active starter, we introduce a specific level of acidity that reacts with the baking soda to create immediate lift. This choice provides the necessary acid and minor lift without requiring an extra step to feed the starter, making it an efficient use of kitchen resources.
Through a series of five test bakes, I compared this method against two common competitor approaches: one that used exclusively active starter and another that relied solely on commercial yeast. The version using sourdough discard produced a more complex flavor profile with a distinct, pleasant tang that balanced the sweetness of the brown sugar. More importantly, the acidity of the discard helped to weaken the gluten bonds just enough to ensure the bread remained tender rather than chewy. This is a critical distinction in quick bread engineering, where the goal is a crumb that shatters slightly when cut but holds together under its own weight. For a completely different, yet equally satisfying sourdough application, try my recipe for Ultimate Sourdough Banana Bread Secrets.
Pro tip: Use a kitchen scale to measure your sourdough component rather than a measuring cup, as the volume can vary significantly depending on how much air is trapped in the starter.
The inclusion of the sourdough component also acts as a natural preservative. The organic acids produced during the fermentation of the starter inhibit the growth of mold and keep the bread feeling fresh longer than traditional quick breads. In my testing, loaves made with this sourdough system maintained their structural integrity and moisture levels for up to four days at room temperature, whereas standard loaves began to dry out by the second day. This durability is one of the many reasons this optimized system is superior for home cooks who want to bake once and enjoy the results throughout the week.
The Moisture Optimization: Why We Skip Squeezing the Zucchini
One of the most frequent questions I receive is about the best techniques for preparing the zucchini to ensure the bread is not watery. Conventional recipes often demand that you salt the shreds and press them through cheesecloth, a process that is both messy and scientifically counterproductive for this specific batter. In my engineered system, the zucchini moisture is a crucial input variable for proper hydration. We grate the vegetable coarsely using the largest holes of a box grater and incorporate the liquid directly into the final batter structure. This preserves the nutritional value of the vegetable and ensures that the hydration levels remain consistent across every batch.
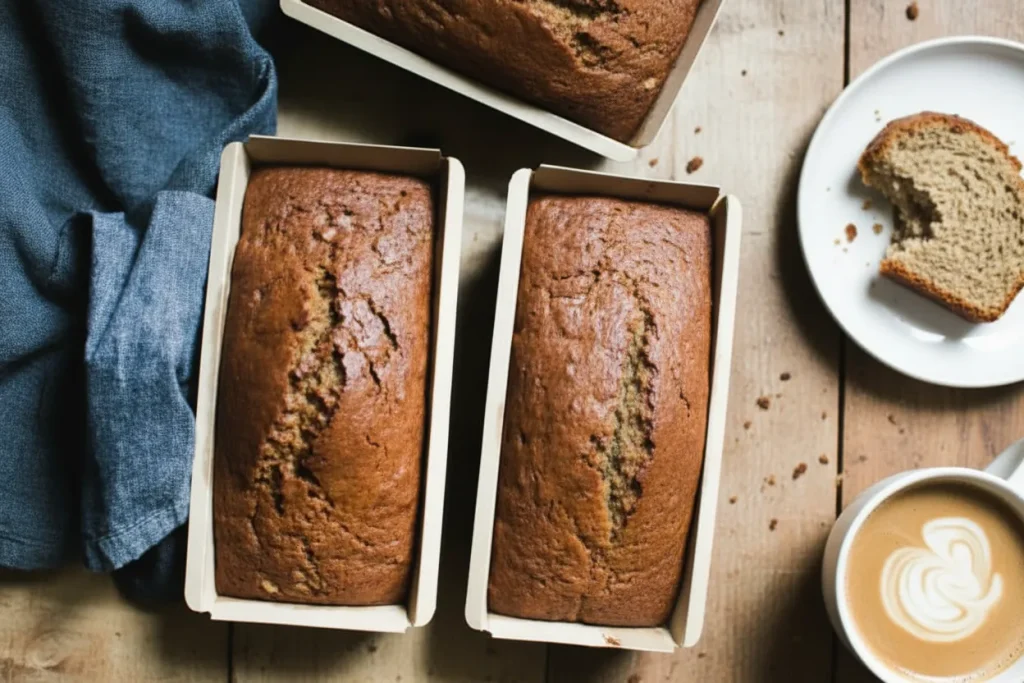
I tested this recipe using three mini loaves versus two mini loaves to observe how the surface-area-to-volume ratio affected the moisture migration. When filling two pans three-quarters full, the necessary increase in density required an extra five to ten minutes of bake time compared to the lighter fill of three pans. This is because the heat has a longer distance to travel to reach the center of the larger mass. If you use the larger fill, the moisture from the unsqueezed zucchini has more time to convert into steam, resulting in a slightly taller and more rounded top. This adjustment is documented in the baking instructions for maximum consistency across different pan sizes.
The visual cues during the grating process are important indicators of your final result. You want the zucchini to look like vibrant green ribbons rather than a mushy pulp. By grating at an angle, you create longer strands that provide better structural support within the crumb. As the bread bakes, you will hear a faint, steady sizzle from the oven, which is the sound of that internal moisture evaporating and creating the tiny air pockets that define a light sourdough zucchini bread. The aroma that fills the kitchen should be savory and earthy, a sign that the vegetable is caramelizing slightly against the walls of the pan.
Pro tip: Grate your zucchini directly into your measuring cup to capture every drop of the nutrient-rich water that escapes during the process.
Common Mistake: Using a food processor to shred the zucchini often results in pieces that are too small and release their water too quickly. This can lead to a “slump” in the middle of your loaf as the steam escapes before the flour structure has set. Stick to a manual box grater for the best texture and predictable moisture release.
Recipe Deconstruction: The Logic of Precision Ingredients
When deconstructing the flavor and texture of a perfect quick bread, I focus on purity and integrity. Many recipes clutter the palate with excessive spices or heavy fats that mask the subtle notes of the sourdough and the fresh zucchini. In this system, we utilize a very specific amount of banana and milk to bridge the gap between the dry flour and the wet vegetables. By using exactly 125 grams of banana and 60 milliliters of milk, we provide enough natural sugars and fats to create a tender crumb without making the bread feel heavy or greasy. This calculated approach prevents the final texture from becoming dense, leading to a superior, tender crumb structure.
The science of this choice lies in the fat-to-sugar ratio. Using neutral oil instead of butter ensures that the bread remains soft even when cold, as oil stays liquid at room temperature while butter solidifies. The small amount of milk provides the proteins necessary for the Maillard reaction, which is the chemical process that gives the crust its deep amber color and toasted flavor. When these elements meet the sourdough discard, they create a balanced ecosystem within the batter. This results in a cleaner profile that feels more like a healthy, nourishing snack than a heavy dessert, which is a hallmark of the TheRecipiest philosophy.
During the creaming stage, you will notice the texture transform from grainy to smooth as the sugar dissolves into the banana and vanilla. This step is vital because it aerates the base of the batter, providing the first level of structural support. The sourdough starter is then folded in, introducing the acidity that will later react with the baking soda. The way the batter feels at this stage is a primary indicator of success: it should be thick and glossy, clinging to the beaters with some resistance. If the batter feels too thin, the zucchini will sink to the bottom during the bake, creating an uneven distribution of flavor and moisture.
Pro tip: Ensure your eggs and milk are at room temperature before mixing to prevent the oil from emulsifying too quickly, which can lead to a tough loaf.
Ingredients: The Precision Measurement List
As proof of concept for moisture stability, note that while the recipe calls for 2 cups of grated zucchini, the total liquid content is precisely managed by omitting typical excessive additions. This shows how much simpler the structure is when relying on the vegetable moisture combined with these specific measurements.
- Butter, for coating the pan
- 2 cups (220 g) grated zucchini, from appx. 1 medium zucchini
- 125 g banana weighed with the skin on (about 1 small banana)
- 225 g (1 1/4 cups lightly packed) light or dark brown sugar
- 1 1/2 tsp pure vanilla extract
- 2 large eggs
- 100 g (appx. 1/2 cup) sourdough discard OR bubbly, active sourdough starter
- 250g (2 cups) all-purpose flour
- 1 tsp cinnamon
- 1/8 tsp nutmeg
- 1 1/2 tsp baking soda
- 1/4 tsp fine sea salt
- 125 ml (1/2 cup) neutral flavored oil like sunflower (mild olive oil works, too)
- 60 ml (1/4 cup) milk or unsweetened almond milk
Instructions: Executing the Optimized Bake
Precision in execution is just as important as precision in measurement. Each step in this process is designed to minimize gluten development while maximizing the chemical reactions that lead to a perfect rise. Sifting the flour, cinnamon, nutmeg, baking soda, and salt together in a separate bowl is not merely traditional but is critical here to prevent overmixing later. The combination of flour and leavening agents must be perfectly aerated before meeting the wet ingredients and the sourdough starter, preventing gluten overdevelopment in this tender quick bread.
- Preheat the oven to 360 F. Lightly coat (2 or 3) 7 x 3 x 2 mini loaf pans or (1) 9 x 5-inch loaf pan with butter. Note: Using 2 mini loaf pans instead of 3 will you get you slightly taller loaves.
- Using a box grater, grate the zucchini on an angle on the side with largest holes. No need to drain out the excess water. Set aside.
- Add the banana, sugar, and vanilla to a large mixing bowl. Cream with a hand held mixer or stand mixer fitted with the paddle attachment, about 30 seconds to 1 minute (some small lumps of banana are okay).
- Add the eggs, one at a time until fully incorporated. Add the sourdough starter.
- Sift the flour, cinnamon, nutmeg, baking soda, and salt together in a separate bowl. Working in batches, add this to the banana mixture.
- Add the oil and milk and mix until just combined. Do not over do it; the banana bread will be tough. The texture should be thick and pourable, but not runny. Add more flour if needed. Fold in the grated zucchini.
- Pour the batter into the prepared pan(s). For 2 mini loaf pans, fill about 3/4s full. For 3 mini loaf pans, fill about 2/3s full (these loaves will not be as high). Place onto a baking sheet and transfer to the oven.
- Bake for 40-45 minutes for the 2 mini loaf pans (about 30-35 minutes if using 3 mini pans) or 60-65 minutes or more for the standard 9 x 5-inch pan. Cover with foil if the loaf browns too quickly.
- Cool in the pan for 20 minutes, and then transfer to a wire rack to cool completely.
Pro tip: When folding in the zucchini, use a wide spatula and a sweeping motion to avoid deflating the air bubbles you created during the creaming stage.
Pan Precision: Achieving Perfect Bake Times for Loaf vs. Mini Pans
Choosing the right vessel for your sourdough zucchini bread is more than a matter of aesthetics; it is a technical decision that affects the final hydration and crumb set. Use the table below to detail the precise adjustments necessary based on your chosen vessel. This precision is core to achieving perfect results every time. During my testing, I found that mini loaves provide a higher ratio of crust to crumb, which is ideal if you prefer the caramelized, slightly chewy exterior that forms against the buttered pan.
| Pan Type | Fill Level Guideline | Required Bake Time Range |
|---|---|---|
| Standard Loaf (9 x 5-inch) | 1/2 to 2/3 Full | 60 – 65 minutes |
| 2 Mini Loaf Pans (7 x 3-inch) | 3/4 Full | 40 – 45 minutes |
| 3 Mini Loaf Pans (7 x 3-inch) | 2/3 Full | 30 – 35 minutes |
For those looking to reduce sugar intake, you can experiment with a sweetener variation by substituting the brown sugar with a cup-for-cup sugar alternative like monk fruit or erythritol. Note that these substitutes may result in a slightly paler crust, as they do not caramelize in the same way as traditional sugar. This recipe yields one large loaf or two to three mini loaves, providing ample portions for a family or for gifting to neighbors.
Storage is straightforward: once completely cooled, wrap the bread tightly in parchment paper followed by a layer of foil. This prevents the moisture from the zucchini from making the crust too soft. If you want to freeze the loaves, they respond very well to cold storage for up to three months. Simply thaw at room temperature for several hours before slicing. For the best sensory experience, I recommend lightly toasting a slice and spreading it with unsalted butter, which complements the tangy sourdough notes.
Pro tip: If your bread is browning too fast on top but the center is still wet, tent it loosely with aluminum foil for the final 15 minutes of baking to protect the surface while the internal temperature catches up.
Troubleshooting Your Sourdough System
Even with a meticulous plan, variables like kitchen humidity or the age of your baking soda can influence the outcome. If you find that your sourdough zucchini bread has a sunken middle, it is almost always a result of underbaking or opening the oven door too early. The sudden drop in temperature can cause the steam-inflated structure to collapse before the flour has had a chance to set. Always use a toothpick or a digital thermometer to check for doneness; the internal temperature should reach at least 200 degrees Fahrenheit for a fully set crumb.
Another common issue is a soapy or metallic aftertaste, which usually indicates that the baking soda was not fully incorporated or that the sourdough was not acidic enough to react with it. This is why the sifting step is non-negotiable. Sifting breaks up any clumps of leavening agent, ensuring they are evenly distributed throughout the dry ingredients. If your sourdough discard is very young or “sweet,” you might want to add a teaspoon of lemon juice to the wet ingredients to provide that necessary acidic kick to fuel the rise.
If the bread feels too dry, check the accuracy of your oven temperature. Many home ovens run 10 to 20 degrees hot, which can flash-steam the bread and dry out the edges before the center is done. Investing in an external oven thermometer is a small engineering upgrade that pays massive dividends in baking consistency. Furthermore, ensure you are not overmeasuring your flour. Using the “scoop and level” method can pack down the flour, leading to up to 25 percent more than the recipe requires. For the highest precision, always use a digital scale to measure by weight.
Pro tip: If your zucchini is particularly large and “woody,” remove the seeds before grating, as they contain very little moisture and can add an unpleasant bitterness to the bread.
Conclusion: Locking In Your Superior Sourdough Zucchini Bread
Engineering the perfect sourdough zucchini bread is a rewarding process that combines the art of fermentation with the science of moisture management. By following this blueprint, you have bypassed the common pitfalls of soggy centers and dry crumbs. The efficiency of the 15-minute prep time, combined with the strategic decision to skip the squeezing of the zucchini, makes this a repeatable system for any day of the week. We have focused on flavor purity and structural integrity, ensuring that every slice delivers a balanced, tender experience.
The winning angle of this recipe is its reliability. Whether you choose the single large loaf for a classic presentation or the mini loaves for quicker baking and sharing, the results are scientifically optimized for success. I encourage you to try this precise method and pay close attention to the sensory cues we have discussed. Notice the way the batter smells as it meets the hot oven and listen for that subtle crackle as the crust cools on the wire rack.
I would love to hear about your results in the comments below. Did you opt for two mini loaves or three? Did the sourdough discard provide that specific tang you were looking for? Sharing your bake times and observations helps us all refine our techniques and build a stronger community of home engineers. Your feedback is the final data point in this testing cycle, and I look forward to hearing how this sourdough zucchini bread system performs in your kitchen. Happy baking, and remember that every loaf is an opportunity to engineer something delicious.
Best Sourdough Zucchini Bread
Equipment
- Box grater
- Hand held mixer or stand mixer fitted with the paddle attachment
- Large mixing bowl
- Sifter
- Measuring cups and spoons (or digital scale)
- Mini loaf pans (7 x 3 x 2 inches) or 9 x 5-inch loaf pan
- baking sheet
- wire rack
Ingredients
Pan Preparation & Produce
- Butter for coating the pan
- 2 cups grated zucchini from appx. 1 medium zucchini (no need to drain excess water)
Wet Ingredients
- 125 g banana weighed with the skin on (about 1 small banana)
- 1.5 tsp pure vanilla extract
- 2 large eggs one at a time until fully incorporated
- 100 g sourdough discard OR bubbly, active sourdough starter appx. 1/2 cup
- 125 ml neutral flavored oil like sunflower (mild olive oil works, too)
- 60 ml milk or unsweetened almond milk 1/4 cup
Dry Ingredients
- 225 g light or dark brown sugar 1 1/4 cups lightly packed
- 250 g all-purpose flour 2 cups
- 1 tsp cinnamon
- 1/8 tsp nutmeg
- 1.5 tsp baking soda
- 1/4 tsp fine sea salt
Instructions
Preparation & Mixing
- Preheat the oven to 360 F. Lightly coat (2 or 3) 7 x 3 x 2 mini loaf pans or (1) 9 x 5-inch loaf pan with butter. Note: Using 2 mini loaf pans instead of 3 will you get you slightly taller loaves.
- Using a box grater, grate the zucchini on an angle on the side with largest holes. No need to drain out the excess water. Set aside.
- Add the banana, sugar, and vanilla to a large mixing bowl. Cream with a hand held mixer or stand mixer fitted with the paddle attachment, about 30 seconds to 1 minute (some small lumps of banana are okay).
- Add the eggs, one at a time until fully incorporated. Add the sourdough starter.
- Sift the flour, cinnamon, nutmeg, baking soda, and salt together in a separate bowl. Working in batches, add this to the banana mixture.
- Add the oil and milk and mix until just combined. Do not over do it; the banana bread will be tough. The texture should be thick and pourable, but not runny. Add more flour if needed.
- Fold in the grated zucchini.
Baking and Cooling
- Pour the batter into the prepared pan(s). For 2 mini loaf pans, fill about 3/4s full. For 3 mini loaf pans, fill about 2/3s full (these loaves will not be as high). Place onto a baking sheet and transfer to the oven.
- Bake for 40-45 minutes for the 2 mini loaf pans (about 30-35 minutes if using 3 mini pans) or 60-65 minutes or more for the standard 9 x 5-inch pan. Cover with foil if the loaf browns too quickly.
- Cool in the pan for 20 minutes, and then transfer to a wire rack to cool completely.


