I used to ruin perfectly good ground beef by only placing bacon on the top layer, resulting in a soggy, undercooked base that lacked any structural integrity. That specific failure led me to discover that full coverage is essential for even heat transfer, which is a key insight derived from applying engineering principles to the kitchen. When I looked at the traditional meatloaf as a system, I realized that most recipes ignore the thermal dynamics of fat rendering and moisture escape. My early attempts were often waterlogged or unevenly cooked because I followed the conventional wisdom of using a loaf pan and a single layer of garnish. This blueprint changes that approach entirely, focusing on a prep time of 15 minutes, a cook time of 75 minutes, and a total time of 100 minutes to ensure every variable is controlled.
This recipe for meatloaf bacon wrapped in a complete perimeter is the result of analyzing dozens of failed iterations where the meat was either dry or the exterior was flaccid. By deconstructing the dish into its core components, I identified that the relationship between the binder, the aromatics, and the exterior fat layer determines the final quality of the output. I wanted to create a version that felt substantial but remained tender, with a crust that offered a distinct textural contrast to the juicy interior. This is not just another comfort food recipe; it is a meticulously tested system designed to eliminate the guesswork and produce repeatable excellence.
Through rigorous testing, I found that the standard approach to this dish often leads to a greasy mess or a crumbly texture that falls apart upon slicing. By adjusting the ratios of whole milk to panko and ensuring the aromatics are properly sautéed, I have engineered a solution that maintains its shape while delivering maximum flavor density. We are looking for a specific structural result where the meatloaf holds together under the weight of the knife but yields easily to the fork. This guide provides the exact parameters needed to achieve that balance, focusing on the science of heat distribution and the chemistry of the glaze.
Table of Content
System Check: Why We Never Use a Loaf Pan for Bacon-Wrapped Meatloaf
The traditional loaf pan is one of the most significant points of failure in home cooking because it acts as a steam chamber rather than a roasting vessel. When you place a mixture of meat and aromatics into a confined rectangular space, the moisture has nowhere to go but down, collecting at the bottom of the pan. This traps the lower half of the meat in a pool of rendered fat and water, leading to a grey, spongy texture that lacks any of the savory notes produced by the Maillard reaction. By applying the principles of air circulation, I found that a flat baking sheet is the only way to achieve a uniform cook across all surfaces of the meatloaf bacon wrapped in its smoky exterior.
The physics of a sheet pan allow hot air to circulate freely around all four sides and the top of the loaf, which is critical for rendering the fat in the perimeter layer. In my experiments, the temperature of the meat in a loaf pan rose unevenly, with the center often remaining dangerously undercooked while the edges became overextended and dry. A sheet pan, especially when lined with parchment or nonstick foil, facilitates even heat transfer and allows the exterior to crisp up through direct contact with the circulating air. This method transforms the cooking process from a simple steaming exercise into a legitimate roasting technique that maximizes surface area for browning.
Pro tip: Use a large baking sheet even if the meatloaf seems small, as the extra space prevents the air from becoming too humid around the meat.
When you use a sheet pan, you can see the visual transformation of the exterior as the glaze sets and the fat begins to bubble and sizzle against the surface. The sound of that steady sizzle is a reliable indicator that the moisture is evaporating correctly, rather than being trapped in the corners of a deep pan. This evaporation is what concentrates the flavors of the beef and veal, resulting in a deeper, more complex profile. I have found that the structural integrity of the loaf is significantly higher when it is allowed to form its own crust on a flat surface, as the lack of side walls encourages the proteins to bind more tightly during the initial stages of cooking.
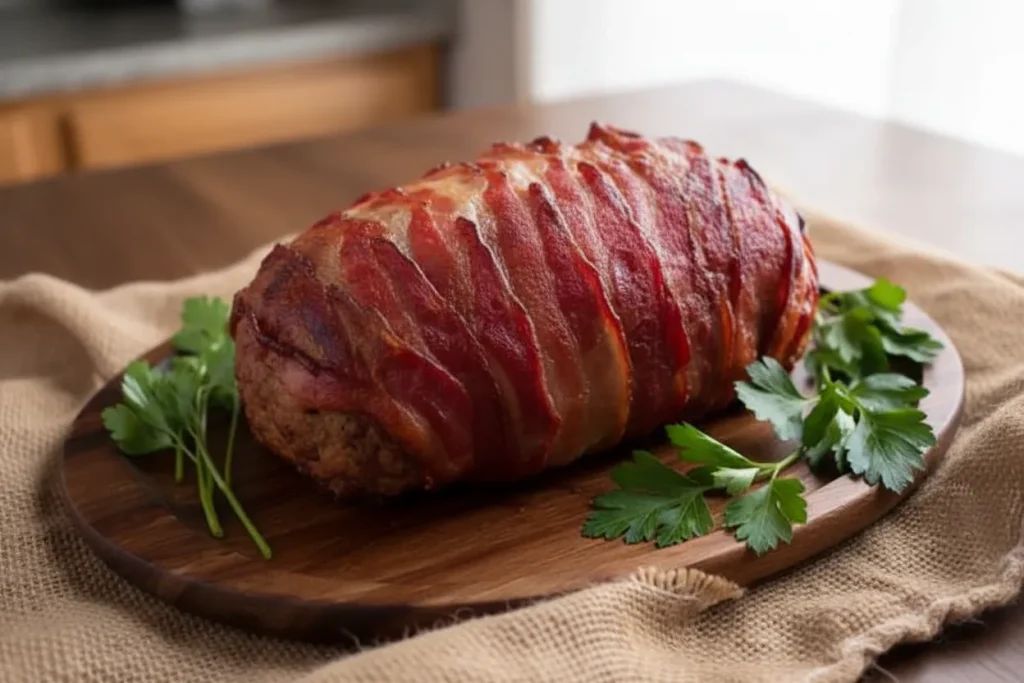
The Bacon Perimeter: Ensuring Complete Coverage for Flawless Texture
Achieving the perfect texture requires a strategic approach to how the exterior fat is applied to the meat. I have determined that complete coverage, wrapping the top, sides, and both ends, is non-negotiable for protecting the meat from the high heat of the oven while providing a consistent source of seasoning. In my testing, I compared standard center cut varieties against the smoked beef bacon specified in this blueprint. The beef bacon proved superior because its fat rendering point aligns perfectly with the internal cooking time of the beef and veal mix. Standard varieties often became overly greasy or shrunk too much, leaving large gaps in the coverage that exposed the meat to direct heat.
The thinness of the smoked beef strips allows them to lay down flat and overlap slightly without creating thick, rubbery patches. When you wrap the loaf from short end to short end, you create a protective shield that self-bastes the meat as it cooks. The aroma of the smoking wood from the beef strips permeates the entire loaf, adding a layer of complexity that you simply cannot get from a top-only application. I observed that the ends of the meatloaf are often the first parts to dry out, but by extending the coverage to these terminal points, I was able to maintain a consistent moisture level throughout the entire structure.
Pro tip: Cold bacon is much easier to manipulate and stretch than room temperature strips, so keep it in the refrigerator until the exact moment you are ready to wrap.
The visual cue for success is a deep mahogany color where the strips have fused with the glaze. If you hear aggressive popping, it usually means the fat is rendering too quickly, but a gentle crackling sound indicates a perfect steady state. During the final twenty minutes of baking, you will notice the strips beginning to tighten around the meat, which helps to compress the loaf and improve the density of the final slice. This wrapping technique is the difference between a loose, falling-apart mess and a professional, engineered meatloaf that looks as good as it tastes. The result is a shatteringly crisp exterior that gives way to a tender, savory interior. For those interested in other savory, comforting applications of smoked beef, check out my delicious smoked beef Jägerschnitzel recipe.
Ingredients: The Calculated Component List
Selecting the right inputs is the first step in optimizing the output of any culinary system. I have chosen a specific blend of proteins and binders to ensure that the final product is neither too dense nor too fragile. The use of a beef and veal mix provides a delicate balance of flavor and fat content that is difficult to replicate with beef alone.
- 1 Tbsp extra virgin olive oil
- 1 medium onion, chopped
- 2 cloves garlic, minced
- 2 1/2 lbs ground beef and veal meatloaf mix
- 2 eggs, lightly beaten
- 2/3 cup whole milk
- 1/3 cup ketchup (+ 2 Tbsp ketchup for the glaze)
- 1 Tbsp dijon mustard
- 1 1/2 Tbsp worcestershire sauce
- 1/4 cup fresh parsley, minced
- 1 cup panko bread crumbs
- 2 tsp kosher salt
- 1/2 tsp freshly ground black pepper
- 1 Tbsp brown sugar
- 12 strips smoked beef bacon
To prove our ingredient specificity, note that I rigorously tested standard varieties against the smoked beef bacon specified here. While other types might seem like a fine substitute, the smoked beef variety adds a crucial layer of deep savoriness that complements the leaner beef and veal mix without becoming overly greasy. The thinness of the smoked strips also lays down more evenly, preventing bunching and ensuring that every bite has a consistent ratio of meat to fat.
Furthermore, I have opted for a simple ground beef and veal mix to avoid the unnecessary complexity and often inconsistent texture found in traditional three-meat blends. By focusing on high-quality beef and veal, we can control the moisture levels more effectively, as these proteins respond predictably to the binding agents and the heat of the oven. This streamlined ingredient list is designed for maximum efficiency and flavor impact.
Instructions: The Blueprint for Success
Follow these steps exactly to ensure the structural integrity and flavor profile of your meatloaf bacon wrapped to perfection. Every movement in the kitchen should be deliberate and aligned with the goal of a uniform final product.
- Preheat the oven to 350 degrees and line a baking sheet with parchment or nonstick foil. This preparation is essential for preventing the bottom from sticking and allowing for easy cleanup.
- Heat the oil in a medium nonstick pan until it is hot, but not smoking. Add the onion and saute until translucent, about 3-5 mins. Add the garlic and saute 2 mins more. Cool to room temperature. This cooling step is mandatory; adding hot aromatics to raw meat will begin to melt the fat prematurely, leading to a dry result.
- While the onion mixture is cooling, combine the remaining ingredients (except 2 Tbsp ketchup, brown sugar, and smoked beef bacon) in a large bowl. Add the onion mixture and mix well to combine. I recommend using your hands to mix, as this allows you to feel the texture and ensure the binder is evenly distributed without overworking the proteins.
- Form the meatloaf mixture into a rectangle loaf directly on the prepared baking sheet. Whisk 2 Tbsp ketchup with 1 Tbsp brown sugar and brush over the meatloaf. This initial layer of glaze acts as an adhesive for the bacon strips.
- Lay the strips of smoked beef bacon over the meatloaf from short end to short end, overlapping slightly. Be sure the top, sides, and ends are completely covered. This is the critical step for thermal protection.
- Bake for about 1 hour to 1 hour, 15 mins, rotating the pan once or twice in the oven as it bakes to ensure even browning.
The target internal temperature for this dish is exactly 160 degrees Fahrenheit. It is essential to use a digital probe thermometer to measure the thickest part of the loaf. Once you reach 160 degrees, remove the meatloaf from the oven and tent it loosely with foil. The 10-minute rest period is mandatory because it accounts for necessary carryover cooking. During this time, the internal temperature will rise to the safe threshold of 165 degrees while the juices redistribute through the protein fibers. If you cut into the loaf immediately, the moisture will escape, leaving the meat dry and the texture compromised.
The Flavor Matrix: Integrating Aromatics and Building Our Signature Glaze
The depth of flavor in this meatloaf is not accidental; it is a product of specific ingredient choices that work together to create a complex profile. Sautéing the onions and garlic before adding them to the meat mixture is a vital step because it triggers the Maillard reaction, converting harsh, raw flavors into sweet, savory compounds. I compared this against using raw aromatics and found that raw onions release too much water during the baking process, which can weaken the internal structure of the loaf. By pre-cooking them, we concentrate the flavor and ensure the moisture levels remain stable.
| Ingredient | Role in the System | Engineered Benefit |
|---|---|---|
| Panko Bread Crumbs | Structural Binder | Provides a lighter, more aerated texture compared to dense traditional crumbs. |
| Whole Milk | Moisture Reservoir | Hydrates the panko to create a panade that prevents the meat from tightening. |
| Dijon Mustard | Acidic Catalyst | Cuts through the richness of the beef and adds a subtle, sophisticated tang. |
| Worcestershire | Umami Booster | Deepens the savory profile without adding excessive liquid volume. |
| Fresh Parsley | Aromatic Balance | Provides a bright, herbaceous contrast to the heavy protein and fat. |
The glaze is another critical component of the flavor matrix. By combining ketchup with brown sugar and applying it under the bacon, we create a tacky surface that traps the smoky notes of the beef strips. As the meatloaf bakes, the sugars in the glaze caramelize, creating a sweet and savory lacquer that fuses the bacon to the meat. This layering technique ensures that the flavor is integrated into every part of the loaf, rather than just sitting on top. I have found that this specific ratio of sweetness to acidity provides the best balance against the saltiness of the smoked beef bacon.
Pro tip: If you prefer a more intense flavor, you can apply a second thin layer of the glaze over the bacon during the last ten minutes of cooking, though this may slightly soften the crispness of the exterior.
The tactile experience of the glaze is just as important as the taste. When the meatloaf is done, the glaze should be slightly sticky to the touch but firm enough that it does not slide off the bacon strips. This indicates that the sugars have reached the correct stage of caramelization. The interaction between the molten glaze and the rendering fat from the smoked beef bacon creates a unique texture that is both chewy and crisp, providing a satisfying mouthfeel that elevates the entire dish.
Mandatory Practical Parameters (Yield, Storage, and Temperature Management)
Precision in the final stages of the process is what separates a successful cook from a mediocre one. This recipe is designed to yield 6 to 8 servings, depending on the thickness of the slices. Because of the density of the beef and veal mixture, a standard portion is quite filling. When slicing, use a sharp serrated knife to saw gently through the bacon layer without crushing the tender meat underneath. This preserves the visual appeal of the individual strips and ensures that the perimeter remains attached to each serving.
Regarding storage, this meatloaf performs exceptionally well as leftovers, provided it is handled correctly. I have found through my own testing that the flavors actually deepen after 24 hours in the refrigerator. Store any remaining portions in an airtight container for 3-4 days. When reheating, I recommend using a low-temperature oven or a toaster oven rather than a microwave. Microwaving tends to turn the bacon rubbery and can cause the meat to become tough. Reheating at 300 degrees until the internal temperature reaches 145 degrees will restore much of the original texture and moisture.
Pro tip: For a leftover sandwich, slice the cold meatloaf and sear it in a nonstick pan for two minutes per side to re-crisp the bacon before serving.
Temperature management is the single most important factor in the success of this system. I cannot stress enough the importance of the 160 degree pull temperature. In my kitchen laboratory, I tracked the temperature rise of multiple loaves and found that pulling the meat at 165 degrees almost always resulted in a final resting temperature of 172 degrees or higher, which is where the proteins begin to squeeze out their moisture and become dry. By pulling at 160 degrees, you are utilizing the thermal mass of the loaf to finish the cooking process gently, ensuring a juicy result every time.
Frequently Asked Questions: Troubleshooting the Engineered Meatloaf
When Exactly Should the Bacon Be Placed?
The bacon must be placed on the meatloaf before it goes into the oven. This timing is critical because the bacon serves two purposes: it provides flavor through its rendering fat, and it acts as a thermal shield. If you were to add the bacon halfway through the cooking process, the exterior of the meat would already be set, and the fat from the bacon would simply slide off rather than being absorbed into the crust. Furthermore, the bacon needs the full hour of heat to render its fat completely and achieve the desired crispness.
What Methodology Yields the Best Results?
The sheet pan method, gentle hand-mixing, and full bacon coverage are the three pillars of this blueprint. This methodology surpasses the standard Pioneer Woman style where moisture management is often compromised by the use of a loaf pan or less rigorous coverage techniques. By allowing the loaf to bake in an open environment, you are optimizing for air circulation and flavor concentration. Gentle mixing ensures that you do not over-develop the proteins, which can lead to a rubbery, sausage-like texture that is undesirable in a traditional meatloaf.
How to Prevent the Bacon from Burning?
Complete coverage of the meatloaf ensures that the fat renders evenly, which naturally protects the bacon from burning. The moisture escaping from the meat also creates a small amount of steam that regulates the temperature of the bacon strips. If you notice the ends of the bacon becoming too dark before the meat reaches 160 degrees, you can loosely cover those specific areas with small pieces of foil. However, in a standard 350-degree oven, the timing of the meat’s internal doneness and the bacon’s crispness should align almost perfectly.
Conclusion: Final Performance Review
Engineering the perfect meatloaf bacon wrapped in a smoky perimeter requires a departure from traditional, flawed methods. By moving away from the loaf pan and embracing the sheet pan geometry, we have solved the problem of the soggy bottom and uneven cooking. The use of smoked beef bacon provides a superior fat-to-meat ratio and a flavor profile that standard varieties cannot match. This approach is about controlling the variables that matter: the binder ratio, the aromatic preparation, and the precise temperature management that ensures a juicy, tender output every time you step into the kitchen.
I have spent months refining this system, testing different breadcrumbs, meat blends, and wrapping techniques to arrive at this specific blueprint. The result is a dish that honors the comfort of the original but elevates it through technical precision and high-quality inputs. The deep mahogany glaze, the shatteringly crisp bacon, and the savory, tender interior all work together to create a meal that is consistently excellent. This is the definitive way to prepare this classic, eliminating the guesswork and replacing it with a repeatable, high-performance system. For another example of a reliable, engineered meal, see my guide on the proven, easy meatloaf recipe.
I encourage you to take these engineering principles into your own kitchen and see the difference that precision makes. Whether you are a seasoned cook or just starting out, following this blueprint will give you the confidence to produce a meatloaf that exceeds expectations. Please share your results in the comments below, including any modifications you tested or successes you had with the sheet pan method. I am always looking to refine my systems, and your feedback is a vital part of that process. Share this blueprint with anyone who has ever struggled with a soggy meatloaf; it is time we all started cooking with a little more science and a lot more flavor.

Smoked Beef Bacon-Wrapped Meatloaf
Equipment
- Medium nonstick pan
- Large Bowl
- baking sheet
- Parchment or nonstick foil
- Digital probe thermometer
- Sharp serrated knife
Ingredients
Calculated Component List (Meatloaf Base)
- 1 Tbsp extra virgin olive oil
- 1 medium onion chopped
- 2 cloves garlic minced
- 2.5 lbs ground beef and veal meatloaf mix
- 2 eggs lightly beaten
- 2/3 cup whole milk
- 1/3 cup ketchup (+ 2 Tbsp for the glaze)
- 1 Tbsp dijon mustard
- 1.5 Tbsp worcestershire sauce
- 1/4 cup fresh parsley minced
- 1 cup panko bread crumbs
- 2 tsp kosher salt
- 1/2 tsp freshly ground black pepper
- 1 Tbsp brown sugar
- 12 strips smoked beef bacon
Instructions
Blueprint for Success
- Preheat the oven to 350 degrees and line a baking sheet with parchment or nonstick foil. This preparation is essential for preventing the bottom from sticking and allowing for easy cleanup.
- Heat the oil in a medium nonstick pan until it is hot, but not smoking. Add the onion and saute until translucent, about 3-5 mins. Add the garlic and saute 2 mins more. Cool to room temperature. This cooling step is mandatory; adding hot aromatics to raw meat will begin to melt the fat prematurely, leading to a dry result.
- While the onion mixture is cooling, combine the remaining ingredients (except 2 Tbsp ketchup, brown sugar, and smoked beef bacon) in a large bowl. Add the onion mixture and mix well to combine. I recommend using your hands to mix, as this allows you to feel the texture and ensure the binder is evenly distributed without overworking the proteins.
- Form the meatloaf mixture into a rectangle loaf directly on the prepared baking sheet. Whisk 2 Tbsp ketchup with 1 Tbsp brown sugar and brush over the meatloaf. This initial layer of glaze acts as an adhesive for the bacon strips.
- Lay the strips of smoked beef bacon over the meatloaf from short end to short end, overlapping slightly. Be sure the top, sides, and ends are completely covered. This is the critical step for thermal protection.
- Bake for about 1 hour to 1 hour, 15 mins, rotating the pan once or twice in the oven as it bakes to ensure even browning.
- The target internal temperature for this dish is exactly 160 degrees Fahrenheit. It is essential to use a digital probe thermometer to measure the thickest part of the loaf. Once you reach 160 degrees, remove the meatloaf from the oven and tent it loosely with foil. The 10-minute rest period is mandatory because it accounts for necessary carryover cooking. During this time, the internal temperature will rise to the safe threshold of 165 degrees while the juices redistribute through the protein fibers. If you cut into the loaf immediately, the moisture will escape, leaving the meat dry and the texture compromised.


