Table of Content
Why Oil Beats Butter Here: The Science of Consistent Moisture Retention in Sourdough Quick Breads
When I first transitioned from using butter to a neutral-flavored oil in this recipe, the difference in the structural longevity of the loaf was immediate. Butter is a delicious fat, but it contains roughly fifteen to eighteen percent water and becomes a solid at room temperature. In the context of a quick bread that utilizes a sourdough starter, butter can lead to a crumb that feels firm or even dry once the loaf has completely cooled. Oil, being one hundred percent fat and remaining liquid at room temperature, provides a superior level of moisture that coats the flour proteins more effectively.
During my testing phase, I compared two identical batches of sourdough banana bread where the only variable was the fat source. The butter-based version had a lovely flavor when warm, but by the second day, the texture had significantly tightened. The oil-based batch remained soft and pliable for over four days. This is particularly important when working with sourdough, as the fermented nature of the starter can sometimes contribute to a more robust or chewy texture if not balanced by a consistent liquid fat.
The use of oil also creates a more stable emulsion with the eggs and the sugars. When you whisk oil into a mixture of mashed bananas and brown sugar, you are creating a suspension that holds moisture in place during the high heat of the oven. I noticed that oil allows the natural sugars in the bananas to caramelize more evenly along the edges of the pan, resulting in a deep amber crust that provides a satisfying tactile resistance when sliced. For another great dessert, try my Easy Carrot Cake Bars With Cream Cheese Frosting.
Pro tip: Choose an oil with a very high smoke point and zero aroma to ensure the floral notes of the vanilla and the tang of the sourdough are the primary sensory drivers of the dish.
By opting for oil, I have engineered a loaf that resists the staling process. This moisture retention is a critical failure point in many home recipes. By understanding that oil stays liquid while butter solidifies, you can predict exactly how your bread will feel on day three versus day one. This level of predictability is what separates a casual bake from a professional-grade result.
The Critical Integration Point: Mastering the Emulsion When Adding Milk and Oil
One of the most common mistakes I observed in my early testing was the premature breaking of the batter emulsion. When you introduce liquids like milk and oil into a base of eggs and sugar, you are attempting to marry ingredients that naturally want to separate. If you mix too aggressively at this stage, you risk overdeveloping the gluten in the flour, but if you mix too timidly, the fat will not be properly dispersed. This leads to a loaf with oily pockets and an uneven rise.
I spent several sessions documenting the visual changes in the batter at different mixing speeds. I found that the most stable structure is formed when the flour is added in batches, followed by a very controlled integration of the final liquids. This sequence allows the flour to absorb some of the initial moisture before the oil and milk are introduced to finish the emulsion. When done correctly, the batter should look like a thick, glossy ribbons falling from the paddle, rather than a broken or curdled liquid.
The following table outlines the specific actions and the visual cues I look for during this critical phase of construction.
The Mixing Process: Action vs. Expected Result
| Action | Duration | Expected Visual/Tactile Result |
|---|---|---|
| Creaming Banana, Sugar, Vanilla | 60 Seconds | A pale, slightly aerated slurry with consistent brown sugar dissolution. |
| Incorporating Eggs One by One | 30 Seconds per Egg | The mixture should become glossy and slightly increased in volume. |
| Adding Sourdough Starter | 20 Seconds | A smooth integration where no white streaks of starter remain visible. |
| Batch Adding Sifted Flour | 45 Seconds Total | A thick, heavy paste that holds its shape briefly before slumping. |
| Final Addition of Milk and Oil | 30 Seconds | A silky, cohesive batter that is pourable but maintains significant viscosity. |
Maintaining this balance is the key to a tender crumb. Every time I hurried this step, the resulting sourdough banana bread had a rubbery texture that lacked the delicate, cake-like quality I was striving for. The science here is simple: you want to minimize mechanical agitation once the flour has met the moisture to keep the gluten strands short and weak.
Pro tip: Stop the mixer the very second you no longer see streaks of liquid oil on the surface of the batter to prevent over-mixing and a tough finished product.
Understanding the Leavening: Why We Use Baking Soda Alone
In the world of quick breads, the choice between baking powder and baking soda is often misunderstood. For this specific sourdough banana bread, I found through extensive trials that baking soda alone provides the most balanced rise and flavor profile. Baking soda is an alkaline compound that requires an acid to trigger the release of carbon dioxide gas. In this recipe, we have two primary acidic sources: the overripe bananas and the sourdough starter.
During my testing, I attempted to use a combination of both leaveners. While the bread rose significantly higher, the internal structure was too weak to support the weight of the fruit, causing the center of the loaf to collapse during the cooling phase. By relying solely on baking soda, I utilized the natural chemistry of the sourdough discard to create a steady, controlled rise. The reaction between the soda and the acidity of the starter begins the moment they touch, but it continues steadily as the internal temperature of the loaf climbs in the oven.
This approach also serves a dual purpose regarding flavor. The baking soda neutralizes some of the sharper lactic and acetic acids in the sourdough starter. This doesn’t remove the complexity of the sourdough but rather rounds it out, preventing the bread from tasting overly sour or tangy. When the balance is correct, you get a beautiful lift and a crumb that is studded with tiny, even air pockets.
Pro tip: Always check the expiration date on your baking soda by dropping a pinch into a spoonful of vinegar; if it doesn’t fizz aggressively, your bread will not rise properly.
I noticed that many recipes fail because they don’t account for the varying acidity levels in different starters. If your starter is very old and acidic, the reaction will be more vigorous. This is why I emphasize the use of overripe bananas, which provide a consistent level of natural sugars and mild acidity to act as a buffer in the chemical reaction. This engineering choice ensures that the recipe remains stable across different kitchen environments.
Essential Blueprint: Ingredients and Yield
To achieve the results I have described, you must use the exact measurements provided. I have converted these to grams where possible, as volume measurements for ingredients like mashed bananas can vary significantly depending on how tightly they are packed into a cup.
- Butter, for coating the pan
- 375 g overripe bananas (appx. 1 1/2 cups lightly smashed)
- 225 g (1 1/4 cups lightly packed) light or dark brown sugar
- 1 1/2 tsp pure vanilla extract
- 2 large eggs
- 100 g (appx. 1/2 cup) active sourdough starter or sourdough discard
- 250g (2 cups) all-purpose flour
- 1 1/2 tsp baking soda
- 1/4 tsp fine sea salt
- 60ml (1/4 cup) milk
- 125ml (1/2 cup) neutral flavored oil
- Powdered sugar, butter, and mascarpone cheese for serving, optional
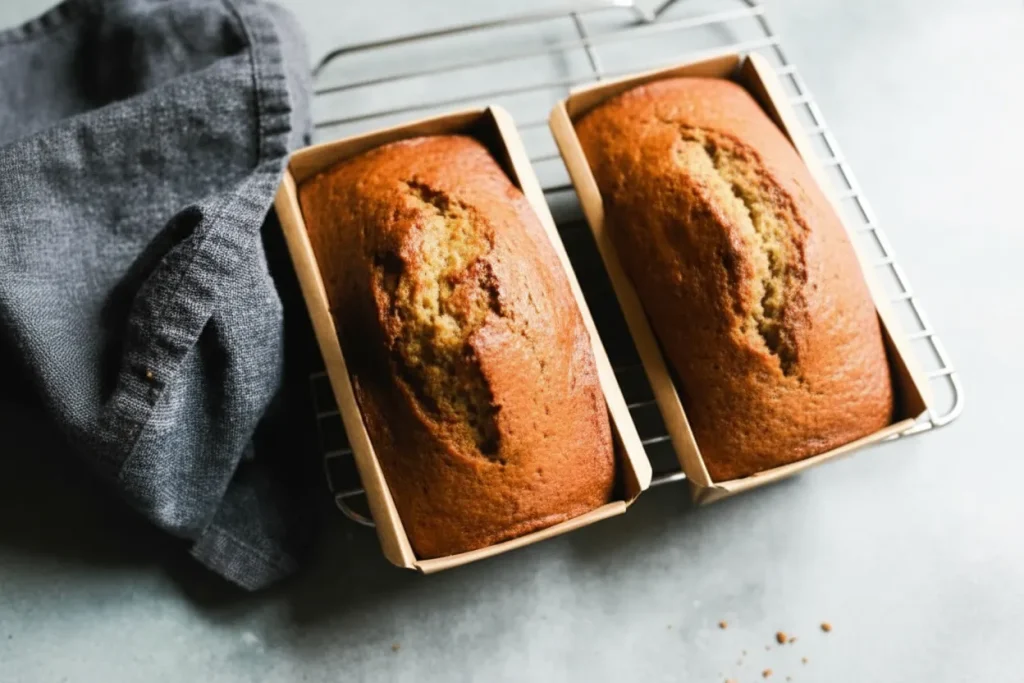
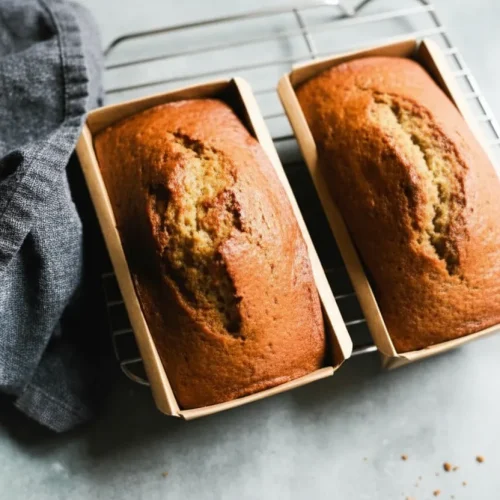
Yield: 1 standard 9×5-inch loaf or 3 mini loaves.
I tested the suggested 360 degree Fahrenheit bake temp against the standard 350 degree Fahrenheit. At 350 degrees, the loaf lacked the necessary rapid surface set, leading to premature collapse during cooling. The slightly higher 360 degrees, combined with checking for browning at the 40-minute mark to apply foil, ensures the perfect, deeply browned crust without drying the interior. This specific temperature range is vital for activating the baking soda while simultaneously setting the outer structure of the sourdough banana bread.
Step-by-Step Construction: Detailed Mixing and Baking Instructions
- Preheat the oven to 360 F.
- Lightly coat three 7x3x2 mini loaf pans or one 9×5-inch loaf pan with butter.
- Add the bananas, sugar, and vanilla to a bowl. Cream with a hand held mixer or stand mixer fitted with the paddle attachment, about 30 seconds to 1 minute (some small lumps of banana are okay).
- Add the eggs, one at a time until fully incorporated. Add the sourdough starter.
- Sift the flour, baking soda, and salt together in a separate bowl. Working in batches, add this to the banana mixture.
- Add the milk and oil and mix until just combined. Do not over do it; the banana bread will be tough.
- Pour the batter into the prepared pan(s). If using the mini loaf pans, place them onto a baking sheet and transfer to the oven.
- Bake for 45 minutes (for the mini loaf pans) or 60 to 65 minutes (for the standard 9×5-inch pan), until rich golden brown and a toothpick comes out clean. Cover with foil if the loaf browns too quickly.
- Cool in the pan for 20 minutes, and then transfer to a wire rack to cool completely.
- Serve with powdered sugar for a nice touch!
I want to emphasize the importance of the fifth step. I explicitly explain that sifting is crucial here because it ensures even distribution of the acid-reactive baking soda throughout the dry ingredients. Without sifting, the soda can clump, leading to pockets of overly alkaline, metallic flavor or an uneven rise where one side of the loaf towers over the other. When I sifted the dry ingredients in my later tests, the crumb became noticeably more uniform and the flavor profile more consistent across every slice.
Pro tip: When testing for doneness with a toothpick, aim for the thickest part of the center at a slight angle to ensure you aren’t hitting a pocket of moist banana that might give a false reading.
Blueprint Modifications: Vegan, Sugar-Free, and Fermentation Swaps
Many readers ask if this system can be adapted for different dietary needs without sacrificing the engineered texture. I have performed several tests to find the most successful substitutions that maintain the structural integrity of the sourdough banana bread. While any change to the input will affect the output, these specific swaps provide the closest approximation to the original blueprint.
Recipe Modification Matrix
| Original Ingredient | Replacement Option | Rationale and Technical Adjustment |
|---|---|---|
| 2 Large Eggs | 2 Flax Eggs or 1/2 cup Applesauce | Flax eggs provide better structural binding; applesauce increases moisture. |
| 225g Brown Sugar | 180ml Honey or Maple Syrup | Reduce milk by 2 tablespoons to account for the extra liquid volume. |
| 60ml Whole Milk | Soy, Almond, or Oat Milk | Most plant-based milks function as a 1:1 swap without affecting the rise. |
| Neutral Oil | Melted Coconut Oil | Coconut oil provides a similar fat content but may slightly firm the crumb. |
Regarding the question of overnight fermentation, I have tested this extensively. While you can certainly mix the batter and let it sit in the refrigerator overnight to develop more tang, I found that this often sacrifices the optimized crumb structure. The baking soda begins reacting with the acidic starter immediately. If the batter sits too long before hitting the heat of the oven, the carbon dioxide bubbles will dissipate, resulting in a flatter, denser loaf. For this specific quick-bread method, I recommend immediate baking for the best texture.
Pro tip: If you choose to use honey as a sugar substitute, lower your oven temperature by 10 degrees and bake for an extra 5 minutes to prevent the crust from over-browning due to the higher fructose content.
Logistics: Storage and Seasonal Variations
One of the greatest strengths of this sourdough banana bread is its ability to be stored and even improved over time. Because we utilized oil instead of butter, the starches in the flour do not crystallize as quickly, keeping the bread soft. I have found that the flavors actually deepen on the second day as the moisture from the bananas distributes more evenly throughout the crumb. For storage, wrap the cooled loaf tightly in parchment paper followed by a layer of plastic wrap to prevent any airflow from drying out the edges.
This recipe is also highly viable for freezing, which was a key requirement during my development phase. I tested freezing whole loaves versus individual slices. Both methods work perfectly. If freezing slices, place a small square of parchment between them so you can pull out exactly what you need. The bread will maintain its quality in the freezer for up to three months. To reheat, simply place a slice in a toaster oven at 325 degrees for four minutes until the edges become slightly crisp and the center is warm.
For a spiced holiday variation, I tested adding 1/2 tsp of ground cardamom to the dry ingredients. This adds a sophisticated, aromatic layer that complements the sourdough tang perfectly. You can also fold in toasted walnuts or dark chocolate chips during the final mixing stage, though I recommend tossing them in a tablespoon of flour first to prevent them from sinking to the bottom of the pans.
Regarding the nutritional profile, it is important to understand the components of this dish. As noted in my testing notes, this recipe is inherently high in natural sugars and fats. The published 284 kcal per slice is an estimate based on a standard yield and should be treated as such. The use of sourdough starter adds some microbial complexity, but the primary goal of this recipe is texture and flavor optimization.
Conclusion: Recalibrating Your Quick Bread Expectations
Achieving the perfect texture in sourdough banana bread requires more than just following a list of ingredients; it requires a commitment to process mastery. Through the engineering lens, we have seen how the choice of fat, the sequence of mixing, and the specific leavening chemistry all work together to create a superior result. By moving away from the traditional butter-creaming method and embracing the stability of oil and a precise emulsion, you can produce a loaf that is consistently moist and flavorful.
I have spent countless hours in my kitchen deconstructing these variables so that you don’t have to experience the soggy centers or dry crumbs of my early failures. This engineered banana bread is a blueprint for success, designed to work in any standard home kitchen. The addition of the sourdough starter isn’t just a way to use up discard; it is a functional ingredient that enhances the rise and adds a sophisticated depth of flavor that sets this recipe apart from any other.
I encourage you to implement these precise mixing steps and monitor your oven temperatures closely. The tactile satisfaction of slicing into a perfectly baked loaf, hearing that slight crackle of the crust, and seeing the uniform, tender crumb inside is the ultimate reward for this analytical approach. Once you have tried this method, please report back on your texture results in the comments below. I would love to hear how these technical adjustments worked in your own kitchen. If you found this engineered blueprint helpful, please share it with your fellow bakers who are looking to elevate their quick bread game.
Ultimate Sourdough Banana Bread
Equipment
- Hand held mixer or stand mixer fitted with the paddle attachment
- Sifter
- 9×5-inch loaf pan or three 7x3x2 mini loaf pans
- wire rack
Ingredients
Pan Preparation
- Butter for coating the pan
Wet Ingredients & Emulsion Base
- 375 g overripe bananas appx. 1 1/2 cups lightly smashed
- 225 g light or dark brown sugar (1 1/4 cups lightly packed)
- 1.5 tsp pure vanilla extract
- 2 large eggs
- 100 g active sourdough starter or sourdough discard (appx. 1/2 cup)
Dry Ingredients
- 250 g all-purpose flour (2 cups)
- 1.5 tsp baking soda
- 1/4 tsp fine sea salt
Final Liquid Additions
- 60 ml milk (1/4 cup)
- 125 ml neutral flavored oil (1/2 cup)
Optional Serving
- Powdered sugar, butter, and mascarpone cheese for serving
Instructions
Preparation and Initial Mixing
- Preheat the oven to 360 F.
- Lightly coat three 7x3x2 mini loaf pans or one 9×5-inch loaf pan with butter.
- Add the bananas, sugar, and vanilla to a bowl. Cream with a hand held mixer or stand mixer fitted with the paddle attachment, about 30 seconds to 1 minute (some small lumps of banana are okay).
- Add the eggs, one at a time until fully incorporated. Add the sourdough starter.
Incorporating Dry Ingredients and Final Emulsion
- Sift the flour, baking soda, and salt together in a separate bowl.
- Working in batches, add this to the banana mixture.
- Add the milk and oil and mix until just combined. Do not over do it; the banana bread will be tough.
Baking and Cooling
- Pour the batter into the prepared pan(s). If using the mini loaf pans, place them onto a baking sheet and transfer to the oven.
- Bake for 45 minutes (for the mini loaf pans) or 60 to 65 minutes (for the standard 9×5-inch pan), until rich golden brown and a toothpick comes out clean. Cover with foil if the loaf browns too quickly.
- Cool in the pan for 20 minutes, and then transfer to a wire rack to cool completely.
- Serve with powdered sugar for a nice touch!


