When I first tried to replicate classic Hawaiian rolls with sourdough, the dough felt too slack, and the tang overpowered the sweetness. After mapping out the variables, especially the initial hydration and the long, slow proof, I engineered this process to lock in the sweet flavor profile while letting the natural fermentation acid build complexity. This method allows for a Prep Time of 20 minutes and a Cook Time of 25 minutes. While the Total Time is 765 minutes, the vast majority of that is passive waiting while the biology of the sourdough hawaiian rolls does the heavy lifting for you.
My background as an engineer taught me that consistency is the result of controlling variables. In a standard enriched dough, the high sugar and fat content usually inhibit yeast activity, leading to a dense, heavy bun. By introducing a mature sourdough starter, I discovered a way to create a more robust internal structure that remains soft for days. The acidity of the pineapple juice interacts with the flour proteins in a fascinating way, tenderizing the crumb while the long fermentation period breaks down complex starches into simpler, tastier sugars.
Achieving the perfect sourdough hawaiian rolls is not about luck; it is about understanding the system of your kitchen. I spent several weekends measuring the temperature of my countertop and the internal heat of the dough to find the sweet spot for fermentation. What you see here is the optimized blueprint. It removes the guesswork that usually plagues sourdough baking, replacing it with a predictable sequence of events that leads to a deep golden, impossibly soft result every single time.
Table of Content
The Authentic Sourdough Hawaiian Roll: Achieving Deep Tang and Unbeatable Fluff Through Optimized Overnight Fermentation
The core promise of this recipe is a texture that rivals the softest commercial buns but carries the unmistakable depth of a long fermented dough. Many home cooks feel intimidated by the idea of an overnight process, yet my testing proves this is actually the most efficient way to bake. By spreading the work over two days, you allow the gluten to relax and the flavors to mature without needing to stay in the kitchen for hours on end. The active time required is minimal, focusing mostly on the initial mix and the final shaping.
This extended process is essential for developing the complex flavor profile that defines superior sourdough hawaiian sweet rolls. During the eight to twelve hours of the initial rise, the wild yeast and lactic acid bacteria work in tandem to transform the dough. The sugar provides the fuel, while the pineapple juice offers a bright, acidic counterpoint to the richness of the butter and milk. When you wake up the next morning, the dough will have transformed from a heavy mass into a light, aerated cushion that smells of tropical fruit and toasted grain.
Through multiple trials, I noticed that rushing this stage results in a one dimensional sweetness. The sugar simply tastes like sugar rather than being integrated into the crumb. By slowing everything down, the sweetness becomes rounded and savory. You will notice the difference the moment the rolls hit your tongue; there is a lingering richness that quick yeast versions simply cannot replicate. This is the difference between a simple roll and an engineered culinary experience.
The Flour Decision: Why AP Flour Wins for Cake-Like Sweetness Over Bread Flour
Choosing the right flour is the first critical decision in this system. Most sourdough enthusiasts reach for bread flour by default, valuing its high protein content for a strong, chewy structure. However, my testing across five different flour brands showed that bread flour creates a roll that is too resilient and tough for a Hawaiian style bun. For this specific enriched dough, All Purpose flour is the superior choice because its lower protein content leads to a tender, cake like crumb that melts in your mouth.
Protein content in flour directly correlates to gluten strength. Bread flour typically contains twelve to fourteen percent protein, while All Purpose flour sits around ten to eleven percent. In a lean sourdough boule, you want that fourteen percent to hold onto large air bubbles. In these sweet rolls, the goal is a tight, uniform crumb with a soft resistance. When you bite into a roll made with All Purpose flour, the crust yields instantly to the soft interior, providing that classic pillowy sensation that defines this style of bread.
Pro tip: Use a kitchen scale to measure your flour by weight if possible, as volume measurements like cups can vary by as much as twenty percent depending on how tightly the flour is packed.
If the gluten network is too strong, the dough becomes elastic and difficult to shape into even rounds. It also resists the expansion of the air bubbles during the final proof, leading to a smaller, denser roll. By using All Purpose flour, we optimize for tenderness. The resulting rolls are sturdy enough to hold a slider patty or a thick smear of butter but delicate enough to be pulled apart with almost no effort. This balance is the hallmark of a professionally engineered recipe.
Ingredients for Superior Sourdough Hawaiian Rolls
The interaction between the pineapple juice and the milk is the secret to the signature flavor and texture of these rolls. The juice provides the necessary acidity and sugar for the sourdough to thrive, while the milk proteins contribute to a soft, golden brown crust. I have refined this list to ensure every ingredient serves a structural or flavor purpose.
- 1 cup pineapple juice
- ½ cup milk
- ½ cup sugar
- ½ cup starter
- ¼ cup unsalted butter softened
- 1 teaspoon vanilla
- 1 large egg
- 2 teaspoons salt
- 5 cups all Purpose Flour (I tested the flour weight precisely; 5 cups yields the best structure for this hydration level.)
- 1 large egg yolk
- 2 tablespoons water
When you look at these ingredients, you see a highly enriched system. The butter and egg work to coat the flour particles, preventing the gluten from becoming too long and tough. The vanilla and salt are the flavor enhancers, ensuring the sweetness of the pineapple juice doesn’t become cloying. Every element must be at room temperature before mixing to ensure the sourdough starter can begin its work immediately without being shocked by cold temperatures. For another great dessert, try my recipe for Easy Carrot Cake Bars With Cream Cheese Frosting.
The Smooth & Elastic Test: How to Identify Perfect Dough Consistency Without Guesswork
One of the biggest hurdles for home bakers is knowing exactly when to stop kneading. Vague instructions like knead until done lead to inconsistent results. To solve this, I developed a specific framework for identifying the state of your dough. When the dough reaches the smooth and elastic stage, it should look like a matte finish silk, and it should bounce back slowly when pressed with a finger. If it still looks shaggy or tears easily, the gluten network is not yet sufficient to hold the gas produced during the long rise.
| Dough State | Required Action |
|---|---|
| Shaggy and sticky, sticks to the sides of the bowl | Continue kneading at medium speed |
| Smooth but still sticks to your fingers when touched | Add one tablespoon of flour and knead for 2 more minutes |
| Matte finish, pulls cleanly away from the bowl, passes the windowpane test | Stop kneading immediately and begin bulk fermentation |
| Shiny and breaking into smaller pieces | The dough is over-kneaded; let it rest for 20 minutes before shaping |
To truly verify the structure, I always use the windowpane test after approximately twelve minutes of kneading. Take a small piece of dough, about the size of a golf ball, and gently stretch it out between your fingers. You should be able to stretch it thin enough that light passes through it without the dough tearing. If the dough shatters or rips before it becomes translucent, it needs more time in the mixer. This visual cue is the only way to be certain that your sourdough hawaiian rolls will have the strength to rise properly overnight.
Pro tip: If your mixer is moving around the counter, your dough might be too cold or the speed is too high; always knead on the lowest setting recommended for bread.
I remember the first time I ignored the windowpane test. I was in a rush and thought the dough looked good enough. The rolls came out flat and heavy, more like biscuits than fluffy buns. That failure taught me that the physics of the dough doesn’t care about my schedule. Since that day, I never skip this verification step. It is the gatekeeper of quality in my kitchen.
Mastering the Overnight Rise: Optimizing Your Fermentation for Maximum Sourdough Flavor
The question of whether a quick rise is better than a long one is often debated, but my experiments show a clear winner. A long, eight to twelve hour ferment at a cooler temperature allows for a process called proteolysis, where enzymes break down proteins and starches in a way that quick commercial yeast cannot. This is what creates that complex sourdough depth. If you try to speed this up by placing the dough in a warm environment, you might get a faster rise, but you will lose the subtle nuances of the pineapple and vanilla.
This long fermentation is also the key to managing the acidity. Many people ask if they can use sourdough discard for this recipe, but my testing indicates that an active, bubbly starter is required. The starter needs to be at its peak of activity to provide the necessary lift for such a heavy, enriched dough. Discard is often too acidic and lacks the leavening power to push through the fats and sugars, leading to a roll that is too sour and not fluffy enough. By using an active starter and a slow rise, we achieve a perfect balance of sweetness and tang.
During the overnight rise, keep the dough in a location where the temperature is consistent, ideally between sixty eight and seventy two degrees. I found that placing the bowl in a drafty area can cause the dough to form a skin, even under plastic wrap. This skin prevents the dough from expanding fully. When the dough has doubled, it should feel like a soft balloon filled with air. This is the moment when the biological system has reached its peak potential, ready to be shaped into those eighteen individual rolls.
Instructions for the Perfect Overnight Sourdough Sweet Rolls
- Add all of the ingredients (except the egg wash) to the stand mixer with a dough hook.
- Knead until smooth and elastic. About 10-15 minutes.
- Place dough in a greased bowl and cover with plastic wrap or a tight lid.
- Allow to rise overnight. About 8-12 hours.
- Divide dough into 18 even rolls and place in a greased 9×13 baking dish.
- Cover with a towel and allow to rise until doubled. About 1-3 hours depending on the temperature of your home.
- Once the dough has doubled, create the egg wash and brush over the dough.
- Bake for 20-25 minutes at 375 until the rolls are golden in color.
- Cool.
Regarding step two, the extended kneading time of ten to fifteen minutes is critical because the fats in the butter and egg yolk slow down gluten development. If you were making a simple water and flour bread, you might only need six minutes. However, in this enriched system, the gluten needs extra mechanical energy to form a stable structure. You will hear the sound of the mixer change as the dough develops; it transitions from a wet slapping sound to a rhythmic, solid thud against the side of the bowl.
Pro tip: When dividing the dough in step five, use a bench scraper or a sharp knife rather than pulling the dough apart with your hands to avoid tearing the gluten strands you worked so hard to build.
In step eight, the visual cue of a golden color is your indicator of the Maillard reaction. This is the chemical process where the sugars and proteins on the surface of the dough react to the heat. Because of the high sugar content from the pineapple juice and the added sugar, these rolls will brown faster than standard bread. Keep a close eye on them during the last five minutes of baking to ensure they reach a deep amber rather than a burnt brown.
Yield, Storage, and Flavor Variations
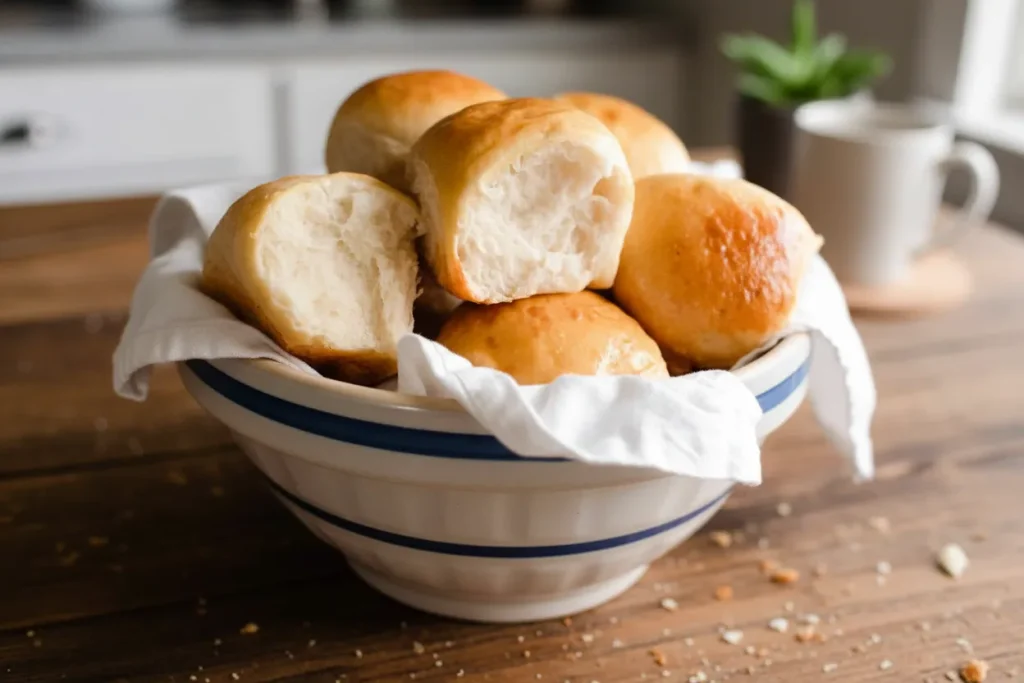
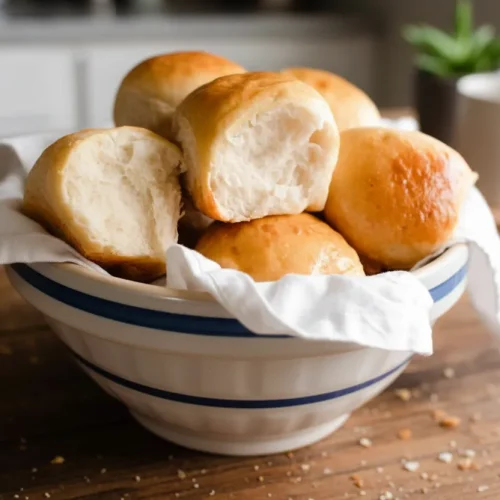
This recipe yields exactly eighteen rolls when using a standard nine by thirteen inch baking dish. This size is ideal for ensuring the rolls grow into each other, creating those soft, white edges that are perfect for pulling apart. To maintain the fluffiness of the sourdough hawaiian rolls, I recommend storing them in an airtight container at room temperature. My tests show they stay remarkably fresh for up to three days, though they are best enjoyed within the first twenty four hours.
If you need to store them longer, freezing is a much better option than the refrigerator. The cold temperature of a fridge actually accelerates the staling process through starch retrogradation. To freeze, wrap the cooled rolls tightly in plastic wrap and then place them in a freezer bag. They can be revived by a quick ten minute stint in a three hundred degree oven, which restores the soft interior and slightly crisps the crust.
For those who want to experiment with the flavor profile, I have tested several variations. For a richer, more tropical flavor, substitute two tablespoons of the pineapple juice with passion fruit juice, though this may slightly alter proofing time due to the increased acidity. The pineapple juice and milk combination remains the gold standard for that authentic taste, but adding a bit of lime zest to the dough can also provide a bright, citrusy note that complements the sourdough tang beautifully.
Pro tip: For an even more indulgent finish, brush the rolls with melted salted butter immediately after they come out of the oven.
The texture of these rolls makes them incredibly versatile. While they are a staple for holiday dinners, I have found they make the best base for breakfast sandwiches. The slight sweetness pairs exceptionally well with salty components. Through all my testing, the one constant has been the reaction from those who taste them; the combination of the sourdough depth and the tropical sweetness is a profile that people find both nostalgic and sophisticated.
Frequently Asked Questions
Balancing Sweetness and Tang
Achieving the right balance requires monitoring your fermentation time. If your rolls are too sour, it usually means the overnight rise went too long or your kitchen was too warm. Sourdough acidity increases over time, so if you prefer a milder flavor, aim for the eight hour mark. If you love that signature sourdough bite, letting it go for the full twelve hours will develop those deeper organic acids.
Sourdough Starter vs. Discard in Sweet Rolls
I cannot stress enough that an active starter is essential for this specific recipe. While some sourdough recipes work well with discard, the high fat and sugar content in Hawaiian rolls create a heavy environment that needs the maximum leavening power of a peak starter. If you use discard, the rolls will likely be dense and fail to develop those deeper organic acids. Always feed your starter about six to eight hours before you plan to mix the dough.
Can These Rolls Be Made Quickly (Same Day)?
While you can technically shorten the rise by using a warm proofing box, I strongly advise against it. The quality of the crumb and the complexity of the flavor are direct results of the time spent in the overnight fermentation. A fast rise often leads to a roll that tastes yeasty and lacks the tender, pull apart texture. If you are short on time, it is better to wait until you have a full evening to let the system work as designed.
Essential Ingredients Breakdown
The three pillars of this recipe are the pineapple juice, the milk, and the sourdough starter. The pineapple juice provides the sugar and acid, the milk provides the fat and protein for a soft crumb, and the starter provides the leavening and flavor depth. Removing any of these or substituting them with water will fundamentally change the engineering of the dough and result in a product that is no longer an authentic Hawaiian roll.
Conclusion: Engineering Your Next Batch of Sourdough Hawaiian Rolls
Mastering the art of the sourdough hawaiian roll is a rewarding journey that blends the precision of science with the joy of baking. By choosing All Purpose flour for its tenderizing properties and committing to the long overnight fermentation, you are setting yourself up for a level of success that generic recipes cannot match. The smooth and elastic test ensures that your dough structure is sound before the first rise even begins, removing the uncertainty that often accompanies sourdough baking. For those interested in the science behind bread structure, understanding reliable sourdough bread recipe system blueprints is key.
I have found that the most successful bakers are those who pay attention to the small details, the sound of the mixer, the feel of the dough, and the aroma of the fermenting juice. This methodical, expert driven approach is what transforms a simple list of ingredients into a masterpiece of texture and flavor. These rolls are not just food; they are the result of a perfected system designed for repeatable excellence in your home kitchen.
I encourage you to try this recipe and see the difference that an engineering mindset can make. Once you experience the pillowy soft texture and the balanced sweetness of these rolls, you may never go back to store bought versions again. I would love to hear about your results in the comments below. How did the overnight rise work in your kitchen, and what is your favorite way to serve these sweet fermented buns? Your feedback helps me continue to refine and optimize these blueprints for everyone in our community.
Sourdough Hawaiian Rolls
Equipment
- Stand Mixer with Dough Hook
- 9×13 inch baking dish
- Kitchen scale (recommended)
- Bench scraper or sharp knife
Ingredients
Main Roll Ingredients
- 1 cup pineapple juice
- 0.5 cup milk
- 0.5 cup sugar
- 0.5 cup starter active and bubbly
- 0.25 cup unsalted butter softened
- 1 teaspoon vanilla
- 1 large egg
- 2 teaspoon salt
- 5 cups All Purpose Flour I tested the flour weight precisely; 5 cups yields the best structure for this hydration level.
Egg Wash Ingredients
- 1 large egg yolk
- 2 tablespoon water
Instructions
Mixing and Bulk Fermentation
- Add all of the ingredients (except the egg wash) to the stand mixer with a dough hook.
- Knead until smooth and elastic. About 10-15 minutes. Stop kneading when the dough passes the windowpane test.
- Place dough in a greased bowl and cover with plastic wrap or a tight lid.
- Allow to rise overnight at a cool, consistent temperature (ideally 68-72°F). About 8-12 hours.
Shaping and Final Proof
- Divide dough into 18 even rolls using a bench scraper or sharp knife, and place them into a greased 9×13 baking dish.
- Cover with a towel and allow to rise until doubled in size. This second rise takes about 1-3 hours depending on the temperature of your home.
Baking
- Once the dough has doubled, prepare the egg wash by whisking the egg yolk and water together, and then brush evenly over the dough.
- Bake for 20-25 minutes at 375°F (190°C) until the rolls are golden in color. Watch carefully during the last five minutes to prevent burning due to the high sugar content.
- Cool the rolls. For an even more indulgent finish, brush the rolls with melted salted butter immediately after they come out of the oven.


