The first time I sliced into what I hoped would be a perfect loaf of sourdough jalapeno cheese bread, I was met with a literal crater of grease and a gummy, under-developed crumb. The cheese had melted prematurely, releasing its fats and moisture into the surrounding dough, which essentially steam-cooked the center into a dense, inedible mass. The jalapeños had clumped together in one corner, creating a pocket of overwhelming heat while the rest of the bread remained bland. It was a failure of distribution and structural integrity.
That disappointment launched a three-month obsession with optimizing the sourdough jalapeno cheese bread system. I spent weeks deconstructing the fermentation process to understand how heavy inclusions like sharp cheddar and moisture-rich peppers interact with a wild yeast environment. My engineering background forced me to look at the dough not just as food, but as a biological structure that must support significant external weight without collapsing.
The result of that research is this blueprint for the Optimized Sourdough System. We are focusing on mastering bulk fermentation and proofing to ensure a flawless rise every single time. This is not a casual hobbyist recipe; it is a technical manual for high-performance bread.
The timing of this process is critical for success. You should plan for a total time of approximately 810 minutes, which is about 13.5 hours. Fortunately, most of this is passive time where the biology of the starter does the heavy lifting. The actual active labor is roughly 40 minutes, while the baking takes 50 minutes.
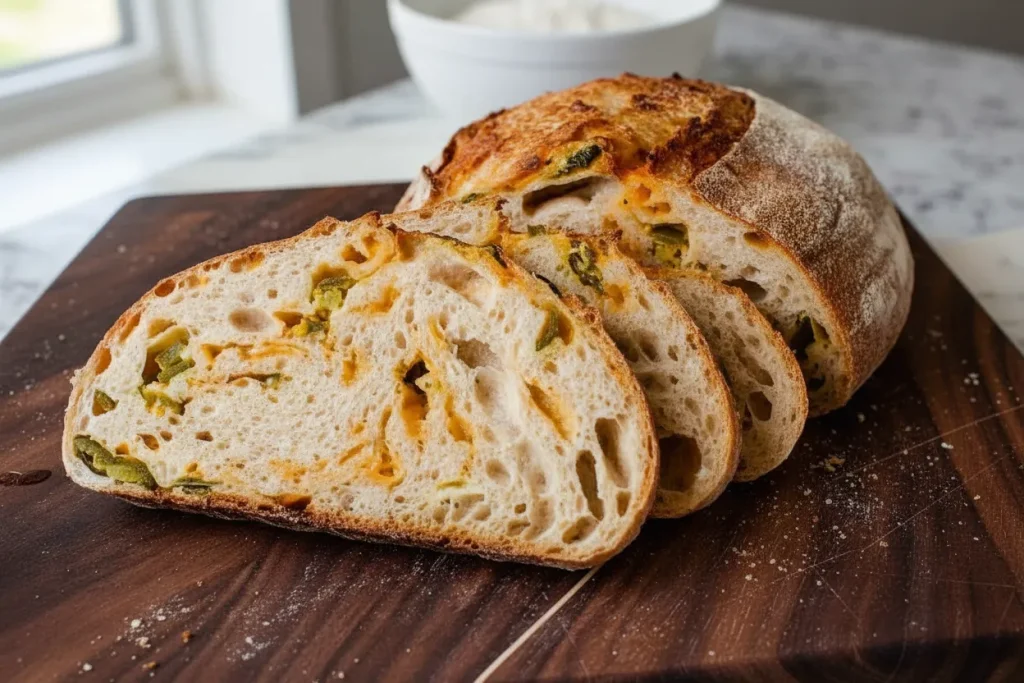
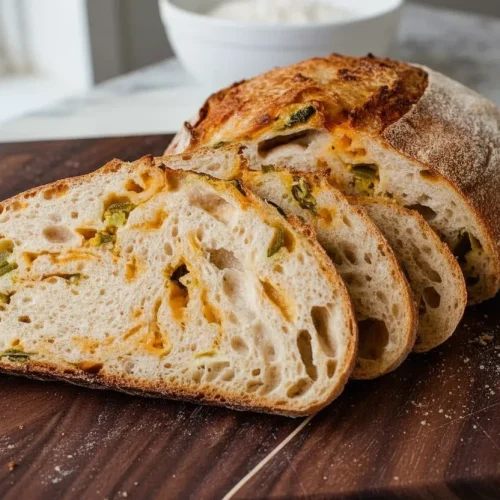
My testing proved that the secret lies in the precision of the inclusions. By following this method, you will achieve a loaf with a shatteringly crisp, mahogany-colored crust and a lace-like internal crumb. Each bite will offer a balanced distribution of melted cheese and zesty heat, held together by a strong, airy gluten network.
Table of Content
Stop Guessing: Defining Bulk Fermentation Success (The 20-30% Volume Rule)
Most bakers fail because they rely on the clock rather than visual metrics. In my early trials, I followed recipes that told me to let the dough rise for six hours. On a humid day, the dough over-fermented and turned into a puddle. On a cold day, it was under-proofed and produced a brick.
Through rigorous testing, I have determined that bulk fermentation duration is secondary to volume increase. For a loaf containing heavy inclusions like cheddar, you must target a 20-30% volume increase during the bulk phase. This is a tighter window than a plain sourdough loaf, and for a very specific scientific reason.
I specifically tested adding the cheese and jalapeño at the very beginning during the autolyse phase. The result was catastrophic. The salt in the cheese and the acidity of the peppers interfered with the initial enzymatic breakdown of the flour. The moisture migrated from the peppers into the starch, resulting in a dense, gummy core that never fully set.
This is why we wait for the dough to establish its primary structure before introducing the extras. When you see that 20% to 30% rise, the gluten is strong enough to act as a cage. It can hold the weight of the cheese without the air bubbles collapsing. If you wait until the dough has doubled (100% rise), the structure is too fragile to handle the shaping process with inclusions.
Pro tip: Use a straight-sided transparent container for bulk fermentation so you can accurately measure the percentage of rise with a piece of tape or a marker.
Inclusion Integration: Why We Add Cheese and Jalapeño Mid-Process
The method of integration is just as vital as the timing. Many recipes suggest folding in your cheese at the very end of fermentation, but my testing showed this leads to poor distribution and potential tearing of the gluten skin. Instead, we introduce the inclusions during the second set of stretch and folds.
By the second set of folds, the dough has already undergone its autolyse and initial salt integration. The gluten bonds are beginning to align into long, elastic chains. When you spread the cheddar and peppers over the surface at this stage, the subsequent folds wrap the inclusions in layers of dough. This creates a laminated effect, much like a pastry, which keeps the cheese isolated in beautiful pockets.
The dough needs this preliminary development to handle the weight and moisture of the additions without losing its ability to trap gas. If added too early, the oils from the cheese can coat the flour particles, preventing them from bonding. If added too late, you risk popping the delicate air bubbles you spent hours cultivating.
When you perform the integration, you must be gentle yet deliberate. I recommend spreading the ingredients across the top before you pull the dough over itself. This ensures that the pieces are trapped between layers rather than being forced through the dough. For a similar challenge involving controlled structure and inclusions, try my ultimate sourdough bagels recipe.
Pro tip: Ensure your jalapeño slices are patted dry with a paper towel before adding them to prevent excess moisture from creating slick spots in the crumb.
Ingredients: The Structure and Flavor Matrix
The ingredients list for this sourdough jalapeno cheese bread is designed for structural resilience. I have selected bread flour as the primary component because of its higher protein content. During my testing, all-purpose flour lacked the tensile strength to support the 4 ounces of cheese, often resulting in a flattened loaf.
- 1 tablespoon sourdough starter
- 1/3 cup + 1 tablespoon all-purpose flour
- 3 1/2 tablespoons water
- 1/2 cup sourdough starter (active)
- 1 1/2 cups water (30 grams divided)
- 1/3 cup + 1 tablespoon whole wheat flour
- 3 3/4 cups bread flour
- 2 teaspoons fine sea salt
- 1/4 cup sliced jalapeños (pickled or fresh)
- 4 oz. sharp cheddar cheese (shredded)
I specifically tested adding the cheese and jalapeño at the very beginning (during Autolyse) and the result was catastrophic. The moisture migrated, resulting in a dense, gummy core. This is why we mandate adding inclusions only after the dough has established preliminary structure during the second set of folds.
The inclusion of a small amount of whole wheat flour serves a functional purpose beyond flavor. The bran in the whole wheat provides tiny “grips” for the inclusions to adhere to, while also increasing the overall water absorption capacity of the dough. This allows the bread to remain moist even as the oven heat dries out the cheese.
The Systematic Bake Procedure: From Dough to Crispy Crust
This procedure follows a strict timeline to ensure the yeast remains active and the gluten remains elastic. I have calibrated the hydration levels to approximately 73% before the additions are included. This is significantly higher than many standard recipes which often sit around 65% to 68%.
I found that higher hydration is essential for achieving a light, open crumb despite the heavy inclusions. The extra water turns to steam rapidly in the hot oven, pushing the dough outward and creating those sought-after air pockets. Lower hydration loaves I tested resulted in a tight, bagel-like texture that felt heavy on the palate.
- 12 hours before you plan to mix the dough, add the ingredients to make ½ cup (100 g) of active sourdough starter to a clean jar. Stir until combined, loosely cover the jar and let the starter rise at room temperature. (This will create a total of 115 g active starter but some of it will stick to the sides of the jar during the transfer, so we are making a little more than needed.) The sourdough starter is ready to use when it has doubled in size and there are plenty of bubbles on the surface and sides of the jar.
- Autolyse: In a mixing bowl, combine 330 grams of water and 100 grams active sourdough starter, stir to combine. Add 50 grams whole wheat flour and 450 grams bread flour and use your hands to combine the ingredients until there are no dry bits and the dough looks like a shaggy mass. Cover the bowl and let the dough rest on the counter for 1 hour.
- Add salt: Add 10 grams of salt to the remaining 30 grams of water in a small bowl and stir to dissolve. Add the salt water to the dough and use your hands to work it in until well combined. Cover the bowl and let rest on the counter for 1 hour.
- Bulk fermentation: Perform 3 sets of stretch and folds, 30 minutes apart, over the first hour and a half. Add the shredded cheddar cheese and jalapeños to the dough during the second set of stretch and folds. Keep the bowl covered between sets. Once finished with the third set of stretches and folds, cover the dough and allow it to rise at room temperature for an additional 2-3 hours. How to perform a set of stretches and folds: While the dough is still in the bowl, pick up one side with a wet hand. Pull it up and over itself. Turn the bowl and repeat this action on 4 sides of the dough until the bowl has come full circle.
- Shape and Second Rise: Turn the dough onto a floured surface and shape it into a rough ball. (The outside of the dough will not be smooth). Flour the top of the dough and place into a floured proving basket, top-side down. Allow it to rise at room temperature for 2-3 hours or until it has risen about 20%-30%.(Alternatively, you can cover the shaped dough and let it rest in the fridge for up to 36 hours.)
- Preheat: Preheat the oven, with the dutch oven inside, to 500° for 30 minutes.
- Score and Bake: Turn the dough out onto a piece of parchment paper and score the top with a razor. Remove the dutch oven and place on stove-top. Use the parchment paper as a sling and lift the dough up and into the dutch oven. Cover with the lid, turn oven down to 450° and bake for 30 minutes. Remove the lid and bake an additional 20-25 minutes or until the crust is at the desired color.
- Cool: Let the bread cool on a cooling rack for 2 hours before cutting.
Pro tip: When you add the salt water in step 3, use a squeezing motion with your hand to incorporate the liquid into the shaggy mass until the dough feels uniform and slippery.
The Ultimate Next Step: From Shaped Dough to Oven-Ready (Cold vs. Room Temp Proofing)
The final proofing stage is where you can tailor the flavor profile of your loaf. You have two primary paths: a quick room-temperature proof or a long, cold fermentation in the refrigerator. Each has distinct mechanical advantages depending on your schedule and desired outcome.
| Proofing Method | Proof Duration | Resulting Crumb Profile | Ideal Use Case |
|---|---|---|---|
| Room Temperature | 2 – 3 Hours | Milder flavor, softer crust, very airy | Same-day baking for dinner |
| Cold Fermentation | 12 – 36 Hours | Tangy, complex flavor, blistered crust | Maximum flavor and better digestibility |
I recommend briefly patting down any exposed jalapeño pieces before the final score to prevent them from burning black during the bake. When jalapeños are left on the surface, the 450-degree heat of the oven can char them into bitter carbon before the bread is actually finished cooking. Pushing them slightly into the dough protects them from the direct heat.
During my testing of the cold fermentation method, I noticed that the cheese flavor became much more integrated with the bread. The cold environment allows the lactic acid bacteria to produce more complex notes that complement the sharpness of the cheddar. If you have the time, the 24-hour mark in the fridge is the sweet spot for flavor.
Pro tip: If using the cold proof method, do not let the dough sit at room temperature after taking it out of the fridge; score it while cold for the cleanest, deepest cuts.
Practical Output: Yield, Storage, and Seasonal Adaptation
This recipe yields one large loaf, approximately 1.5 pounds in weight. Because of the high cheese content, this bread behaves differently during storage than a standard loaf. The fats in the cheese help keep the crumb moist for a longer period, but they also mean the crust can soften more quickly if stored in plastic.
For storage, I mandate that you keep the loaf in a paper bag or wrapped in a clean kitchen towel at room temperature for up to two days. If you need to keep it longer, slice the bread and freeze it with parchment paper between the slices. When you are ready to eat, reheat it in a toaster or oven. Reheating is non-negotiable for this bread; it revives the oils in the cheese and restores the crispness of the crust.
For a seasonal variation, I have had great success swapping the sharp cheddar for Pepper Jack cheese. During the summer months, I suggest using fresh, roasted jalapeños instead of pickled ones. Roasting the peppers first removes the raw grassy note and adds a smoky depth that pairs beautifully with the sourdough tang.
If you are looking for a unique presentation, this recipe works perfectly as a Popper Bread Bowl. You can hollow out the center of the baked loaf, leaving a one-inch thick wall. Fill the center with a cream cheese and garlic dip, then use the removed bread pieces for dipping. It is an engineering marvel for any social gathering.
Pro tip: When slicing, use a high-quality serrated knife and let the weight of the blade do the work to avoid squashing the delicate internal structure.
Frequently Asked Questions
Which Cheddar Varieties Work Best with Jalapeño in Sourdough?
My testing indicates that a sharp, aged white cheddar provides the best contrast to the heat of the jalapeño. Younger cheddars have a higher moisture content and can melt too aggressively, potentially causing the dough to collapse in spots. An aged cheddar has a lower moisture-to-fat ratio, allowing it to hold its shape better during the initial stages of the bake. I recommend using a block and shredding it yourself, as pre-shredded varieties often contain anti-caking powders that interfere with the dough’s hydration.
Can I Substitute Bread Flour with All-Purpose Flour?
You can substitute all-purpose flour, but be prepared for a structural compromise. All-purpose flour generally has a protein content around 10% to 11%, whereas bread flour sits at 12% to 14%. That extra protein is what creates the strong gluten network required to suspend 4 ounces of heavy cheese and peppers. If you must use all-purpose, I recommend reducing the water by about 20 grams to prevent the dough from becoming too slack and difficult to handle.
What are the Most Common Beginner Sourdough Mistakes for Flavored Loaves?
The most common error is misjudging the bulk fermentation. Many beginners see the inclusions and assume the dough is ready because it looks bulky. However, you must look for the 20-30% rise in the actual dough mass, not just the total volume of dough plus cheese. Another frequent mistake is under-proofing during the second rise, which leads to “fool’s crumb” where there are large holes at the top and a dense layer at the bottom. Always use the finger-poke test; the dough should spring back slowly and leave a slight indentation.
Conclusion: Your Blueprint for Repeated Sourdough Excellence
Mastering the sourdough jalapeno cheese bread system requires moving beyond the “follow a recipe” mindset and adopting a “manage a process” approach. By focusing on the visual metrics of bulk fermentation—specifically that 20% to 30% rise—you eliminate the guesswork that leads to inconsistent results. The precision of adding your inclusions during the second set of folds ensures that your gluten remains a strong, supportive skeleton for the flavor-packed additions.
Every element of this system, from the 73% hydration to the 500-degree preheat, has been calibrated to produce a professional-grade loaf in a home kitchen. You now have the data and the methodology to avoid the pitfalls of gummy centers and scorched crusts. The science of the autolyse and the controlled environment of the Dutch oven work together to create a bread that is as beautiful as it is delicious.
I encourage you to execute this blueprint exactly as written for your first attempt. Once you have established a baseline of success, feel free to experiment with different cheese aged-profiles or pepper intensities. Cooking is an iterative process, and every loaf is an opportunity to refine your technique.
Please share your results in the comments below. I am particularly interested in hearing about your volume measurements and how your crumb profile turned out. If you run into any structural anomalies, describe them in detail so we can troubleshoot the system together. Post your loaf photos online and tag me so I can see your progress in mastering this optimized system.
Jalapeño Cheddar Sourdough Bread Recipe
Equipment
- mixing bowl
- Straight-sided transparent container (for bulk fermentation monitoring)
- Proving basket (banneton)
- Dutch oven
- Razor or lame (for scoring)
- cooling rack
Ingredients
Recipe Inclusions (To be added mid-process)
- 1/4 cup sliced jalapeños pickled or fresh, patted dry
- 4 oz. sharp cheddar cheese shredded
Leaven/Starter Prep (12 hours prior)
- 1 tablespoon sourdough starter To feed starter for bulk use
Dough Base Ingredients
- 1/2 cup sourdough starter active (approx 100g)
- 1 1/2 cups water (30 grams divided from 330g total)
- 1/3 cup whole wheat flour plus 1 tablespoon
- 3 3/4 cups bread flour
- 2 teaspoons fine sea salt (10g)
Instructions
Starter Activation
- 12 hours before mixing the dough, add the ingredients to make ½ cup (100 g) of active sourdough starter to a clean jar. Stir until combined, loosely cover the jar and let the starter rise at room temperature.
Dough Mixing and Initial Rest (Autolyse)
- Autolyse: In a mixing bowl, combine 330 grams of water and 100 grams active sourdough starter, stir to combine.
- Add 50 grams whole wheat flour and 450 grams bread flour and use your hands to combine the ingredients until there are no dry bits and the dough looks like a shaggy mass.
- Cover the bowl and let the dough rest on the counter for 1 hour.
Salt Integration and First Rest
- Add salt: Dissolve 10 grams of salt into the remaining 30 grams of water in a small bowl and stir until dissolved.
- Add the salt water to the dough and use your hands to work it in until well combined, using a squeezing motion until the dough feels uniform and slippery.
- Cover the bowl and let rest on the counter for 1 hour.
Bulk Fermentation and Inclusion Integration
- Perform 3 sets of stretch and folds, 30 minutes apart, over the first hour and a half. Keep the bowl covered between sets.
- During the second set of stretch and folds, add the shredded cheddar cheese and jalapeños, spreading them across the surface before folding the dough over itself.
- Once finished with the third set of stretches and folds, cover the dough and allow it to rise at room temperature for an additional 2-3 hours, aiming for a 20%-30% volume increase.
Shaping and Final Proof
- Turn the dough onto a lightly floured surface and shape it into a rough ball.
- Flour the top of the dough and place it into a floured proving basket, top-side down.
- Proof at room temperature for 2-3 hours (for same-day baking), OR cover and let rest in the fridge for 12-36 hours (for maximum flavor).
Baking
- Preheat the oven, with the dutch oven inside, to 500°F for 30 minutes.
- Turn the dough out onto a piece of parchment paper and gently pat down any exposed jalapeño pieces before scoring the top with a razor.
- Remove the dutch oven and place it on the stovetop. Use the parchment paper as a sling to lift the dough up and into the dutch oven.
- Cover with the lid, turn oven down to 450°F, and bake for 30 minutes (Lid On).
- Remove the lid and bake an additional 20-25 minutes or until the crust is the desired mahogany color (Lid Off).
- Let the bread cool completely on a cooling rack for at least 2 hours before cutting to allow the internal structure to set.


