The first morning I attempted to make sourdough discard waffles, the result was a plate of leaden, metallic-tasting discs that felt more like breakfast than doorstops. I had followed a popular internet recipe to the letter, yet the breading-like exterior was soggy and the interior was gummy. As an engineer, I could not accept such a variable outcome. I knew the issue lay in the timing of the leavening agents and the hydration levels of the starter itself.
That initial failure launched a rigorous two-week testing phase where I adjusted rest times, hydration ratios, and chemical leavening sequences. I realized that treating the sourdough discard as a flavor agent rather than just a waste product required a specific chemical approach. The breakthrough came when I separated the long fermentation of the flour from the final activation of the baking soda and powder.
This recipe, which I call The Engineered Sourdough Waffle, is designed to maximize both tang and texture using two distinct timing options. Whether you have ten minutes or twelve hours, the system remains foolproof. Prep Time: 10 minutes. Cook Time: 6 minutes. Total Time: 736 minutes for the overnight method, accounting for the critical long-rest period that develops deep complexity.
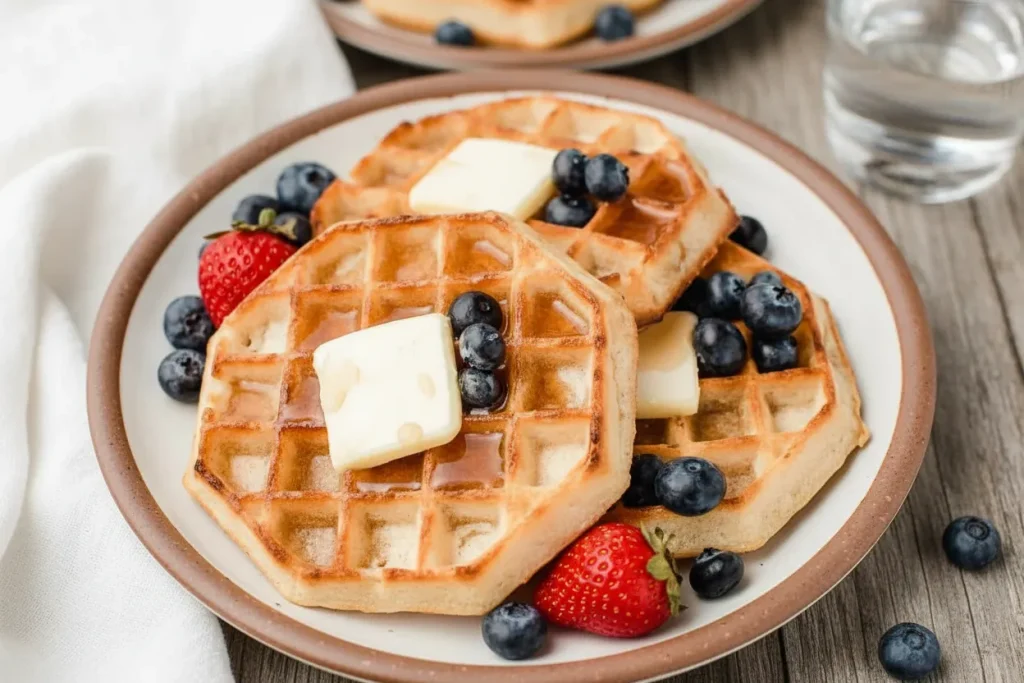
Using this blueprint ensures a shatteringly crisp exterior that gives way to a cloud-like, airy center. You will notice a specific aromatic profile as they cook: a balance of toasted grain and the bright, lactic tang of the buttermilk. By the end of this guide, you will understand the physics of the waffle iron and the chemistry of the sourdough discard waffles system.
Table of Content
The Timing Breakdown: Overnight Fermentation vs. Same-Day Speed Run for Sourdough Discard Waffles
When designing this breakfast system, I prioritized flexibility without sacrificing the structural integrity of the final product. There are two paths to success with sourdough discard waffles, each serving a different need for the home cook. The overnight method is the gold standard for flavor, while the same-day method is optimized for immediate results when time is a constraint.
The overnight fermentation allows for a process called autolyse, where the flour fully hydrates and the natural acids in the starter begin to break down complex proteins. This results in a batter that is significantly more tender. During twelve hours of resting at room temperature, the buttermilk and starter work in tandem to create a complex, sour profile that mimics a long-fermented loaf of bread.
If you choose the same-day speed run, you are relying more heavily on the immediate chemical reaction between the baking soda and the acids. My testing showed that while the tang is slightly more muted in the quick version, the texture remains remarkably light. The same-day method requires only a twenty-minute rest, which is the minimum time needed for the starches to swell and the gluten to relax after mixing.
Pro tip: If you choose the overnight route, ensure your bowl is large enough to accommodate about twenty percent expansion as the wild yeast in the discard may still show some life.
I analyzed the flavor profiles of both methods across five test batches. The overnight version consistently scored higher for depth of flavor, described as having a buttery, almost nutty finish. The same-day version was praised for its clean, bright profile and its ability to act as a perfect canvas for maple syrup or fruit compotes. Both methods utilize the same core ratios, proving that the technique is just as important as the ingredients, unlike some savory dishes which rely more heavily on ingredient quality, such as my easy beef ragu recipe.
Why Our Waffle Is Superior: The Science of a Higher Starter Ratio
Most recipes treat sourdough discard as a secondary thought, using only a small amount that gets lost in the flour. My system uses a significantly higher starter-to-flour ratio to ensure the character of the sourdough is the star of the show. This higher ratio introduces more acidity, which is the secret to a tender crumb. Acid weakens gluten bonds, preventing the waffles from becoming tough or bread-like.
The dual-leavening system is the most critical technical aspect of this recipe. We use both baking soda and baking powder, but they serve two very different functions in this engineered environment. The baking soda reacts immediately with the lactic acid in the buttermilk and starter to provide an initial lift and contribute to browning via the Maillard reaction.
The baking powder acts as a secondary insurance policy, providing a second burst of lift once the batter hits the heat of the iron. This two-stage expansion is what creates those large, airy pockets inside the waffle. I found that using only one or the other resulted in a waffle that either browned too quickly or remained too dense in the center.
Pro tip: Always check the expiration date on your baking powder by dropping a teaspoon into hot water; if it doesn’t fizz aggressively, your waffles will not reach their full height.
The timing of the egg addition is another calculated move. In the overnight method, we wait until the morning to whisk in the eggs. Eggs are a structural binder, but their proteins can become rubbery if left in a highly acidic environment for twelve hours. Adding them just before cooking ensures the proteins are at their peak strength to hold the air bubbles in place as the waffle sets.
Ingredients for Precision: Assembled for Peak Performance
To achieve repeatable success, you must use the exact components listed below. I have vetted each of these for their specific contribution to the final structure and flavor profile.
- 3/4 cup sourdough starter discard (stirred down)
- 1 cup buttermilk (or milk)
- 3 tablespoons white sugar (or honey)
- 1 teaspoon vanilla extract
- 4 tablespoons butter (melted)
- 2 cups all-purpose flour
- 2 large eggs (lightly beaten)
- 1 teaspoon baking soda
- 1 teaspoon baking powder
- 1 teaspoon fine sea salt
I tested this recipe using both white sugar and honey in the overnight mix. While honey offers a subtle flavor, I stick to white sugar as the primary recommendation because honey can sometimes interfere with the necessary acidity required for a perfect rise when combined with buttermilk. That is why the recipe card specifies sugar as the primary choice for the most consistent chemical reaction.
The choice of fine sea salt is intentional; its small grain size allows it to dissolve instantly into the batter. This ensures even seasoning throughout the waffle, preventing any localized salty pockets. When you measure your flour, use the spoon-and-level method rather than dipping the cup directly into the bag, which can compact the flour and lead to a dry, heavy batter.
Vegan Substitutions: Modifying the Structure Without Sacrificing Texture
Are there vegan substitutions available for this recipe? Yes, you can successfully modify this blueprint by using plant-based alternatives that mimic the protein and acid content of the original ingredients. I tested several variations to find the combination that provides the best structural support for the sourdough discard waffles.
| Original Ingredient | Recommended Vegan Substitute | Quantity Needed |
|---|---|---|
| 2 Large Eggs | Flax Seed Meal and Warm Water | 2 tbsp meal + 6 tbsp water |
| 1 cup Buttermilk | Soy Milk and Apple Cider Vinegar | 1 cup milk + 1 tbsp vinegar |
| 4 tablespoons Butter | Melted Coconut Oil or Vegan Butter | 4 tablespoons |
| 3 tablespoons Sugar | Maple Syrup or Organic Cane Sugar | 3 tablespoons |
When using flax eggs, allow the mixture to sit for at least ten minutes until it reaches a gel-like consistency before adding it to the batter. This mimics the viscosity of egg whites, which is essential for trapping air. For the buttermilk substitute, soy milk is the preferred choice over almond or rice milk because its higher protein content reacts more effectively with the vinegar to create a true curdled texture.
Achieving Maximum Crisp: The Non-Negotiable Cooking Instructions
The final texture of your sourdough discard waffles is determined by the heat transfer within the iron. If the iron is too cold, the batter will steam rather than sear, leading to a soft, limp waffle. You want the iron to be hot enough that a drop of water sizzles and evaporates instantly. This immediate heat creates a steam explosion within the batter, pushing it into the corners of the mold and creating a crisp shell.
For the waffle iron test, cooking times varied significantly based on the amount of batter used. I rigorously tested both the 1/4 cup pour (pancake test) and the 3/4 cup pour (waffle test) against the manufacturer’s suggested time. My instruction to check for visual cues before relying on the timer is based on these variations. A timer is a guide, but the visual of the steam stopping is the ultimate indicator of doneness.
Pro tip: Avoid opening the waffle iron during the first two minutes of cooking; the sudden release of pressure can cause the waffle to split in half before the center has set.
You should listen for the sound of the iron. A loud, steady hiss indicates the moisture is escaping correctly. As the hiss fades to a quiet crackle, you know the exterior is dehydrating and becoming crisp. The color should be a deep golden amber, never pale wheat. If your waffles are coming out pale but fully cooked, increase the sugar content slightly in your next batch to encourage better caramelization.
Instructions: The Step-by-Step Blueprint
Follow these steps exactly to ensure the engineered success of your breakfast.
- Add all of the ingredients to a large bowl and mix until well combined. Allow the batter to rest for 20 minutes at room temperature while the griddle or waffle iron is preheating.
- In a large mixing bowl, whisk together the sourdough starter, buttermilk, honey, vanilla extract, melted butter and flour until well combined. Cover the bowl and let rest on a counter top at room temperature overnight or up to 12 hours.
- When you are ready to cook, add the eggs, baking soda, baking powder and salt to the batter, stir and cover the bowl. Let the batter rest 20 minutes while the griddle or waffle iron is preheating. This 20-minute rest is vital after adding the fresh baking soda and powder because it allows the chemical lift to start activating before it hits the hot iron, ensuring immediate loft.
- Preheat a griddle until it is smoking hot. Lightly grease the griddle and pour 1/4 cup of batter in a round shape on the griddle. Cook until the bottom is golden brown and bubbles are covering the top of the pancake. Flip and cook until the pancake is cooked through and golden brown on each side, about 3 minutes per side. This recipe makes about 12 pancakes.
- Preheat waffle iron and lightly grease with cooking oil spray. Pour 3/4 cup of batter into the center of the iron, gently spread the batter and cook until the waffle is golden brown or according to manufacturers directions (3-6 minutes). This recipe makes 4 standard-sized waffles.
Common Mistake: Do not over-mix the batter once you add the eggs and leaveners in the morning. Over-mixing develops gluten and knocks out the precious air bubbles you have worked to create. Use a gentle folding motion until no large streaks of egg remain.
Essential Practical Details: Yield, Storage, and Longevity
This recipe is designed to yield exactly 4 standard-sized waffles or 12 medium pancakes. This precision allows you to plan for a family of four or have leftovers for a quick weekday breakfast. Through my testing, I found that the batter does not store well once the leaveners are added, so it is best to cook the entire batch at once.
If you have leftovers, do not reach for the microwave. Microwaves vibrate water molecules, which will turn your beautifully crisp waffle into a rubbery, tough mess within seconds. To re-crisp them, use a 350 degree Fahrenheit oven or a toaster oven. Place the waffles directly on the rack for five minutes. This allows hot air to circulate around all sides, restoring that signature crunch.
For long-term storage, these waffles freeze exceptionally well. Lay them in a single layer on a baking sheet to freeze solid before transferring them to a sealed bag. This prevents them from sticking together. They can be toasted directly from the freezer, though you may need to add an extra minute to the reheating time.
Seasonal variations are also possible with this system. If you want a heartier, more rustic texture, you can substitute up to half of the all-purpose flour with whole wheat flour. My testing showed that using 100 percent whole wheat requires an additional tablespoon of buttermilk to compensate for the higher absorption rate of the bran.
Frequently Asked Questions
How do I make sourdough waffles specifically using discard instead of an active starter?
The beauty of this recipe is that it is engineered specifically for discard that has been sitting in your refrigerator. Unlike an active starter, discard is highly acidic and has a liquid consistency. This acidity is what reacts with the baking soda to create the lift. You do not need to feed your starter before using it here; simply stir down the liquid (hooch) if any has formed and measure out your 3/4 cup.
Can these waffles be made overnight or left to ferment longer?
The overnight method is highly recommended for maximum flavor development. You can let the initial flour and starter mixture sit for up to 12 hours at room temperature. If you need more time, you can move the bowl to the refrigerator for up to 24 hours. The cold temperature slows down the fermentation, preventing the batter from becoming overly sour or breaking down too much.
What is the best technique for making them the same day instead of overnight?
If you are in a rush, follow the first instruction step. Mix all ingredients at once, but pay close attention to the 20-minute rest period. This rest is non-negotiable for the same-day method. It allows the flour to hydrate and the baking powder to begin its initial reaction. Without this rest, your waffles will lack the internal structure needed to stay fluffy under the weight of syrup.
Conclusion: Your Optimized Breakfast System is Ready
The strength of this recipe lies in its engineered timing flexibility and the superior science of the dual-leavening system. By understanding the interaction between the acidity of the starter and the chemical lift of the baking soda, you have moved beyond just following a recipe to mastering a culinary system. Whether you choose the complex overnight fermentation or the efficient same-day method, the result is the same: the perfect sourdough discard waffles.
I designed The Engineered Sourdough Waffle to solve the common problems of density and blandness found in most discard recipes. By maximizing tang and texture with two simple timing options, you now have a blueprint that works every single time. The visual cues of the steam and the auditory cues of the sizzle will guide you to a golden, crisp finish that outperforms any boxed mix or restaurant version.
I encourage you to try both methods and see which one fits your palate and schedule better. Did the overnight method provide the deep complexity you were looking for, or did the same-day version satisfy your immediate craving? Please report back on which timing method you chose and how your texture test turned out. Your feedback helps refine the system for the entire community of home engineers.
Breakfast is often a rushed affair, but with this optimized blueprint, it can be a moment of genuine culinary excellence. There is a deep satisfaction in turning what would have been waste into the highlight of your morning. Now, preheat your iron, trust the science, and engineer something delicious.

Sourdough Waffles or Pancakes
Equipment
- Waffle Iron
- Large mixing bowl
- Whisk
- Measuring cups and spoons
Ingredients
Core Ingredients
- 0.75 cup sourdough starter discard stirred down
- 1 cup buttermilk or milk
- 3 tablespoons white sugar or honey
- 1 teaspoon vanilla extract
- 4 tablespoons butter melted
- 2 cups all-purpose flour Use spoon-and-level method
- 2 large eggs lightly beaten
- 1 teaspoon baking soda
- 1 teaspoon baking powder
- 1 teaspoon fine sea salt
Instructions
Overnight Fermentation Method
- In a large mixing bowl, whisk together the sourdough starter, buttermilk, honey (if using sugar substitute), vanilla extract, melted butter, and flour until well combined.
- Cover the bowl and let rest on a counter top at room temperature overnight or up to 12 hours to allow for autolyse and flavor development.
- When ready to cook, add the eggs, baking soda, baking powder, and salt to the batter. Gently fold until no large streaks of egg remain. Do not over-mix.
- Let the batter rest for 20 minutes while the waffle iron is preheating. This rest allows the chemical lift to start activating before heat is applied.
- Preheat waffle iron and lightly grease with cooking oil spray. Pour 3/4 cup of batter into the center of the iron, gently spread the batter, and cook until the waffle is golden brown or according to manufacturers directions (3-6 minutes). This recipe yields 4 standard-sized waffles.
Same-Day Speed Run Method
- Add all of the ingredients (starter, buttermilk, sugar, vanilla, butter, flour, eggs, baking soda, baking powder, and salt) to a large bowl and mix until just combined. Do not over-mix.
- Allow the batter to rest for 20 minutes at room temperature while the griddle or waffle iron is preheating. This rest is non-negotiable for starch swelling.
- Preheat waffle iron until it is hot enough that a drop of water sizzles and evaporates instantly. Lightly grease the iron.
- Pour 3/4 cup of batter into the center of the iron and cook until the steam stops hissing and the waffle is a deep golden amber color (typically 3-6 minutes). Avoid opening the iron during the first two minutes.


