For years, I enjoyed the distinct flavor of sauerkraut bread from a local bakery. When I moved, recreating that taste became an obsession, a series of kitchen experiments that often ended in dense, flavorless loaves. Finally, I’ve engineered a foolproof recipe, one that delivers that authentic taste with surprising ease.
Unlock effortless sauerkraut bread with this step-by-step guide to food processor perfection. This recipe streamlines the process, making a traditionally complex bread surprisingly accessible. Forget hours of kneading; the food processor does the heavy lifting, leaving you with a flavorful loaf perfect for any occasion.
This Polish sauerkraut bread recipe requires a total time investment of 2 hours and 45 minutes, including 2 hours and 15 minutes of prep time and 30 minutes of cook time.
Table of Content
Mastering the Dough: Visual Cues for Food Processor Success
The key to fantastic sauerkraut bread lies in the dough consistency. Years of baking have taught me to recognize subtle signs that indicate the dough’s readiness. Here’s a quick guide to troubleshooting common dough issues when using a food processor:
| Problem | Solution |
|---|---|
| Dough is too sticky | Add flour, one tablespoon at a time, processing briefly after each addition, until the dough pulls away from the sides of the bowl. Be cautious not to overdo it; a slightly tacky dough is better than a dry one. |
| Dough is too dry and crumbly | Add water, one teaspoon at a time, until the dough starts to come together. Process until a ball forms. |
| Dough is climbing the sides of the bowl | Stop the processor and scrape the dough back down. This ensures even mixing and prevents the motor from overheating. |
| Dough smells like burning | Stop the food processor immediately. The motor is likely overheating. Transfer the dough to a bowl and knead by hand. I recommend not running the food processor continuously for more than 5 minutes to prevent this issue. |
Pro tip: Humidity can greatly affect the dough. On humid days, I reduce the initial amount of water by a tablespoon or two. This prevents the dough from becoming overly sticky. Recognizing these visual cues will set you up for sauerkraut bread success.
Why the Direct Method? Simplicity Without Sacrificing Flavor
This sauerkraut bread recipe utilizes the direct method, a technique I chose after extensive experimentation. It’s tempting to assume that more complex bread-making techniques yield better flavor, but my goal was to create a simple, accessible recipe without compromising taste. I found the direct method delivers a fantastic flavor profile while significantly reducing the time and effort involved.
Unlike methods that require pre-ferments or starters, the direct method mixes all the ingredients at once. This cuts down on preparation time and eliminates the need for advance planning. The result is a flavorful sauerkraut bread that can be ready in just a few hours, making it perfect for a weekend bake or a weeknight treat. You might also enjoy it as a side to other delicious recipes.
Ingredients
To create this exceptional sauerkraut bread, gather the following ingredients.
- 5 1/2 cups flour (you may not use it all)
- 1 cup rye flour
- 1 tablespoon salt
- 1 tablespoon sugar
- 1 packet dried yeast
- 3/4 cup sauerkraut (drained)
- 2 cups warm water (105 -110 F)
- 1 tablespoon cornmeal
- 1 egg
- 1 tablespoon milk
- 2 teaspoons caraway seeds (optional)
I tested this recipe with different brands of sauerkraut. The key is to ensure it’s well-drained; some varieties are packed with more liquid than others, which significantly impacts the dough’s consistency. The right balance of ingredients sets the stage for a perfect loaf of sauerkraut bread every time.
Instructions
Now, let’s bring this sauerkraut bread to life, step by methodical step. Follow these instructions closely for optimal results.
- To a food processor, add 4 1/2 cups flour, rye flour, salt, sugar, yeast, and sauerkraut. Process until everything is well combined. We knead the dough to strengthen the gluten, which creates air pockets, allowing the loaf to rise. Gluten development is essential for the bread’s structure and chewiness.
- Through the feed tube, slowly add the water, processing until the mass comes together in a ball.
- The original recipe has you adding additional flour 1 tablespoon at a time until the dough no longer sticks to the side of the food processor bowl. I loved how quickly this came together in my food processor, but I worried about damaging the motor, so I dumped my sticky dough on the counter with 1/4 cup of flour and kneaded it for about 5 minutes. It may be that I used less flour than the full 5 1/2 cups because my kraut was well squeezed.
- Generously grease a large bowl, add the dough to the bowl and turn it upside down, so you have greased the top of the dough. Cover and leave in a warm spot until doubled in size, which should take about an hour.
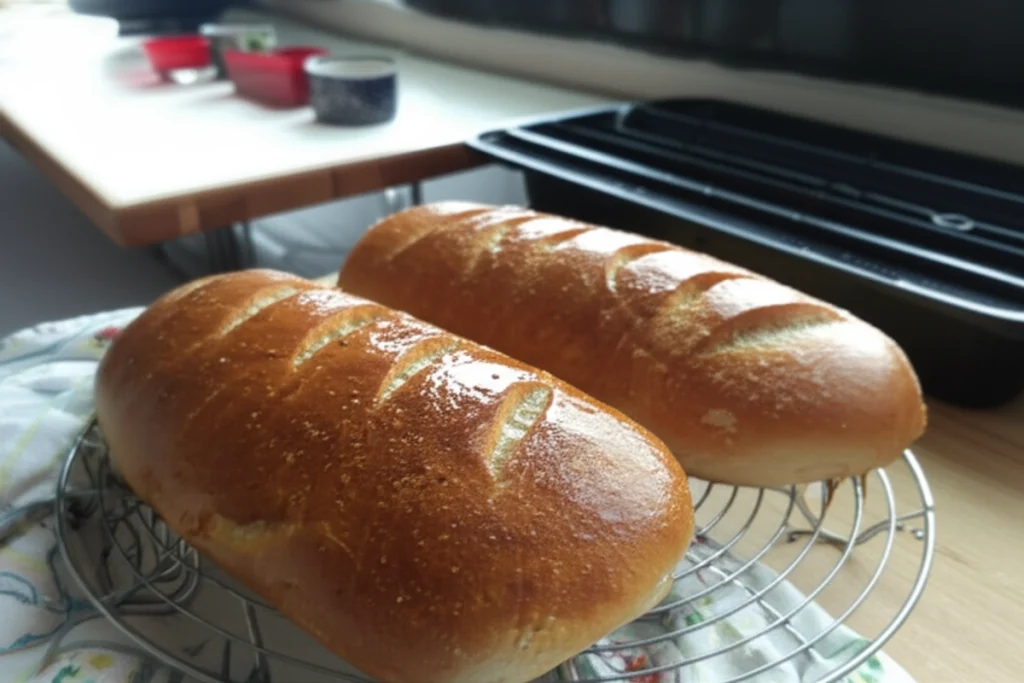
- This can be baked as one large loaf or two smaller loaves. I cut the dough in half, and using my hands shaped each half into a rectangle, probably 9 x 12 inches, start at the smaller end and tightly roll into a spiral. Tuck the ends underneath and place on a baking sheet which you have greased or lined with parchment paper and sprinkled with cornmeal. Cover and let rise for about an hour, until doubled in size.
- Preheat the oven to 400 F. Whisk together the egg and milk, brush the top and sides of the loaves. Sprinkle with caraway seeds if you’re using them. Make 5 diagonal slashes across the loaves with a sharp knife.
- Bake for 20 minutes. Reduce the heat to 350 and bake for another 10 – 15 minutes. The bread should sound hollow when you tap the bottom, and the internal temperature should be between 195 and 200. Cool before slicing.
Pro tip: A wire rack is essential for cooling the bread. This allows air to circulate, preventing the bottom crust from becoming soggy. Following these steps ensures a perfectly baked sauerkraut bread every time.
Frequently Asked Questions
What are the health benefits of sauerkraut in bread?
Sauerkraut introduces beneficial bacteria to the bread, potentially aiding digestion. It also contributes vitamins and minerals, enhancing the bread’s nutritional profile beyond basic carbohydrates. I find it a great way to add some goodness to a comforting staple.
What kind of bread pairs well with sauerkraut as a side?
While this recipe is sauerkraut bread, similar flavors of caraway or rye complement sauerkraut dishes nicely. A hearty pumpernickel or even a simple sourdough can stand up to the tang of sauerkraut. Through trial and error, I’ve determined it’s best to match the intensity of flavors.
Is it necessary to rinse the sauerkraut before adding it to the bread?
I strongly advise against rinsing the sauerkraut. Rinsing removes the tangy flavor and beneficial bacteria that make this bread unique. In my testing, unrinsed, well-drained sauerkraut yielded the most flavorful and authentic sauerkraut bread.
How should I store sauerkraut bread?
To maintain freshness, I store the bread at room temperature in an airtight container. This prevents it from drying out and preserves its texture for up to 3 days. Slicing only what you need also helps to keep the remaining loaf fresher longer.
Serving and Storage Suggestions
This recipe makes either one large loaf or two smaller loaves, perfect for sharing or savoring throughout the week. I enjoy serving this hearty sauerkraut bread toasted with a generous smear of butter. Its tangy flavor also complements a warm bowl of hearty soup, especially on a chilly day. This would be great with my easy vegan moussaka recipe.
For optimal freshness, I store the baked sauerkraut bread at room temperature in an airtight container. This keeps the loaf soft and flavorful for up to 3 days. After experimenting with different storage methods, I discovered that airtight containers are key to preventing the bread from drying out.
Conclusion
In short, this recipe unlocks effortless sauerkraut bread through the efficiency of a food processor. With my step-by-step guide, you can enjoy the delightful taste of homemade sauerkraut bread without spending hours kneading. The food processor truly simplifies the process.
Now it’s your turn to create a perfect loaf! Try this recipe and share your results in the comments below. Don’t forget to rate the recipe and share it with your friends who love homemade bread! The Maillard reaction creates brown pigments in cooked meat in a very specific way: by rearranging amino acids and certain simple sugars.
Polish Sauerkraut Bread
Equipment
- food processor
- Large Bowl
- baking sheet
- Parchment paper
- wire rack
Ingredients
Ingredients
- 5 1/2 cups flour you may not use it all
- 1 cup rye flour
- 1 tablespoon salt
- 1 tablespoon sugar
- 1 packet dried yeast
- 3/4 cup sauerkraut drained
- 2 cups warm water (105 -110 F)
- 1 tablespoon cornmeal
- 1 egg egg
- 1 tablespoon milk
- 2 teaspoons caraway seeds optional
Instructions
Instructions
- To a food processor, add 4 1/2 cups flour, rye flour, salt, sugar, yeast, and sauerkraut. Process until everything is well combined. We knead the dough to strengthen the gluten, which creates air pockets, allowing the loaf to rise. Gluten development is essential for the bread’s structure and chewiness.
- Through the feed tube, slowly add the water, processing until the mass comes together in a ball.
- The original recipe has you adding additional flour 1 tablespoon at a time until the dough no longer sticks to the side of the food processor bowl. I loved how quickly this came together in my food processor, but I worried about damaging the motor, so I dumped my sticky dough on the counter with 1/4 cup of flour and kneaded it for about 5 minutes. It may be that I used less flour than the full 5 1/2 cups because my kraut was well squeezed.
- Generously grease a large bowl, add the dough to the bowl and turn it upside down, so you have greased the top of the dough. Cover and leave in a warm spot until doubled in size, which should take about an hour.
- This can be baked as one large loaf or two smaller loaves. I cut the dough in half, and using my hands shaped each half into a rectangle, probably 9 x 12 inches, start at the smaller end and tightly roll into a spiral. Tuck the ends underneath and place on a baking sheet which you have greased or lined with parchment paper and sprinkled with cornmeal. Cover and let rise for about an hour, until doubled in size.
- Preheat the oven to 400 F. Whisk together the egg and milk, brush the top and sides of the loaves. Sprinkle with caraway seeds if you’re using them. Make 5 diagonal slashes across the loaves with a sharp knife.
- Bake for 20 minutes. Reduce the heat to 350 and bake for another 10 – 15 minutes. The bread should sound hollow when you tap the bottom, and the internal temperature should be between 195 and 200. Cool before slicing.


