Table of Content
The Engineer’s Focaccia: Achieving Restaurant-Grade Air Pockets Through Meticulous Cold Fermentation Control
The first time I attempted to bake focaccia, I followed a popular sixty-minute recipe that promised instant gratification. The result was a culinary disappointment that haunted my kitchen for weeks. Instead of the airy, cavernous crumb and shatteringly crisp crust I expected, I pulled a dense, cake-like slab from the oven that felt more like an oily biscuit than an artisan loaf. As an engineer, I couldn’t accept this failure. I realized that these focaccia bread recipes are not about speed; they are about precision, timing, and the careful management of biological systems.
I spent the next several months deconstructing the physics of bread dough. I tested hydration levels, flour types, and most importantly, the impact of temperature on yeast kinetics. Through dozens of batches, I learned that the secret to those massive, translucent air bubbles and that distinctive tangy flavor isn’t found in a special tool or a secret ingredient. It is found in the discipline of the cold proof. This recipe represents the optimization of that process, requiring only 30 minutes of active prep time and 30 minutes of baking, though it demands a total time of 18 hours and 30 minutes to allow the system to reach its full potential.
My goal with this blueprint is to remove the guesswork that plagues so many home bakers. I have engineered this process to be repeatable and foolproof, provided you respect the timeline. We are not just making dinner; we are managing a complex fermentation cycle that transforms simple pantry staples into something extraordinary. This is the difference between a quick bread and a masterpiece of texture and taste. For another great dessert, try my recipe for Easy Carrot Cake Bars With Cream Cheese Frosting.
Pro tip: Use a digital scale for your measurements to ensure the hydration ratio remains exactly where my tests showed it to be most successful, as even a slight deviation in flour volume can lead to a denser crumb.
The journey from a shaggy mass of dough to a golden, dimpled loaf is a lesson in patience and observation. When you finally pull this bread from the oven, you will hear the faint crackle of the crust settling, a sound I call the baker’s applause. The aroma of toasted olive oil and fermented flour will fill your home, signaling a level of success that no quick recipe can ever replicate.
The Cold Proof Mandate: Why 12+ Hours Separates Good Focaccia from Great Focaccia
Many amateur bakers view the refrigerator as a way to hit the pause button on their dough, but my research shows it is actually an active, essential phase of development. In the world of focaccia bread recipes, time is an ingredient just as much as flour or water. When dough sits at room temperature, yeast consumes sugars rapidly, producing carbon dioxide and alcohol at a rate that provides lift but sacrifices complexity. By moving the dough into a cold environment for at least 12 hours, we dramatically slow down the yeast, allowing other biological processes to take center stage.
During this extended cold proof, naturally occurring enzymes in the flour begin to break down complex starches into simpler sugars. This process, known as amylase activity, is significantly more effective at lower temperatures over long periods. These sugars are what eventually lead to superior browning through the Maillard reaction once the dough hits the high heat of the oven. Without this time, your bread will lack that deep, nutty golden color and the subtle tang that defines high-quality artisan bread.
Furthermore, the cold environment strengthens the gluten network without the need for intensive kneading. I observed in my testing that cold-fermented dough has a much more resilient structure, which allows it to hold onto the large gas bubbles produced by the yeast. If you rush this process, the gas bubbles will be small and uniform, resulting in a tight, crumbly texture. The 12 to 72-hour window I recommend is the sweet spot where flavor, texture, and structural integrity all reach their peak simultaneously.
Pro tip: If you plan to proof your dough for the full three days, ensure your refrigerator is set to 38 degrees Fahrenheit or lower to prevent the yeast from over-extending and eventually collapsing the dough.
The visual change in the dough after a night in the cold is remarkable. You will see large, translucent bubbles stretching just beneath the surface, a clear indicator that the fermentation has been successful. This slow development also makes the dough much easier to handle during the dimpling stage, as the cold temperature keeps the fats in the olive oil from becoming too runny, allowing for those iconic deep indentations that hold onto pools of oil and salt.
Flour Selection and Hydration Control: The Foundation of Artisan Bread Recipes
The success of these artisan bread recipes hinges on the relationship between your flour choice and the water content, or hydration level. I conducted a series of tests comparing all-purpose flour against bread flour to determine which yielded the most consistent results for the home baker. While bread flour has a higher protein content (typically 12-14%), which can lead to a chewier texture, I found that all-purpose flour (10-12% protein) actually provides a more delicate, tender crumb that perfectly balances the crispness of the fried exterior.
Protein content is the primary driver of gluten development. In my experiments, all-purpose flour allowed for sufficient structure to support the large air pockets without making the bread feel tough or rubbery. If you choose to use bread flour, you may find the dough requires a slightly longer rest period during the final rise to allow the stronger gluten to relax. However, for the average kitchen setup, the versatility of all-purpose flour remains the optimized choice for this specific system.
- All-Purpose Flour: Provides a tender, light crumb and is easily accessible for most home cooks.
- Bread Flour: Offers more structural strength and a noticeably chewier, more substantial bite.
Hydration is the second critical variable. This recipe utilizes a high-hydration dough, which is essential for achieving the steam production required for a cavernous interior. Low-hydration doughs are easier to handle because they are less sticky, but they lack the fluidity needed for those massive bubbles to form and expand. By precisely measuring 455 grams of water against 512 grams of flour, we achieve a hydration level of approximately 89%. This creates a dough that is technically a very thick batter, which is the secret to the unique focaccia texture.
Pro tip: When measuring your flour, use the spoon-and-level method if you do not have a scale; never scoop directly with the measuring cup as this packs the flour and will result in a dry, heavy loaf.
Water temperature control is where many bakers lose their consistency. I have engineered a simple formula to achieve the perfect lukewarm environment for yeast activation without the need for a thermometer. By combining 1/2 cup of boiling water with 1 1/2 cups of cold tap water, you create a thermal environment that is ideal for the yeast to begin its work without the risk of thermal shock. This precise control over yeast activation kinetics ensures that your fermentation starts on a predictable, successful trajectory every single time.
Dough Transformation: Mastering the Stretch & Fold for Maximum Bubbles
One of the most significant insights I gained during my testing was the impact of the stretch and fold technique. While many older recipes rely on intensive mechanical kneading, this manual intervention is far more effective for high-hydration doughs. This step, though seemingly simple, is where the physical transformation of the dough occurs. When you first mix the flour, water, salt, and yeast, you are left with a shaggy, sticky mass that lacks any real strength. By implementing a series of folds after a short 30-minute rest, you are aligning the gluten proteins in a way that builds tension and elasticity.
The process of the stretch and fold is a tactile experience that allows you to feel the dough evolve. As you pull the edge of the dough up and over itself, you are creating layers and trapping small amounts of air. In my trials, I found that 8 to 10 sets of these folds are the optimal number to achieve a cohesive structure. You will notice that with each fold, the dough resists your pull more strongly. This is the signal that the gluten network is tightening and becoming capable of holding the gas produced during the long cold proof.
- Wet your hand thoroughly in a bowl of room temperature water to prevent the dough from sticking to your skin.
- Reach under one side of the dough mass and gently pull it upward until you feel resistance.
- Fold that portion of the dough over the top toward the center.
- Rotate the bowl slightly and repeat the process, moving in a circle until you have completed 8 to 10 folds.
- Observe the surface of the dough; it should change from a rough, lumpy texture to a smoother, more matte finish.
This technique is superior to kneading because it preserves the delicate air pockets that are already starting to form. Intense kneading can often squeeze out the very gases we are trying to cultivate. The stretch and fold method works with the dough’s natural chemistry, encouraging the proteins to link up without over-stressing the system. It is the most critical intervention you will make in the entire process.
Pro tip: If the dough feels too tight and begins to tear during the folding process, stop immediately and let it rest for another ten minutes before continuing to allow the gluten to relax.
The sound of the dough during this stage is also an indicator of success. You may hear small, soft pops as tiny air bubbles are trapped within the folds. This auditory feedback tells you that the hydration is correct and the yeast is already beginning to produce carbon dioxide. By the end of the folding sequence, the dough should feel bouncy and resilient, almost like a soft marshmallow, rather than a wet paste.
Pan Prep & Dimpling Protocol: Avoiding The Dreaded Flat Spot
The final hurdle in creating perfect focaccia is the interaction between the dough and the baking vessel. I have seen countless beautiful doughs ruined because they became fused to the bottom of a pan. Through extensive testing across various materials, I discovered that the choice of grease is not just about release; it is about heat conductivity. Glass and metal behave very differently under the high heat of a 425 degree Fahrenheit oven. Glass is an insulator and takes longer to heat up, which can lead to a soggy bottom if not managed correctly. Metal, particularly heavy-duty steel, conducts heat rapidly, providing that fried, crispy base we desire.
To solve the sticking issue, I developed a specific greasing protocol based on the pan material. My tests showed that for glass or ceramic dishes, a layer of room temperature butter is non-negotiable. The solids in the butter create a physical barrier that olive oil alone cannot provide in these materials. For professional-grade metal pans, olive oil is often sufficient, but the addition of butter adds a level of insurance and flavor that is worth the extra step.
| Pan Type | Required Greasing Agent(s) | Oil Allocation |
|---|---|---|
| Metal (USA/Steel) | Olive Oil (Butter Optional) | 1-2 Tablespoons per pan |
| Glass (Pyrex/Ceramic) | Butter + Olive Oil | 2 Tablespoons per pan |
| Non-Stick Sheet Pan | Olive Oil | 2 Tablespoons |
The dimpling stage is perhaps the most satisfying part of the process, but it serves a vital functional purpose. By pressing your fingers deep into the dough, you are creating valleys that catch the olive oil and salt, but you are also preventing the dough from rising too vertically and becoming a loaf of bread. This ensures the focaccia remains a flatbread with a high surface-area-to-volume ratio, maximizing the amount of crispy crust in every bite.
Pro tip: When dimpling, press your fingers all the way down until you feel the bottom of the pan; do not worry about popping bubbles, as the dough is resilient enough to maintain its structure.
As you dimple, you should feel the dough yielding under your fingertips. If the dough snaps back or refuses to fill the corners of the pan, it is a sign that the gluten is still too cold or too tight. In this case, simply wait fifteen minutes and try again. The goal is a landscape of deep craters and high peaks, which will bake into a beautiful, variegated surface of light and dark gold.
Ingredients (The Optimized Formula)
To achieve the best results, I recommend using a high-quality kosher salt with large grains, as this provides a controlled burst of seasoning without being overly salty. The choice of olive oil is also paramount; look for an extra virgin variety with a peppery finish, as the flavor will concentrate during the baking process.
- 4 cups (512 g) all-purpose flour or bread flour, see notes above
- 2 to 3 teaspoons (10 to 15 grams) kosher salt, see notes above
- 2 teaspoons (8 g) instant yeast, see notes above if using active dry
- 2 cups (455 g) lukewarm water, made by combining 1/2 cup boiling water with 1 1/2 cups cold water
- butter for greasing
- 4 tablespoons olive oil, divided
- flaky sea salt, such as Maldon
- 1 to 2 teaspoons whole rosemary leaves, optional
I tested the pan greasing protocol extensively. While I can use oil only in my specific metal USA pans, anyone using glass bakeware must use butter underneath the oil layer to guarantee release. This recipe optimizes for the non-stick requirement across diverse kitchen setups. Using the precise measurements listed here ensures that the hydration remains high enough for air bubbles but low enough for the dough to retain its shape.
Instructions (The Systematic Bake)
Follow these steps exactly to ensure the biological and physical systems of the dough are managed correctly. I have found that skipping even the optional steps can significantly impact the final texture of the crumb.
- In a large bowl, whisk together the flour, salt, and instant yeast. Add the water. Using a rubber spatula, mix until the liquid is absorbed and the ingredients form a sticky dough ball. Cover the bowl, and let rest for 30 minutes, then stretch and fold the dough — this is an optional new step (9/17/2025), but if time permits, do it: I find it makes for an especially bubby focaccia. Fill a small bowl with water. Using a wet hand, grab an edge of the dough and pull it up and towards the center. Repeat this stretching and folding process, 8 to 10 times, moving your hand around the edge of the dough with every set of stretches and folds. As you stretch and fold, you should feel the dough transform from being sticky and shaggy to smooth and cohesive. Find video guidance here.
- Rub the surface of the dough lightly with olive oil. Cover the bowl with a lid (ideally) or plastic wrap and place in the refrigerator immediately for at least 12 hours or for as long as three days. (See notes above if you need to skip the overnight rise for time purposes.) NOTE: It is important the dough really be slicked with olive oil, especially if you are not using a hard lid. If you do not slick the dough with enough oil, you risk the dough drying out and forming a crust over the top layer.
- Line two 8- or 9-inch pie plates or a 9×13-inch pan (see notes above) with parchment paper or grease with butter or coat with nonstick cooking spray. (Note: This greasing step may seem excessive, but with some pans, it is imperative to do so to prevent sticking. With my USA pans, I can get away with olive oil alone; with my glass baking dishes, butter is a must.)
- Pour a tablespoon of oil into the center of each pan or 2 tablespoons of oil if using the 9×13-inch pan. Using two forks, deflate the dough by releasing it from the sides of the bowl and pulling it toward the center. Rotate the bowl in quarter turns as you deflate, turning the mass into a rough ball. Use the forks to split the dough into two equal pieces (or do not split if using the 9×13-inch pan). Place one piece into one of the prepared pans. Roll the dough ball in the oil to coat it all over, forming a rough ball. Repeat with the remaining piece. Let the dough balls rest for 3 to 4 hours depending on the temperature of your kitchen (Note: no need to cover for this room temperature rise).
- Set a rack in the middle of the oven and preheat it to 425°F. If using the rosemary, sprinkle it over the dough. Pour a tablespoon of oil over each round of dough (or two tablespoons if using a 9×13-inch pan). Rub your hands lightly in the oil to coat, then, using all of your fingers, press straight down to create deep dimples. If necessary, gently stretch the dough as you dimple to allow the dough to fill the pan. Sprinkle with flaky sea salt all over.
- Transfer the pans or pan to the oven and bake for 25 to 30 minutes, until the underside is golden and crisp. Remove the pans or pan from the oven and transfer the focaccia to a cooling rack. Let it cool for 10 minutes before cutting and serving; let it cool completely if you are halving it with the intention of making a sandwich.
- When it has completely cooled, transfer it to an airtight bag or vessel and store it at room temperature for up to 3 days. Otherwise, freeze it for up to 3 months. Always reheat it on subsequent days to revive its crust: 350ºF for 15 minutes.
Pro tip: For the most accurate results in Step 1, ensure the water temperature is achieved by using the precise ratio of boiling to cold water, as this manages the yeast activation kinetics perfectly for the initial 30-minute rest.
Topping Variations and Flavor Profiles
While the classic salt and rosemary combination is hard to beat, the architecture of focaccia makes it an excellent canvas for various flavor experiments. The deep dimples we created are essentially flavor reservoirs, waiting to be filled with ingredients that will roast and caramelize in the high oven heat. I have tested numerous combinations to see which hold up best during the 30-minute bake.
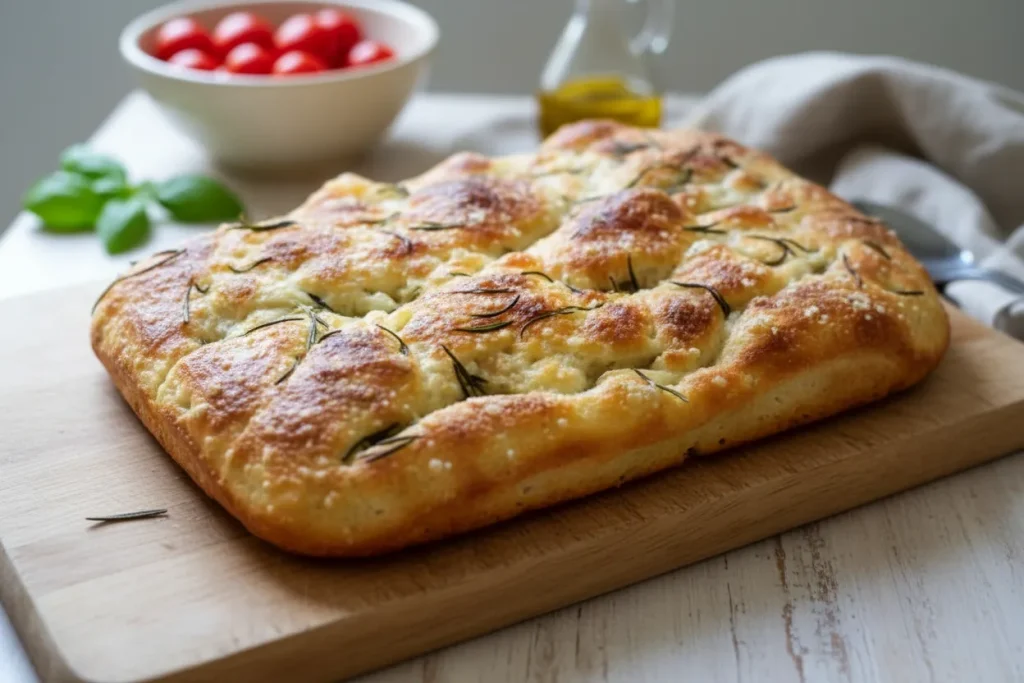
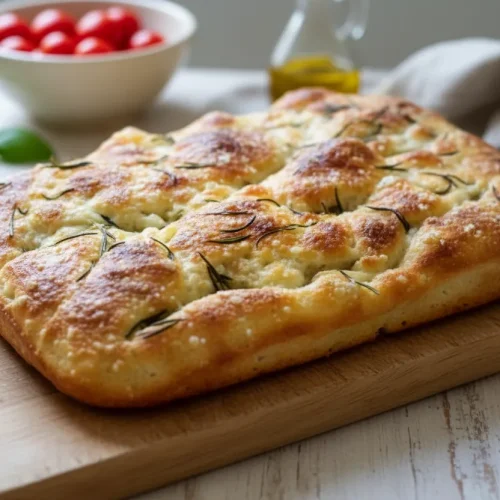
Classic Salt & Rosemary
This is the benchmark for all focaccia bread recipes. The rosemary needles become crisp and toasted, releasing their aromatic oils into the pools of olive oil on the surface. Use fresh rosemary rather than dried whenever possible; the moisture in fresh leaves prevents them from burning and turning bitter. The flaky sea salt provides a textural contrast that enhances the crunch of the crust.
Savory Olive Blend
For a more Mediterranean profile, I highly recommend a blend of halved Kalamata olives and cracked black pepper. The olives release a salty, briny liquid that seasons the dough from the top down. I tested this by pressing the olives deep into the dimples before the final rise, which prevents them from scorching and ensures they become part of the crumb. A sprinkle of fresh thyme at the very end adds a bright, herbal finish.
Sweet and Savory Fig & Balsamic
This is an advanced variation that plays with the balance of sugar and salt. Use sliced dried figs and a very small drizzle of high-quality balsamic glaze. Because the sugar in the figs and glaze can burn quickly, I suggest adding them halfway through the baking process. This prevents the topping from turning acrid while still allowing the flavors to meld with the bread. This variation pairs exceptionally well with a side of soft cheese.
Pro tip: When adding wet toppings like olives or tomatoes, pat them dry with a paper towel first to avoid adding excess moisture that could lead to soggy spots on the surface of your bread.
Yield, Storage, and Reheating Protocol
One of the most frequent questions I receive is how to handle the leftovers from this recipe. This system is designed to yield either two 8-inch or 9-inch round loaves or one large 9×13-inch sheet pan. Because of the high olive oil content and the long fermentation, this bread actually holds its quality better than many other artisan loaves, but it still requires proper management to maintain its texture.
Fresh focaccia is at its peak about ten to twenty minutes after leaving the oven. During this window, the interior is soft and steamy while the exterior remains shatteringly crisp. Once the bread cools completely, the moisture from the interior begins to migrate toward the crust, a process known as starch retrogradation. To slow this down, store your bread in an airtight container at room temperature. It will remain delicious for up to three days.
If you cannot finish the bread within three days, it freezes beautifully. I recommend cutting the loaves into individual portions before freezing. Wrap each piece tightly in plastic wrap and then place them in a freezer-safe bag. This prevents freezer burn and allows you to thaw only what you need. The bread will maintain its integrity for up to three months in the freezer.
- Room Temperature: Up to 3 days in an airtight vessel.
- Freezer: Up to 3 months, pre-sliced and double-wrapped.
The reheating protocol is the final piece of the engineering puzzle. Never use a microwave for focaccia; the rapid heating of water molecules will turn the crust rubbery and tough. Instead, place the bread in a 350 degree Fahrenheit oven for 15 minutes. This dry heat evaporates any surface moisture and re-crisps the olive oil in the crust, essentially reviving the bread to its original state.
Pro tip: To ensure the center of a frozen slice is heated through without burning the edges, wrap the slice loosely in aluminum foil for the first 10 minutes of reheating, then uncover for the final 5 minutes to restore the crunch.
Frequently Asked Questions
What are the specific techniques or secrets required to achieve excellent focaccia texture?
The primary “secrets” are the long cold proof, the disciplined stretch and fold method, and a generous application of olive oil. The cold proof develops the flavor and browning potential, while the stretch and folds build the structural integrity needed to hold large air bubbles. The olive oil essentially fries the bottom and sides of the dough in the pan, creating that iconic textural contrast.
What if I need to skip the overnight rise for time purposes?
While I strongly recommend the cold proof for the best results, you can skip it by allowing the dough to rise at room temperature for 3 to 4 hours in Step 4. You will still achieve a good texture, but you will notice a significant decrease in flavor complexity and the crust will not brown as deeply. If you take this route, ensure your kitchen is warm (around 75 degrees Fahrenheit) to encourage the yeast.
Why is my focaccia dense?
In my experience, density is usually the result of three factors: insufficient hydration, using weak or expired yeast, or skipping the stretch and fold transformation. If the dough doesn’t have enough water, it cannot produce the steam required to lift the crumb. Similarly, if the gluten hasn’t been developed through the folding process, it will be too weak to hold onto the air bubbles, causing them to collapse and create a heavy, dense interior.
Can I use a different type of oil?
While you can technically use other oils, extra virgin olive oil is functionally important for both flavor and the Maillard reaction. Oils with lower smoke points or different fat compositions will not provide the same golden-brown results or the characteristic savory aroma. Stick to a high-quality olive oil for the best results.
Conclusion: Mastering Your Focaccia Bread Recipes
Engineering the perfect loaf of focaccia is a journey that rewards those who value precision over speed. By understanding the biological needs of the yeast and the physical requirements of the gluten network, you have moved beyond simply following a recipe. You are now managing a system designed for repeatable success. This approach, centered on the cold proof and the stretch and fold technique, ensures that every loaf you pull from the oven has the restaurant-grade air pockets and shatteringly crisp crust that define great bread.
The beauty of these focaccia bread recipes lies in their versatility. Once you have mastered the foundational mechanics of hydration and fermentation, the possibilities for customization are endless. Whether you stick to the classic rosemary and salt or venture into more complex savory toppings, the structural integrity of this dough will support your creativity. The effort you put into the 18-hour timeline is reflected in every bite of the finished product.
I encourage you to document your results. Pay attention to the size of the bubbles and the color of the crust, and don’t be afraid to adjust your timing by an hour or two based on the specific climate of your kitchen. Cooking is a constant process of optimization, and your feedback helps refine the system for everyone in our community.
Pro tip: Share your topping creations and photos of your bubbly dough in the comments below; seeing how different bakers adapt this blueprint is the best part of the engineering process.
Thank you for trusting my systematic approach to one of the world’s most beloved breads. Now, gather your ingredients, set your timer, and prepare to experience the best focaccia you have ever tasted. Happy baking.
The Engineer’s Focaccia
Equipment
- Large mixing bowl
- rubber spatula
- Two 8- or 9-inch pie plates OR one 9×13-inch pan
- Two forks
- cooling rack
Ingredients
Main Dough Ingredients
- 512 g all-purpose flour or bread flour see notes above
- 10 g kosher salt minimum, up to 15g maximum
- 8 g instant yeast see notes above if using active dry
- 455 g lukewarm water made by combining 1/2 cup boiling water with 1 1/2 cups cold water
Greasing and Topping
- butter for greasing
- 4 tbsp olive oil divided
- flaky sea salt such as Maldon
- 1 tsp whole rosemary leaves optional, up to 2 tsp
Instructions
Initial Mix and Rest
- In a large bowl, whisk together the flour, salt, and instant yeast. Add the water.
- Using a rubber spatula, mix until the liquid is absorbed and the ingredients form a sticky dough ball.
- Cover the bowl, and let rest for 30 minutes.
Stretch and Fold Development
- Fill a small bowl with water. Using a wet hand, grab an edge of the dough and pull it up and towards the center.
- Repeat this stretching and folding process, 8 to 10 times, moving your hand around the edge of the dough with every set of stretches and folds.
- Continue until the dough transforms from sticky and shaggy to smooth and cohesive.
Cold Proofing
- Rub the surface of the dough lightly with olive oil.
- Cover the bowl with a lid or plastic wrap and place in the refrigerator immediately for at least 12 hours or for as long as three days.
Pan Preparation and Room Temperature Rise
- Line two 8- or 9-inch pie plates or a 9×13-inch pan with parchment paper or grease with butter or coat with nonstick cooking spray.
- Pour a tablespoon of oil into the center of each pan (or 2 tablespoons if using the 9×13-inch pan).
- Using two forks, deflate the dough by releasing it from the sides of the bowl and pulling it toward the center. Rotate the bowl in quarter turns as you deflate, turning the mass into a rough ball.
- Use the forks to split the dough into two equal pieces (or do not split if using the 9×13-inch pan). Place one piece into one of the prepared pans.
- Roll the dough ball in the oil to coat it all over, forming a rough ball. Repeat with the remaining piece.
- Let the dough balls rest, uncovered, for 3 to 4 hours depending on the temperature of your kitchen.
Final Dimpling and Baking
- Set a rack in the middle of the oven and preheat it to 425°F.
- If using the rosemary, sprinkle it over the dough.
- Pour a tablespoon of oil over each round of dough (or two tablespoons if using a 9×13-inch pan).
- Rub your hands lightly in the oil to coat, then, using all of your fingers, press straight down to create deep dimples, pressing all the way to the bottom of the pan.
- If necessary, gently stretch the dough as you dimple to allow the dough to fill the pan. Sprinkle with flaky sea salt all over.
- Transfer the pans or pan to the oven and bake for 25 to 30 minutes, until the underside is golden and crisp.
- Remove the pans or pan from the oven and transfer the focaccia to a cooling rack. Let it cool for 10 minutes before cutting and serving.


