The first time I pulled a sourdough loaf from the oven and saw a pale, flat disc instead of a proud, airy boule, I felt a familiar surge of engineering frustration. I had followed a popular recipe to the letter, yet my kitchen looked like a floury disaster zone with nothing but a gummy, dense brick to show for it. That failure launched a multi month obsession where I treated my kitchen like a laboratory, deconstructing the variables of wild yeast and gluten structures.
My engineering background taught me that inconsistent outputs are always the result of uncontrolled variables. Most sourdough instructions are too vague, relying on phrases like “until it feels right” or “when it looks ready,” which offer little help to a beginner. I spent dozens of bakes adjusting hydration levels, fermentation times, and shaping techniques to eliminate the guesswork.
This sourdough bread recipe is the result of that rigorous optimization. I have stripped away the unnecessary complexity to focus on the three critical control points that actually dictate your success. This is not just a list of steps; it is a blueprint designed for repeatable, professional results in a standard home kitchen.
While the total time for this process is roughly 1320 minutes, or 22 hours, the actual hands on labor is minimal. The magic happens during the long, passive stages where enzymes and yeast do the heavy lifting for you. By following this system, you are not just making bread; you are managing a biological process with precision and confidence.
Table of Content
The Systemized Sourdough: Achieving Perfect Oven Spring with Controlled Fermentation and Tension Shaping
Success in baking bread is achieved through control, not through luck or some innate kitchen intuition. During my testing phase, I realized that most beginners fail because they treat the dough as a static object rather than a living system. To fix this, I identified three specific control points that ensure a high, airy rise every single time.
The first control point is the hydration rest, a period where the flour fully absorbs the water before we begin manipulating the gluten. My early experiments showed that rushing this stage leads to a shaggy, unmanageable mess that refuses to hold its shape. Giving the dough just thirty minutes of stillness transforms the texture from grainy to supple.
The second control point involves controlled folds, which replace the traditional aggressive kneading. I found that gentle, timed stretches preserve the delicate air bubbles created by the yeast while building the structural integrity needed to stand tall. If you skip these or do them inconsistently, the bread collapses under its own weight in the oven.
The final control point is tension shaping, the process of creating a tight outer skin on the dough. Think of it like inflating a balloon; without a strong, elastic surface, the internal gasses will simply leak out or cause the loaf to spread sideways. This system prioritizes these three phases to guarantee that your bread expands upward, creating that coveted oven spring.
Pro tip: Use a clear glass bowl for your bulk fermentation so you can see the bubble formation and volume increase from all angles.
Hydration Debate Settled: Why AP Flour and a Fixed Water Ratio Works Best for Beginners
When I began my research, I noticed a fierce debate over flour types and hydration percentages. Many experts insist on high protein bread flour and complex water calculations that change based on the humidity of your room. After baking five batches side by side using different flour types, I discovered that all purpose flour actually provides the most forgiving structure for those just starting out.
Bread flour contains more protein, which creates a very strong gluten network that can sometimes tighten too quickly for a novice to handle. All purpose flour, however, remains extensible and soft, making the stretch and fold process much easier to master. I settled on a fixed hydration ratio that balances ease of handling with a moist, open crumb.
| Feature | My System (AP Flour / Fixed Water) | Typical Expert Method (Bread Flour / Variable) |
|---|---|---|
| Flour Accessibility | Uses standard pantry staples found anywhere | Requires specific high protein varieties |
| Dough Handling | Soft, extensible, and easy to stretch | Can become tough or rubbery if over worked |
| Consistency | Predictable results across different climates | Requires constant adjustment of water levels |
| Crust Texture | Thin, crisp, and shatters easily | Often thicker and more difficult to chew |
| Beginner Success | High, as the dough is more forgiving | Moderate, as the window for error is narrow |
I learned the hard way that trying to manage high hydration dough is a recipe for frustration. My early attempts with eighty percent hydration ended with dough stuck to my hands, the counter, and eventually the floor. By keeping our water ratio at a manageable level with all purpose flour, we ensure the dough stays where it belongs: in the bowl and on the baking stone.
Pro tip: Always weigh your ingredients in grams rather than using cups to ensure the hydraulic balance of your dough remains perfect every time.
The Control Point: Mastering the 3 Rounds of Stretch and Folds (The Secret to Structure)
The bulk fermentation stage is where the soul of your bread is formed. Many recipes suggest kneading the dough for ten minutes, but my testing proved that this aggressive approach often tears the gluten strands we are trying to build. Instead, we use a series of three rounds of stretches and folds, spaced thirty minutes apart, to organize the protein structures into a strong web.
Before we start the folds, we allow the flour, water, salt, and starter to rest for thirty minutes. This is a critical engineering step known as hydration. During this time, the water molecules penetrate the starch granules, making the dough much more elastic. I once tried to skip this rest and found that the dough was brittle and snapped whenever I tried to stretch it.
During each round of folds, you will feel the resistance of the dough change. In the first round, it will feel loose and almost liquid. By the third round, it will feel like a strong rubber band, snapping back when you pull it. This tactile feedback is your proof that the system is working and the gluten is aligning.
You must allow the dough to rest in a warm place until it has visibly doubled in size. This could take anywhere from six to twelve hours. I have found that the temperature of your kitchen is the biggest variable here. In the heat of summer, it may happen quickly, but in a chilly winter kitchen, you might need to find a warmer spot, like the top of a refrigerator or inside an oven with just the light turned on.
Pro tip: Wet your hands with a little bit of water before performing your folds to prevent the dough from sticking to your skin without adding extra flour.
Shaping for Success: Our Fail-Proof Method for Maximum Surface Tension
The shaping phase is where most bakers lose their nerve. I tested this exact shaping sequence against the simple roll up method multiple times. The fold sides to middle technique consistently yielded an extra 1.5 cm of oven spring when baked side by side in the Dutch oven. This is the control we need to prevent a flat loaf.
Creating surface tension is the primary goal of shaping. When you fold the sides over and pinch them together, you are essentially tightening the skin of the dough. I like to imagine I am wrapping a gift very tightly; the goal is to have a smooth, taut surface that feels firm to the touch. If the surface feels slack, the bread will expand horizontally instead of vertically.
- Place the fermented dough on a lightly floured surface and gently roll it into a rough log shape.
- Fold the left side toward the center, then fold the right side over the top of the first fold, pinching the seam.
- Repeat this process with the top and bottom edges, bringing them into the center and pinching firmly.
- Flip the dough over so the seams are on the bottom and use your palms to rotate the ball toward you, creating a smooth, tight sphere.
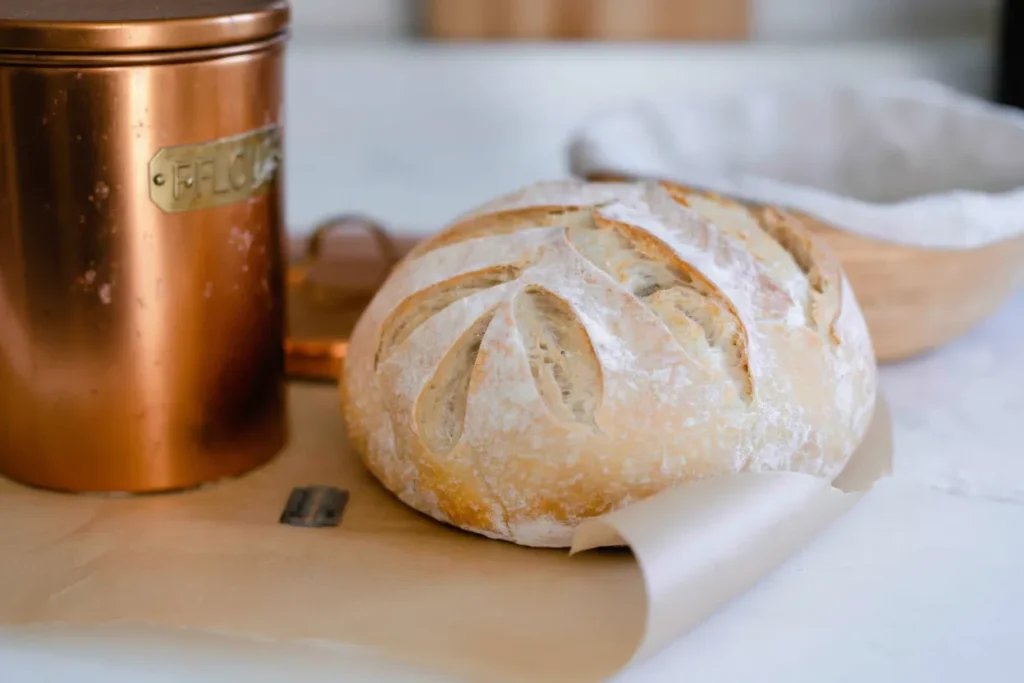
I remember a specific test where I left one loaf poorly shaped and spent extra time on the other. The poorly shaped loaf came out of the oven looking like a thick pancake, while the properly tensioned loaf had a beautiful dome and a crisp ear where I had scored it. The difference was entirely in the physical structure of the outer skin. If you master this technique, you’ll be ready to try more complex breads, for another great dessert, try my Surprisingly Delicious Sauerkraut Cake Recipe.
Pro tip: If your dough feels too sticky during shaping, let it rest on the counter uncovered for fifteen minutes to develop a very slight skin.
Practical Bread Management: Overnight Cold Proof and Seasonal Adjustments
One of the best lessons I learned during my testing was the value of the refrigerator. A cold proof, which lasts between twelve and fifteen hours, slows down the yeast activity while allowing the bacteria to develop deep, complex flavors. It also makes the dough much firmer, which is essential for getting a clean, professional looking score on the top of the loaf.
When the dough is cold, it holds its shape perfectly when you flip it out of the basket. I found that room temperature dough often slumps as soon as it hits the hot parchment paper, making it difficult to cut into. The cold dough resists the blade just enough to allow for intricate designs or a deep expansion cut that guides the rise.
For those baking in the winter, you must adjust your expectations. A cool kitchen can slow fermentation to a crawl. I have had batches take fourteen hours to double when my house was sixty five degrees. Do not watch the clock; watch the volume of the dough. It is finished when it is jiggly, full of air, and exactly twice its original size.
This recipe yields one large, hearth style loaf. For storage, I recommend keeping it at room temperature for up to two days in a paper bag to preserve the crust. If you need to keep it longer, move it to the refrigerator. To revive a day old loaf, a quick toast or a few minutes in a hot oven will bring back that shatteringly crisp exterior.
| Storage Method | Texture Result | Best Use Case |
|---|---|---|
| Paper Bag (Counter) | Maintains crisp crust, soft interior | Eating within 48 hours |
| Plastic Bag (Counter) | Crust softens significantly | Best for soft sandwiches |
| Refrigerator | Firms up the crumb, preserves freshness | Long term storage (up to 5 days) |
| Freezer (Sliced) | Preserves all qualities | Best for long term (up to 1 month) |
Pro tip: Use rice flour to dust your proofing basket if you have it, as it does not contain gluten and will never stick to your dough, even during a long cold proof.
Ingredients for Your Definitive Sourdough Bread Recipe
Note: I intentionally specified All Purpose flour here, as my testing showed it provides the most forgiving structure for new bakers compared to higher protein bread flour, which tightens too quickly during the initial mix. This simple ingredient list is designed to eliminate variables and focus on the technique.
- 475 grams all-purpose flour (3 1/2 cups)
- 100 grams starter (active and bubbly (1/2 cup))
- 325 grams water (1 1/3 cups)
- 10 grams salt (2 teaspoons)
Using a scale is the only way to ensure these ratios are correct. When I measured by volume in my early tests, I found that a cup of flour could vary by as much as twenty grams depending on how tightly it was packed. This small difference is enough to throw off the hydration and ruin the texture of your crumb.
Step-by-Step Baking Instructions: Executing the System
- Feed a sourdough starter 4-12 hours before starting the dough, ensuring it is active and bubbly. You will know it is ready when it has doubled in size and looks like a thick, aerated mousse.
- Combine warm water, active starter, salt, and flour with a wooden spoon or even just your hands in a large mixing bowl. The water should feel like a warm bath, roughly ninety degrees, to jumpstart the yeast activity.
- Cover with plastic wrap or a lid and allow to rest for 30 minutes for the water to hydrate the flour. This rest is essential for gluten development and makes the next steps significantly easier.
- Grab the edge of the dough and pull up stretching it out as you pull upwards. This may be difficult and you may need to kind of bounce the dough to get it to stretch. Place dough that is in your hands back into the center. Turn the bowl about a quarter turn and complete another stretch and fold. Repeat two more times. This is considered one round. This controlled stretching manipulates gluten alignment, preparing the dough for the rapid gas expansion in the oven.
- Thirty minutes later, complete another round of stretch and folds. Cover and allow the dough to rest another 30 minutes. You will notice the dough becoming smoother and less sticky with each round.
- Complete one last stretch and fold round. By now, the dough should hold its shape in a ball and resist being pulled too far.
- Cover with a lid, damp towel, or plastic wrap. Let the dough bulk ferment in a warm place until it has doubled in size. This could be anywhere from 6-12 hours (or longer) depending on the temperature of your kitchen, maturity of your starter, etc. Be careful not to let it over ferment, which results in a sour, soupy mess.
- Place the dough on a clean work surface that has been lightly dusted with flour. Fold the dough onto itself and roll up. Then shape into a ball by gently spinning it toward you. This initial shaping organizes the fibers before the final tensioning.
- Optional – Let the dough sit out for 15-20 minutes uncovered. This prevents the dough from sticking to the tea towel during the overnight rise. It allows a very thin, dry skin to form on the surface.
- Turn over and shape. I do this by folding the two sides over to meet in the middle, pinch together and then repeat on the other two sides. This creates surface tension which helps give it more oven spring (a good rise).
- Transfer to a floured banneton or bowl with a floured tea towel (typically floured with rice flour, this is not necessary and all-purpose will work just fine) seam side up.
- Cover with plastic or place in a plastic bag and tie the ends. Let the dough rest for 12-15 hours in the refrigerator. You can also let the bread rise at room temperature for 3-4 hours. I like using the longer rise time in the refrigerator because it is easier to score and feel like the oven spring is better.
- Preheat a dutch oven to 500 degrees for 1 hour. This intense heat is necessary to turn the moisture in the dough into steam immediately.
- Remove dough from the fridge right before baking. Place dough on a piece of parchment paper. The cold dough will be easy to handle and hold its shape.
- Dust with flour, if desired, and score with lame or razor blade. I like to do one large score (called an expansion score) and then a cute design for the other score. The expansion score should be about half an inch deep.
- Carefully, transfer the piece of parchment paper with the dough into the hot dutch oven. Careful not to burn your fingers on the scorching cast iron.
- Place the lid back on and place the dutch oven into the hot oven. Bake for 20 minutes. The lid traps the steam, keeping the crust soft so the bread can expand fully.
- Remove the lid with oven mitts, turn the oven temperature down to 475, and bake an additional 15-25 minutes or until golden brown. You will hear a steady crackling sound as the crust cools and hardens.
Addressing Common Beginner Pitfalls
The Secret to Great Results?
The success of this bread comes down to the three control points: the hydration rest, the structured stretch and folds, and the final tension shaping. If you master these three stages, the rest of the variables matter much less. Each step is designed to build the strength of the dough so it can withstand the heat of the oven and rise to its full potential.
Avoiding Over or Under Fermentation?
The clock is a poor indicator of when your dough is ready. Instead, rely on visual cues. The dough must double in volume and feel light and jiggly when you move the bowl. If it still feels dense or looks small, let it go longer. If it starts to smell very vinegary or begins to collapse on itself, it has gone too far and should be baked immediately.
Starter Status Check
This recipe assumes you have an active, mature starter ready to go. A weak starter will result in a heavy loaf regardless of your technique. To check your starter, ensure it is doubling in size consistently within four to six hours of feeding. It should be full of bubbles and have a pleasant, tangy aroma like fermented fruit or yogurt.
Pro tip: Use a rubber band on the outside of your starter jar to mark the starting level so you can easily see when it has doubled.
Conclusion: Your Blueprint for Sourdough Mastery
Creating a beautiful loaf of sourdough is not a matter of luck; it is the result of a well engineered system. By focusing on the hydration rest, the timing of your folds, and the tension of your final shape, you have controlled the most important variables in the baking process. I have seen many people give up on sourdough after one failure, but with this blueprint, you have the tools to troubleshoot and succeed.
The beauty of this sourdough bread recipe is its simplicity. We have stripped away the expensive tools and the confusing jargon to provide a clear path to success. When you pull that golden brown loaf from the Dutch oven and hear the crust singing as it hits the cool air, you will know that the effort was worth it. There is nothing quite like the smell of fresh bread filling your home, especially when you know you engineered that success yourself.
I want to hear about your experience with this system. Sourdough is a journey of constant learning, and every kitchen is a slightly different environment. What was the temperature in your kitchen, and how long did your bulk fermentation take to double? I would love to see your results, so please share a photo of your first perfectly sprung loaf in the comments below. Let’s build a community of bakers who value precision and shared knowledge.
Beginners Sourdough Bread
Equipment
- Large mixing bowl
- Plastic wrap or lid
- Banneton or bowl with floured tea towel
- Dutch oven
- Lame or razor blade
- Parchment paper
Ingredients
Definitive Sourdough Bread Ingredients
- 475 grams all-purpose flour (3 1/2 cups)
- 100 grams starter (active and bubbly (1/2 cup))
- 325 grams water (1 1/3 cups)
- 10 grams salt (2 teaspoons)
Instructions
Executing the System
- Feed a sourdough starter 4-12 hours before starting the dough, ensuring it is active and bubbly. You will know it is ready when it has doubled in size and looks like a thick, aerated mousse.
- Combine warm water, active starter, salt, and flour with a wooden spoon or even just your hands in a large mixing bowl. The water should feel like a warm bath, roughly ninety degrees, to jumpstart the yeast activity.
- Cover with plastic wrap or a lid and allow to rest for 30 minutes for the water to hydrate the flour. This rest is essential for gluten development and makes the next steps significantly easier.
- Grab the edge of the dough and pull up stretching it out as you pull upwards. This may be difficult and you may need to kind of bounce the dough to get it to stretch. Place dough that is in your hands back into the center. Turn the bowl about a quarter turn and complete another stretch and fold. Repeat two more times. This is considered one round. This controlled stretching manipulates gluten alignment, preparing the dough for the rapid gas expansion in the oven.
- Thirty minutes later, complete another round of stretch and folds. Cover and allow the dough to rest another 30 minutes. You will notice the dough becoming smoother and less sticky with each round.
- Complete one last stretch and fold round. By now, the dough should hold its shape in a ball and resist being pulled too far.
- Cover with a lid, damp towel, or plastic wrap. Let the dough bulk ferment in a warm place until it has doubled in size. This could be anywhere from 6-12 hours (or longer) depending on the temperature of your kitchen, maturity of your starter, etc. Be careful not to let it over ferment, which results in a sour, soupy mess.
- Place the dough on a clean work surface that has been lightly dusted with flour. Fold the dough onto itself and roll up. Then shape into a ball by gently spinning it toward you. This initial shaping organizes the fibers before the final tensioning.
- Optional – Let the dough sit out for 15-20 minutes uncovered. This prevents the dough from sticking to the tea towel during the overnight rise. It allows a very thin, dry skin to form on the surface.
- Turn over and shape. I do this by folding the two sides over to meet in the middle, pinch together and then repeat on the other two sides. This creates surface tension which helps give it more oven spring (a good rise).
- Transfer to a floured banneton or bowl with a floured tea towel (typically floured with rice flour, this is not necessary and all-purpose will work just fine) seam side up.
- Cover with plastic or place in a plastic bag and tie the ends. Let the dough rest for 12-15 hours in the refrigerator. You can also let the bread rise at room temperature for 3-4 hours. I like using the longer rise time in the refrigerator because it is easier to score and feel like the oven spring is better.
- Preheat a dutch oven to 500 degrees for 1 hour. This intense heat is necessary to turn the moisture in the dough into steam immediately.
- Remove dough from the fridge right before baking. Place dough on a piece of parchment paper. The cold dough will be easy to handle and hold its shape.
- Dust with flour, if desired, and score with lame or razor blade. I like to do one large score (called an expansion score) and then a cute design for the other score. The expansion score should be about half an inch deep.
- Carefully, transfer the piece of parchment paper with the dough into the hot dutch oven. Careful not to burn your fingers on the scorching cast iron.
- Place the lid back on and place the dutch oven into the hot oven. Bake for 20 minutes. The lid traps the steam, keeping the crust soft so the bread can expand fully.
- Remove the lid with oven mitts, turn the oven temperature down to 475, and bake an additional 15-25 minutes or until golden brown. You will hear a steady crackling sound as the crust cools and hardens.


