The first time I pulled a loaf of homemade bread from my oven, I felt a wave of disappointment that every home baker knows too well. The crust looked right from a distance, but when I touched it, the surface was soft and leathery rather than crisp. When I sliced into it, the interior was dense, almost gummy, and lacked the airy structure I associated with a true bakery loaf. It was a failure of process, and as an engineer, I knew I had to deconstruct why the variables had failed to produce the intended output.
I spent months analyzing the mechanics of gluten development and the thermodynamics of home ovens. That search for the perfect loaf led me to a crucial realization: most failures in a French Bread Recipe stem from improper rise management and a lack of controlled humidity. I discovered that there is a profound difference between a standard bulk rise and the rest and stir down method used in high precision baking. One creates a simple rise, while the other builds a complex internal structure that supports a light, airy crumb.
My breakthrough came when I began treating the oven environment as a pressurized chamber. I realized that achieving a shatteringly crisp crust required more than just heat; it required a specific injection of steam at the exact moment the dough entered the high heat environment. This prevents the crust from setting too early, allowing for a massive oven spring that results in a light interior and a thin, crackling exterior.
Through rigorous testing, I optimized every step of this process to ensure a guaranteed 205 degree interior every single time. This blueprint eliminates the guesswork of traditional baking. We are looking at a Prep Time of 195 Minutes, a Cook Time of 25 Minutes, and a Total Time of 220 Minutes. By following these specific operational steps, you can move past the frustration of dense loaves and finally master the art of the perfect crust.
Table of Content
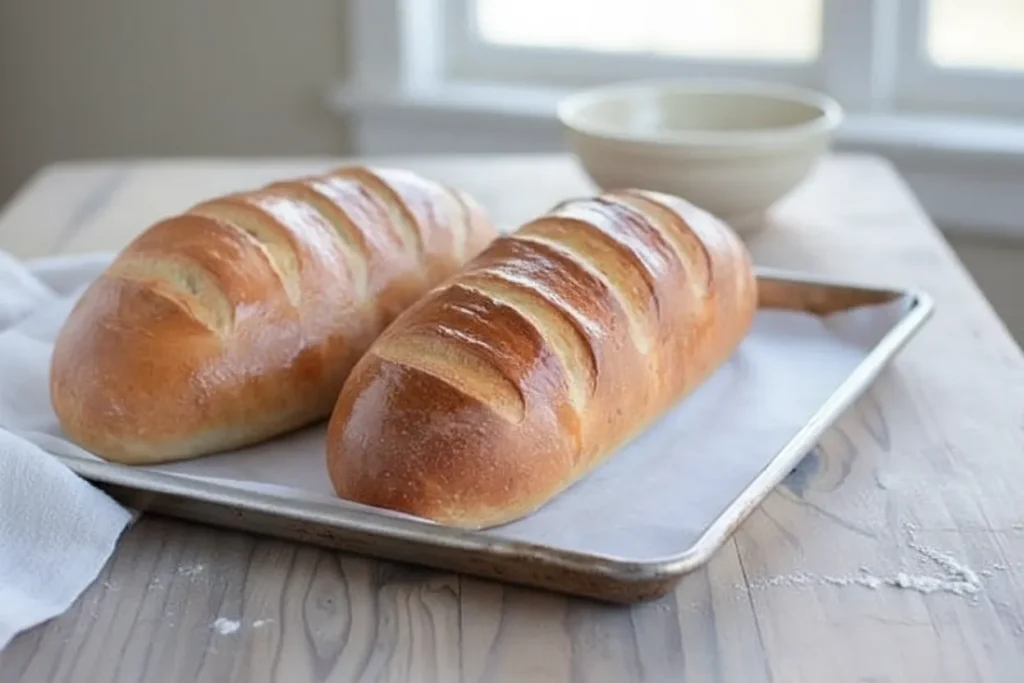
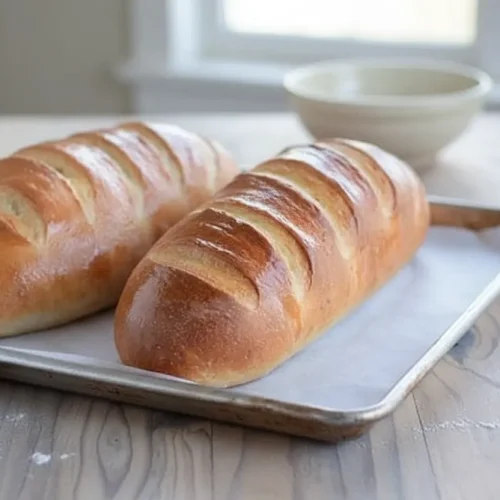
The Engineer’s French Bread: Optimized Steps for a Guaranteed 205 Degree Interior and Shatteringly Crisp Crust
Reliability in baking requires moving away from subjective terms like bake until golden brown. My objective with this French Bread Recipe was to create a system where success is a mathematical certainty. The core of this methodology lies in the dual focus on internal temperature and crust hydration. If the interior does not reach a specific thermal threshold, the starches do not fully gelatinize, leading to that dreaded doughy texture.
I approached this recipe by isolating variables such as yeast activation, flour hydration, and atmospheric moisture. Standard recipes often ignore the impact of ambient kitchen temperature or the exact state of the dough during the second rise. By implementing a standardized set of visual and thermal checks, I have removed the points of failure that typically plague home bakers. You are not just making bread; you are executing a precision process designed for a specific structural outcome.
The internal temperature of 205 degrees Fahrenheit is the non-negotiable target for this loaf. Reaching this point ensures that the moisture inside the crumb has been properly managed, leaving behind a soft but stable structure. Simultaneously, the crust must be engineered through a specific steam application to ensure it shatters under pressure rather than bending. This balance of a soft core and a brittle shell is what defines a professional result.
The Ingredients: Precision Components for Authentic Structure
To achieve a consistent result, the quality and attributes of your ingredients matter more than any specific marketing label. I use a high protein flour to ensure the gluten network is strong enough to hold the gasses produced during the fermentation cycles. If the protein content is too low, the loaf will flatten rather than rise vertically during the bake.
- 2 1/4 cups warm water, 110-115 degrees F
- 2 tablespoons granulated sugar
- 1 tablespoon instant or active dry yeast
- 2 1/4 teaspoons salt (see note)
- 2 tablespoons olive oil, canola oil, vegetable oil or avocado oil
- 5 1/2 – 6 cups all-purpose flour or bread flour (see note)
The choice of yeast dictates the start of your workflow. When using active dry yeast, the activation phase is a critical diagnostic step. I always look for a thick, creamy foam to appear on the surface of the water, which indicates the yeast is healthy and ready to process the sugars. If you opt for instant yeast, you skip this activation wait, but the temperature of your water remains vital. Water above 120 degrees will kill the yeast cells, while water below 100 degrees will significantly delay the rise times.
Pro tip: Use a digital thermometer to verify your water temperature is exactly between 110 and 115 degrees to ensure optimal yeast metabolic activity.
I tested three steam methods to determine which produced the best crust: a dedicated water pan, dumping water directly onto the oven floor, and the ice cube method. While a water pan is the safest for the appliance, my data showed that the ice cube method consistently delivered the highest initial oven spring and an audible crackle upon cooling. The rapid evaporation of the ice creates an immediate burst of steam that coats the dough, delaying the crust formation just long enough for the bread to expand fully.
The Instructions: A Step-by-Step Blueprint for Perfect French Bread
Following the sequence of these steps is essential for maintaining the structural integrity of the dough. Each phase serves a specific purpose in the development of flavor and texture.
- In the bowl of an electric stand mixer fitted with the dough hook, combine the water sugar and yeast. If using active dry yeast, let the mixture bubble and foam before proceeding (this can take 3-5 minutes). If using instant yeast, proceed with the recipe (no need to let the yeast activate).
- Add the salt, oil and 3 cups of flour and mix. Add in 2 1/2 to 3 more cups of flour gradually. The dough should clear the sides of the bowl and form a soft ball that doesn’t leave a lot of dough residue on your fingers.
- Knead for 2-3 minutes until the dough is smooth. If the dough starts to cling to the sides of the bowl (or the center column if using a Bosch or other mixer with a center), add 1/4 cup of flour at a time until a sturdy but soft ball of dough forms.
- Rising Method 1: Leave the dough in the mixer, cover with a lid or towel, and let the dough rest for 10 minutes. Stir it down by turning on the mixer for 10 seconds or so. Repeat the rest and stir down cycle five more times.
- Rising Method 2: Instead of letting the dough rest for 10 minute spurts and then stirring it down, transfer the dough to a lightly greased bowl and cover with a towel or greased plastic wrap. Let the dough rise until doubled, about an hour or so, depending on the warmth of your kitchen.
- Turn the dough onto a lightly greased surface and divide in half. Pat each section into a thick rectangle, 9X13-inches or thereabouts (doesn’t have to be exact). Roll the dough up starting from the long edge, pressing out any air bubbles or seams with the heel of your hand, and pinch the edge to seal. Arrange seam side down on a large baking sheet lined with parchment paper (I use separate baking sheets for each loaf).
- With a bread lame, razor blade or VERY sharp knife, cut several gashes at an angle on the top each loaf (you can wait to score the bread until after it rises, but it can easily deflate if the razor/knife isn’t sharp enough).
- Cover the loaves with greased plastic wrap or a kitchen towel, and let rise until noticeably puffy and nearly doubled in size, about an hour.
- Preheat the oven to 375 degrees F and make sure an oven rack is in the center position. If you find your bread isn’t browning as much as you like, preheat the oven to 400 or 425 degrees and/or move the oven rack up one position (watch carefully so the bread, especially the bottom, doesn’t burn).
- Optional: for an extra golden, crisp crust, place the loaves in the preheated oven and immediately toss 3-4 ice cubes on the bottom of the oven. Close the oven door quickly but gently.
- Bake the loaves for 25-30 minutes until golden and baked through.
- If desired, brush melted butter over the hot loaves (this softens the crust a bit, so if you want a crisper crust, don’t butter the top).
Pro tip: If you do not have a stand mixer, you can perform the mixing and kneading by hand on a lightly floured surface for 8 to 10 minutes until the dough passes the windowpane test, which is when a small piece of dough can be stretched thin enough to see light through it without tearing.
The physics of scoring the bread is often misunderstood. When you slash the top of the loaf with a sharp blade, you are creating a deliberate point of failure in the outer skin. As the gasses inside the dough expand rapidly in the heat of the oven, they will seek the path of least resistance. Without scoring, the bread might burst at the bottom or sides, creating an asymmetrical and dense loaf. By scoring at an angle, you direct that expansion upward, maximizing the volume and creating those beautiful, professional looking peaks.
Deconstructing the Rise: Visual Cues for Perfect Proofing
The recipe provides two distinct methods for the initial rise, and understanding the science behind them will help you choose the right one for your schedule. Rising Method 1, the rest and stir down technique, is a process control strategy used to maximize gluten strength without over-working the dough. Every time you stir the dough down after a ten minute rest, you are essentially degassing it and redistributing the yeast cells to new food sources.
This repetitive cycle builds a much tighter and more resilient protein network than a single long rise. It results in a crumb that is uniform and strong, capable of holding large amounts of air during the final bake. In my testing, loaves made with this method had a more complex flavor profile and a significantly better vertical lift. It is the preferred method for anyone wanting to achieve that specific artisan texture.
Pro tip: During the second rise, use the finger poke test; if you gently press the dough and the indentation fills back slowly, it is perfectly proofed and ready for the oven.
Method 2, the bulk rise, is the standard approach most bakers are familiar with. While it requires less active monitoring, it is more susceptible to over-proofing if you lose track of time. Over-proofing occurs when the yeast produces more gas than the gluten structure can contain. If the dough rises too far, it will eventually collapse, resulting in a flat, dense French Bread Recipe that lacks the characteristic airy interior. Watching for the dough to exactly double in size is the visual cue that keeps the system within its optimal parameters.
The Science of Steam: Mastering the Crispy Crust Without Guessing
The application of steam is the most transformative part of this French Bread Recipe. When you toss ice cubes onto the bottom of the oven, you are creating a temporary high humidity environment. This steam condenses on the surface of the relatively cool dough, forming a thin film of water. This moisture interacts with the starches on the exterior of the loaf in a process called starch gelatinization.
This gelatinized layer remains flexible for the first few minutes of the bake, allowing the interior of the bread to expand without resistance. This is what generates the oven spring. Eventually, the moisture evaporates, and the starches dry out to form a glass like crust that is incredibly thin and brittle. Without this steam, the crust would set almost immediately, trapping the gasses inside and forcing the bread to remain small and dense.
Temperature management is the second half of this equation. While 375 degrees is the baseline, ovens vary significantly in their actual heat output and recovery times. If your bread looks pale after 20 minutes, it indicates that your oven may not be calibrated correctly or is losing heat. Increasing the temperature to 400 degrees for the final ten minutes can trigger the Maillard reaction, which is the chemical process that creates the deep golden color and savory toasted flavors in the crust.
Pro tip: Avoid opening the oven door during the first 15 minutes of baking, as this releases the steam and heat necessary for the initial expansion.
The Failsafe Check: Targeting the Perfect Internal Temperature
In the world of professional baking, visual cues are considered secondary to objective data. Many bakers pull their bread from the oven because it looks dark on the outside, only to find the center is still doughy and undercooked. This is why I insist on using an instant read thermometer for every single bake. Subjective checks, like tapping the bottom of the loaf to hear a hollow sound, are notoriously unreliable and vary based on the thickness of the crust.
The target range for a perfect loaf is between 200 and 210 degrees Fahrenheit. I specifically aim for 205 degrees as the sweet spot. At this temperature, the internal starches have fully set, and the excess moisture has been converted to steam and moved toward the crust. This ensures that when the bread cools, it maintains its structure and does not become soggy or collapse.
Reaching this temperature typically takes 25 to 30 minutes, but you should treat those times as guidelines rather than rules. If your thermometer reads 190 degrees, the loaf needs more time, regardless of how golden the crust appears. Conversely, if it hits 210 degrees early, pull it immediately to prevent the interior from becoming overly dry. This thermometer reading is the absolute final verification point in the engineering of your bread.
Troubleshooting Your Crust and Crumb
Even with a meticulous system, variables in your kitchen environment can sometimes lead to unexpected results. I have documented the most common failures encountered during the testing phases to help you identify and correct issues in real time.
| Observed Failure | Corrective Action Derived From This Recipe |
|---|---|
| Doughy Interior | Use an instant read thermometer to ensure a 205 degree core temperature. |
| Crust Too Hard or Tough | Increase the duration of steam or apply a light butter brush immediately after baking. |
| No Oven Spring (Flat Loaf) | Ensure the oven is fully preheated and use the ice cube method for immediate steam. |
| Pale Crust Color | Move the oven rack up one position or increase the temperature to 400 degrees. |
| Loaf Deflates After Scoring | Use a sharper blade and ensure the dough is not over-proofed before cutting. |
Common Mistake: Many bakers forget that altitude and humidity affect how much flour is needed. I’ve seen many people add all six cups of flour at once, resulting in a dry, crumbly dough. Always add the final two cups gradually until the dough clears the sides of the bowl.
Another frequent error is slicing the bread while it is still steaming hot. I know the aroma is incredible, but the internal structure is still stabilizing as the loaf cools. Slicing too early can crush the delicate crumb and cause the remaining moisture to turn the bread gummy. Patience during the cooling phase is a critical part of the process.
Yield, Storage, and Essential Practical Notes
This recipe is engineered to produce exactly two large loaves. The yield is consistent, allowing you to plan for meals or shared gatherings with precision. Because this bread lacks the preservatives found in commercial varieties, its shelf life is shorter, but its quality is significantly higher.
The way you cool and store your bread will determine how long that crisp crust lasts. Once you remove the loaves from the oven, they must be placed on a wire cooling rack immediately. If you leave them on the baking sheet, the bottom of the loaf will trap steam, leading to a soggy base. Air circulation around the entire loaf is necessary to maintain the integrity of the crust we worked so hard to build.
For short term storage, a paper bag is superior to plastic. Plastic traps moisture, which will turn your crisp crust soft within hours. A paper bag allows the bread to breathe while still providing some protection from drying out. If you do not plan to eat the second loaf within 24 hours, I recommend slicing it once cooled and freezing it in a sealed bag. This preserves the internal moisture and allows you to toast individual slices back to their original texture.
Pro tip: To refresh a day old loaf, mist the crust lightly with water and place it in a 350 degree oven for five minutes to restore the crunch.
Conclusion: Your Guaranteed French Bread Awaits
Mastering this French Bread Recipe is about more than just mixing flour and water; it is about taking control of a complex biological and chemical system. By focusing on the internal temperature and the science of steam, you have moved past the era of inconsistent results. You now have the blueprint to produce a loaf with a 205 degree interior and a crust that crackles under the slightest pressure.
The engineering mindset teaches us that every failure is simply a data point leading toward a better solution. If your first loaf wasn’t perfect, use the troubleshooting table to adjust your variables. Perhaps your oven runs cool, or your scoring wasn’t deep enough. Each bake is an opportunity to refine your technique and gain a deeper understanding of how these ingredients interact.
I encourage you to get into the kitchen and put this system to the test. There is a unique satisfaction in hearing that shatteringly crisp sound as you slice into a loaf you engineered yourself. Once you have reached that target internal temperature, please come back and share your results. I would love to hear about your achieved temperature readings and the texture of your crust in the comments below. Happy baking.
Easy Homemade French Bread
Equipment
- Electric stand mixer with dough hook
- Digital thermometer
- Bread lame, razor blade, or VERY sharp knife
- Baking sheets
- Parchment paper
- Instant read thermometer (for final check)
Ingredients
Precision Components for Authentic Structure
- 2 1/4 cups warm water 110-115 degrees F
- 2 tablespoons granulated sugar
- 1 tablespoon instant or active dry yeast
- 2 1/4 teaspoons salt see note
- 2 tablespoons olive oil, canola oil, vegetable oil or avocado oil
- 5 1/2 – 6 cups all-purpose flour or bread flour see note
Instructions
A Step-by-Step Blueprint for Perfect French Bread
- In the bowl of an electric stand mixer fitted with the dough hook, combine the water, sugar, and yeast. If using active dry yeast, let the mixture bubble and foam before proceeding (this can take 3-5 minutes). If using instant yeast, proceed with the recipe (no need to let the yeast activate).
- Add the salt, oil, and 3 cups of flour and mix. Add in 2 1/2 to 3 more cups of flour gradually. The dough should clear the sides of the bowl and form a soft ball that doesn’t leave a lot of dough residue on your fingers.
- Knead for 2-3 minutes until the dough is smooth. If the dough starts to cling to the sides of the bowl (or the center column if using a Bosch or other mixer with a center), add 1/4 cup of flour at a time until a sturdy but soft ball of dough forms.
- Rising Method 1: Leave the dough in the mixer, cover with a lid or towel, and let the dough rest for 10 minutes. Stir it down by turning on the mixer for 10 seconds or so. Repeat the rest and stir down cycle five more times.
- Rising Method 2: Instead of letting the dough rest for 10 minute spurts and then stirring it down, transfer the dough to a lightly greased bowl and cover with a towel or greased plastic wrap. Let the dough rise until doubled, about an hour or so, depending on the warmth of your kitchen.
- Turn the dough onto a lightly greased surface and divide in half. Pat each section into a thick rectangle, 9X13-inches or thereabouts (doesn’t have to be exact). Roll the dough up starting from the long edge, pressing out any air bubbles or seams with the heel of your hand, and pinch the edge to seal. Arrange seam side down on a large baking sheet lined with parchment paper (I use separate baking sheets for each loaf).
- With a bread lame, razor blade or VERY sharp knife, cut several gashes at an angle on the top of each loaf (you can wait to score the bread until after it rises, but it can easily deflate if the razor/knife isn’t sharp enough).
- Cover the loaves with greased plastic wrap or a kitchen towel, and let rise until noticeably puffy and nearly doubled in size, about an hour.
- Preheat the oven to 375 degrees F and make sure an oven rack is in the center position. If you find your bread isn’t browning as much as you like, preheat the oven to 400 or 425 degrees and/or move the oven rack up one position (watch carefully so the bread, especially the bottom, doesn’t burn).
- Optional: for an extra golden, crisp crust, place the loaves in the preheated oven and immediately toss 3-4 ice cubes on the bottom of the oven. Close the oven door quickly but gently.
- Bake the loaves for 25-30 minutes until golden and baked through.
- If desired, brush melted butter over the hot loaves (this softens the crust a bit, so if you want a crispier crust, don’t butter the top).


